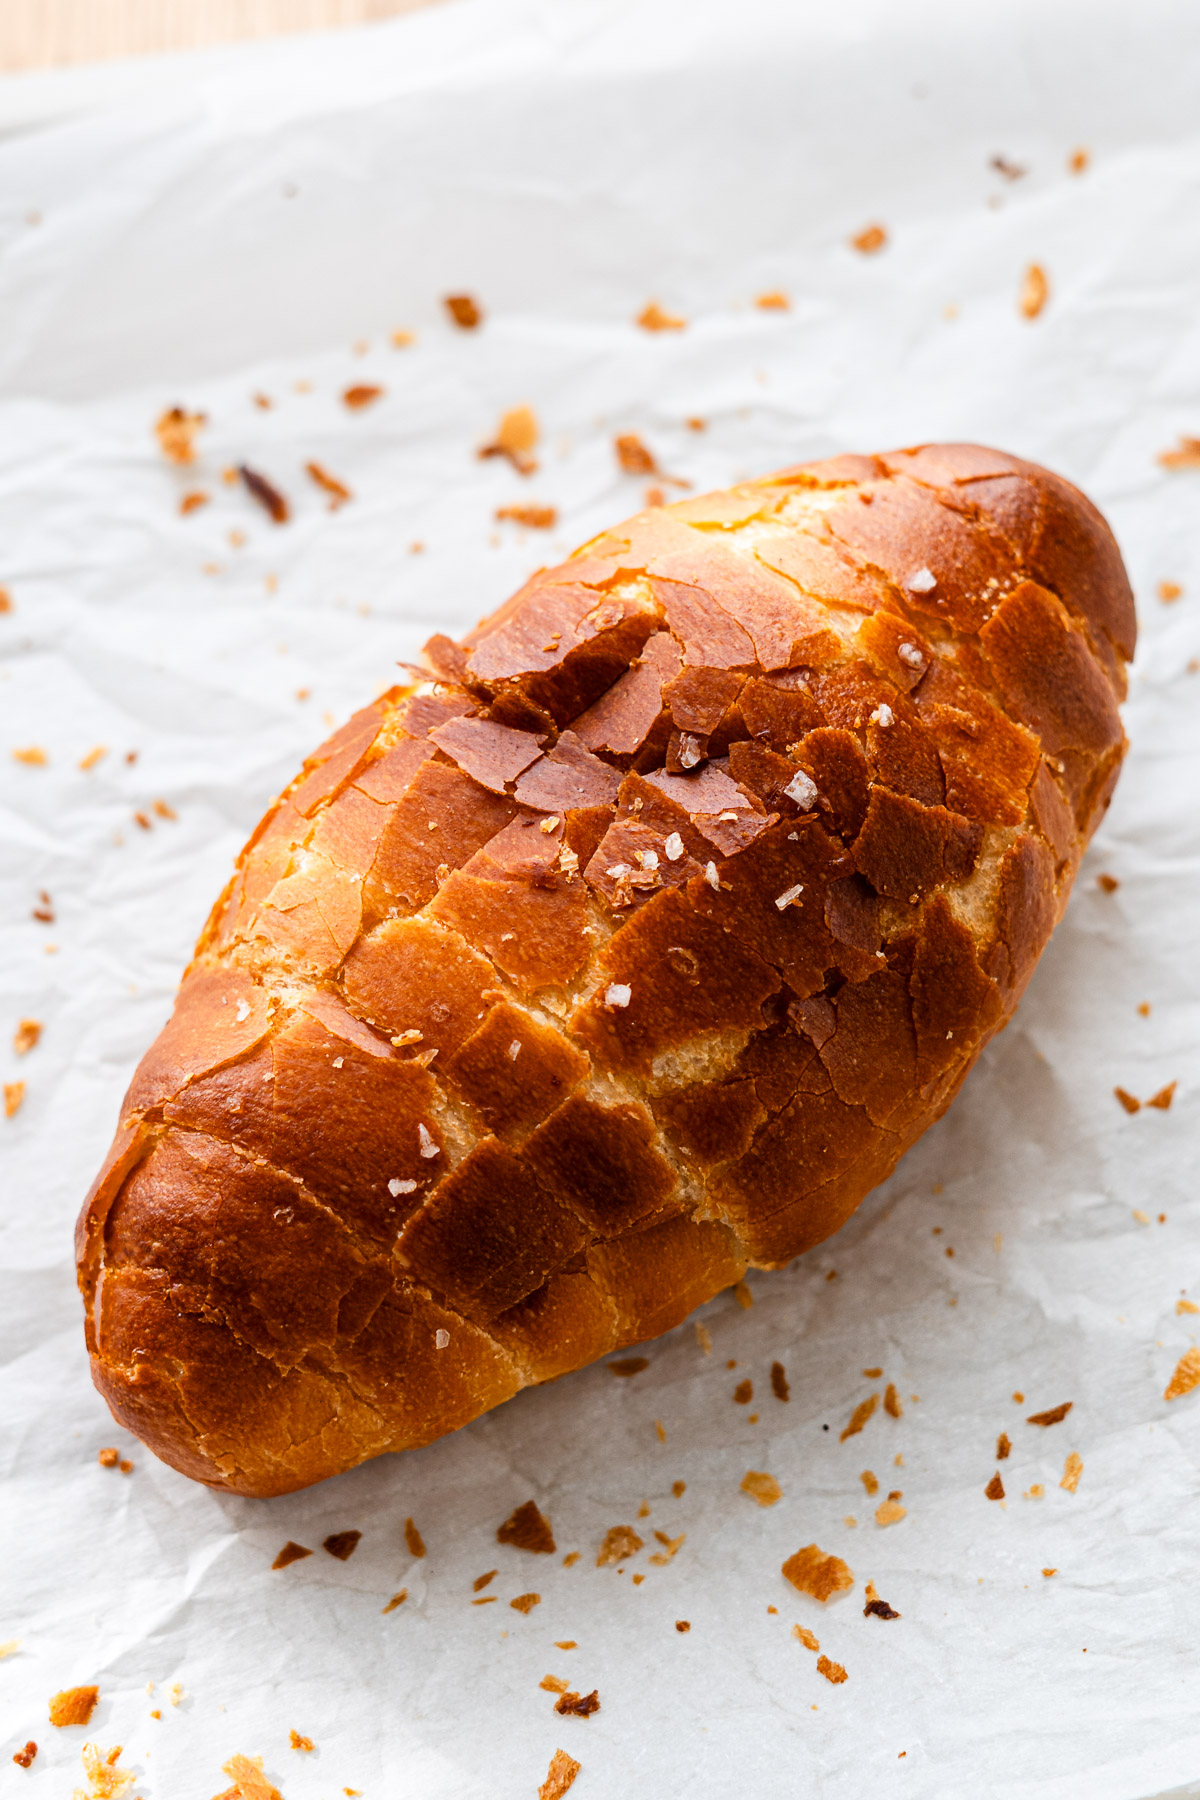
Salt Bread, or Shio Pan, is a Japanese bakery favorite known for its crisp golden crust, soft buttery interior, and hint of salt. As it bakes, the butter rolled inside melts, creating a butter hole and a perfectly fried, crispy bottom. This step-by-step salt bread recipe shows you how to make authentic shio pan at home with key tips and simple ingredients!

Table of Contents
- The Ultimate Guide to Salt Bread (Shio Pan)
- What is salt bread (shio pan)?
- Key Characteristics of Shio Pan
- 3 Types of Japanese Salt Bread (Shio Pan)
- Key Ingredients for Salt Bread
- Water Temperature
- How to Make Salt Bread
- Gluten Development
- How to Shape Salt Bread
- What Type of Pan to Use
- Knowing When the Dough is Proofed
- Lisa’s Recipe Tips
- Oven Spring for Salt Bread
- Salt Bread Variations
- Serving Suggestions
- How to Store and Reheat Salt Bread
- Recipe FAQ
- More Salt Bread Recipes
- Salt Bread (Shio Pan) Recipe
The Ultimate Guide to Salt Bread (Shio Pan)
Japanese salt bread, or shio pan, has exploded in popularity all over the world—and for good reason. This simple combination of soft bread, butter, and salt creates a lightly salted, crispy-bottomed roll with a tender, airy interior. In this guide, I’ll share its history, popular variations, and my tried-and-true Japanese salt bread recipe for making it at home.
When shio pan first came out, it quickly became one of my mom’s favorite bakery items. Because it was only available in Japan back then, she often made it at home, so I grew up eating these buttery Japanese salt bread rolls in all sorts of ways: as a snack, with jam, or in sandwiches. While planning my Japanese bakery series earlier this year, I knew I had to include classic salt bread. Over the years, Japanese bakeries have taken salt bread in many directions. Even if they look similar, each one has its own taste, texture, and charm. Through my research, I discovered that shio pan can be categorized into three main types—hard crust, semi-hard crust, and soft crust—each with its own distinct characteristics. To explore these nuances firsthand, I visited bakeries across Tokyo, comparing, tasting, and taking notes to understand what makes each version unique.
In developing my recipe, I couldn’t choose just one style—each variation is so delicious in its own way! Instead of picking, I developed recipes for all three. After 55+ test batches (I wish I was exaggerating), I finally landed on versions that felt just right. I highly recommend baking all three and comparing them—it’s so rewarding to see the differences, and incredibly satisfying to make!

What is salt bread (shio pan)?
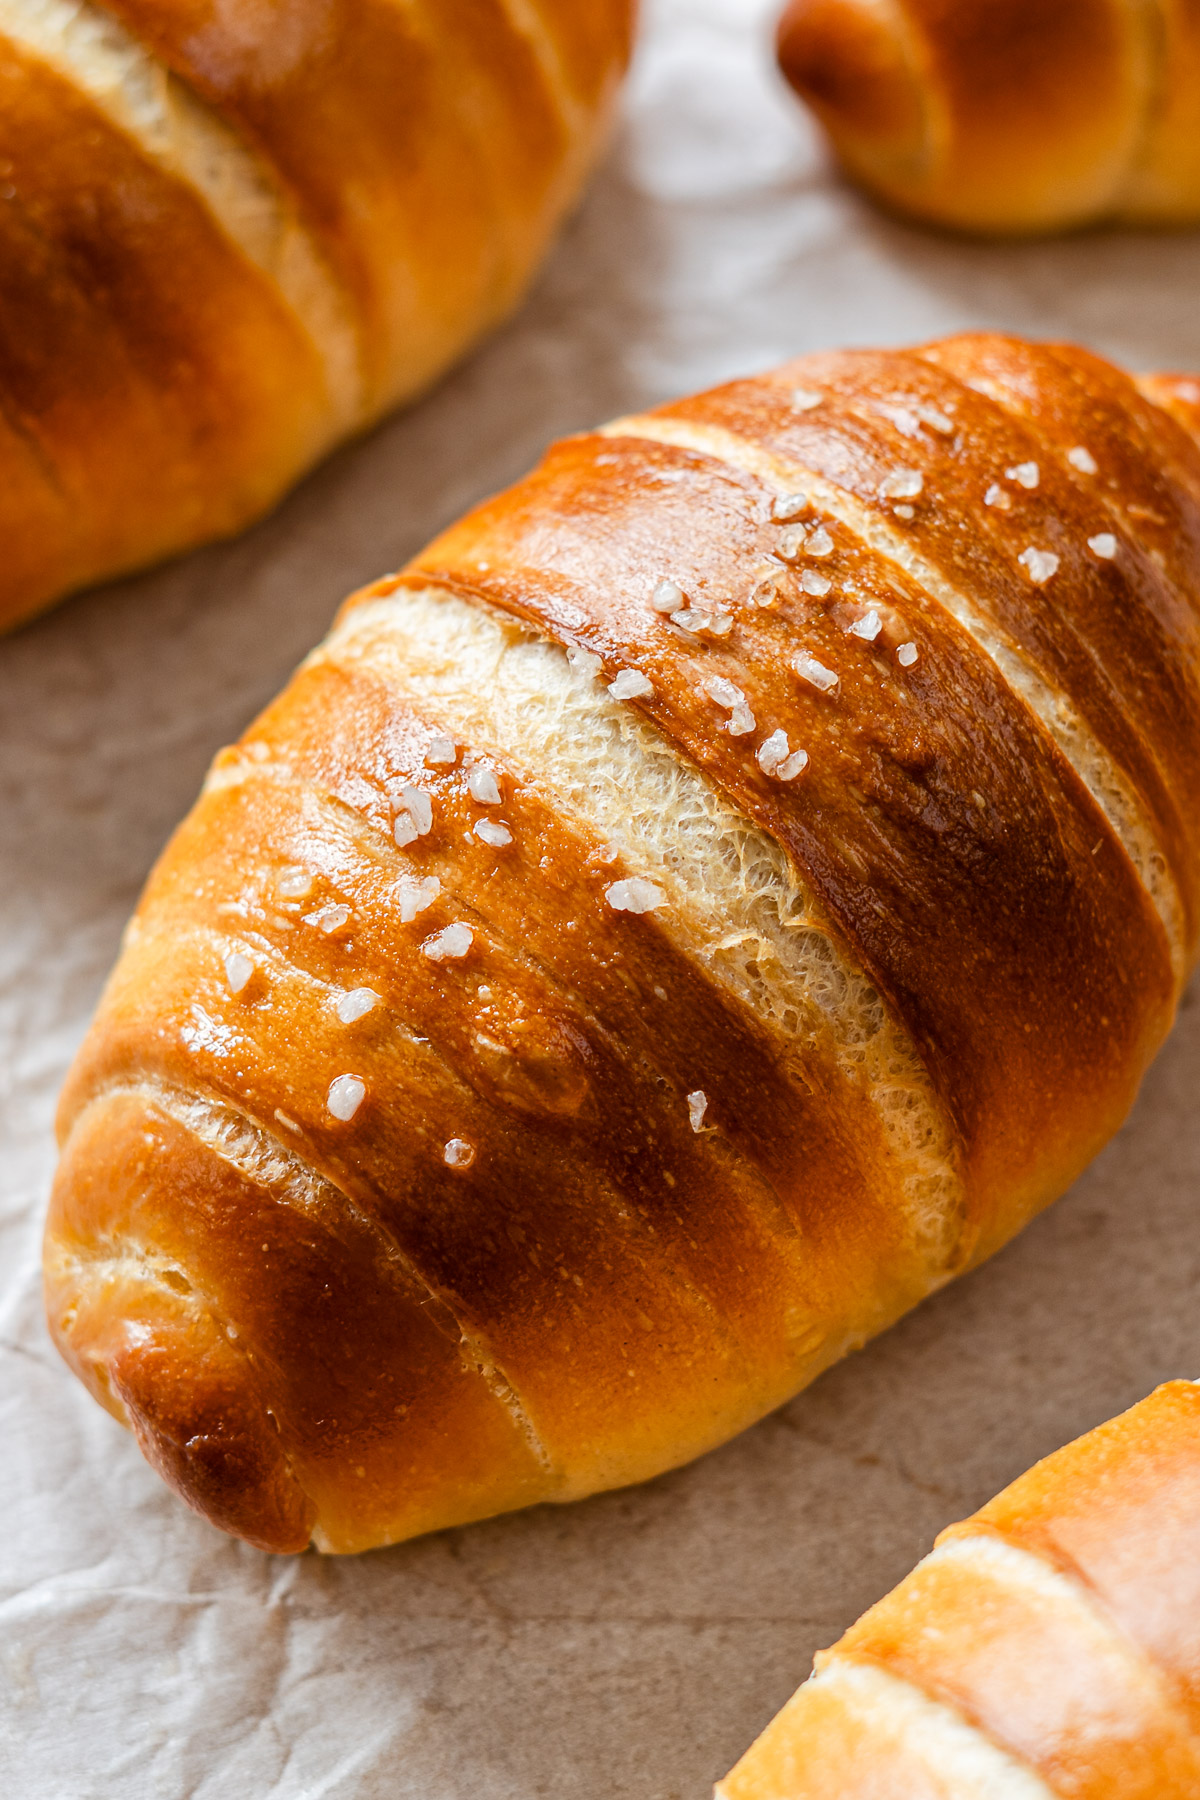
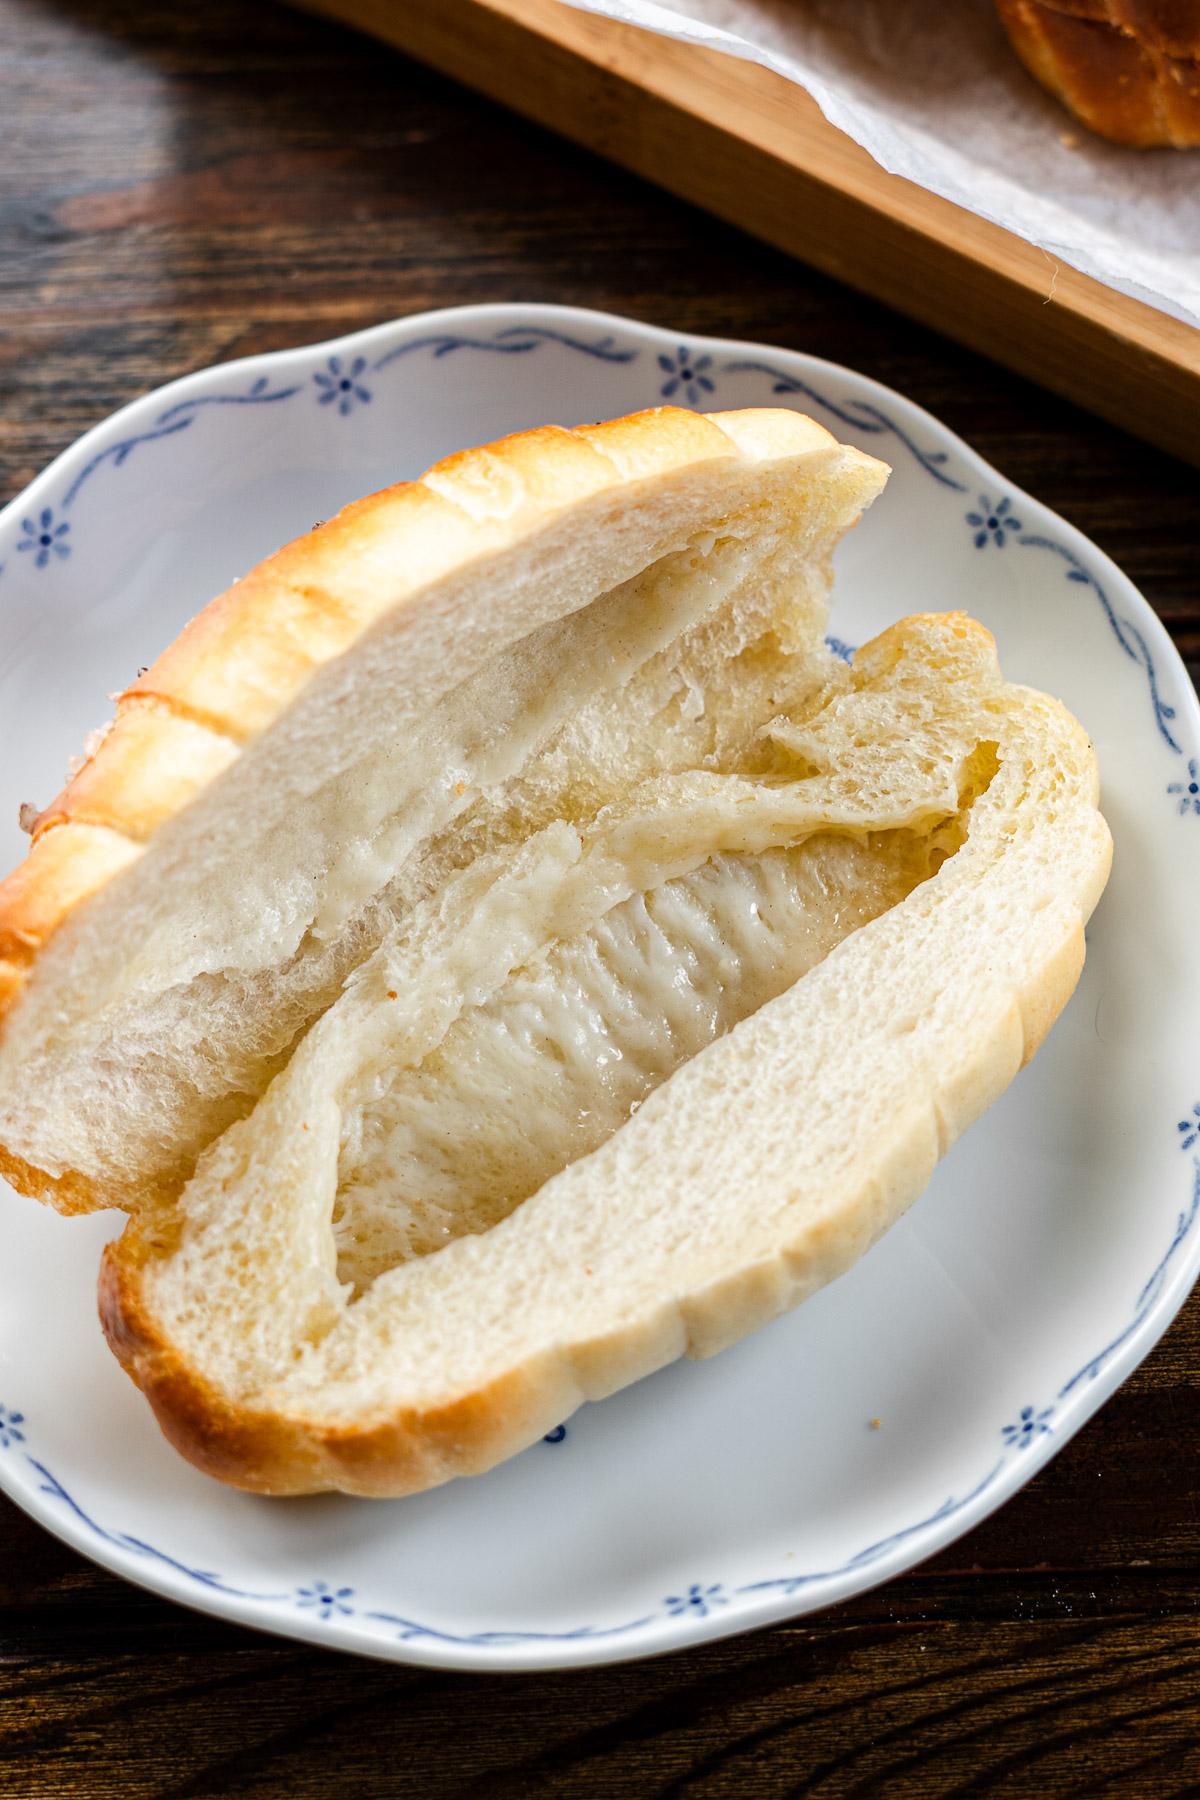
Salt Bread, or Shio pan (塩パン), is a Japanese butter roll that’s soft, fluffy, and wrapped around a piece of butter. As it bakes, the butter melts into the dough, creating a crispy, fried buttery bottom and a lightly salted finish, while keeping the interior tender and airy.
Originally developed at a small bakery called Pain Maison in Ehime Prefecture in the early 2000s, it was designed to be a bread people would still crave during Japan’s hot summers, when appetite drops but the body naturally craves salt.
The textural contrast of the soft, chewy crumb and shatteringly crisp, fried bottom, along with the rich buttery aroma and perfectly salted flavor, is what makes salt bread so well loved. In recent years, Japanese salt bread has gained popularity overseas, including in countries like Malaysia, Singapore, the United States, and Korea (where it’s called sogeum-ppang), making it recognizable worldwide while its roots remain firmly Japanese.
Key Characteristics of Shio Pan
There are 3 main characteristics to really delicious salt bread. It must have:
- The sprinkled salt on top.
- The interior is soft with a butter hole.
- The exterior, especially the base has a crispy fried texture. Without this, its simply a classic butter roll.
3 Types of Japanese Salt Bread (Shio Pan)
After trying many different salt breads and talking to bakers at bakeries across Japan, I’ve found that shio pan generally falls into three main styles. While every bakery has its own interpretation, most salt breads can be categorized by dough strength and level of enrichment.
Hard Type (Lean Dough)
Many Japanese bakeries that specialize in baguettes or other hard breads offer this style of shio pan. It’s made with a lean dough—typically just flour, water, salt, and a small amount of butter. The crumb can range from fairly tight (almost bagel-like) to more open and rustic, depending on hydration and fermentation. The crust is thicker, crispier, and slightly chewy, and high hydration paired with steam during baking often creates a naturally cracked surface with that beautiful, crackly look. If you love focaccia, bagel- or baguette-style textures, check out my cracked salt bread recipe!
Semi-Hard Type (Most Common)
The semi-hard type uses a lightly enriched dough, typically made with a small amount of milk or sugar, resulting in a crumb that’s soft and fluffy while still maintaining structure. This is the most common style of shio pan found in Japanese bakeries. The exterior has a thin, shattery crisp that’s lighter and more delicate than hard, lean-dough versions. The interior is tender and slightly chewy, and the bottom develops the signature crispy, fried layer as the butter melts and leaks out during baking. Sitting between the soft and hard types, it’s considered the classic, everyday version of Japanese salt bread—and the style I’ll be sharing in this recipe.
Soft Type (Enriched Dough)
The soft type uses a more enriched dough, often made with higher amounts of milk and butter, along with additional enriching ingredients like cream and eggs—similar to classic butter rolls or milk bread. Unlike the other styles, this version does not have a distinct crisp exterior. The crust stays soft all around, with a very tender, pillowy crumb that almost melts into your teeth. Despite the soft exterior, it still has the signature crispy, fried bottom created as the butter melts underneath during baking. This style is rich and ultra-soft, perfect if you prefer buttery, roll-like textures over crusty bread— you can follow my soft crust shio pan recipe to make this version at home.
Key Ingredients for Salt Bread
Here are the key ingredients you’ll need to make salt bread:
- Bread flour and Cake flour: In the recipe card, I’ve provided the amounts based on King Arthurs bread flour (12.7% protein) and cake flour (10% protein). In the notes section I’ve included the amounts based on Robin Hood Canadian bread flour (13.3% protein) and cake flour (10% protein).
- Unsalted Butter or Refined Coconut Oil: I first used unscented coconut oil by accident when I ran out of butter, and it ended up surprising me in the best way. Refined coconut oil behaves like butter in dough but gives a slightly lighter, fluffier crumb and found it keeps the interior of the bread softer longer. Either can be used for the dough recipe.
- Salted butter: High-quality butter is one of the signatures of Japanese bakery breads. Many bakeries choose from cultured, fermented, or high-fat European-style butters to control flavor, richness, and how the butter melts during baking. Because each type has a slightly different aroma and melt profile, every bakery’s shio pan ends up tasting a little different. Use your favourite brand of butter because the flavour really shines in salt bread.
- Salt: Bakeries use all kinds of salts depending on the flavor they want—everything from Alpine rock salt to Guérande salt to mineral-rich rock salts from regions like Nagano or Okinawa. Each type has its own character: some taste clean and sharp, others have more minerality or subtle sweetness. Because salt is so key to shio pan, the salt choice alone can change the entire flavor of the bread.
- Sugar: For the slightest sweetness.
- Milk powder: Milk powder adds richness and a subtle sweetness to salt bread while keeping the crumb soft and tender. It also helps control dough hydration without adding extra liquid, making the dough easier to handle. Essentially, it boosts flavor, texture, and workability all at once. There are different types of milk powders: skim milk powder, whole milk powder and buttermilk powder. After comparing all 3, I found skim milk powder to be the easiest to work with in terms of gluten formation and produces an ideal soft and chewy texture for salt bread.
- Water: See more on water temperature below.
- Egg: For the egg version. It enriches the dough more and adds softness and subtle sweetness.
What Type of Flour to Use
In Japan, bakers often mix different flours to balance structure and softness. Strong flour (bread flour) gives chew and shape, while weak flour (cake flour) keeps the crumb soft and pillowy. Japanese flours also come in a wide range of protein contents, which allows more control over the dough’s texture and consistent results. Keep in mind, protein content isn’t the only factor—flour type, gluten quality, and milling all influence texture, which is why two flours with the same protein percentage, like bread flour and all-purpose flour, can behave differently in dough.
In Canada, bread flour and all-purpose flour are both relatively high in protein (~13.3%), so using some cake flour is essential to lower the overall protein and achieve a softer crumb and exterior. In the US, bread flour is slightly lower in protein, so adjustments are a bit less drastic. For semi-hard crust salt bread, aim for a protein content around 11.6–12.2%. Here’s the formula to calculate it:
Weight of bread flour = Total weight of flour x (target protein content – protein content of cake flour) / (protein content of bread flour − protein content of cake flour)
Weight of cake flour = total weight – weight of bread flour
Water Temperature
I talked about this in my Japanese bagel recipe, but it applies here too—water temperature and your kitchen environment are things people usually overlook, and they make a big difference. Dough temperature affects how quickly the yeast ferments, how the gluten relaxes, and how the dough proofs. If the dough gets too warm, it rises too fast and can feel weak; if it’s too cool, it proofs slowly and feels tight. Salt bread especially benefits from controlled dough temperature because we want that soft, light crumb without the butter leaking.
To keep things consistent, it helps to measure your water temperature with a candy thermometer instead of guessing. Bakers use a simple formula to figure out what temperature the water should be based on the desired dough temperature (around 23–26°C for salt bread):
Water Temp = (Desired Dough Temp × 3) – (Room Temp + Flour Temp + Friction)
The friction factor is simply the amount of heat added to the dough from mixing—usually around 2–4°C for low-speed mixing, 4–7°C for medium mixing and 6–9°C for longer mixing (10+ minutes), depending on your mixer and mixing time. You don’t have to be exact, but even roughly adjusting your water warmer or cooler depending on the season will give you more predictable dough and better results.
How to Make Salt Bread
The simplicity of traditional salt bread is exactly what makes it a little tricky. It’s not artisanal bread, but it’s also not your typical soft milk bread—it’s somewhere in between. You want a soft, airy crumb while also achieving a crispy golden exterior with just the right amount of chew. Balancing these elements was the trickiest part to nail down—but if you follow my shio pan recipe closely, you’ll bake bakery-worthy rolls and might just get hooked on making them! There are a few key steps that really matter for achieving that signature texture. Here’s a rundown of how to make shio pan:
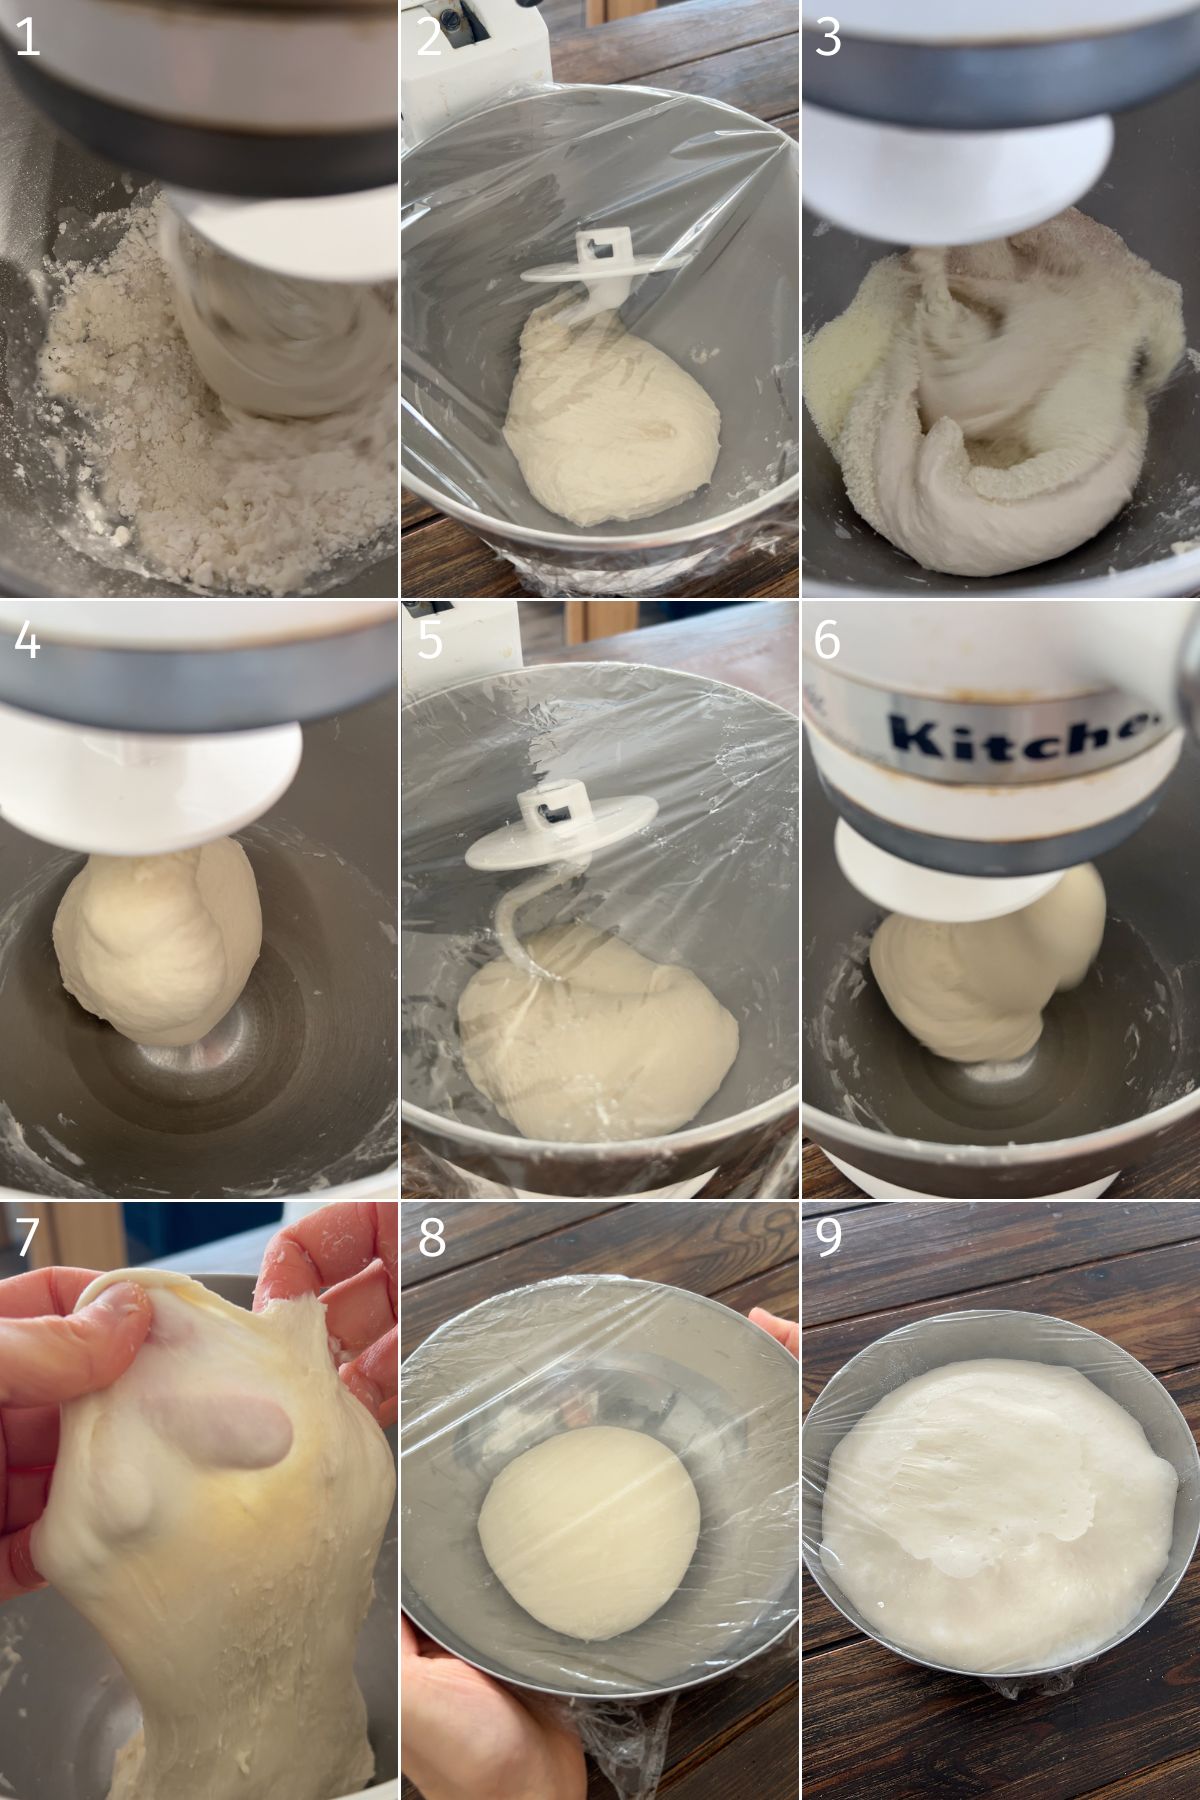

- Mix, autolyse and knead the dough (1-7): Mix flour and water -> autolyse -> mix in milk powder, sugar, salt, yeast and egg (if using) -> knead in butter -> rest -> last mixing. You should have a well developed dough that is elastic, stretchy and slightly tacky. The dough should finish around 24–26°C (75–78°F).
- First rise (8-9): Round into a ball, place into a bowl and cover. Proof thoroughly, until a little more than double in size.
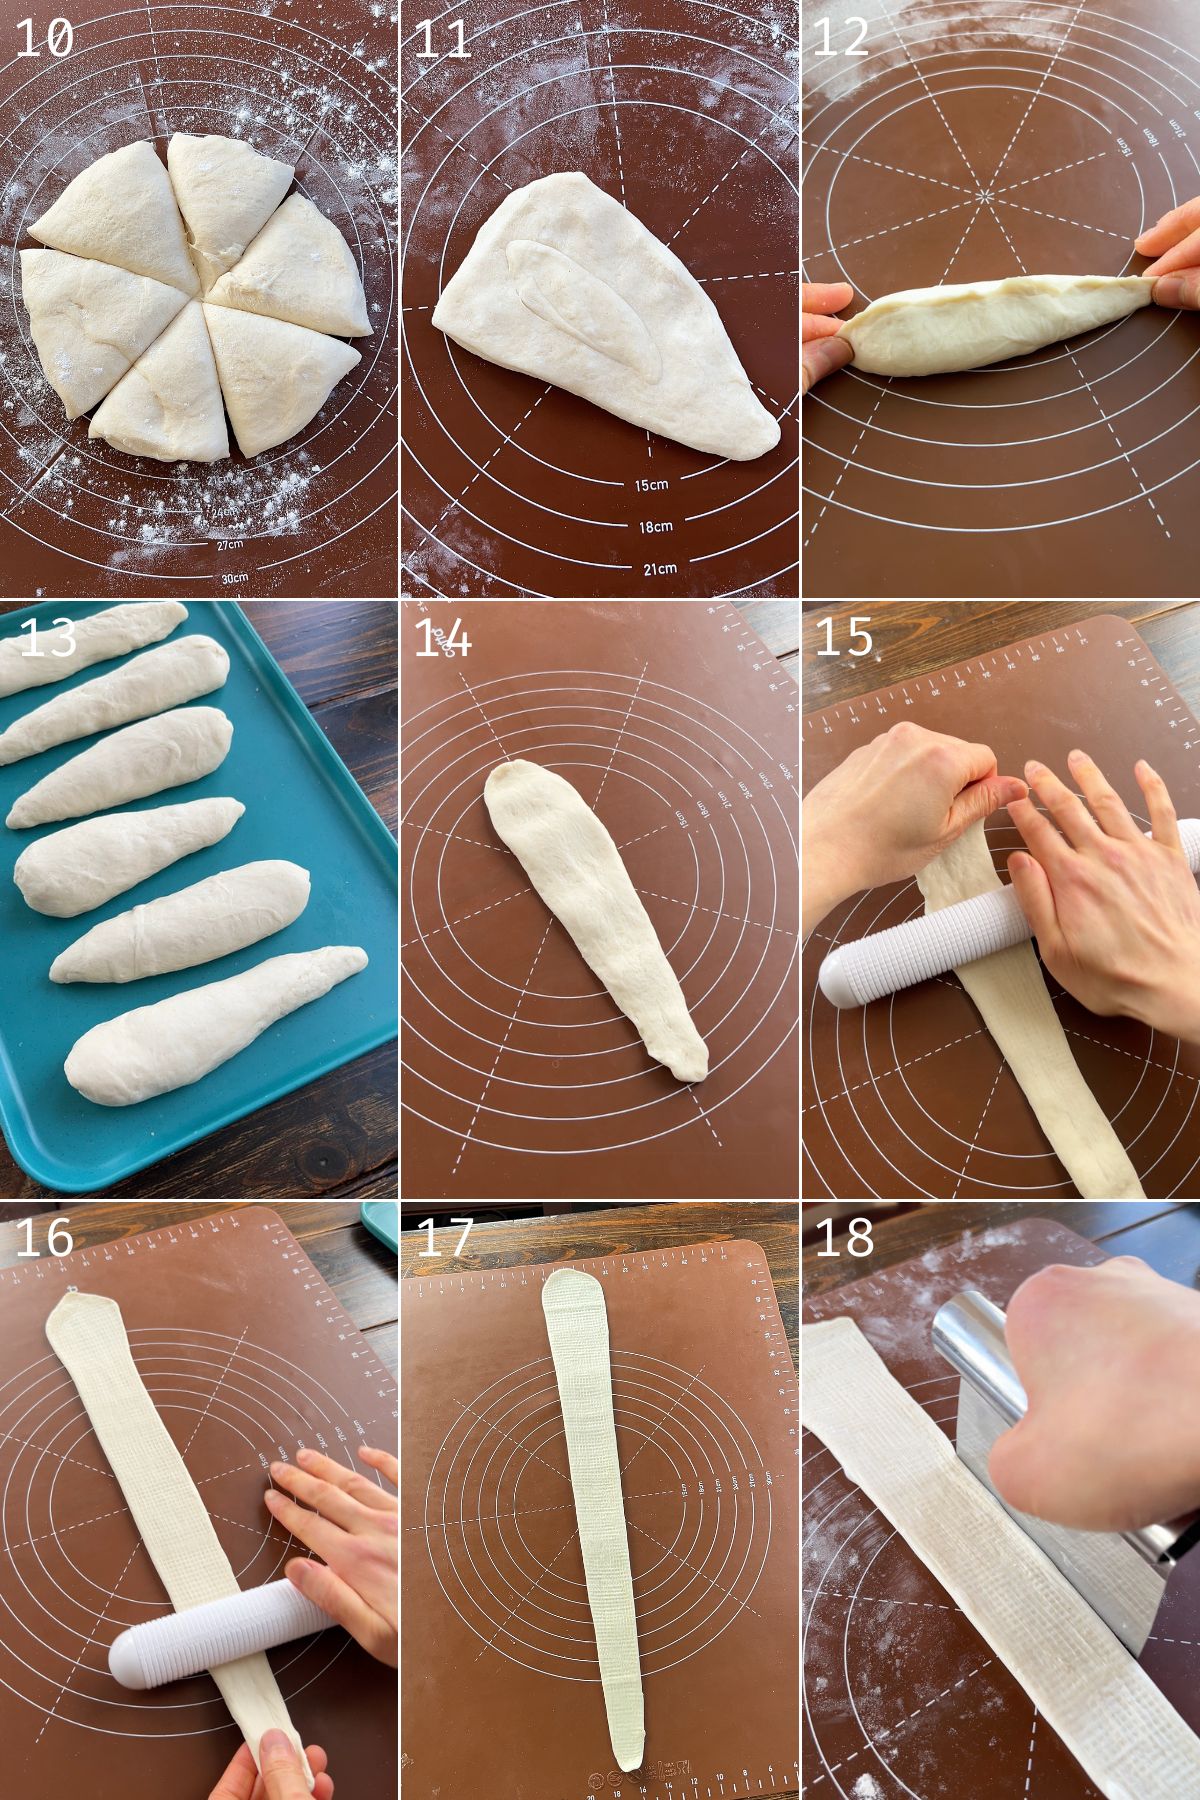
- Divide and pre-shape (10-13): Turn the dough out, gently deflate it, and divide it into six triangular pieces. Weigh each piece so they are the same size and add the scraps in the middle of the triangle. Form each piece into a pointed icicle shape. Give each piece a quick roll to elongate slightly, place seam-side down, and let them rest for ~15 minutes so the gluten relaxes.
- Roll into long triangles (14-18): Working with one piece at a time (rough side up), flatten the piece with the base of your palm. Using a rolling pin, roll the dough while starting with either the base or the tail. Then repeat with the other end. Adjust the rolling direction depending on where the dough is thicker.
- Add the butter block (19-22): Place your butter block at the wide base of the triangle. Fold the top edge down over the butter, then fold in the sides to enclose it. Repeat one more time and then roll all the way down. Roll down naturally, with the slightest bit of tension, not too tight or loose. Press the tip gently into the dough and place it seam-side (tail-side) down on a baking tray. Keep the dough covered as you work.
- Second proof (23-24): Let the shaped rolls rise again until almost double in size and noticeably puffy. When gently poked, the dough should spring back very slowly and leave a faint indent. Preheat your oven 20-30 minutes before ready to bake.
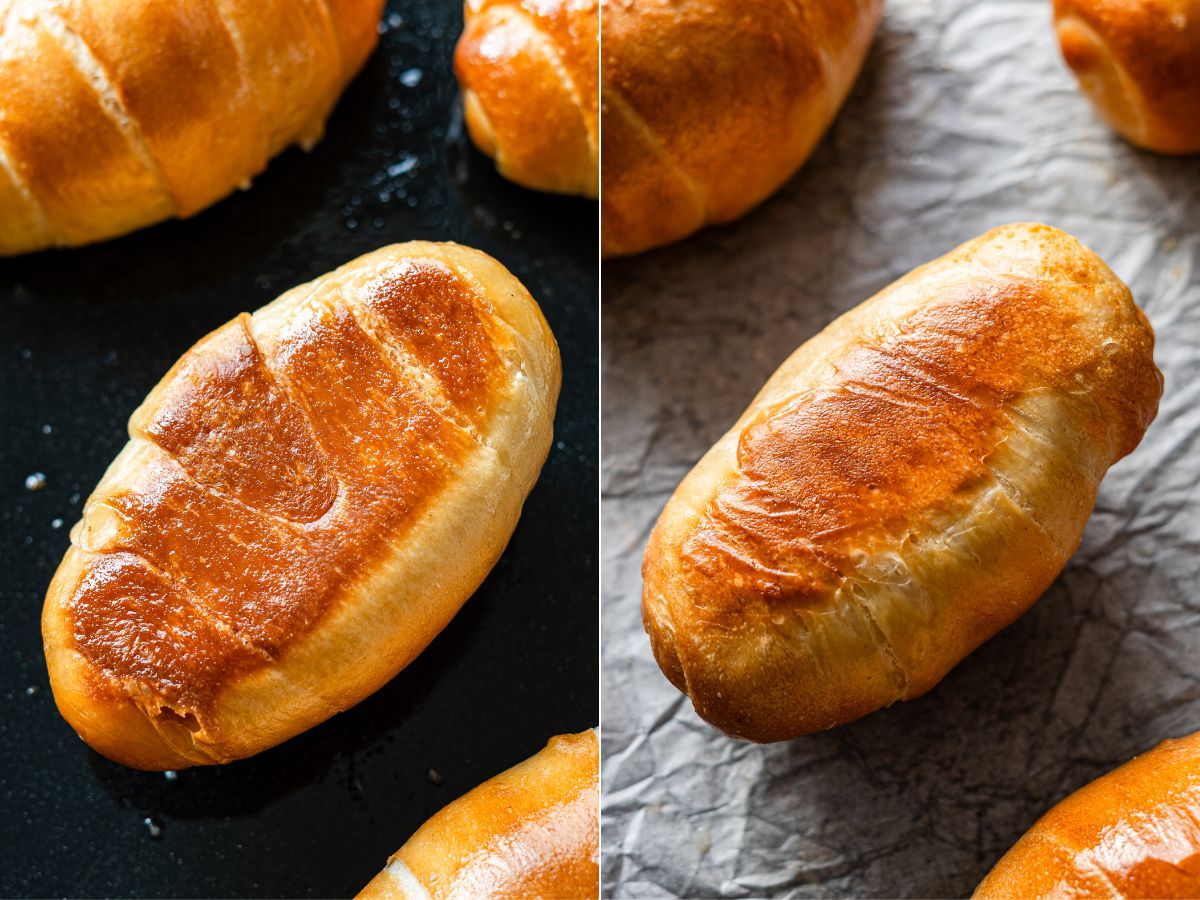
- Prep and bake with steam (25-26): Lightly mist the rolls with water and sprinkle with salt before baking. Bake with added steam (steam function, spray or hot pan and lava rocks) until the tops and bottom is golden, fried and crispy.
- Finish with butter (27): As soon as the rolls come out, brush the tops with melted butter.
Gluten Development
There are two techniques I often use to help develop gluten: poolish and autolyse. I use both in my cracked butter rolls recipe because they build structure and flavor for a lean dough, but for this slightly enriched butter roll, I omitted the poolish to keep things simpler. I do recommend using autolyse, though—it helps create soft, airy bread without excessive kneading.
Why use autolyse?
For a long time, I struggled with forming a cohesive salt bread dough. Because the hydration is high and it’s a leaner dough than typical butter rolls, it takes a lot of effort for the gluten to develop. Even when I finally got it nice and stretchy, it always looked a little rough. That’s where autolyse comes in. Autolyse is a simple resting step where flour and water are mixed and left to sit before adding yeast, salt, and fat. This allows the flour to fully hydrate and the gluten to start forming naturally, creating a smooth, elastic dough without over-kneading. It also makes it easier to incorporate butter later without breaking the gluten structure. The result is a dough that traps gas effectively during proofing, expands beautifully in the oven, and produces a tender, airy crumb with a crisp bottom, AKA the ideal salt bread texture.
Optional: Using a Poolish
If you’re familiar with preferments, you can use a poolish for extra flavor and a slightly lighter crumb. If you want to learn more about poolish, check out my cracked salt bread recipe where I include it! A typical poolish uses a 1:1:0.01 ratio of flour, water, and instant yeast, and I use about 22% of the total flour when adding it to this dough. It gives the dough a head start on gluten development and boosts aroma—but it’s completely optional for this recipe.
Wrapping the Butter
I’ve tried a bunch of ways to wrap the butter, and it’s a small detail that makes a big difference in the final salt bread. This is more of a personal preference…
- Completely wrapped: You’ll still get some butter seeping out if the dough is properly proofed and gluten is strong, but a snug wrap will keep more butter in the center. Sometimes a little butter puddle forms inside (which I secretly love when it’s fresh out of the oven 😂). The bottom may be slightly less fried and crispy, since the butter that escapes fries the dough. I like this method for compound butters, like my salted maple butter or honey butter rolls, where I want to keep most of the butter inside.
- Leave it too exposed: It’s okay if you can see some of the butter after rolling it up, it should get slightly covered up after rolling it. Just make sure it’s not completely sticking out of the rolls or you’ll risk losing the butter hole entirely or ending up with just a tiny one— especially if proofing in a warm environment.
Even with perfect wrapping, underproofed or weak gluten dough may block butter flow. But with strong gluten and proper proofing, some butter will always seep out and lightly fry the bottom — that’s what gives salt bread its signature texture!
How to Shape Salt Bread

Japanese salted butter rolls comes in all different shapes and sizes. Some are longer and more crescent shaped and some are shorter and rounder. Many have 2-3 spirals and others have 4+ spirals. This is personal preference but here’s how to achieve either shape:
Short and Round
- Start with short and thick butter blocks about 2×4 cm
- The base should be shorter, about 4.5-5 cm.
- Roll out to about 40-50 cm in length
- The longer you roll it, the more ‘rolls’ you’ll see. I personally love the look of 3 spirals 🙂
- Avoid rolling too tightly or as it proofs, it will expand horizontally.
- If you roll the dough so the base and tip are roughly the same width, the roll will look chubbier and rounder at the edges. If you roll it into more of a long triangle, the tips will be pointier and the roll will have more of a diamond-like shape.
Long and Crescent
- Start with a longer and thinner butter block, about 1×6 cm
- The base should be longer, about 10-12 cm
- Roll out to about 25-35 cm.
- For crescent shape, gently bend the two edged inward.
How Shape Affects Texture
Shaping your salt bread doesn’t just change how it looks—it also subtly affects its texture. Using the exact same dough, kneading method, and baking time and temperature, a round, chubby roll will feel softer and fluffier than a longer roll. Think of it like pillows: a thicker pillow feels cushioned and plush, while a thinner pillow feels more firmer and springy. Neither shape or texture is ‘better’—it just depends on the texture you’re aiming for. This is a perfect example of how even one small step in the shaping process can change the final bread, even with the same recipe.
What Type of Pan to Use
You can bake salt bread on a parchment-lined or unlined dark non-stick baking pan. Baking directly on the pan gives the crispest, deeply browned “fried” bottom because of better heat contact, but the pan must be non-stick or the dough will stick, and you’ll need to clean it between bakes since milk solids can burn. Parchment is a great alternative if you want easier cleanup or need to transfer proofed dough— you can still get a very crispy bottom, especially when using a dark pan. I don’t recommend silicone mats because they insulate the dough and prevent proper crisping.
Knowing When the Dough is Proofed
Another crucial element to salt bread is getting the proofing just right. The first proof is pretty straightforward — the dough should look noticeably puffed (about doubled in size) and when you gently poke it, it leaves a dent without springing back immediately. The second proof is where it gets trickier. I’ve over and under proofed salt bread a few ties, and honestly, if you’re ever unsure, I’d err slightly on the side of over proofing. It will still bake up soft and fluffy, whereas an under proofed one tends to be tighter and denser.
For the second proof, I look for a few cues: when you nudge the tray, the shaped dough has a light jiggle, it looks plump and airy but not so fragile that it feels like it will collapse, and the finger test leaves a soft indentation that slowly and partially springs back. That’s usually the sweet spot.
VIDEO: Watch How to Make It
Lisa’s Recipe Tips
- Weigh your ingredients: Using a kitchen scale ensures your dough is consistent every time, which is especially important for salt bread where small variations in flour or water can affect stickiness of the dough, texture after baked and oven spring.
- Develop gluten properly: This is one of the key factors for salt bread. Gluten gives the bread a soft interior, a crisp exterior, and the perfect amount of chew. It also determines whether you’ll get the signature butter hole and crispy fried bottom. Using an autolyse helps the gluten form naturally, so you don’t need to knead excessively.
- Pay attention to dough temperature: The ideal dough temperature after mixing is around 24–26°C (75–78°F). Too cold and fermentation slows; too warm and the dough can overproof quickly. Dough temperature affects texture, flavor, and oven spring, so it’s worth knowing your kitchen’s temperature and adjusting the water accordingly. See above to figure out what the temperature of your water should be.
- Use the right amount of butter: Butter isn’t just for flavor—it melts during baking and fries the base, creating the signature crispy bottom. Too little and you lose the butter pocket; too much and the dough can get greasy. I recommend 14% (10 g/70 g dough) for soft crust, 18% (13 g/70 g) for semi-hard crust, and 20% (14 g/70 g) for hard crust dough.
- Bench time: This bench time is important as it lets the gluten relax so its easy to roll out. If at any point it feels like it’s shrinking as you’re rolling it out, let it rest for longer. If you forcefully roll it out, it may unravel or tear when baking.
- Proof thoroughly: Proper proofing lets the dough expand fully, which helps with oven spring and butter absorption. Under-proofed dough won’t absorb the butter properly to let it seep out, leaving it greasy, and it won’t rise enough in the oven, making the bread dense. Over-proofed dough can collapse or deflate.
- Steam is essential: It helps the crust stay thin, promotes rapid oven spring, and creates a light, airy interior with a golden, slightly crisp exterior. Too much steam, however, can keep the crust wet and soft for too long, resulting in a tough, chewy texture—so avoid over-spraying the dough.
- Experiment and adjust baking temp and time: Every oven functions slightly differently so I highly recommend you staying close to the oven to watch for colour and taking notes for every batch you bake. Some ovens run hotter and some are a bit weaker. Across 4 ovens, I’ve had the most success with baking at a temperature of 200-210°C/392-410°F anywhere from 14-18 minutes.
Oven Spring for Salt Bread
Oven spring is the rapid rise that happens during the first few minutes of baking, and it’s crucial for salt bread because it gives each roll a light, airy interior while keeping the exterior thin, crisp, and golden. Achieving great oven spring starts with using the appropriate blend of flour and a well-hydrated dough, which help build strong gluten. Thorough gluten development during mixing and kneading ensures the dough can stretch without tearing.
Enough primary proofing allows the dough to ferment fully and build structure, while strong shaping—not too loose, not too tight—creates surface tension that supports lift in the oven. Perfect final proofing is also essential; under-proofed dough won’t expand properly, and over-proofed dough can collapse.
Baking with steam is especially important for salt bread, as it keeps the crust thin while allowing maximum oven spring. You can use your oven’s steam function, spray water onto the dough before baking, or add steaming elements like lava rocks or a tray of hot water in the oven.
Finally, baking at the proper temperature ensures the rolls expand quickly, locking in the airy crumb and creating a crisp, golden exterior. You’ll know you’ve achieved good oven spring when your shio pan is puffy (you’ll see signs of expansion on the crust between each roll like the photo above), the crumb is airy, and the bottom has that treasured buttery crunch.
Salt Bread Variations
There are so many salt bread variations you can find across Japan from savory to sweet. Whether you change the flavour of the dough, make different flavoured butters, stuff additional ingredients inside, top it off with something else on the outside! Here are some of my favourite variations:
- Compound butters: Make compound butter and cut them into butter blocks like I did in my maple butter salt bread and honey butter salt bread. Think cinnamon sugar butter, spicy cod roe butter, kombu miso butter, honey butter, miso butter, garlic butter or gochujang butter!
- Cheese: It gets all melty inside and pairs so well with other ingredients like ham, bacon and corn. I also love sweet potato cheese salt bread.
- Anko: A super popular variation is to add sweet red bean paste. The combination of anko and butter is incredibly delicious. You can even use other pastes like Japanese sweet potato paste or sweet chestnut spread (Creme de Marrons).
- Cookie topping: I love the melon pan salt bread at pan maison! Make melon pan cookie and place on top after rolling. You can also use sweet boule cookie and pipe it on before baking.
- Change the dough: Think matcha salt bread or chocolate salt bread! Add sesame seeds to the dough for a bit of nuttiness.
Serving Suggestions
Salt bread is one of those breads you never get tired of. It’s amazing on its own, but also so good with jam, butter, or other spreads. I love using it for sandwiches too—tamago sando (Japanese egg sandwiches), prosciutto mozzarella and grilled cheese are my simple go-tos.
Sweet things work great too— I’ve served it with whip cream and fruits like fruit sando. I’ve used it as vessel for ice cream. OH and maple syrup or honey. With a little miso. Can’t forget Japanese sweet potato and cheese! And a classic in Japan is a butter sandwich with anko (sweet red bean paste), it’s so good!!
How to Store and Reheat Salt Bread
Salt bread is best enjoyed fresh—ideally within an hour of baking—but you can store leftovers if needed. Keep them in an airtight container at room temperature for up to a day, or freeze for longer storage. Avoid the fridge because it makes the bread firm, dry, and stale.
To refresh from frozen, thaw at room temperature, lightly mist with water, and reheat in the oven or toaster oven at 180°C (350°F) for 3–5 minutes until the crust crisps back up. You can brush the tops with a little butter before reheating for extra flavour. If you’re in a rush, wrap in a damp paper towel and microwave for a few seconds—just note it won’t stay crispy.
Freezing Salt Bread Dough for Later Baking
You can also freeze the dough after shaping and before baking. When I want fresh salt bread, I take the frozen shaped dough out and place it on a baking pan in the fridge to thaw overnight (about 6–8 hours). About an hour before baking, I remove it from the fridge and let it sit at room temperature for around 60 minutes at 35°C (95°F), or until it looks puffy and jiggly. Then just bake as instructed below.
Recipe FAQ
Yes! Use plant-based butter and a non-dairy milk (I recommend soy milk) if you like. I’ve made vegan salt bread with great success!
Butter rolls are soft and enriched, but they lack the signature crispy fried bottom of shio pan. Salt bread has a thin, slightly chewy crust, a soft but structured crumb, and that small butter pocket that fries into the base while baking.
You can as long as it’s a higher quality all purpose flour. I’ve used Robin Hood all purpose flour with really good results! It does take an extra 3-5 minutes of kneading after the last rest for the dough to develop and the texture is more on the spongy side than bread-y and chewy.
You can, but it changes the dough slightly. Milk powder adds richness, tenderness, and helps control hydration without adding extra liquid. If you use liquid milk instead, omit the water in the recipe.
Dense bread usually comes from under-kneading, underproofing, or using too low-protein flour. Gluten development is crucial for structure, so make sure the dough can be gently stretched without tearing quickly and is smooth when rounding it into a ball. If it tears while doing this there isn’t enough gluten structure. Also check your proofing times and dough temperature—these can affect oven spring and texture.
Oven temperature is the most common culprit. Home ovens sometimes run cooler than it says. Make sure it’s fully preheated, and consider using a slightly higher starting temperature if your crust is pale. Spraying or steaming during the first few minutes also helps develop a golden, crisp exterior.
Salt bread won’t develop a butter hole if the butter melts too early and absorbs into the dough, if the dough isn’t wrapped tightly enough around the butter block to trap steam, if the final proof is overdone (reducing oven spring), if the gluten structure is weak, or if butter leaks out too early during baking. Using cold butter, firmly wrapping the butter and a high temperature bake helps create the steam and tension needed for that hollow pocket.
Crispiness depends on three factors: butter, steam, and baking temperature. Too little butter or low oven heat, or skipping steam, can result in a softer base. Additionally using a dark pan and letting the rolls cool on a wire rack instead of leaving them in a hot pan will ensure a well kept crispy base.
Yes, you can knead the dough by hand but its quite a bit of work. You can check out my no knead salt bread reicpe for something less work intensive!
There are 3 causes to this:
Underproofed dough: If the dough hasn’t risen enough, it’s still tight and dense. When the butter melts in the oven, the dough can’t stretch to absorb it, so the butter stays trapped in the center.
Gluten too tight or underdeveloped: The stretchy gluten network is what holds the dough together while letting butter seep slightly. If it’s too tight or not strong enough, the butter can’t move into the crumb or edges.
Sealed too tightly: If the dough was rolled and sealed very snugly around the butter, it can actually trap the melted butter, creating a little butter “puddle” inside.
Traditional Japanese salt bread (shio pan) is a simple, classic bread: soft, fluffy dough wrapped around butter, with a lightly salted, crisp bottom that highlights the buttery flavor. Even when it features fillings or flavors, Japanese salt bread typically stays minimal, keeping the butter as the star of the bread. The ‘Korean-style’ salt bread variation (sogeum-ppang), is inspired by this bread but often includes extra fillings and toppings, making it sweeter and more decorative.

More Salt Bread Recipes
Enjoy! If you make this Salt Bread recipe, I’d love to hear what you think! Leave a comment and rating below, and if you share it on social media, tag me on Instagram @Okonomikitchen. I can’t wait to see your creations!
Print
Salt Bread (Shio Pan)
- Total Time: 45 minutes
- Yield: 6 servings
- Diet: Vegetarian
Description
Salt Bread, or Shio Pan, is a Japanese bakery favorite known for its crisp golden crust, soft buttery interior, and hint of salt. As it bakes, the butter rolled inside melts, creating a butter hole and a perfectly fried, crispy bottom. This step-by-step salt bread recipe shows you how to make authentic shio pan at home with key tips and simple ingredients!
Ingredients
Semi-hard Crust Dough
- 1 1/3 cup + 1/2 tbsp (170 g) bread flour (12.7% protein)*
- 1/3 cup + 2 tbsp (55 g) cake flour (10% protein)*
- 2/3 tsp (3.4 g) instant dry yeast
- 1 tbsp + 1/2 tsp (14 g) sugar
- 1 tsp (4.5 g) salt
- 1 tbsp + 1/2 tsp (16) unsalted butter or refined coconut oil, room temperature
- 2 tbsp + 1 tsp (14 g) skim milk powder*
- 1/2 cup + 2-2.5 (158-166 ml) water*
Semi-hard Egg Inclusion Dough
- 1 cup + 2 tbsp (138 g) bread flour (12.7% protein)*
- 2/3 cup + 1.5 tbsp (94 g) cake flour (10% protein)*
- 1 tsp (4.5 g) salt
- 2/3 tsp (3.4) instant dry yeast
- 4 tsp (16 g) sugar
- 2 tbsp (12 g) skim milk powder
- 1 tbsp + 1/2 tsp (16 g) unsalted butter or refined coconut oil, room temperature
- 2 tbsp (28 g) whole beaten egg
- 1/2 cup + 2 tbsp (145 ml) water*
Other Ingredients
- 6 butter blocks, 10-14 grams each (14-20% of the dough)
- guerande salt, pretzel salt, rock salt or fancy salt
Instructions
Preliminary Notes:
- Please weigh the ingredients with a kitchen scale for the most successful and accurate results. The imperial measurements are rough estimates of the ingredients and may vary.
- Protein content of flour: Total protein content should be about 11.6-12.2%. Because most of my viewers are US based, I tested this recipe with King Arthur bread and cake flour and used the protein content provided. When using Canadian Robin Hood Flour I use 145 g bread flour (13.3% protein) + 80 g cake flour (10% protein) for semi hard crust and 148 g bread flour + 84 g cake flour for egg inclusion dough.
- Water temperature (Use kitchen thermoemeter):
- Target dough temperature: ~24–26°C (75–78°F) after mixing.
- Calculate water temperature:
- Water temp = (ideal temp x 3)-(room temp+flour temp+friction factor)
- friction factor is 5 if using autolyse and 9 if straight kneading
- Water temp = (ideal temp x 3)-(room temp+flour temp+friction factor)
- Room temperature flour: Use water around 25–28°C (77–82°F) if your kitchen is around 22–24°C.
- Cooler kitchen: Use slightly warmer water (~30°C / 86°F) to compensate.
- Warmer kitchen: Use slightly cooler water (~20–22°C / 68–72°F).
Kneading the Dough
Stand Mix
- Add bread flour, cake flour, and water. Mix on low (speed 2–3) for 3 minutes until a rough dough forms. Cover and rest 15 minutes (autolyse).
- Add milk powder, sugar, salt, yeast, and egg (if making egg-based dough). Mix low for 5 minutes.
- Add butter/coconut oil. Mix low for 2 minutes, then medium (speed 3–4) for 2–3 minutes until smooth. Cover and rest 15–25 minutes depending on the temperature of your work environment (warm kitchen will take less rest time).
- Mix again on medium (speed 4) for 2–3 minutes until dough no longer sticks to bowl sides.
- Shape into a ball and place in a bowl.
Hand Kneading
- Combine all flours and water in a large bowl. Mix by hand or spatula until all flour is hydrated and a rough dough forms (~3–5 min). Cover and rest 15 mins.
- Add milk powder, sugar, salt, yeast, and egg (if using). Gently incorporate using your hands — fold and press until fully mixed.
- Add butter or coconut oil in small pieces. Knead until butter is well incorporated, about 5 minutes. Cover and rest 15–25 min to allow gluten to relax and further develop.
- On a lightly floured surface, knead using traditional push-fold-turn or slap-and-fold for 5-8 mins until dough is smooth, elastic and slightly tacky.
Bread Machine
- Add all ingredients except refined coconut oil/butter to the bowl of the bread machine. Run on bread kneading course for 10 minutes. Add the coconut oil/butter and let it knead for another 20-25 minutes, until the dough is smooth and stretchy. Turn off the bread machine and allow it to proof.
First Proof
- Cup your hands around the dough and gently pull it toward you to create surface tension, rotating as you go, until the dough forms a smooth, tight ball. Place the dough into a bowl and cover.
- Ideal dough temperature: ≈25°C
- Let dough rise for 80-100 minutes at 28-30°C, or until doubled in size.
Prepare Butter Blocks
- Use 10-14 g butter per piece of dough.
- Recommended size of butter blocks: Cut butter into about 2 cm x 4 cm for round salt bread and 1 cm x 6 cm for long or crescent shaped salt bread.
- Keep in freezer after preparing.
Shaping
- Lightly dust the surface of the dough. Use a flexible bench scraper to remove the dough. Punch dough down, transfer to work surface. Lightly dust the dough again.
- Like cutting a pizza, divide into 6 triangular pieces (≈70 g each). Cut off small bits to make them even and place the scraps in the middle of the triangle.
- For each piece, pinch opposite ends together to form a thin icicle shape. Roll gently to elongate slightly to about 15 cm if needed. Place seam side down. Cover and rest 15 minutes (gluten relaxes).
- Take the first piece, rough side up. If the dough is sticky, very lightly dust with flour. Flatten it gently with the base of your hands. Roll the dough into a long icicle shape. Be sure to roll it firmly to remove built up gas. If there are any air bubbles along the edges, press them out with the base of your palm.
- I find it easiest to start at about 1/3 of the way down, holding the base and rolling upwards. Then from the same spot, lift the tail and roll downwards until desired length. You can either start rolling upward or downwards, depending on the pre-shape and whichever feels more natural to you. This way you can control the width of the dough from top to bottom.
- Optional: to make clean and even rolls, use a bench scraper to straighten out the sides of the dough.
- If the dough isn’t stretched long enough or is uneven, lift the thicker sections at the top or bottom and roll gently up or down to even it out. This should only take 1–2 passes. If the dough resists or shrinks while rolling, let it rest a bit longer before continuing.
- Note on shape:
- round, thicker roll → shorter base (4-5 cm), 40-50 cm length
- longer roll (crescent shape) → longer base (10-12 cm), 25-35 cm length
- Note on shape:
Adding Butter
- Place a butter block at the base of the dough and fold the top edge over it, rolling down. The roll should be snug but not too tight or loose. Every so often, lift the roll slightly and pull back gently to create light tension. The butter doesn’t need to be completely sealed on the sides — it will be covered during proofing — but take care that it doesn’t completely stick out.
- Press the very end tip into the dough gently. Place dough onto a (parchment lined or unlined) dark coloured baking tray, tail side down. Keep covered and repeat with remaining dough.
- Baking directly on a dark tray will get you the crunchiest fried bottom but you must use a non-stick pan. I rub a thin coat of butter on the pan for insurance.
Second Proof & Preheating Oven
- Let dough rise for 55-65 minutes at 30-33°C or until doubled in size and looks airy and puffy. I typically proof at 32°C for 60 minutes.
- To test, poke gently. It should springs back slowly, leaving a faint indent. When moving the pan it should jiggle.
- Preheat the oven 20–30 minutes before you expect the proof to finish to the highest temperature (mine is: 232°C/450°F).
Pre-Bake Preparation
-
Remove the cover and lightly spray with water and sprinkle with salt from one edge to the other.
Baking*
Steam Oven
- As soon as you place it into the oven, set to steam mode for 3-5 minutes.
- Reduce heat to 210°C and bake 12–14 minutes or until golden and crispy on both sides.
- Rotate tray towards the last 5-8 minutes of baking for even browning.
Convection/Conventional Oven
- Spray dough 10 times right before baking. Avoid over spraying as it can make the crust tough.
- Once salt bread is in the oven, quickly spray 15 times into the walls of the oven and close the door immediately and bake for 3 minutes.
- Convection oven: Reduce heat to 190-200°C/374-392°F and bake for 12 minutes or until deeply golden on both sides.
- Conventional oven: Reduce heat to 200-210°C/392-400°F bake for 12 minutes.
- Rotate the baking pan during the last 5-6 minutes of baking for even browning. Keep an eye on them, especially the last 5 minutes of baking and adjust oven temperature as needed.
Toaster Oven
- Once preheated, if your toaster oven has a manual steam function, add 1 tbsp hot water. If not, spray the interior about 15 times.
- Spray the dough 10 times before placing it in the oven. Avoid over-spraying, as this can make the crust tough. Immediately close the door.
- Bake for 4 minutes. Then, if needed, open the oven door briefly to remove built up steam and reduce the heat to 190–200°C (375–392°F). Bake for another 8–10 minutes, or until golden and crispy all around.
Finish
- Remove from oven and brush the leaked butter on tops of the salt bread. Serve fresh and enjoy!!
Notes
Bread flour and cake flour can be substituted with all purpose flour with an appropriate protein content but may take an additional 5 minutes of kneading at the end for enough elasticity and gluten to form.
To substitute milk powder, use 178 ml of 2% milk for semi hard crust vr. and 138 ml 2% milk for soft crust vr.
Adjust the water temperature according to your environment using the water temperature calculator
You can skip the autolyse, but I highly recommend taking the extra 20–25 minutes. Autolyse develops gluten more efficiently and smoothly, with less kneading and less wear on your mixer. If you have a heavy-duty mixer, you can knead all the ingredients except the butter/coconut oil on low speed until the dough comes together (2–3 minutes). Then add the fat and increase to medium speed (setting 4), kneading 14–20 minutes until the dough is smooth and stretchy.
Every oven behaves a little differently, so baking times and temperatures may need adjusting. Some steam ovens hold steam longer, which can keep the crust soft, while others dry out quickly, which can limit oven spring. Some ovens also drop in temperature when steam is added which can affect oven spring. If your crust is too soft, shorten the steam time or extend the dry bake. Watch for a golden, crisp crust as your guide rather than relying on the clock alone. Additionally, ovens heat up slightly different so you may need to adjust the temperature and bake time. Across 4 different ovens I’ve used, I had the most success with temperatures between 190-210°C / 375-410°F.
- Prep Time: 30 minutes
- Cook Time: 15 minutes
- Category: Bread
- Method: Baking
- Cuisine: Japanese
Nutrition
- Serving Size: 1 salt bread
- Calories: 258
- Sugar: 2.2 g
- Sodium: 411 mg
- Fat: 12.8 g
- Saturated Fat: 7.9 g
- Unsaturated Fat: 4.9 g
- Trans Fat: 0 g
- Carbohydrates: 31 g
- Fiber: 0.95 g
- Protein: 4.9 g
- Cholesterol: 36 mg


the most well-rounded recipe for salt bread among all the ones that i have tried! the dedication that goes into the recipe development for 3 types of salt bread is most appreciated!
Usually this recipe comes out perfect and has been my favorite thus far! For some reason, this time the dough was much drier than it normally is..I’m wondering if you have any insight on what my problem may have been?
Hi Christine,
It might be environment conditions (humid weather vs. dry) but it shouldn’t be a huge difference. If its dry to the point of it being unwork-able, kt could maybe be accidental weighing error? I’ve done this before 🙇🏻♀️
This is hands down the best shio pan recipe and process ever! The detail you put into it is incredible. This was my first time making shio pan, and it turned out so well. Thank you so much for such an amazing, detailed recipe 🙂
I followed your recipe and it was so yummy! I didn’t have cake flour so used apf + potato starch.
question!!!
how can I double / triple the bread count? should I double / triple the recipe?
Thank you for trying my recipe, I’m so glad you enjoyed! 🙂 To make more, simply double or triple the ingredients.
Tried multiple shio pan recipes and this is the best and my favorite one yet (as expected of Lisa’s recipes)! Easy to follow and the bread turns out super soft.
I love this recipe and appreciate the details of it all! In your post I noticed you left instructions for if you want to freeze the shaped dough for later baking. When doing so, do you let the shaped dough rest at room temperature at all before putting it in the freezer?
Could I also just skip the freezer and let the dough rest in the fridge overnight and then take it out to bake? Please let me know! I’d be so curious if there’s a way to prep this ahead of time but bake it the next day or morning.
I’ve been baking and enjoying a lot of salt bread recently, but this recipe is by far the most in-depth and thorough I’ve come across. And for good reason! This recipe will make a delicious, buttery, and crisp salt bread and includes a fantastic breakdown of every step in the process of what impacts the final product. It’s been cool to learn new tips and understand what made past attempts at making this recipe work, while others fall short. Give this post and recipe a very thorough read before diving into the recipe to understand each step. And I really appreciate the flexibility in ingredients and substitutions based on what you may be more accessible or what you want out of your final salt bread. 5 stars all around!
I made this recipe a couple of times. For my last bake, I substitute butter for coconut oil for my dough. The dough was so smooth, mixed very well and had a very nice coconut fragrance. I followed the visual instructions for the shaping, after a few tries I manage to get the plump roundish shape that I aim for. It was super easier to follow. Thanks Lisa!
I tried the no knead recipe and so glad I did!
I almost decided to not try since I don’t have a stand mixer but luckily there was the no knead recipe so I gave it a go.
The salt bread turned out so good.
Such a detailed and easy recipe! I can’t wait to make it again and again.
I was overwhelmed in the beginning but after going through the recipe it helped me understand the process better and I was able to follow through easily!
A small detail for any other beginners following along – for the final proofing at
30-32C, I preheated my oven and kept checking the temperature using a digital thermometer to get something along the line
72
Not sure if there’s a better way to do this but I found it working for me!
We made it with friends at cottage with only the most basic equipments – a toaster oven, bowls, forks, knives, and a scale! We were rolling out the dough with soju bottle and olive oil bottle LOL. They looked far from perfect given our limited tools, but we could not ask for a higher return for the effort. We demolished the breads within 5 minutes coming out the oven, that was half block of butter between 8 of us 🤣
fluffy and soft! buttery and salty. everything you want in a bread. thank you for the recipe.
I’ve looked at many salt bread recipes but this was super detailed! I’m a bread newb but was able to follow and make delicious salt bread. I don’t have a scale and they weren’t exactly picture perfect but they tasted fantastic! Looking forward to improving my technique and trying out the different varieties.
Hi, really glad for your thorough recipe! While the recipe yields very good salt bread, but I wonder why my butter did not leaked and fried the bottom? And the exterior is quite soft, with huge button holes (more than half of the bread – maybe 2/3). I want to make it again but I don’t know what to adjust – oven temperature / proofing temperature?
Thanks 🙂
Hi Nara,
Please read the tips and FAQ section! But in short, its due to the elasticity of the dough (gluten development) and proper proofing o timing is a big part. Butter should leak through the dough, not between 1/2 way through baking. If by half the time it’s not, while not ideal you can poke holes on the sides with chopstick to let the butter seep out.
Thankyou again Lisa! Will try again. Thanks for the great recipe and explanation. I remember there’s a pool of butter as well, but I feel the gluten development seems Okay – but will try again and tweak some! Thankyouu
So crispy and buttery! These taste so similar to the ones I had in Korea.
I followed the recipe without egg, and did the autolyse steps, but I didn’t get windowpane and my dough was quite sticky, so I had to use a lot of flour during shaping.
Should I keep mixing the dough for longer next time? Maybe even reduce the amount of water?
I think this is honestly the most detailed blog I’ve come across for shio pan bread. I really appreciated the step-by-step photos — I’m a very visual person, so it was incredibly helpful to have something to reference throughout the process. I followed the instructions as closely as I could, though I definitely need to work on my rolling skills, haha — that part is on me! Nevertheless, they turned out delicious, and I’ll absolutely be making them again to achieve that tight, bakery-style look shown in your photos 😆 I’m also excited to try making the Dubai or cinnamon version next time! [Resubmitting because I typed in my information (email) incorrectly the first time] 🤦🏻♀️
The most thorough shio pan blog post I’ve yet to see!
Came out pretty good for the first time. It was hard kneading the dough by hand so I think I’ll use a mixer next time haha the bottom is super crispy but my top crust came out a bit soggy. Don’t know where I made the mistake but will try again soon!
Amazing recipe that was generally easy to follow even with minimal bread baking experience. Had to be mindful of the temp in my apartment during the proofing process though but her explanation of each step helped me know what to look for and it turned out so fluffy, buttery and had that signature crunch
By far the most comprehensive explanation regarding shio pan. Eventhough mine was far beyond perfect, but I think I can try again next time and just adjust the oven temperature or the baking time. Thank you, Lisa! 🙂
Loved this recipe! I made a few small mistakes, but Lisa’s guidance and notes still got me to great results. The shio pan was incredibly delicious and took me right back to the shio pans I ate in small Tokyo bakeries! 🥰
I made the recipe fully vegan and using Polish ingredients. For European vegans: „Rama plant based” vegan butter worked well for me 🙂
I do recommend thoroughly reading the recipe first and a few times. My errors stemmed from skimming through the recipe well in advance, so then I forgot about some parts of the mixing process, which probably made my stand mixer work more than needed. But it still yielded super tasty rolls, so highly recommend!
Hi, can I double this recipe if I want to make a dozen?
Hi Mitch,
Yes absolutely, I find 6 easy amount to make especially if its for the first time but I often double and it takes the same time for mixing 🙂
I followed the no-egg recipe with AP flour and used whole milk instead of skim milk powder. The recipe wasn’t clear whether milk should replace the water so instead of the warm water, I added warm whole milk. My kitchen is cold so I added more flour until the dough stopped sticking to the sides and kneaded until it passed the windowpane test.
When baking, after 15 minutes in the oven, I brush the leaked butter onto the top of the bread and put it back into the oven for about 4 more minutes to make the top crisp and golden.
The resulting dough is soft and fluffy and the outside is crispy and buttery! Next time, I’ll use garlic butter or add green onions into the dough/butter for more savory options.
Ok I have made this multiple times, and have also made Erin’s popular “viral” recipe. Erin’s one dump is basically as easy as it gets, but I think the nuance and food science explanation behind this recipe, as a regular baker, really gets me! All of the thorough explanations brought out the baking nerd in me and I appreciated it. If you don’t love reading long explanations, and cookbooks, this might not be for you, but if you love problem solving baking errors with a full textbook to help understand why, this is perfect. Having said that, is this part missing the end of a thought “Add butter/coconut oil. Mix low for 2 minutes, then medium (speed 3–4) for 2–3 minutes until smooth. Cover and rest 15–25 minutes depending on .” I’ve just been resting for 25 minutes for funsies blind haha. I’ve also been practicing my rolling, but no matter how I roll/seal, my butter always leaks (even tried freezing), and the leaked butter burns. Successful butter holes, but leaking butter is not ideal. Also have baked these on USA pans, which 100% stick, but if you use parchment, or if you butter A LOT, you get a good crust either way.
Hi Angela,
Thank you for your review, so glad you enjoyed!! And thank you for pointing out the missing sentence 😂, just updated!
The butter is suppose to leak through the dough vs. escaping through gaps… so that usually means the gluten was weakened/torn somewhere along the process (under/over-proofing) if the butter was sealed in. This honestly is really difficult to nail every time especially if the temperature of your work environment changes a bit– you can try to use a slightly less dark pan to prevent too much of the milk solids burning! I’ve switched to a dark grey pan vs. a black pan and that seemed to help when my butter leaks as well 🙂
Been following you on Instagram for awhile now and really love the pantastic bread club idea!
It’s my first time working with dry milk powder. I usually just use regular milk with another shio pan recipe. I love the science behind baking so I really enjoy your posts about precision and dough temperature! I enjoyed reading your post about Foccacia too!
I was a little confused about the amount of water since it was a range instead of exact amount. I just went with in between 😆 dough was more sticky than what I’m used to but I just kneaded a little more in the stand mixer until it stopped sticking to bowl. I definitely rolled some of them too tightly, some of the butter leaked from the dough in the oven and some didn’t. I just threw in a small cube butter midway point when I flipped the pan. Breads came out so fluffy!! Pillowy and buttery with crispy bottom! I went to bed smelling like butter and loved it! Thank you for sharing your recipes!
Hi Beli,
The amount of water depends on your flour and environment 🙂 Generally, start with lower amount if you’re in a warmer kitchen and higher amount in a colder kitchen! Thank you so much for trying the recipe!!
Thank you for this recipe Lisa!! Made this recipe a number of times already and I really appreciate how detailed it is, I particularly enjoy learning the science behind baking and you made it so approachable 😊
One thing I struggle a bit with is getting the butter hole consistently each time (I’ve been freezing the butter before rolling them up to try and prevent them from melting too early during the 2nd proof and bake) but the texture still always comes out so pillowy and soft!!
If anyone has any feedback or things to try, would really appreciate. Thanks!!
We do not have any cake flour here in NZ. What alternative can I use?
All purpose or more bread flour is fine, but the texture will just be slightly different!
i realized i bought whole milk powder instead of skim milk powder. was wondering if i could potentially tweak the recipe to ensure that i can still get the crispy exterior and softness inside. or would you suggest that i just buy skim milk powder instead.
Whole milk powder still works! I find the crust isnt AS sharply crisp (it could be due to other factors…) but you can still get a good crust!
I tried this recipe twice in one week to give it a good chance n although I made MANY lil errors both times I still ended up with delicious salty, SOFT, and crispy bottomed buttery rolls no matter what! I also made a miso maple cinnamon brown butter version and it was DELICIOUS BTW. Here is what I found both times!!!
Flours used: – bob’s red mill ap flour 10-12% (with calculating what’s on the nutrition facts it came to 11.7% BUT after testing I definitely think it is on the lower end probably 10-11% so smth to keep in mind for u all using that flour!!)
– Robin Hood bread flour 13.3%
Stand mixer used: 5.5q bowl lift kitchenaid
Trial 1: with trying to get a protein content of 12% I used her formula and got 185g bob’s ap flour, 40g bread flour. I temped my kitchen and temped my water accordingly. Autolysed for 30 mins. Divided dough equaled 70g each with 14g butter block.
Mistakes:
– all stages of mixing took a looooong time to develop gluten properly, added more flour as I was worried I added too much water and probably ended up overdeveloping gluten/adding too much flour in the end.
– overproofed my dough so rolling out was hard, dough was springing back lots due to overmixing and when encasing the butter block I rolled them too tightly so they burst when baked and leaked lots of butter
Trial 2: I did a double batch to do two different flavours and this time used 340g ap, 110 bread flour. Took water temp, autolysed for 20 mins, divided dough was 72g each with 14g butter block.
– with making flour adjustments kneading def took less time even with a double batch but I still ended up adding a lil more flour. Didn’t badly overproof this time and rolling out went v nicely after resting and made sure not to roll too tightly.
– ended up freezing them and then following her directions to thaw in fridge then proof and bake. I think having the dough sit in the fridge made them end up having bubbly crusts but I’m not sure?? They were giving sourdough for sure, not the cutest but WOW was the flavour sm better on those. Still had too much butter leakage but ik ONE OF THEM FOR SURE CAME OUT PERFECT.
Takeaways:
– if kneading is taking forever: either using too much water or need to add a higher percent of ur higher protein flour
– let ur dough REST after the pre shaping. If ur worried abt over proofing, work from ur fridge (I did this a LOT)
– try and make sure ur butter block is fairly well encased and DONT pull tightly on dough while rolling, gentle firm lil roll up.
– overproofing makes tearing rlly easy n was probably some of my rolls’ biggest downfall :,)
With how detailed this recipe is though it makes it very easy to figure out how to fix things and I WILL be trying a third time.
I appreciate how detailed your recipes are!
I’m not sure what I did wrong but I followed the egg inclusion dough + stand mixer directions and it took about 25-30min to do the final kneading (where it says mix on medium for 2-3min until dough no longer sticks to bowl sides) and it was still slightly sticky. There could definitely be human error on my end somewhere though! The shio pan still ended up super soft and yummy! I think I just need to try the recipe again.
Amazing recipe with different variations of shio pan! The autolyse method was an absolute game changer for me as someone who doesn’t bake very often yet somehow finds a way to fail very often! This has since been a fool proof way to get the dough to come together nicely, and have good gluten development. Highly recommended for those that have trouble with sticky dough / dough failing to pass the window pane test.
Thanks Lisa!
your instructions are very detailed and helpful. I’m not sure if I did anything wrong but the top of the bread wasn’t as crispy, it was mostly soft. I used a different recipe before this one and had to squirt more water than this one so not sure if that is the reason. otherwise, i really like all of the explanations and thoughts that went behind this recipe!
This is an extremely detailed recipe and you can tell all the trial and care that went into creating it! I made the egg inclusion version, weighed everything really carefully and even did the water temperature calculations, but I guess due to flour in the UK and temperature/humidity my dough was impossibly wet to begin with. I chucked in an extra handful of bread flour and kneaded by hand for half an hour and eventually got to something workable. It was still extremely sticky but the gluten did develop eventually and the texture was lovely and soft after proving. I did maybe a 45 minute prove after they were shaped and then put them in the fridge overnight. In the morning I took them out for half an hour and then baked and the oven spring was still amazing, I was really impressed. My oven does go a lot hotter than the temps stated here though and I do think it was too hot since the colour was very dark and I had to turn it way down to stop them burning, so maybe follow the temperatures instead of turning the oven up ‘as hot as it will go’. Texture and flavour were perfect and the bottom went beautifully crisp, will definitely make again!!
This recipe was so detailed and amazing; every question was answered. My bread came out crispy, buttery and absolutely delicious!
This recipe was super easy to follow! I love how thorough the instructions are and the photos included are so helpful during the process. I’ve made it a few times now and I’m obsessed. Thank you so much!
I’ve tried a couple of salt bread recipes and this one won out! The detailed instructions are AMAZING!! Having the stand mixer vs hand knead parts were awesome and I used both.
This bread comes out soft and fluffy and so delicious. It takes a few times of trial and error if you’ve never made bread before, but it still turns out great. I’ve brought to friends and they’re OBSESSED. Give these a shot!!
I made this recipe but experienced some trial and error. When I made it half way through my mixer broke and prevented me from getting the correct dough texture, so it didn’t turn out as I imagined. Recently I got a new mixer and tried again today. This attempt went very smoothly. Making the salt bread shape was the best part. Rolling the dough was very satisfying. Once they were cooked the texture was lovely, crunchy and buttery with a fluffy inside. I shared with my friends and family and they wanted more. I loved this recipe so much! I will definitely be making it again and again.
This was one of the most detailed and explanative recipes I’ve come across, but I knew it would be worth reading through all of the notes and tips.
The options for different brands of flour and warmer vs cooler kitchen environments were very helpful (-20C tonight).
I did find it a little tricky to follow the ingredient measurements with ranges as my first time using the recipe, but I’m sure I’ll get the hang of it with my next batch! For my first attempt, they still turned out delicious!
They came out soo good my sister and husband love it . the recipe is easy . Will make more thank you so much for this wonderful recipe
Thank you for trying the recipe Johannia, so glad it was well received! 🙂
I’ve made 9 batches using this recipe and it still is the best ever!! My first ever salt bread batch was using erinscozykitchen’s recipe and unfortunately it didn’t work out like I wanted it to. Lisa has updated her recipe since I started using it, but so far I’ve made the soft crust and the semi-hard crust egg inclusion dough versions. I also skip the autolyse steps because the recipe didn’t include those steps before and I was on more of a time crunch, but I’ll do that the next time I bake!
I add ice to my water to make sure the dough temp doesn’t rise too much when mixing in my KitchenAid, and the dough temp is still above target range but honestly the bakes are still good. I turn my oven on the lowest setting and then turn it off to proof the dough. I use King Arthur’s bread flour and cake flour. ALSO make sure your yeast is not expired!! I also add less butter (about 8 grams per roll) and they still turn out delish. I accidentally forgot to reduce the heat upon putting the rolls in the oven about 8 minutes too late, but that was a great mistake bc my rolls turned out more golden.
I loved how detailed and instructional this recipe was – all the feedback on temperature, impact of shape/size of the dough impacts aesthetics/taste, dough rest times et cetera were all very helpful. I found the dough much easier to work with after resting. If Okonomi Kitchen has articles in the future purely on knowledge/theory – e.g. how to tell if your dough is proofed, how to tell if your dough is at windowpane (70%/80%/90% there etc.), I would love that! I remember seeing on IG that Lisa had to work on this recipe 50+ times to perfect it – I’d even love to learn more about the trials and errors – what worked, what didn’t work, why didn’t something work etc.
As someone who is still working on shaping dough consistently and quickly, I’d recommend starting the timer as soon as you start working on your first dough (e.g. if you have 6 pieces of dough to shape and the recipe asks you to rest the dough after final shaping is complete, start the timer as soon as you finish the first piece of dough, not when you’ve finished the last one).
Two questions for Okonomi Kitchen – (1) do you have any butter recommendation/how do I prevent my butter from browning super quickly in the oven? When I brush the butter over the buns at the end, it carries a lot of the “browned” butter particles and doesn’t end up looking as nice. (2) Do you have a POV on oven settings – when baking bread, is the top and bottom conventional oven (two horizontal lines) vs bottom only (one horizontal line) vs convection preferred/would you ever switch from one setting to another halfway through baking? Thanks so much for the great recipe!
Hi Phoebe,
Thank you so much for your comment and feedback. Really good tip on the timer!
As for your questions:
1. If the butter is leaking too early it means that the gluten might have been weak or teared while shaping. You want to see the butter seeping out around the half way mark and only the fat, so no milk solids ideally would come out. You could try to seal the butter in (close off the ends). You can also just melt some extra butter so you dont have the brown bites on them.
2. My ovens don’t have top and bottom heating, it’s full convection! My oven runs a little hotter on the bottom which is why mine comes out a bit darker than most people. I would use both top and bottom heating though because you want it to be evenly browned.
Hope that helps, and thanks again for trying the recipe! 💚
Hi Lisa! Gonna make this for the second time, but this time I want to make a double batch and freeze half of it. Do you recommend freezing immediately after shaping, or after proofing for the 80-100 min?
Hi Sarah, Freeze after shaping but please see the section: Freezing Salt Bread Dough for Later Baking! 🙂
Hi Lisa! Thank you for sharing your recipe. It is sooo good! I just have a couple of questions.
If my shaped dough springs back when trying to roll it flat after proofing does it mean it’s under-proofed? My dough doesn’t look as smooth and feels very light and airy. Also, if I want to add canned chopped jalapeños to the dough, should I add more bread flour or cake flour?
Hi Rebecca,
I’m so glad you enjoyed! Do you mean after pre-shaping and trying to roll it out to shape? If so, let it rest for a little longer! If your workspace is cold it can take a bit longer for the gluten to relax 🙂 It’s okay if it doesn’t look smooth. When pre-shaping be sure to degas it too. If you’re adding jalapenos, blot them to remove excess moisture. I would either cut them up really small and knead it into the dough at the very end so it doesn’t get squished and release too much moisture– the last 2-3 mins of mixing and doing it on low speed or add pieces with the butter. I think this would be a bit easier to do. Goodluck! 🙂
Thank you! Can I proof the dough after shaping in the refrigerator overnight and bake it the next day?
Yes you can! Shape the rolls and then place them into the fridge. Take it out and leave it at room temp until its room temp and doubled in size 🙂
my first and now only recipe for salt bread. so clear and thorough with such a great attention to detail.
Loved how detailed and comprehensive the recipe was! It was easy to follow! So worth the effort of making these. I’ll make them again and again.
loonggg recipe to read through, but the fact that it is super in depth is helpful! def worth reading slowly before beginning.
+ my salt bread came out PERFECT, had the whole family standing and eating them fresh out the oven
Made this yesterday and it didn’t turn out quite like it’s supposed to but it was super delicious nonetheless!! With Lisa’s detailed notes I’m sure I can troubleshoot it. Pretty sure I just need to bake it at a higher temp and roll up the butter a bit tighter. Excited to try again!
This is my first time making any bread and they turned out sooooo good. The crust is immaculate!
These are some of the best shio pan ive had! They have the best crunch to squidgy interior ratio. I need to make more soon.
Thank you for the clear breakdown on dough temperature and how it affects handling and final texture — it was genuinely eye-opening.
I’m based in Singapore, and I’ve always struggled to get results similar to online recipes because of how hot and humid it is here. After following your techniques closely, I was finally able to achieve the best shio pan I’ve ever made using the same recipe I’ve always used. It really drove home how important dough temperature and technique are, beyond just the recipe itself.
For anyone baking in warm, humid climates (around 28–32°C), I found it very helpful to use flour straight from the freezer and ice-cold water. Letting the dough rest in the fridge during the rest periods (and allowing the full rest time) helped keep it close to the target dough temperature of around 25°C while still developing enough gluten. I also found a short fridge rest after shaping useful, as the dough warms up very quickly during rolling.
Lastly, for those in Singapore, you can also purchase Tomiz Lys D’ Or flour from Redman — it’s pricey but worth every dollar.
Hi Vanessa,
Thank you so much for sharing this! I totally understand, when I’m baking in Japan the temperature of the water I use it super cold vs. in Canada it’s on the warmer side. I was thinking the autolyse and rest would help with the heating of the dough, but maybe even adding the dough into the fridge during the autolyse/rest period could help too! 🙂 I’m glad it worked out for you <3
All your recipes are amazing. But this one in particular, chefs kisses!!! Best one out there!
Sooo good! It’s very flavourful, can’t stop eating!
Hi Sarah,
Thank you for trying the recipe, so glad you enjoyed it! 🙂
I made these for dinner last night and they came out beautifully. The dough was very tender and easy to work with. Salt bread is pretty simple to make and this recipe is very straightforward. I appreciated the easy instructions. The buttery bottom came out perfectly. I only recommend making a double batch because they are irresistible!
Hi Lisa,
I made shio pan from your recipe a few times now and they turned out great! I am back and have a couple questions – Can I make it ahead by putting the dough in the fridge overnight after mixing instead of freezing it after shaping? I don’t have a lot of space in my freezer. I saw your no knead shio pan recipe, so I was also wondering if the same method (cold fermentation) would work if I use a stand mixer.
Thank you!
Hi HH,
So glad you hear you enjoyed them!! Thank you 🙂 Regarding the overnight proof, yes. I would proof it out of the fridge for ~30 minutes and then put it into the fridge overnight. Before dividing, make sure to bring the dough back to about ~18–22°C (64–72°F) before dividing and shaping which can take about 45-90 mins depending on your environment.
I tried the semi hard one. The result was excellent.
The texture and flavor were very satisfying.
I’ll definitely be making this again. Thank you for sharing such a great recipe 🤍
The best!! Thank you for the very detailed recipe. It came out perfect even for first timer like me
Heyy Lisa, love your recipes!! I’m testing out this salt bread recipe tomorrow and I’m now facing a dilemma. I’ve run out of cake flour and it just so happens that I used up my all-purpose flour as well.. Good news is I have bread flour but I was wondering what I should substitute the cake flour with?
Hi Diana,
Thank you so much!! You can’t substitute cake flour unfortunately when making bread, adding starch affects the texture. However, you can totally use all bread flour! Depending on the protein content it’ll be more or less chewy which isn’t a bad thing! You can try using all bread flour this time around and then try it with the cake flour next time to compare 🙂
Made the dough the bread machine and it came out great! Appreciate the detailed breakdown and directions 🙂
Easy to follow recipe. Came out really well. Very tasty and fluffy.
Hi Lisa,
I’m wondering why the substitution for skim milk powder is 2% milk? Isn’t there a difference in fat content? Also, should I reduce the amount of water if using 2% milk?
Thank you!
Hi! Great questions 🙂
You’re right that there is a difference in fat content. Even though skim milk powder is low-fat, it still adds milk solids (proteins and sugars) that contribute to softness, flavor, and browning. I found using 2% milk as a liquid substitute helps mimic those effects better than skim milk, which tends to make the dough a bit drier and less flavorful.
If you’re using 2% milk, replace the water 1:1 with milk—no additional water is needed. So yes, the water is reduced by the same amount you’re adding milk.
Hope that helps, and happy baking!
This shio pan turned out absolutely perfect! The crust came out just the way I love it—semi-hard with that satisfying bite, while the inside stayed soft and fluffy. Thank you so much for sharing this recipe, it’s definitely a keeper! I also tried the shio pan bagel recipe, and it was amazing! Right now I’m really enjoying eating bagels thanks to your recipe.
The most delicious turnout ever!! Got the perfect blend of buttery salt. Probably my favorite bread out all of the ones I’ve ever tried. Must try!
tried this recipe and all of my friends approved! I don’t own dark nonstick baking pans so I lined my pans with parchment to keep from burnt bottoms. Took a few attempts to determine the oven temp and baking time that works with my gas oven. Ovens are not created equally so just a tip to use the baking temp/time in any recipe as a guide and adjust to your oven to get results you want.
Hi Lisa! Thanks so much for sharing your recipe! I’ve tried out different ones before but yours is by far the easiest to follow and absolutely delicious. When making the dough different flavors (cocoa powder for chocolate, matcha, etc), how much would you recommend to add to the dough? Would you sub out anything if you’re making it flavored? Thanks so much!
Hi Vanessa, thank you so much for trying my recipe and I’m so glad you enjoyed! Cocoa and matcha both absorb a lot water so you typically will reduce the flour or increase the hydration. I actually have the chocolate and matcha ones coming out next month after the holidays :’)
Love the texture and simple flavours of this bread!
Hi Lisa! I just used your recipe and they turned out phenomenal! I used your formula to adjust my water temp so that I could reach the ideal dough temp, but I think after mixing in the stand mixer, the dough got warmer than the target range. Still delicious though!
I’m making it again tonight and wanted to double or even triple the recipe. Do you have any tips on how long I should mix the dough for in the mixer if I need to adjust the time for bigger batches?
Yayyyy I’m so glad to hear, thank you!! If your mixer is a little stronger you can decrease the temp of the water a bit, that might help! I’ve doubled the recipe with the same kneading time but I haven’t tripled the recipe. I do think it would take the same amount of time, or even less because theres more friction as long as your mixer can handle a larger dough amount. After kneading in the butter, pull it to see if its stretches or windowpane test. If its well developed, you can stop there and let it proof or if you think it needs a bit more work then continue with the recipe. 🙂
Why you delete the hard crust recipe? i like your recipe and i want to make some shio pan with that recipe again :((
Sorry, it’s still up! It’s under hard crust cracked one 🙂 I just separated it because it felt like a lot in one recipe card and a slightly different steam and baking time.
Hi, sorry I was wondering if using full fat milk powder will make a difference, and also it says to preheat at highest temperature and then bake at only 200 degrees celsius for the convection oven. Is this correct?
Hi! You can def swap in whole-fat milk powder—your salt bread will just turn out a bit richer. The dough may feel a touch softer, but the recipe still works the same. If it seems too slack, you can reduce the water by 2–3 g, though I didn’t have to when I tried it! 🙂
The crisp I got from my salt bread using this recipe was unreal. Can’t wait to make it again, tried the semi-hard one and looking forward to trying the soft one next time!
I loved the results I got from this recipe! The recipe is also very detailed and easy to follow. I made the semi hard one and it tasted amazing.
Thank you for such a detailed recipe! I just have a question about kneading with a stand mixer. You said it took you 20 minutes with your Kitchenaid, starting at speed 2, then speed 4 for. For my Kitchenaid mixer, it says not to go over speed 2 for doughs so I’m not sure if I should go to speed 4. I have a 5.5qt bowl lift model!
Hi! KitchenAid recommends speed 2 for heavy, low-hydration doughs, but this recipe uses a soft, high-hydration dough, so speed 3–4 is generally safe on a 5.5qt bowl-lift model. If you prefer to stay cautious, you can keep it at speed 2 the whole time — it’ll just take longer (about 25-30 minutes).
Thanks for the quick reply!! My dough is proofing right now but I wasn’t able to pass the window pane test. It was stretching well without ripping but I couldn’t get that really thin see through effect last longer than 2 seconds without it starting to rip. I stopped when my dough was lifting off the bottom of the mixer after ~23 minutes of kneading on speed 3 cause I was worried about over kneading. I’ll see how this batch turns out but I was wondering if its a good indicator when the dough isn’t sticking to the side of the mixer anymore but slightly sticking to the bottom like in your photo #3? This is my first time making bread sorry for all the questions LOL
Hi! Yes, if the dough isn’t sticking to the sides anymore and you stretch the dough, it should come out okay but I just updated the dough recipe because I think it’s a dough that does take a lot for it to come together. My windowpane test sometimes looked a little rough too especially with my old stand mixer so I’ve included a autolyse step now and it really helps achieve a well developed dough without heavy kneading! I’ve updated the photos for your reference so you can see the smoothness 🙂
My second attempt came out great!! The only thing was that the lines for the rolls aren’t that distinct unlike yours, kind of merged together but I could still see the lines faintly. Any idea why? I’m guessing it might’ve been over proofed.
Yay so happy to hear!! Yesss, sometimes this happens to me too. It can be a combo of things though! If the dough is over-proofed, it gets too relaxed so everything spreads and the lines merge. Weak oven spring can do it too — if it doesn’t puff up enough. And if it’s not rolled with enough tension, the layers will naturally fuse together as it proofs + bakes.
I’ve tried so many salt bread recipes but this was by far the most detailed recipe so I was able to bake them well, they were better than the ones i had at bakeries! I tried the semi hard and soft and they’re both delicious but the soft one is my favourite, they stayed soft for days and crisped back up in the oven. I highly recommend everyone trying that one. 🙂
Hi Lisa! I only have non-fat milk powder on hand. Is that okay and now would that affect the recipe? Thanks!!
Hi Cathy, non fat milk powder is fine it wouldn’t have a huge affect on it. I use skim milk powder!
I’ve been trying quite a few salt bread/shio pan recipes and this one turned out the absolute best! Super yummy, fluffy and the right amount of crisp on the outside. Definitely going to be my go-to.
I tried the semi hard one and it was better than the ones I had from bakeries! I can’t wait to try the other ones the details for dough temperature and shaping really helped thank you!
Hi Lisa! Do you have baking instructions on a regular conventional oven? I don’t have a steam nor a convection oven. Thanks!
Hi yes! Sorry I thought I had added it, just updated it! Enjoy 🙂
Hi! I’ve noticed in your recipe that some of the numbers (especially the grams) didn’t change even after i clicked the 2x or 3x scale. Would love to make this soon and hope you can fix it soon as i can try make them
Hi! I’m going to reach out to see if I can get this fixed but I think it may be because I add the exact grams I use instead of the one the plugin provides. If anything, you can multiply all the ingredients by 2 or 3 and it will work out. Thanks for letting me know! 🙂