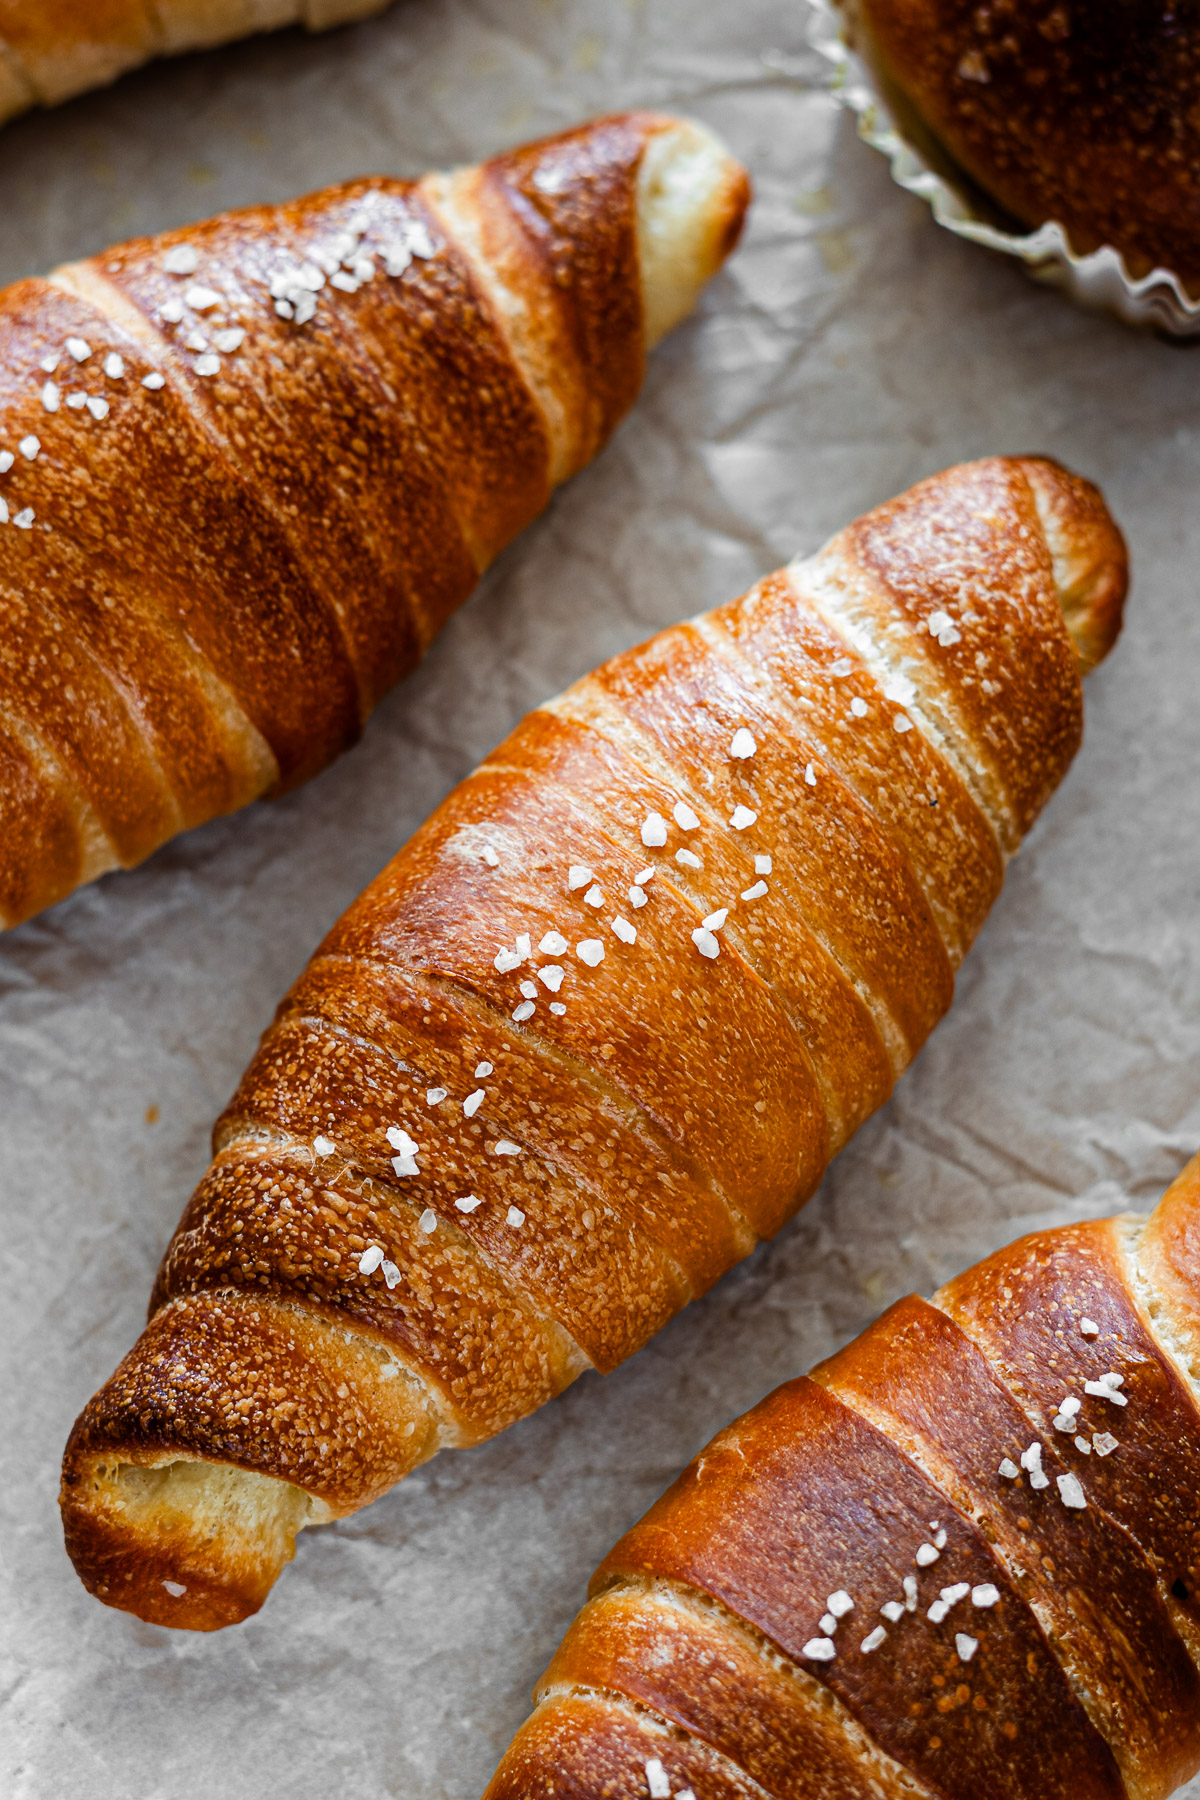
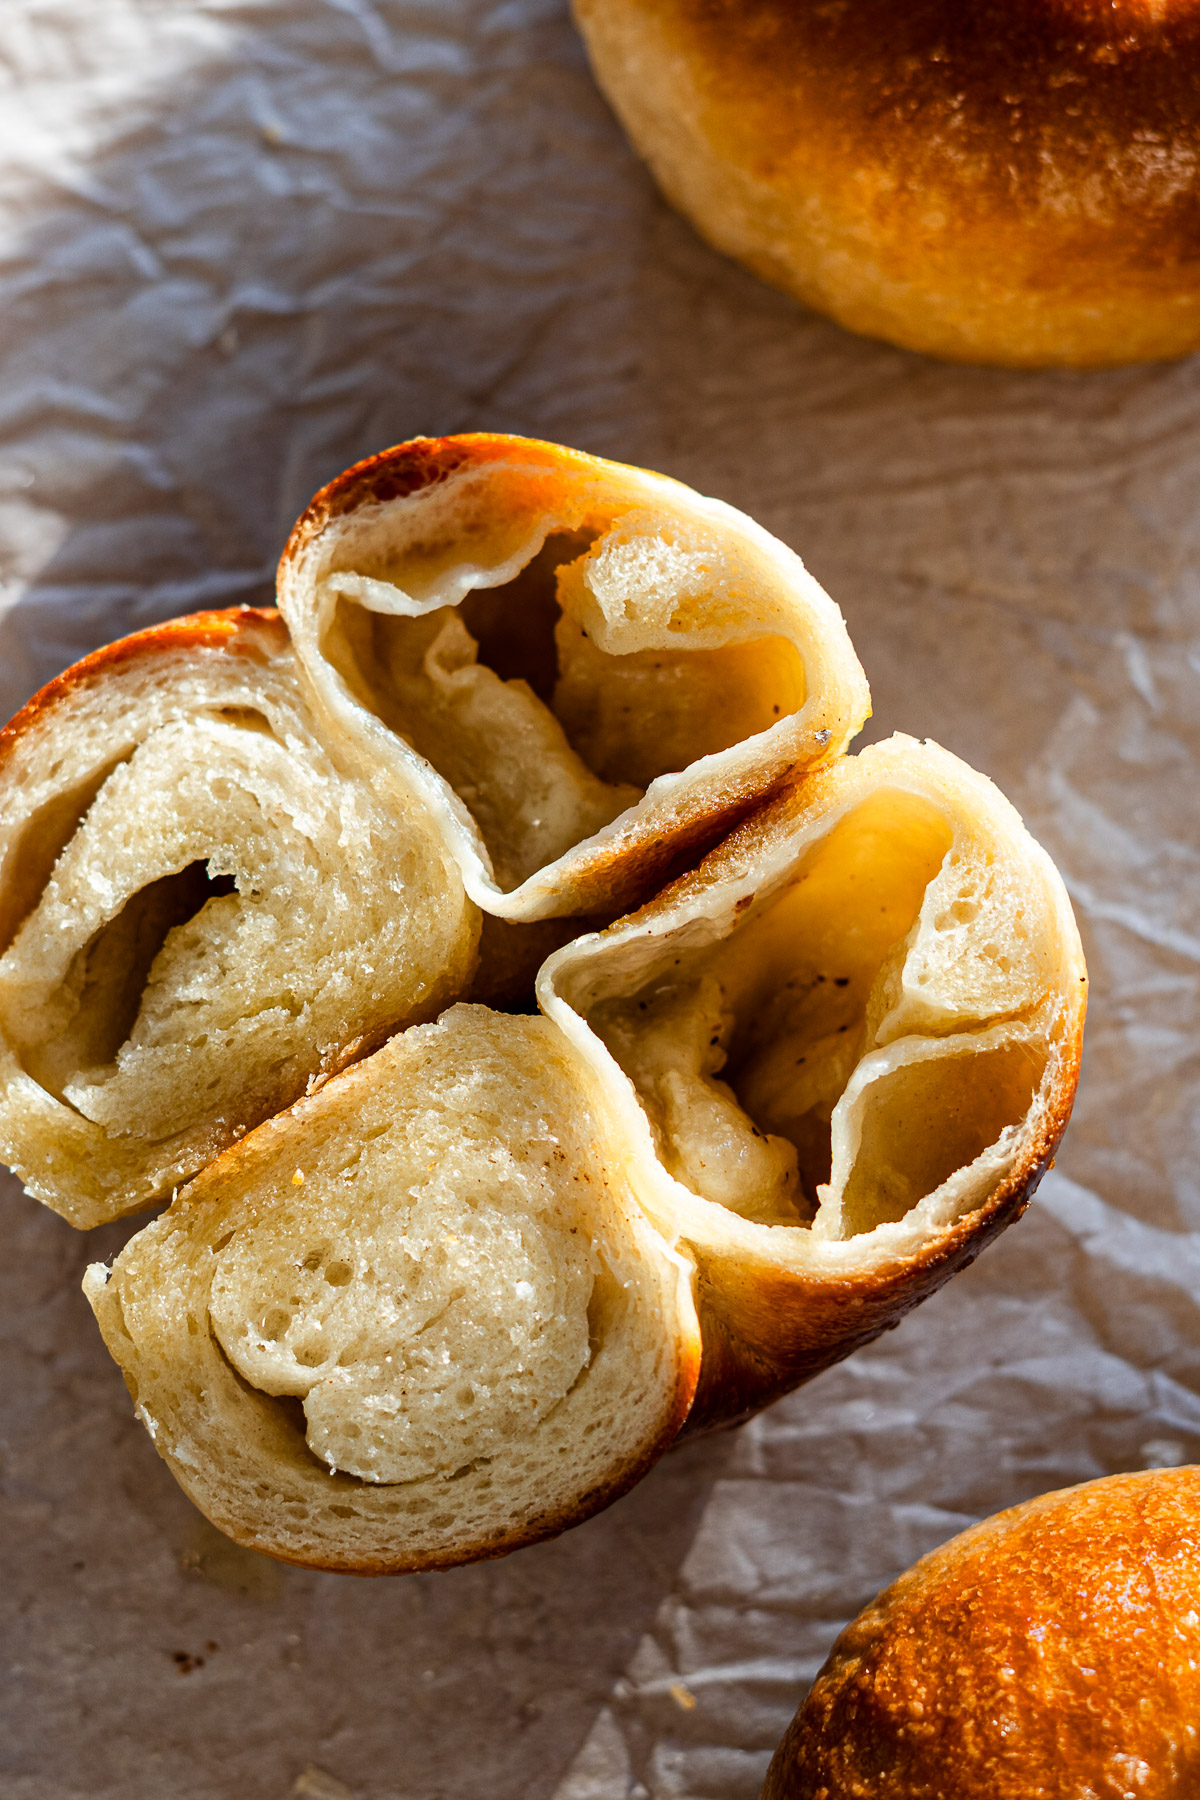
These Shio Pan Bagels are Japanese-style bagels with a golden, crackly, lightly salted top and a soft, chewy interior flowing with melted butter. This recipe shows you how to make butter-filled salt bread bagels at home in two ways—classic bagel shape or traditional Shio Pan form. Full of rich, buttery flavor, these bagels are the definition of simple is best!

Table of Contents
- Salted Butter Bagels
- Ingredients and Substitutions
- Bagel Dough vs. Shio Pan Bagel Dough
- How to Make Shio Pan Bagels
- DIY Bread Baking Cups
- VIDEO: Watch How to Make It
- Lisa’s Recipe Tips
- Variations
- Serving Suggestions
- How to Store and Reheat Leftovers
- Recipe FAQ
- More Japanese Style Bagel Recipes
- Shio Pan Bagels (Butter Bagels) Recipe
Salted Butter Bagels
Shio Pan is the definition of simple is best, and it’s all insanely viral right now—for good reason. Butter is already a classic favorite, but baking it inside dough gives you a golden, glassy, crisp exterior that’s insanely satisfying.
It’s actually my mom’s all-time favorite bread. Every time we went to Japan, she’d make a beeline for Pain Maison—where Shio Pan originated—and stock our freezer full of them. She’d even bring bags home from different bakeries and do comparison taste tests. 😂
So back when I was doing bagel popups in 2023, I developed this Shio Pan Bagel, mainly for her. Before I went to Japan for a couple of months, I even made her Shio Pan Focaccia so she could easily bake it herself—that’s how much she loves butter and bread.
Good salt bread is hard to find in Toronto, so she asked me to make these bagels for her almost every week. As a thank-you, she’d even bring me groceries, haha. It was also my most popular bagel from my simple lineup, and I still get DMs asking if I’ll ever do popups again. Since I don’t have plans for that anytime soon, I figured I’d just share the recipe here!
I’ve made original Shio Pan before and absolutely love them—they really are worth the hype. This version is just a little different, with a crust that’s still super crispy but with an extra bit of chew.
Ingredients and Substitutions
For my popups I always used hoshino yeast and yudane (water roux) which makes the bagels extra soft and chewy, almost like mochi but still very much a bagel dough. However, this recipe still works wonderfully using my Japanese bagel dough recipe or a slightly softer dough recipe which I’ve provided below. Shio pan often uses milk powder or milk which many makes a slightly softer dough. Regardless of which you decide to make, all you need is a few very simple ingredients to make this high reward salted butter bagels:
- Bread Flour: The flour you use should be at least 11.5% of protein. In Japan, its common to use a mix of soft flour (cake flour) and strong flour (bread flour) to get the ideal protein content so depending on the brand you can also use all purpose flour. I use Canadian all purpose flour that is about 13.5%. You can read more about why its important to use bread flour for bagels in my Japanese bagel recipe.
- Instant Dry Yeast
- Oil
- Brown Sugar
- Salt
- Water
- Milk Powder: Milk powder delivers the benefits of milk solids without adding extra liquid, allowing for precise hydration control. It enhances flavor, softness, and browning for that golden crust while strengthening gluten for a balanced chew. In contrast, liquid milk can alter hydration and slightly weaken gluten, leading to a softer, less crisp texture. However, you can still use milk with a 1:1 substitute of the water.
- Malt powder, baking powder or sugar: This will be used for boiling
- Rock salt/Flaky Salt: Rock salt is ideal especially for aesthetics but I haven’t been able to find it for a while so I’ve been using flaky salt. I think any corse salt can work here!
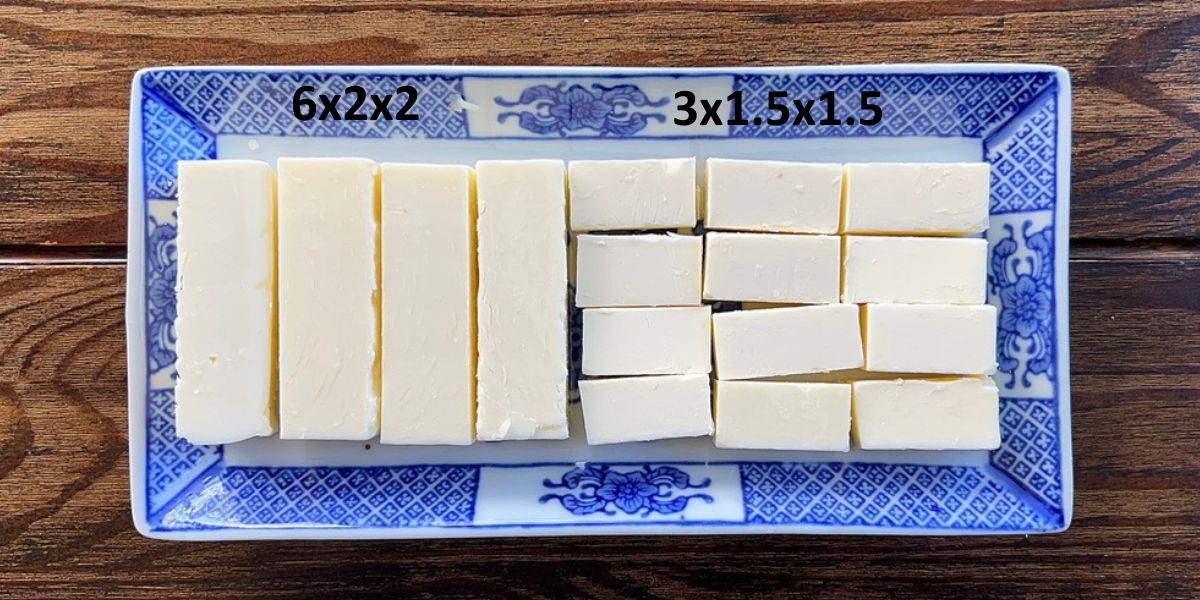
- Salted Butter: The higher quality of butter, the more delicious the bagels. I slice mine into about 6x2x2 cm for the shio pan shape version and 3×1.5×1.5 cm for the bagel shape. The smaller size makes it easier to shape for the bagel shape. The dimensions don’t matter too much but I’ve found anywhere from 25-35% of butter per gram of dough weight to be satisfactory. 25% will get you a buttery flavoured bagel whereas 35% will bake up incredibly rich and buttery with a guaranteed fried crispy bottom.
In addition, you’ll also need some parchment paper cut into about 10×10 cm (4×4 inch) squares. I also recommend using baking cups to hold in the butter when baking so that it absorbs all of that buttery goodness. I’ve shown below how to make a DIY mold.
Bagel Dough vs. Shio Pan Bagel Dough

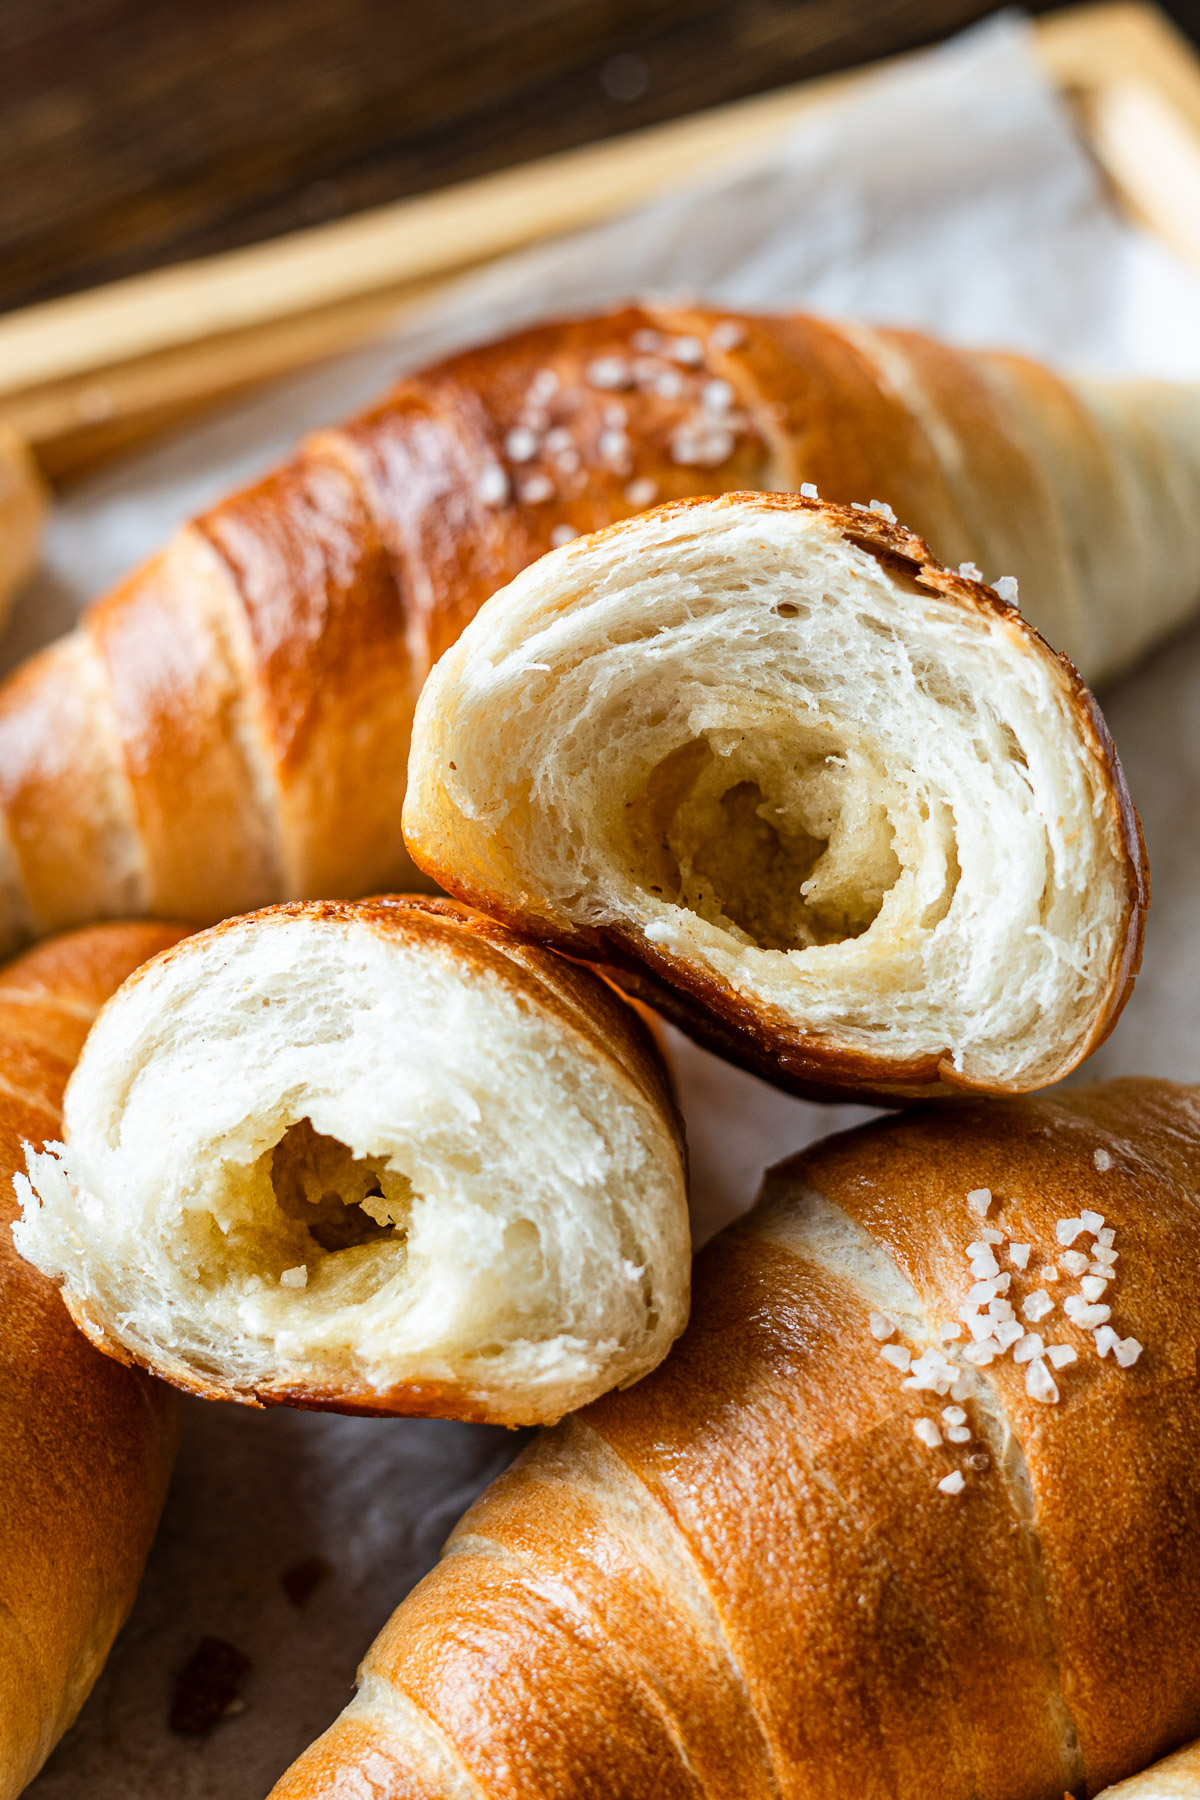
The bagel dough version leans more on the texture of bagels, with a thicker, crispy, and chewy crust. It’s still soft and fluffy but denser, as bagels should be. The shio pan bagel dough, on the other hand, has a thinner, glass-like, chewy, and crispy crust, and the inside is a little softer—reminiscent of shio pan. They’re both really delicious in their own way, so I recommend you try both!
How to Make Shio Pan Bagels
Molding bagels and salt butter bread takes a little practice, but it’s really fun once you get the hang of it!
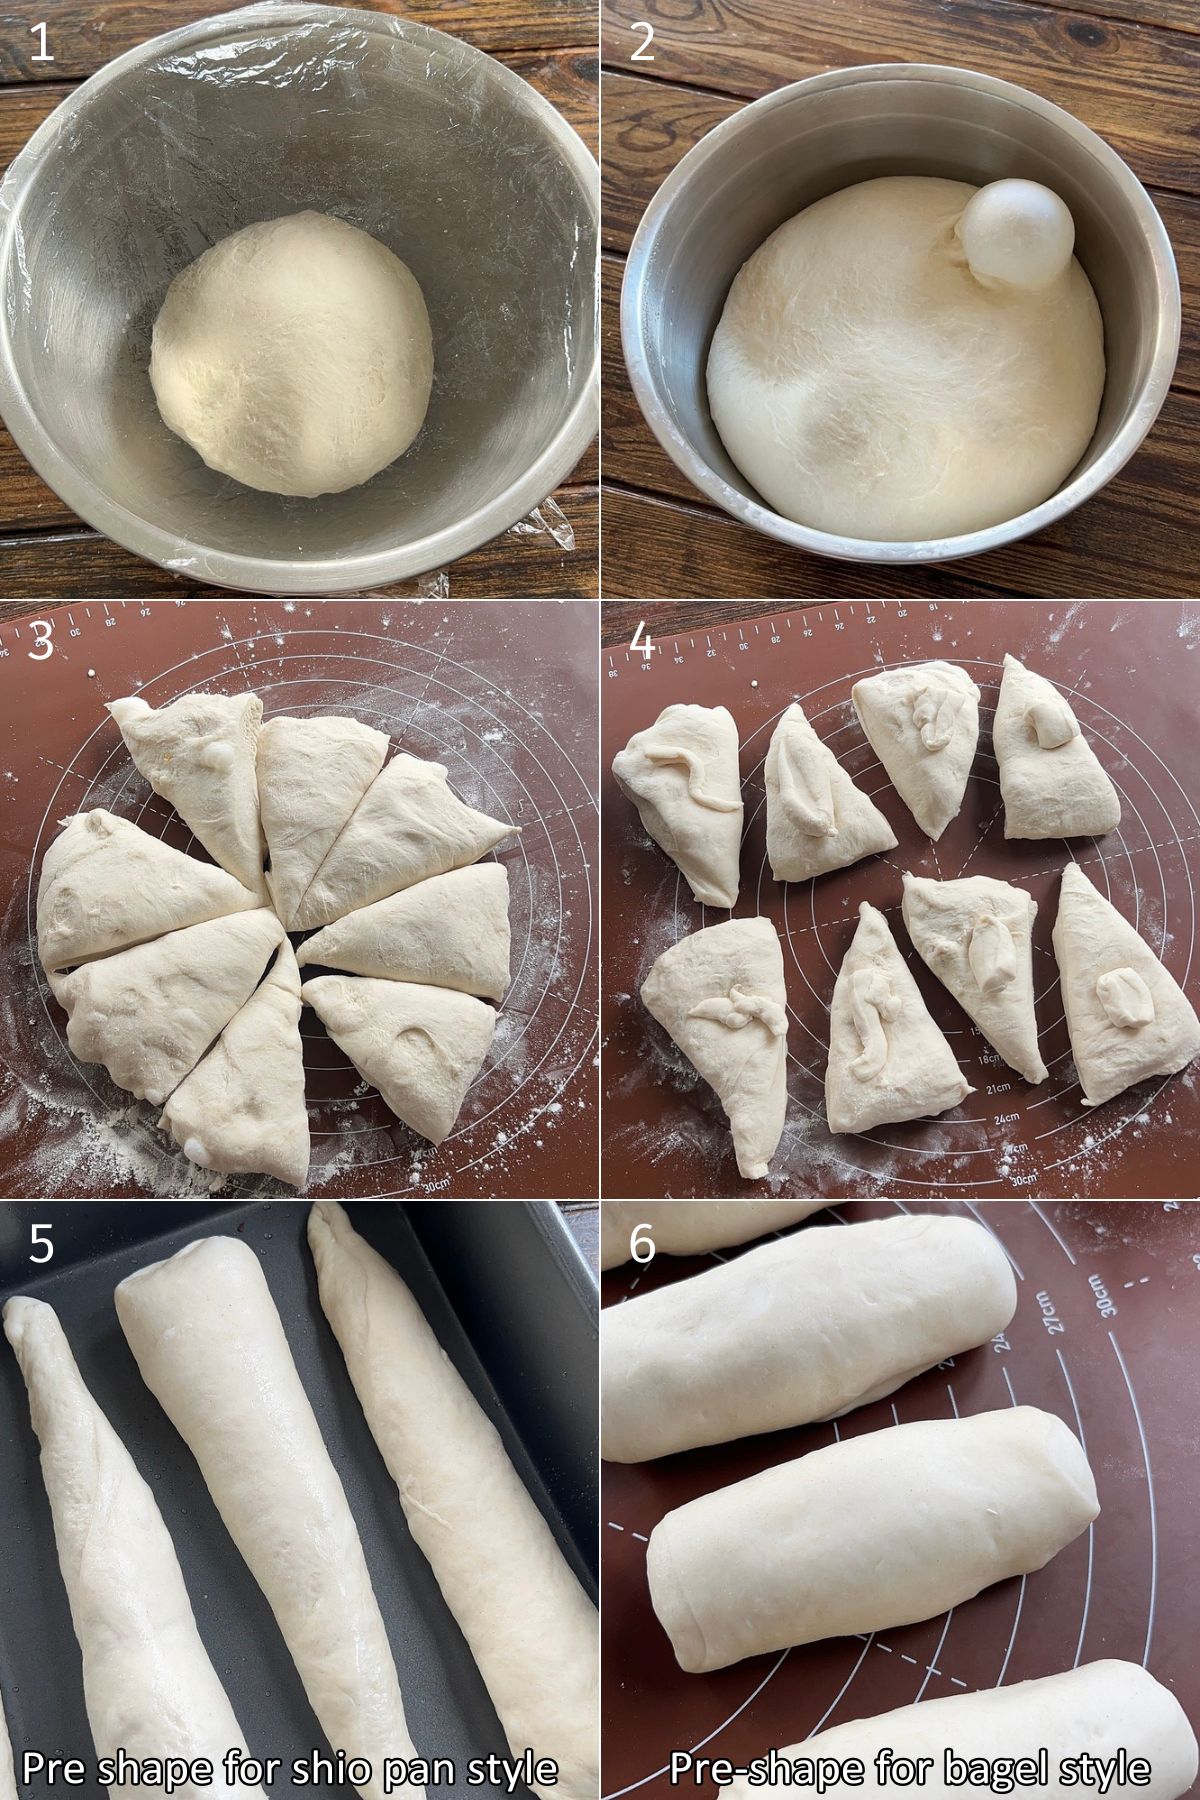

- Prepare the dough (1-2): Make a batch of Japanese bagel dough or a slightly softer dough which I’ve provided the recipe for below. I highly recommend using a stand mixer for easier kneading. Once kneaded, allow the dough to proof.
- Divide the dough (3-6): Divide the dough into 7-8 triangular pieces of equal weight. Pre-shape the dough and rest for 10-15 minutes to let the gluten relax.
- Shape the bagels (7-8): You can choose from two options (see below).
- Secondary proofing (9): Cover and let it proof for 20-30 minutes at 40 C or until x1.5 in size. It should leave spring back very slowly when poked, leaving a very slight indent.
- Boiling (10): Bring a large pot of water to a boil with malt syrup, molasses, baking soda or sugar. Reduce the heat so its a gently boil and place the bagels in. Remove parchment paper and boil each side for 30 seconds up to 2 minutes. The longer you let it sit in the hot water the thicker and chewier the exterior. Use a slotted spoon to remove the bagel, dab it onto a towel and place onto a baking cup (if using) or parchment lined baking tray.
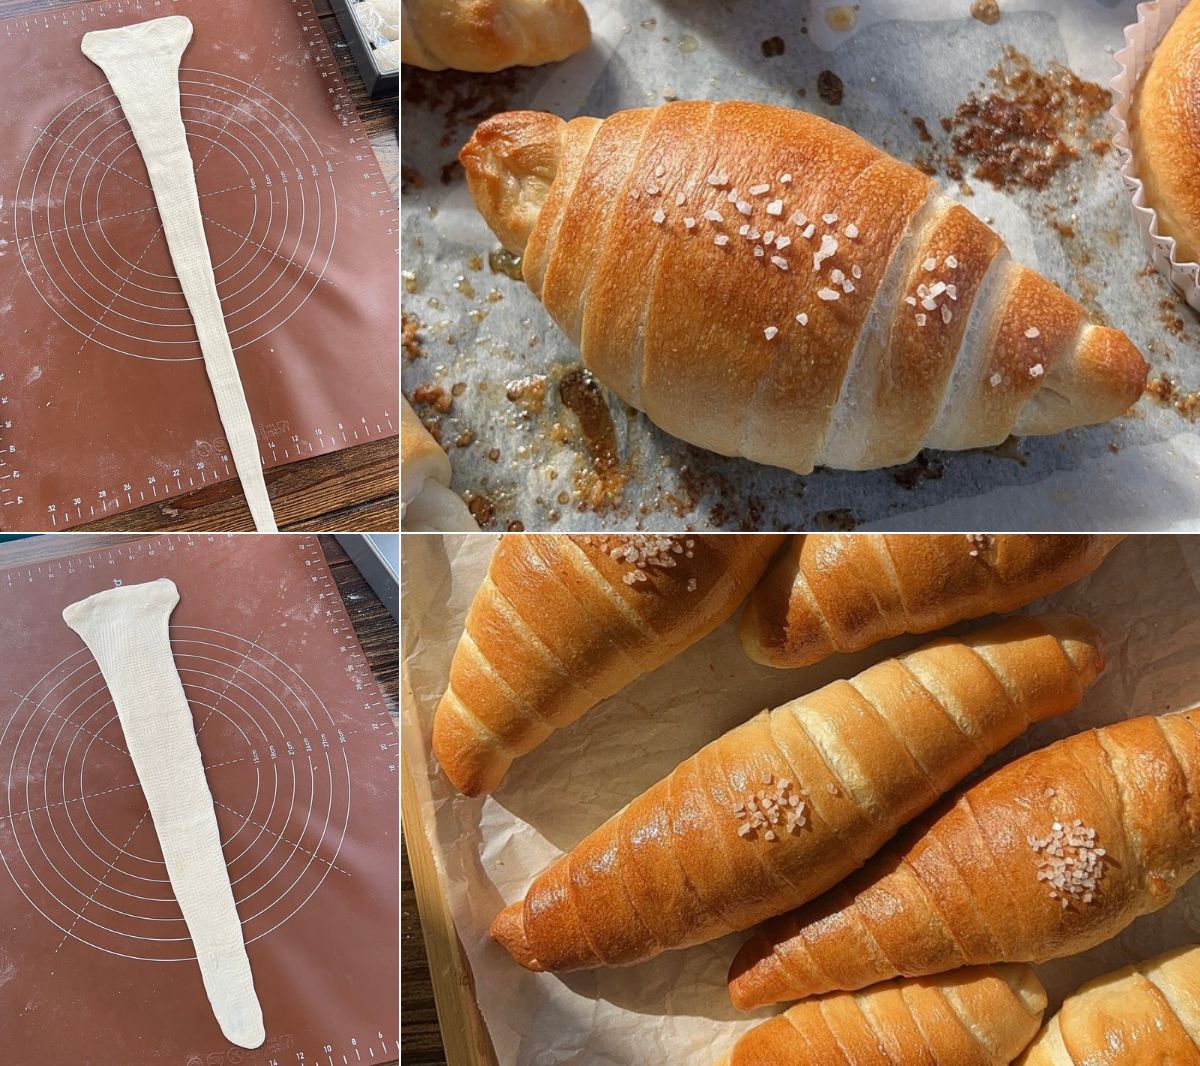
- Bake (11-12): Top with salt. Bake at 210 C (410 F) 18-22 minutes until deeply golden brown. Remove from oven and use a pastry brush to brush the butter leaked onto the pan on top if desired.
Bagel Shape
This shaping style is the one I’ve used for my shio pan bagels since the very beginning — it’s simple, reliable, and especially great if you plan to fill the dough or are new to Japanese-style bagels. If you want a closer look, check out my Japanese Bagel post for more step-by-step photos.
- After the dough has finished proofing, gently transfer it to your work surface and divide it into 7 equal portions (aim for within ±3g of each other). Lightly pre-shape each into a log, cover, and let them rest for about 10 minutes to relax the gluten.
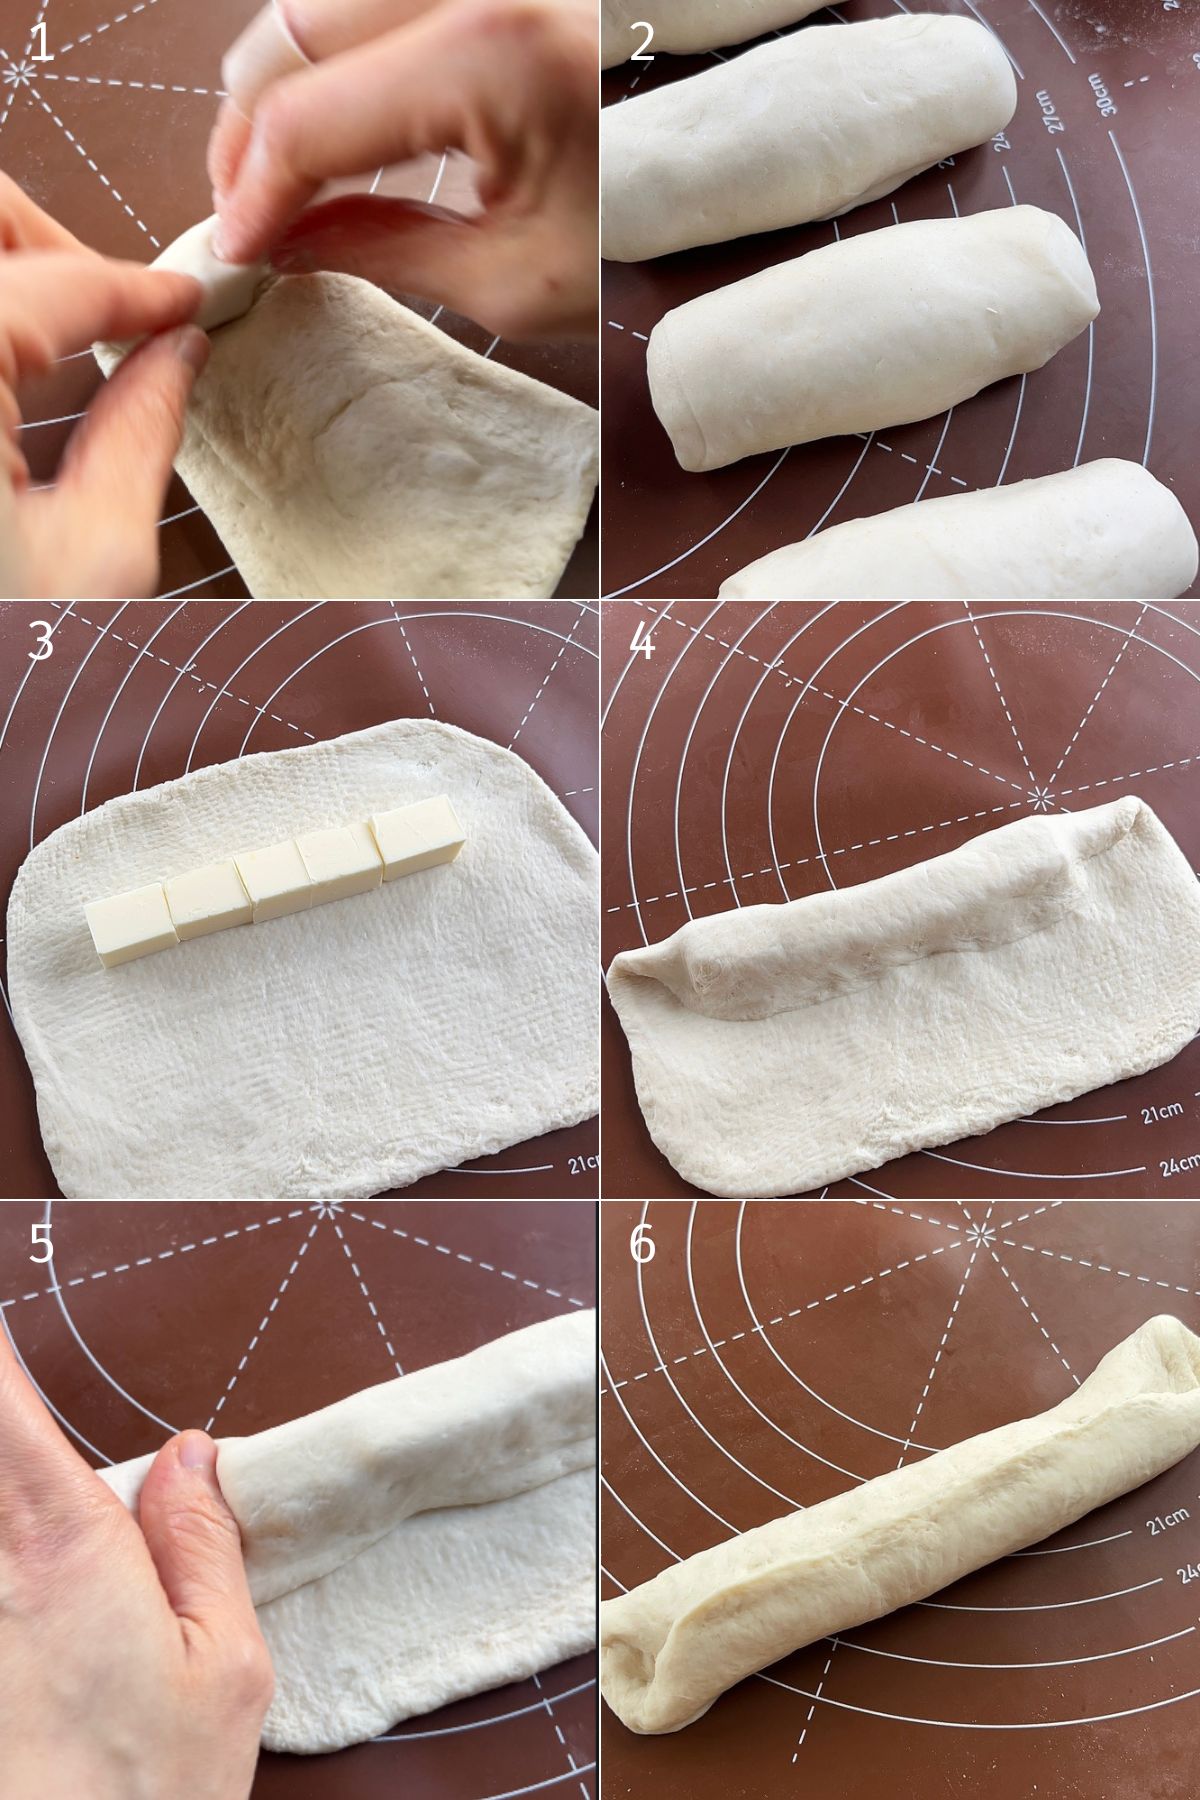
- Take one piece and roll it out into an 18×14 cm rectangle. Line 4-5 blocks of butter along the top edge, leaving about 2 cm space on one side and 4 cm on the other. Roll the top edge over the butter, pressing firmly to seal — don’t forget to pinch the left and right edges too so the butter doesn’t leak when boiled. Continue rolling tightly, pressing gently after each turn. When you reach the end, seal the seam well so it doesn’t unravel.
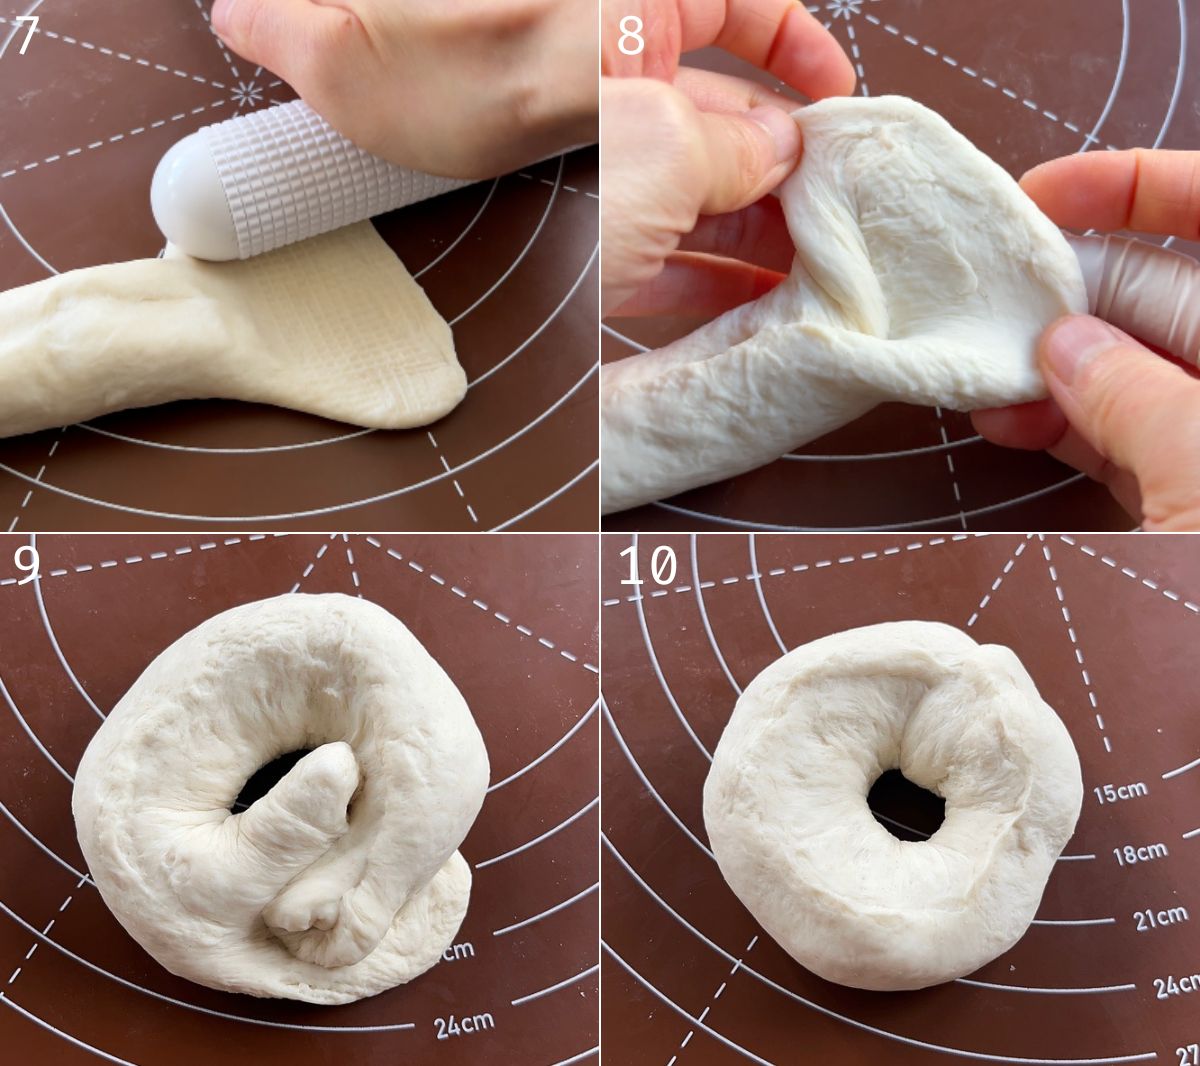
- Place the log seam-side up, flatten or open the flap on one end, then bring the other side over and wrap, pinching tightly to secure. Rest seam-side down on parchment, covered.
Shio Pan Shape
This is the shape most people think of when they picture shio pan — that cute teardrop roll with visible layers. It’s a bit trickier to master but so satisfying once you get the hang of it!
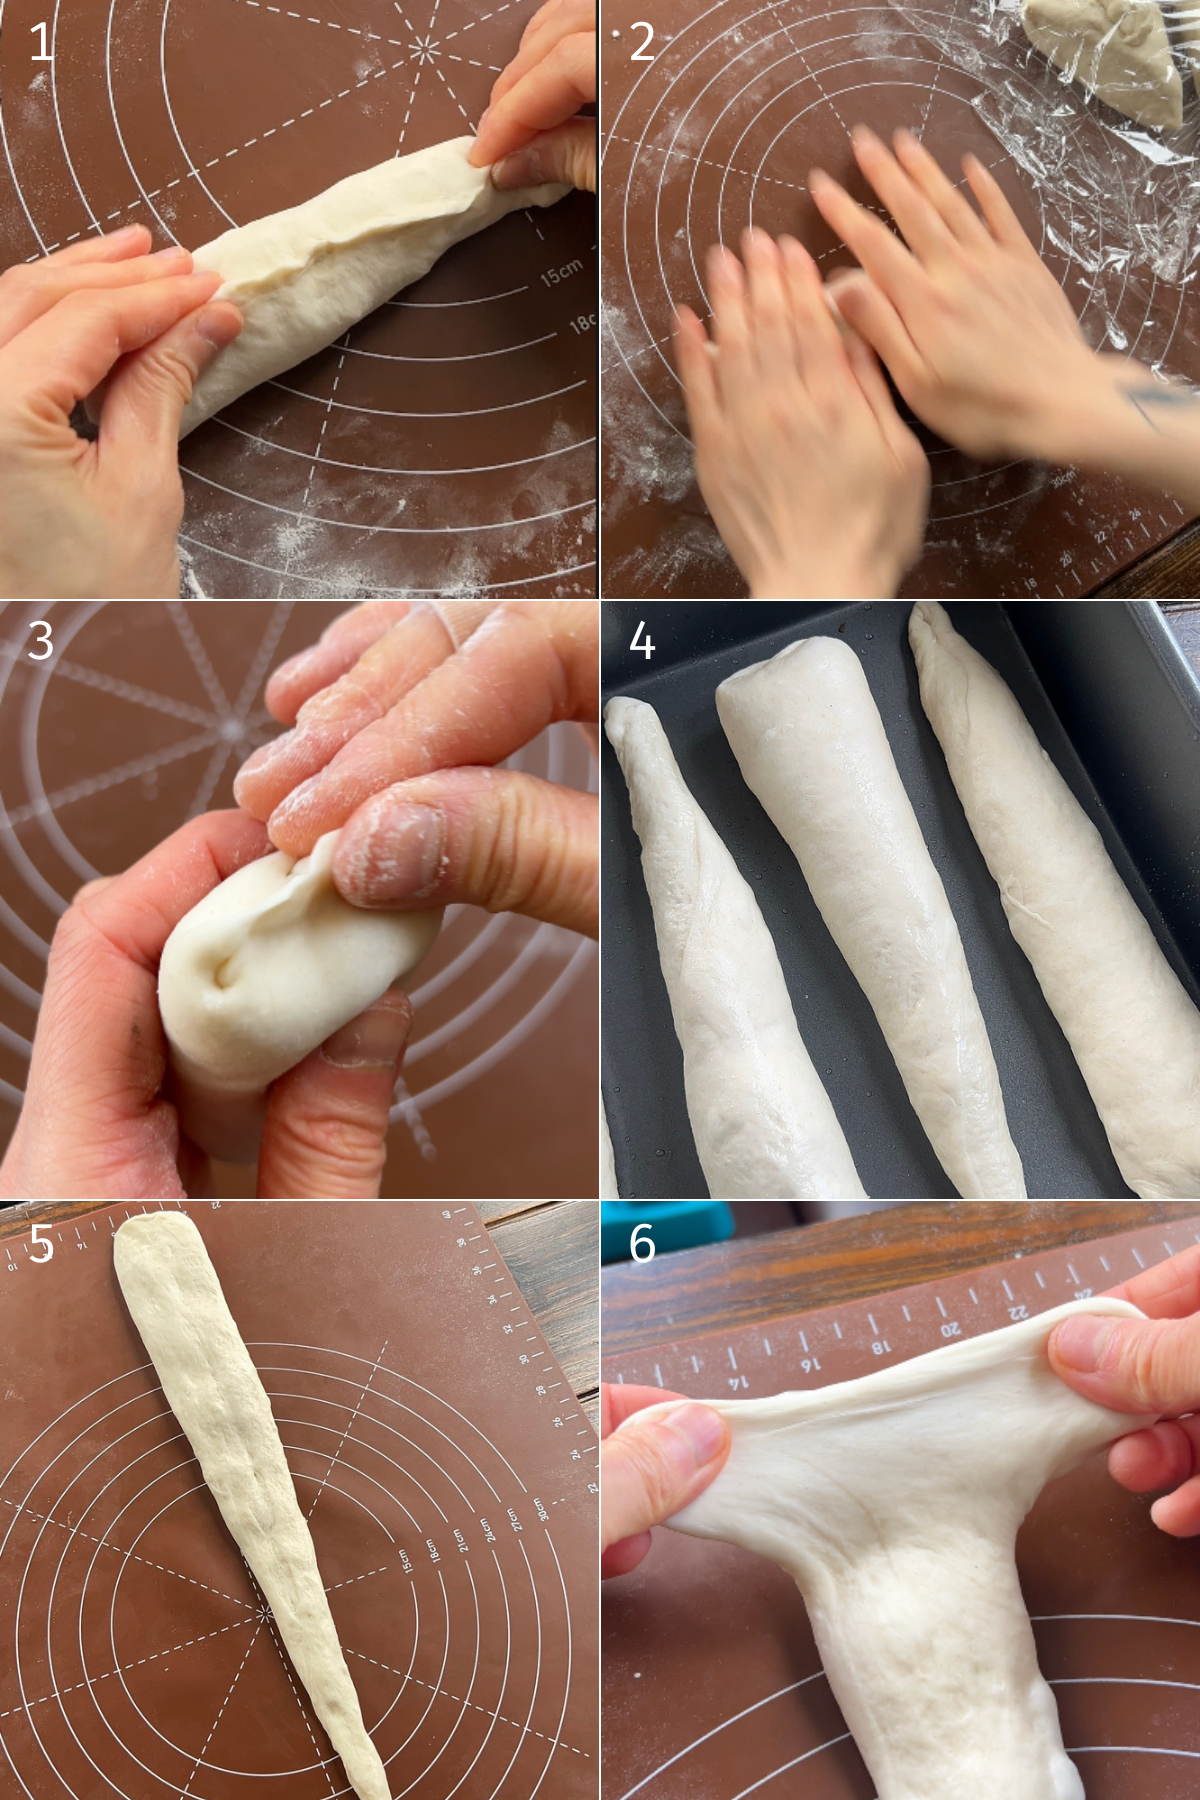
- Start by flattening your proofed dough into a circle and dividing it like a pizza into 8 equal triangles (weigh them if you want precision). Flatten each triangle, pinch the opposite ends together. Pinch the opening at the top together. Roll it into a teardrop or icicle shape using your palms. Rest seam-side down and cover while you shape the rest.
- When ready to roll, take the first piece and place it rough side up (where the seam was). Flatten gently with your palm. At the widest end, pull the corners slightly apart to stretch it wider and then press it onto your working surface firmly.
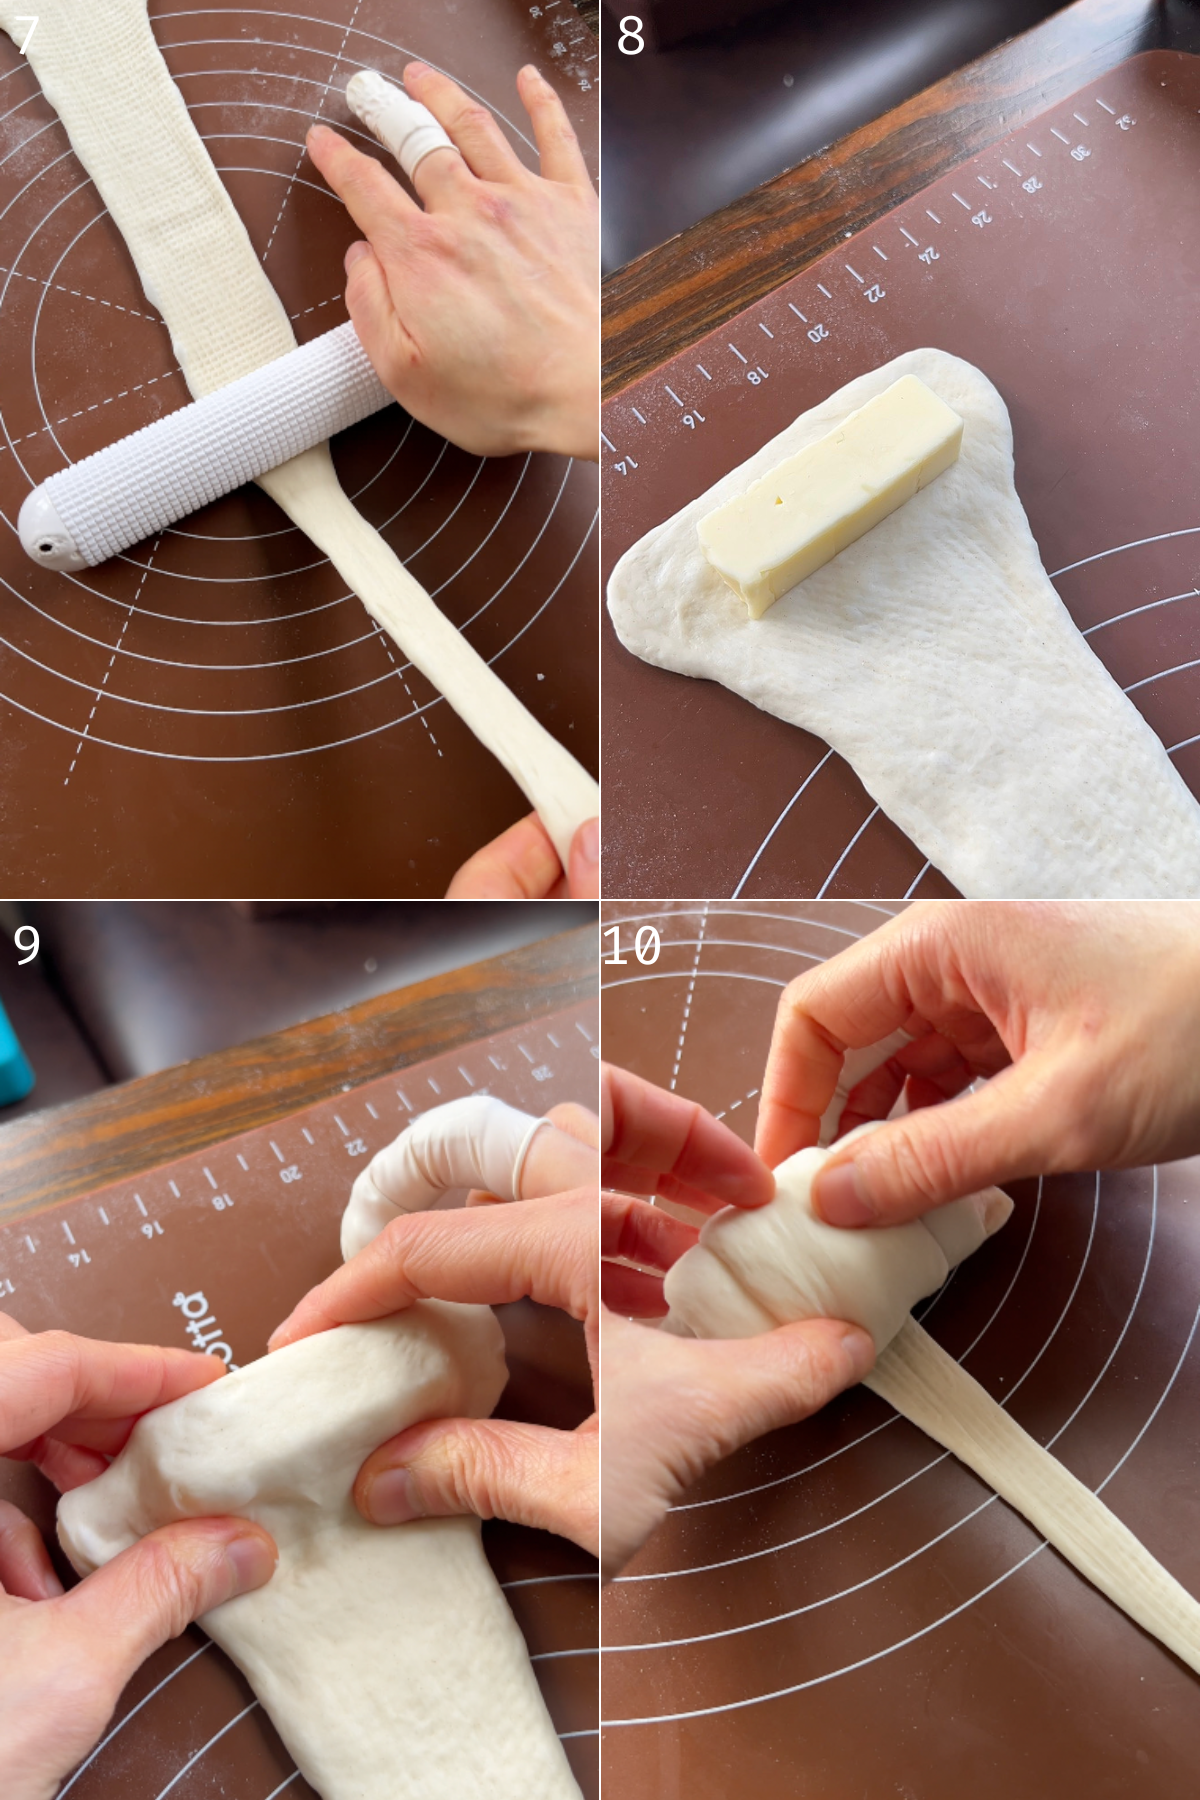
- Take a rolling pin and roll downward while holding bottom portion of the dough. Roll to about 35–50 cm long. The longer it’s rolled out the more plump it will be because there will be more rolls.
- Place a piece of butter at the widest end and roll down, firmly pressing down to seal the butter inside. Then roll down tightly until you reach the end. Press the end into the dough to secure and place it seam end side down onto a piece of parchment paper. Cover and repeat with remaining dough.
DIY Bread Baking Cups
I highly recommend using baking cups when making salt butter bagels. This allows the dough to fry in the butter and soak it all up without it spilling onto the pan. No baking cups? No problem—you can make a simple DIY mold with parchment paper!
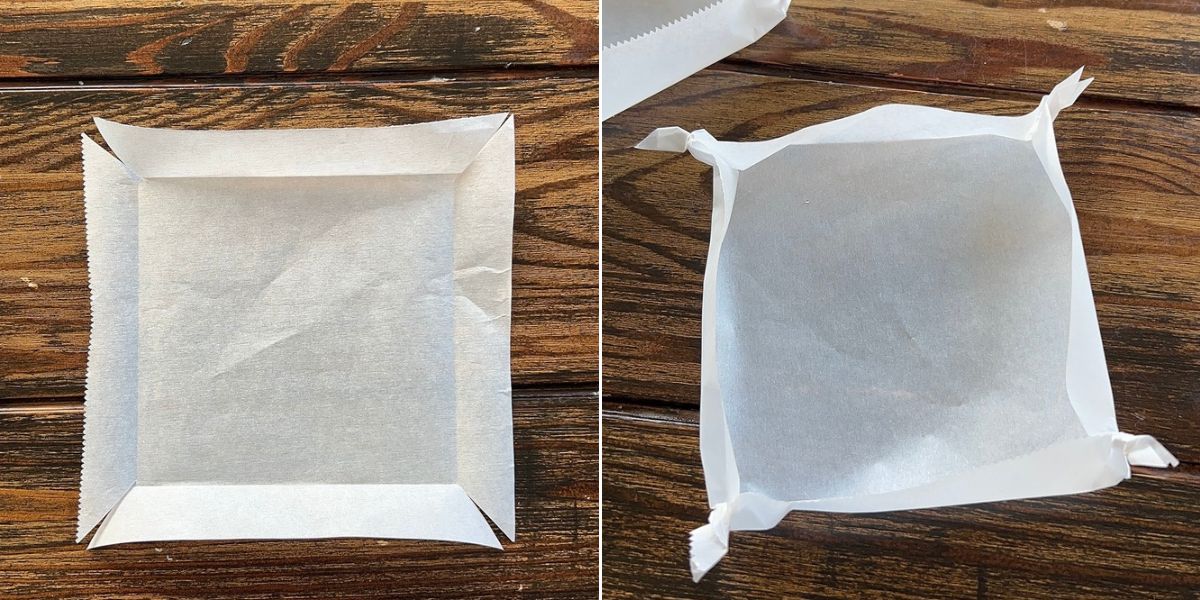
Cut out pieces of parchment paper that are 15×15 cm. Make slits in the corners 3 cm deep. Fold the edges inwards and then take the corners and twist to hold them together.
VIDEO: Watch How to Make It
Lisa’s Recipe Tips
- Weigh the ingredients: Use a kitchen scale to weigh the ingredients for best results, consistency and accuracy.
- Press the seam firmly into the dough: This is super important to make sure the butter doesn’t seep out too much and unravel, especially when boiling.
- Rest the dough: If at any point there is tension in the dough, let it rest for a few minutes. Don’t force the dough or it will spring back and cause tearing or unraveling while boiling or baking.
- Use Baking Cups: Shio pan often uses salt bread trays or molds to catch all the flowing butter so it has a chance to fry in it and also soak it back up after baking.
- Scrape the leftover butter: If you don’t use baking cups, let the pan cool and then use a bench scraper to scrape off all the extra butter. It’s brown butter goodness! I like to spread it on when eating it to make sure I don’t waste any butter.
Variations
Nowadays there are many variations of salt bread, truly anything you can imagine! You can add whatever you want to it and because it’s simply butter it pairs well with just about anything, sweet or savory. Here are some I’ve done and loved:
- Compound butter: garlic butter, cinnamon sugar butter, miso honey butter, gochujang butter
- Pastes: Sweet red bean paste (my favourite!!), Japanese sweet potato paste (okay, my second favourite), kabocha paste
- Creams: cream cheese, custard cream
- Cheese: Mozzarella, gouda, brie, extra sharp cheddar
Serving Suggestions
What makes shio pan bagels so delicious is the juiciness (yes, the juiciness) of the butter thats been soaked up in the crispy bagel so they’re truly delious on its own. However, theres are sooo many ingredients that pair beautifully with butter! Here are some of my favourite things to pair it with:
- Sweet red bean paste (very popular combination in japan called an-butter).
- Japanese sweet potato paste
- Cinnamon sugar
- Jams
- Honey
- Use it for a sandwich
- Stuff with sweet or savory cream cheese
- Stuff with cheese and re-toast to melt
How to Store and Reheat Leftovers
These salt bread bagels are best fresh out of the oven but keep really well if stored correctly.
- Room temperature: Keep in an air tight container for up to 2 days. Do not store in the fridge.
- Freeze: Wrap each one individually or place in a freezer safe bag. Freeze for up to 3 months.
- Reheat: Toast in a toaster oven for 2-3 minute until warm and crispy again. You can also bake it at 190 C / 375 F for 3-5 minutes until toasty.
Recipe FAQ
Either the bagels were proofed too much or the seams were not firmly sealed to the dough.
Yes! Swap the milk for plant based milk and the salted butter for salted non dairy butter.
Sure! Adjust the amount of butter and how long you roll it out for if using less dough.
More Japanese Style Bagel Recipes
- Carrot Cake Bagels
- Kabocha Bagel
- Cinnamon Roll Bagels
- French Toast Bagels
- Bagel Donuts
- Matcha Bagels
Enjoy! If you make this Shio Pan recipe, I’d love to hear what you think! Leave a comment and rating below, and if you share it on social media, tag me on Instagram @Okonomikitchen. I can’t wait to see your creations!
Print
Shio Pan Bagels (Butter Bagels)
- Total Time: 12 hours 40 minutes
- Yield: 8 servings
- Diet: Vegetarian
Description
These Shio Pan Bagels are Japanese-style bagels with a golden, crackly, lightly salted top and a soft, chewy interior flowing with melted butter. This recipe shows you how to make butter-filled salt bread bagels at home in two ways—classic bagel shape or traditional Shio Pan form. Full of rich, buttery flavor, these bagels are the definition of simple is best!
Ingredients
Version 1, Bagel Dough (easier to handle)
- 1 batch of Japanese style bagels
Version 2, Shio Pan Bagel Dough
Yudane
- 3/4 + 1.5 tbsp (108 g) bread flour
- 3/4 cup (180 ml) water, using 2/3 cup (160 ml) boiling water
Main Dough
- 2 1/2 cup (322 g) bread flour
- 3 tbsp (24 g) skim milk powder*
- 1/2 cup (125 ml) water
- 1/2 tsp (2 g) instant dry yeast
- 1.5 tbsp (22 g) honey or brown sugar
- 1 tbsp (14 g) neutral oil
Other Ingredients
- 10–16 tbsp (144–224 g) of salted butter (20-30% of dough)
- For bagel shape: cut into 3×1.5×1.5 rectangles, ~40 pieces. Each bagel will get 22-32 g of butter.
- For shio pan shape: cut into 6x2x2 rectangles, 8 pieces. Each bagel will get 20-28 g of butter.
- *The amount of butter you add is up to you! A higher amount will bake up more rich, buttery and fried at the bottom.
- Rock salt, pretzel salt or flaky salt, for topping
- malt syrup, molasses, sugar or baking soda for boiling*
Instructions
Prepare the Dough
Version 1, Bagel Dough
- Prepare a batch of Japanese style bagel dough up until primary proofing is complete and the dough 17 C / 63 F.
Version 2, Shio Pan Bagel Dough
- Bring 3/4 cup (180 ml) of water to a boil. Pour in 160 ml of this hot water into the bowl with 108 g of bread flour. Mix immediately until a gelatinized consistency. Cover and rest for one hour until cool or overnight in the fridge.
- Note: You can skip making yudane and add 108 g of flour and 160 ml of water to the main dough directly.
- When ready, add all of the ingredients for the dough and yudane to a stand mixer. Mix on medium speed for 15-20 minutes or until the dough comes together.
- Cover and rest overnight for ~12 hours or on the counter for 1.5-2 hours until double in size and puffy.
- If proofing overnight, let it sit at room temperature until the dough is 17 C / 63 F.
Shape the Dough
Bagel Shape
- Once the dough has finished proofing, transfer it to your work surface and divide it into 7 equal portions about 105 grams each (±3 g). Lightly shape each into a short log, cover, and rest 10 minutes to relax the gluten.
- Take one piece and roll it out to an 18 × 14 cm rectangle. Place 5–6 small rectangular blocks of butter along the top edge, leaving about 2 cm on one side and 4 cm on the other.
- Starting from the top, roll the edge over the butter and press firmly to seal. Continue rolling down tightly, pressing with the base of your palms or fingertips after each turn to keep the roll snug and even.
- When you reach the end, seal the seam well and pinch both left and right edges closed to prevent butter from leaking.
- Place the log seam side up, flatten one end with your palm, then bring the opposite end over it and pinch to close tightly. Place seam side down on parchment paper and cover. Rest for 20-30 minutes.
- Optional advanced version: Instead of pinching the final seam, open the flaps slightly, tuck them into the center, and pinch inside to secure for a cleaner base.
Shio Pan Shape
- After proofing, flatten the dough into a large circle and divide into 8 equal triangles (like slicing a pizza) about 90 grams each (±3 g). Flatten one triangle and pinch opposite edges together. Pinch the opening seam on top.
- Roll it between your palms to form a teardrop or icicle shape. Place seam side down, cover, and rest 10 minutes.
- Take one piece and place it rough side (seam side) up. Flatten gently with your palm, then stretch the top corners outward at the widest end to widen the base. Press it down securely onto your work surface.
- Holding the tail of the dough with your non-dominant hand, use a rolling pin to roll down with your dominant hand until 35-55 cm long. You may need to lift the dough up once and roll again. (Shorter = plumper bun; longer = more visible rolls.)
- Place a block of butter at the widest end and roll down tightly, pressing the edge to seal the butter in. Continue to roll down all the way to the end.
- Once rolled, pinch the end firmly to seal and place seam side down on parchment paper. Cover while shaping the rest. Cover and Proof for 20-30 minutes.
Boil and Bake
- Towards the end of proofing, start pre-heating the oven to 210 C / 410 F.
- Bring a pot of water to a boil. Add 1 heaping tablespoon of malt syrup, molasses or sugar. Once boiling (or temperature of 85 C / 185 C) boil for 10-30 seconds on each side. The longer you boil, the chewier the exterior. Using a slotted spoon, remove the bagels and transfer to a prepared baking tray or baking cups.
- Sprinkle with flaky salt or rock salt.
- Bake for 18-22 minutes or until deep golden brown. Remove from oven and use a pastry brush to brush the butter leaked onto the pan on top if desired.
Notes
- Helpful equipment: kitchen scale, rolling pin, bench scraper, standmix with dough hook or bread machine, slotted spoon
- Here are the baking cups I use for making shio pan bagels. You can also make a DIY one using parchment paper (see blogpost).
- *Milk powder substitute: Omit the milk powder and water and subsitute with 1/2 cup (125 ml) milk
- *For the boiling water mixture use 1 tbsp of molasses, malt syrup or sugar for every 1 L of water. I also sometimes like to add 1 tbsp of baking powder to the mix for more browning.
- Prep Time: 20 minutes
- Rest time: 12 hours
- Cook Time: 20 minutes
- Category: Bread
- Method: Baking
- Cuisine: Japanese
Nutrition
- Serving Size: 1 serving
- Calories: 354
- Sugar: 4.7 g
- Sodium: 485 mg
- Fat: 16.8 g
- Saturated Fat: 9.2 g
- Unsaturated Fat: 7.1 g
- Trans Fat: 0.5 g
- Carbohydrates: 44.6 g
- Fiber: 1.6 g
- Protein: 6.8 g
- Cholesterol: 46 mg


I made the shio pan bagel today and it was really really really good. I even added some black sesame paste to one of them and kaya spread to another and it was delicious. maybe a little too much butter for my taste, so will reduce the butter amount next time but otherwise it was delicious.
This shio pan recipe is amazing!!! I made it this past weekend and I didn’t even put anything on it..you can eat it by itself and it’s so delicious. the step by step instructions were very clear and very thoughtful with the substitute options as well, if you didn’t have the ingredients on hand!!! this is a must make!
I made these today and WOW, they came out sooo good!!! 😍😍
hi there Lisa…
thank you for the details recipe. Definitely will try it.
can we use sourdough starter for this one? how much do you think we can use?
Hi! So I just asked my friend that is more experienced with sourdough and she said she would start with 389 g bread flour, 217-225 ml water and 86 g active sour dough starter (100%) for the Japanese bagels version and for the shio pan style dough:
Yudane:
108 g bread flour
160 ml boiling water
Main Dough:
279 g bread flour
82-92 ml 2% milk
86 g active sourdough starter (100% hydration, at peak)
22 g honey or brown sugar
14 g neutral oil
All of the yudane
If you try sourdough would love to know how it turned out, good luck!! 🙂
I made both versions and they’re so good I can’t stop eating it! I’ll be making more for sure thank you for the recipe, I can’t wait to experiment with other flavours