This Bagnut recipe is bagel or donut dough that is boiled, baked and then fried. They can be enjoyed as a savory meal, coated with a sweet glaze or cinnamon sugar or be made with both sweet and savory elements! Once you have the base bagnut down, the flavours and combinations are endless. They’re made with simple ingredients, no eggs and dairy free.

Whenever my family went on vacation, I looked forward to our on-the-road breakfast that usually consisted of bagels and donuts. I’ve always associated these breakfast foods with fun and relaxation which is probably why they taste even better.
Since moving out, I started making donuts. I had phases where I’d make donuts every weekend when seeing friends or just for our weekend dessert. Last year, I started my bagel-making journey. I was making tons of dessert style bagels and one day was in the middle of making bagels but craving donuts. Then the idea of a bagel donut came to mind… and when bagnuts were born.
The first batch came out good, but they were a little oil and difficult to fry after boiling. I tinkered a bit with the dough and also the method.
Instead of frying the dough after boiling, I baked them and then fried them. This idea came from one of my favourite school lunch menu item we had in Japan called agepan (あげぱん). Agepan are deep fried bread rolls coated in sugar and other flavoured powders like cinnamon or kinako. They came out soft, fluffy, super chewy and with that delicious fried pastry flavour. Because they’re fried for a short period of time, they’re not oily but have that perfect crispy thin crust.
So if you’re ever conflicted on whether to have a bagel or donut… now you can have both 🙂
I’m so excited to finally share the first bagnut recipe!! I’ve had my friends and family taste test almost all of the variations I’ve made, and because everyone has different preferences when it comes to texture, I decided to share two variations of bagnuts. One is more enriched and donut-forward, whereas the other one is chewier and more bagel-like in texture. Both are delicious so I hope you to try both to see which one you prefer.
The donut-forward bagnut is great for sweet fillings and for making dessert-sandwiches, whereas the bagel-forward bagnut is perfect for savoury sandwiches and burgers. If you love sweet and savoury food, you’ll love my favourite Bagnut Breakfast Sandwich or my friend’s Jacky’s Bagnut Smash Burger recipe.
Table of Contents
What are Bagnuts?
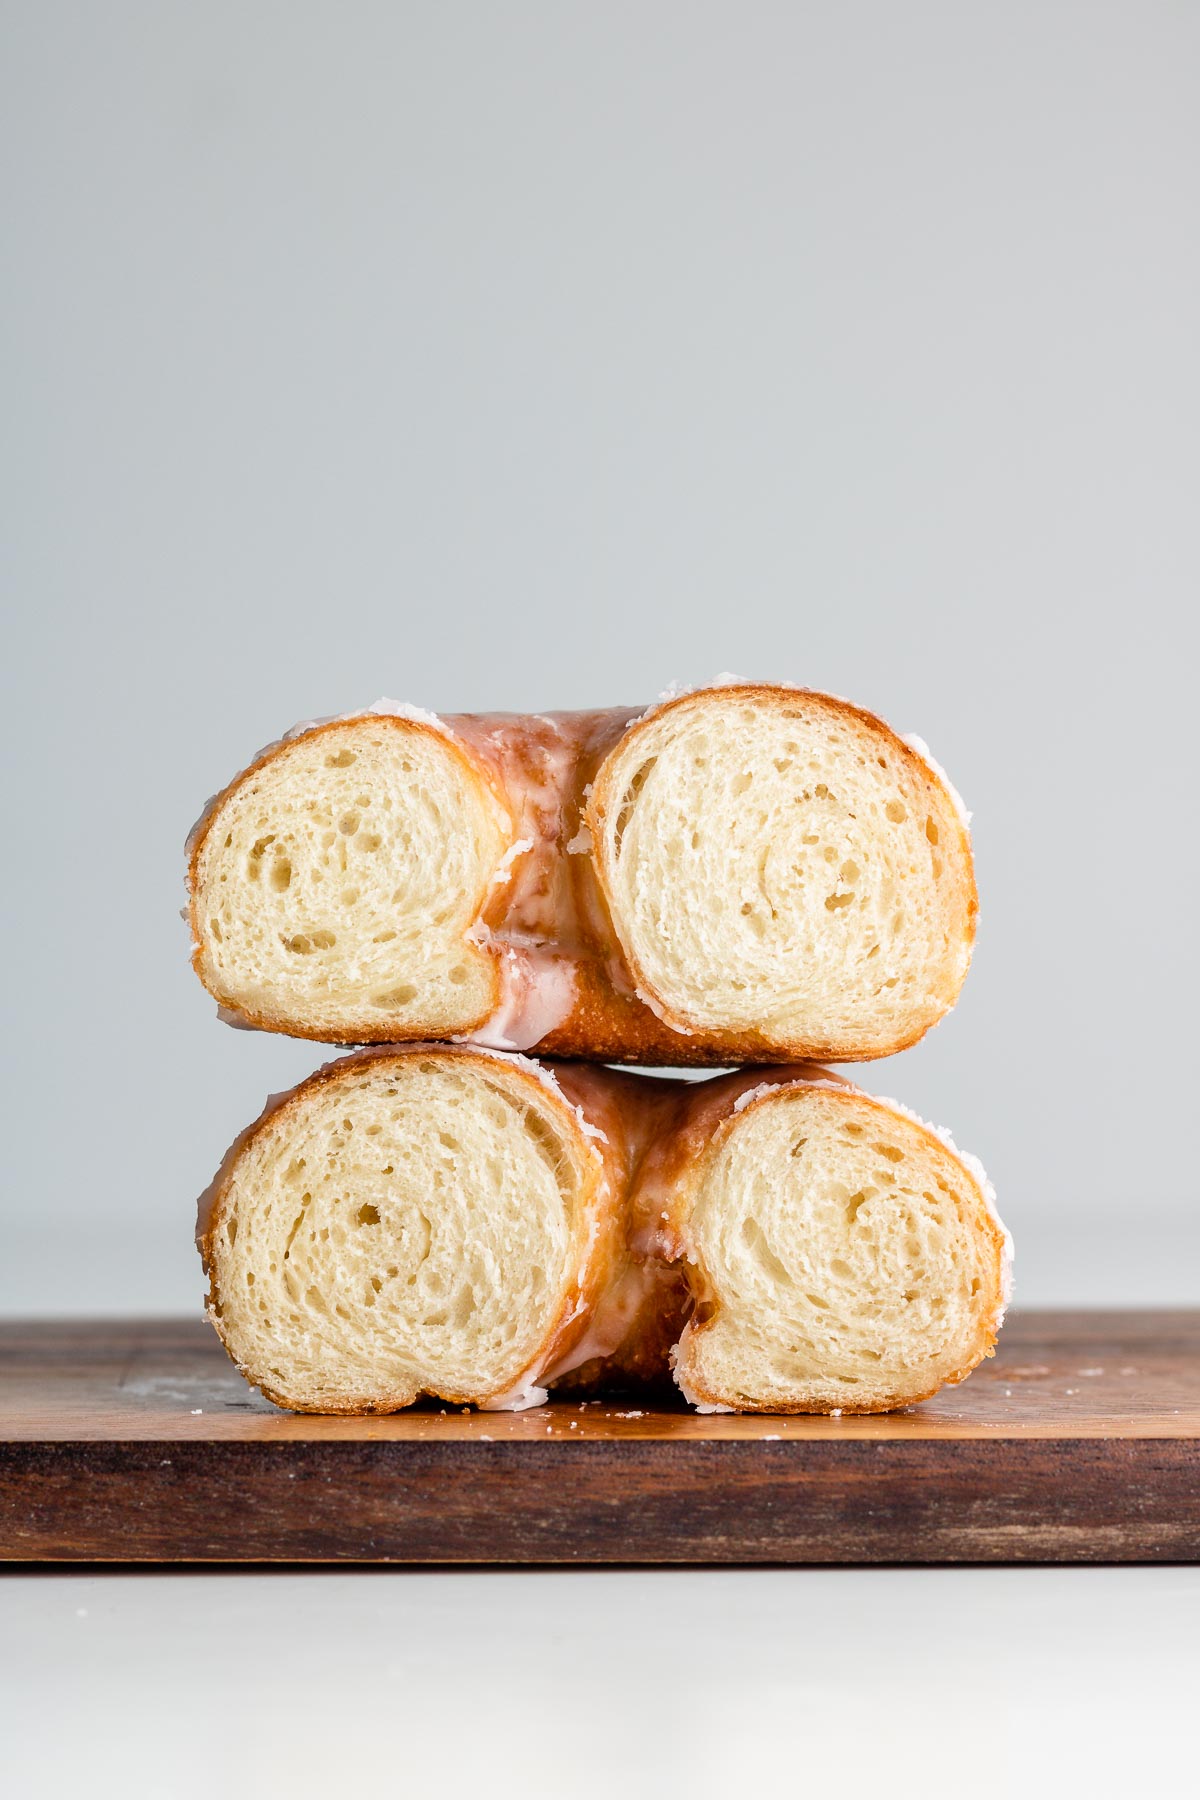
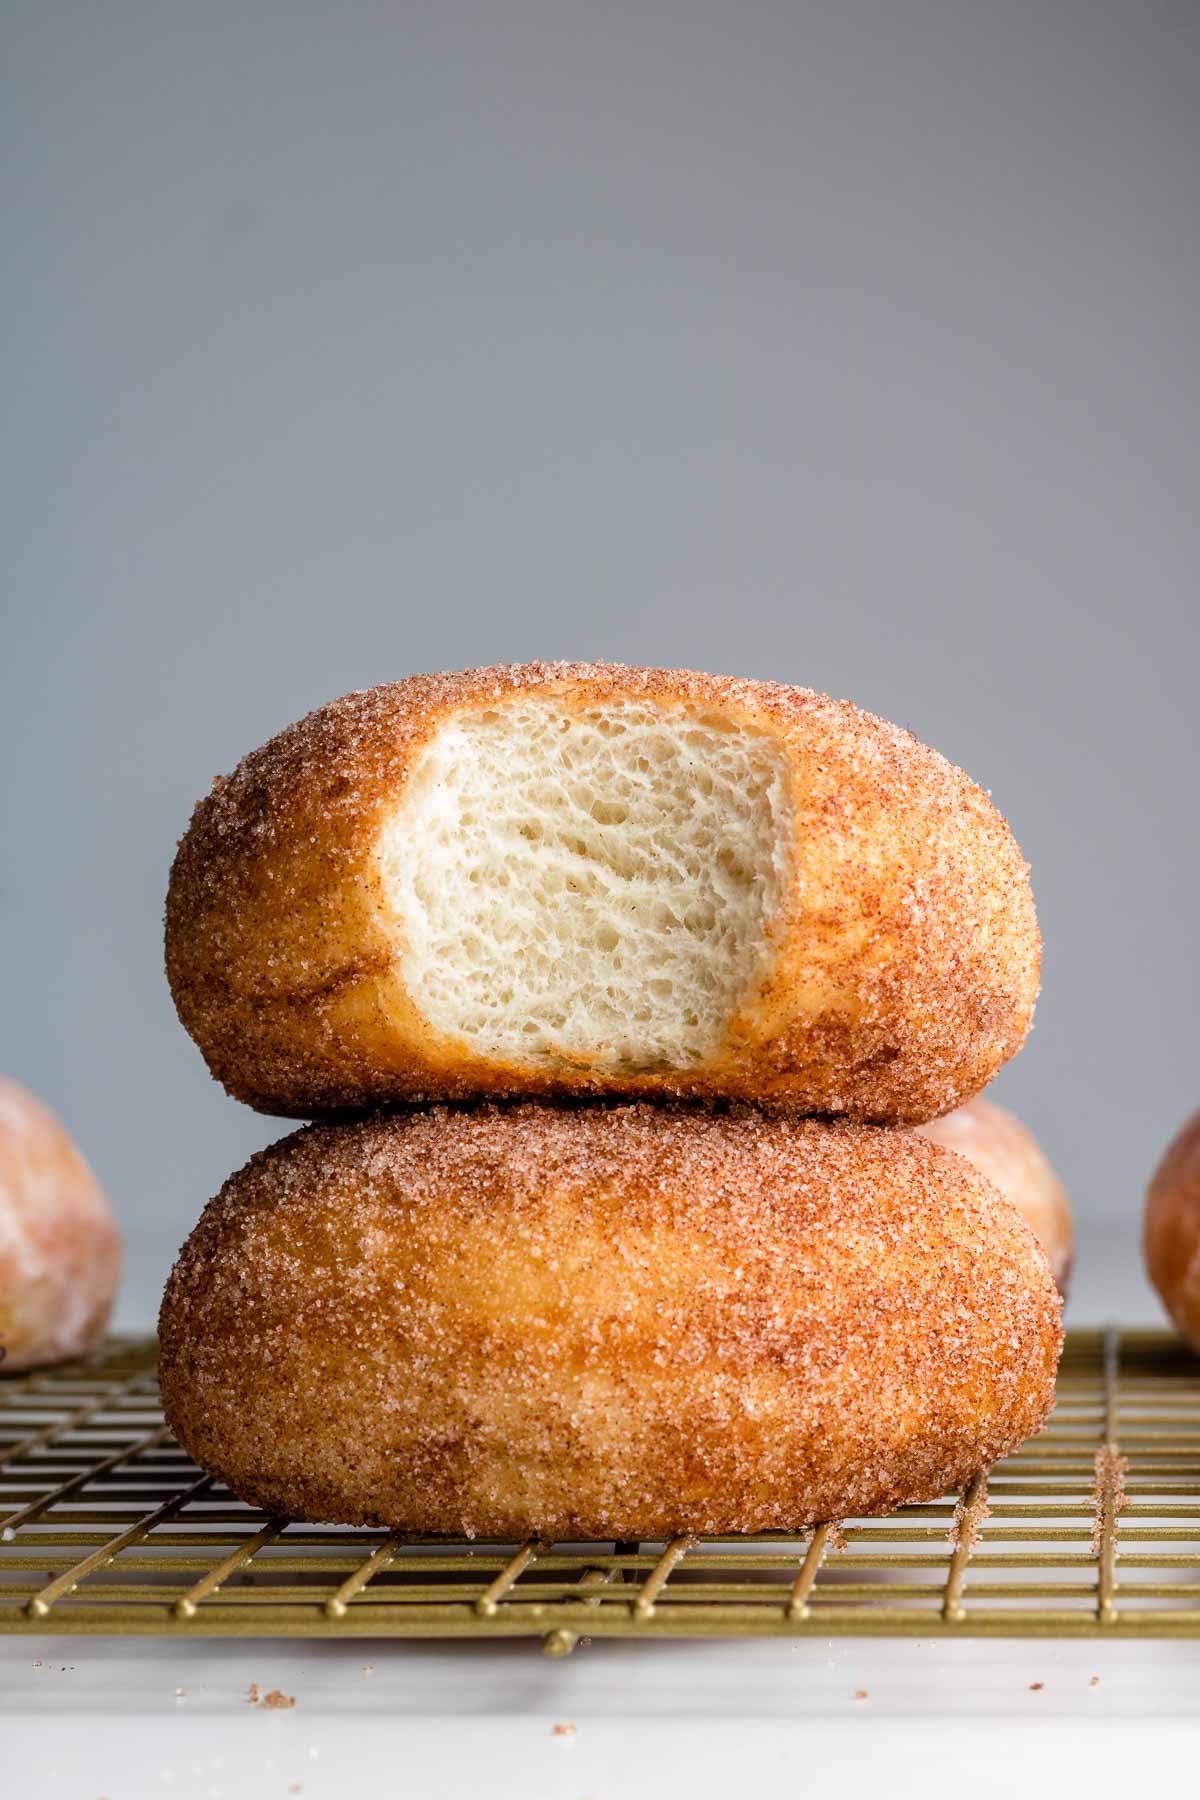
A bagnut is a cross between a bagel and a donut. Unlike other fusion pastries, they can be made closer to the texture of a bagel or the donut depending on the dough. They’re boiled just like bagels, baked and then fried until golden brown like donuts. They’re coated with various sweet toppings and can be filled too! Bagnuts offer a unique twist on both bagels and donuts, blending savory and / or sweet elements into a single tasty pastry.

Ingredients
Bagnut dough require just 6 basic ingredients. Depending on the texture you prefer, there are many options you can use! More details on how to achieve your ideal bagnut texture below:
- High protein flour: Use a flour with a protein content of 13-14%. If using Canadian flour, you can use all purpose or bread flour. The all purpose flour (13.3% protein content) makes a slightly lighter texture whereas the bread flour bakes up more chewy.
- Water or Milk: For both recipes, I prefer to use a mix of both water and (soy) milk. However, you can use 100% milk or 100% water. Any type of milk works for this recipe such as oat milk, soy milk or dairy milk.
- Sugar or Condensed milk: Condensed milk (I used non-dairy oat or coconut condensed milk) is one of my secret ingredients I use to make my donuts super light and soft which holds true to these enriched bagnuts as well. However, plain white or brown sugar works just fine.
- Oil or Butter: Either fat works for both recipes. Butter (I use PC or Becel Dairy-free Butter) just adds a bit of enriched flavour but oil keeps is more moist for longer.
- Dry yeast
- Salt
For a simple glaze you’ll need:
- Powder sugar
- Liquid: any form of liquid can be used such as water, milk, cream and juices. Add a bit at a time until you reach your the desired consistency. A runnier glaze will leave a very light coating whereas a less-viscous glaze will leave a thicker glaze.
- Vanilla, optional for flavour
- Corn syrup: optional, but will make a glossy firm finish
For cinnamon sugar coating:
- granulated white sugar
- cinnamon
- nutmeg, optional for flavour
How to make Bagnuts
Bagnuts are a bit time consuming, but are easy to make once you get the hang of it! If you’re familiar with making donuts and bagels, the process is very similar. Please refer to the photos above or this video, especially for the shaping.
- Make the dough: Add the flour, sugar, salt, yeast, water, milk and oil to a stand mix and mix until smooth-ish dough ball forms.
- Proof: Cover the dough and keep in the produce compartment of the refrigerator overnight (12-18 hours).
- Pre-shape: Let dough go up in temp (15 C – 17 C), divide the dough, degas and preshape the dough into a cylinder. Cover and let it rest for 15-20 minutes to let the dough relax.
- Shape: Refer to photos above for shaping.
- Proof: Dough should grow about 1.5 times in size or when poking the dough, it should spring back slowly and leave a very faint dent.
- Boil: Boil for 15-45 seconds on each side. The longer the boil time the more chew the crust of the bagnut will be.
- Bake: In a 200 C / 400 F pre-heated oven, bake for 14-16 minutes or until the bottom of the bagnut is golden brown.
- Fry: Heat oil to 190 C (375 F) – 200 C (400 F). Fry on each side for about 30 seconds or until golden brown on each side.
- Coat: Dip in glaze or toss in cinnamon sugar.
How to Make Filled Bagnuts
Follow all the steps above until you reach the shaping stage.
Roll out the dough into a longer rectangle. Add the filling to the top portion of the dough. Take the top edge of the dough and fold over the filling. Seal securely on all sides to ensure the filling doesn’t come out when boiling, baking and frying. Lift the bottom toward the roll and pinch to seal. Continue with the same steps as above.
Bagnut Variations
Just like donuts and bagels, once you have mastered the base recipe, there are endless variations and flavour that you can make! Here are some of my favourite fillings:
- Cream cheese and red bean paste with simple glaze
- Cream cheese and jam with a simple glaze
- Cheesecake bits and biscoff cookies with biscoff glaze
- White chocolate and strawberry compote with strawberry glaze
- Apple compote with earl grey glaze

Recipe Tips
- Proof overnight: A longer proof time makes the dough more flavourful and the dough is easier to work with slightly chilled.
- Let the dough relax before shaping: If you try to shape the dough without letting it rest, it’ll be harder to roll out and during secondary proofing, they tend to tear and unravel. The ideal temperature of the dough should be about 17 C (62 F).
- Seal the seam highly by pinching the dough between your fingers. Especially with filled bagnuts to ensure they don’t explode during boiling, baking and frying.
- Place shaped bagnuts on individual pieces of parchment paper: This makes it much easier to boil and reduced the risk of the bagnuts tearing. The parchment paper should come right off once it gets into contact with water.
- Fry at a higher temperature for a shorter period of time: Donuts are typically fried at a lower temperature to ensure they are fully cooked through. Because we’re baking them prior, all they need is a bit of frying on the outside. Frying for a shorter period of time reduces oil absorption.
- Glaze and coat while warm: This will help the glaze drip down nicely and sugar coatings tend to stick better right after being fried.
Recipe FAQ
Yes, they do not contain eggs and I always make my bagnuts with dairy free substitutes. My family has made them with dairy butter and condensed milk with success.
Yes, unlike bagel and donut dough, this dough is easy to knead together and handle. Simply mix the ingredients together and knead until a smooth-ish dough forms. It does not need to pass a window-plane test. When I make it by hand, it takes about 8-10 minutes for the dough to come together.
Yes, increase the yeast to 1.4% instead of 0.5%. Let the dough proof until double in size and continue with the rest of the recipe.
Yes. Instead of pre-shaping, roll out the dough about 1/2 inch thick and then use a donut cutter to portion out the dough. The scraps can be rested and re-rolled but they make slightly denser bagnuts due to the nature of re-rolling dough.
The enriched bagnut is more donut-like with a softer texture (photo above with caption) and richer, slightly sweeter flavour. The basic version if more chewier and has more of a flavour of a bagel (photo above captions basic bagnut).
If you prefer a dough with a tight crumb, twist the dough when shaping 2.5 times before sealing. Additionally, reduce the second proof time so they grow only slightly bigger.
Enjoy!! If you make this Bagnut recipe, let me know! Leave a comment, rating and if you decide to share it on socials, tag me on instagram @Okonomikitchen. I’d love to hear from you 😁!
Print
Bagnut
- Total Time: 24 hours 30 minutes
- Yield: 5 bagnuts
- Diet: Vegetarian
Description
Learn how to make soft, chewy and crispy bagnut with this easy to follow recipe!
Ingredients
Version 1 (Basic dough)
- 2 1/2 cups (360 g) bread flour
- 2 tbsp (24 g) brown sugar
- 3/4 cup (185 ml) water
- 3 tbsp (45 ml) milk or more water
- 1 tbsp + 1 tsp (18 g) oil
- 1/4 tsp (1.8 g) instant dry yeast
- 1 1/4 tsp (6 g) salt
Version 2 (Enriched dough)
- 2 1/2 cup (360 g) bread flour
- 2 tbsp (45 g) condensed milk
- slightly less than 1 cup (230 ml) milk of choice
- 1 tbsp + 1 tsp (20 g) butter
- 1/4 tsp (2 g) instant dry yeast
- 1 1/4 tsp (6 g ) salt
Cinnamon Sugar
- 1/2 cup sugar
- 2 tbsp cinnamon
- 1/4 tsp nutmeg
- pinch of salt
Glaze
- 2 cups powdered sugar
- 2 1/2 – 3 tbsp water or milk
- 1 tbsp corn syrup
- 1 tsp vanilla extract
Instructions
- Make the dough: Add the dough ingredients to a stand mix. Mix on low until the flour has absorbed most of the liquids. Increase the speed to medium and let it knead for 5-8 minutes or until a smooth-ish dough ball forms. The dough should not be too wet nor too dry. It shouldn’t stick to the sides of the bowl but still feel moist.
- Leave overnight: Transfer the dough into a ziplock bag or in a bowl, covered. Place into the produce compartment of the refrigerator overnight (12-18 hours).
- Pre-shape: Let the dough side out for 20-30 minutes or until it reaches 15 C- 17 C / 59 F – 63 F. Divide the dough into five 125 g pieces. De-gas each piece and roughly roll the dough top down. Cover and let it rest for 15-20 minutes to let the dough relax.
- Shape: Roll out the pre-shaped dough into a rectangle. Roll the dough top down, pinching the edge each time you roll. For the last roll, ensure the seam is pinched securely so that it does not unravel. Roll out the right side of the log of dough seam side up and then bring the left side over to the ride an tuck the end in, pinching the two sides to seal (see photos for visual reference). If you prefer a chewier and denser texture, twist the dough 2 – 2.5 times. This will keep the dough tight (less air bubbles form).
- Proof: Spray with water and keep at room temperature or a warm place until they have grown about 1.5 times in size. When poking the dough, it should spring back slowly and leave a very faint dent.
- Boil: Boil for 15-45 seconds on each side. The longer the boil time the more chew the crust of the bagnut will be.
- Bake: In a 200 C / 400 F pre-heated oven, bake for 14-16 minutes or until the bottom of the bagnut is golden brown (this will ensure its fully baked inside).
- Fry: Heat oil to 190 C – 200 C / 375 F – 400 F. Fry on each side for about 30 seconds or until golden brown on each side.
- Coat: Dip in glaze or toss in cinnamon sugar while still hot.
- Prep Time: 24 hours
- Cook Time: 30 minutes
- Category: Breakfast
- Method: Baking
- Cuisine: Japanese-Western


The recipe was pretty simple and delicious this is my second week in a row making this. My family loved them so much! The three step cooking process isn’t as bad as some may think because while the bread is baking, the oil is heating and you are making your toppings. Silicone mats come in handy!
These were so good! The best parts of a bagel and donut combined. Definitely making again.
These are so delicious and fun to make!