Chocolate Salt Bread is a rich, semi-sweet variation of Japanese shio pan. Soft cocoa dough is wrapped around salted butter and chocolate, then baked until the butter melts and the bottom turns fried and crispy. The inside stays soft and tender with a molten chocolate center, finished with salt.

Table of Contents
Chocolate Shio Pan
After sharing my original salt bread recipe, I got so many requests for different variations, and one of the most requested was chocolate—because who doesn’t love salted chocolate? I had to make this one, especially since I’m a sucker for chocolate croissants.
If you love bread, butter, and salted chocolate, this one is for you. It’s perfect if you’ve been obsessed with making salt bread and are ready for a new variation. This Chocolate Salt Bread tastes like a rich chocolate croissant, butter roll, and salted chocolate pretzel all rolled into one. Soft, chewy, chocolatey, buttery—what’s not to love?
Ingredients and Substitutions
Before we get into the steps, here’s what you’ll need to make Chocolate Salt Bread. I always recommend weighing your ingredients with a kitchen scale for the best results!
- Bread flour + cake flour: You can also use all purpose flour but its more difficult for the gluten to develop. Use all purpose flour with the highest wheat quality and protein %.
- Cocoa powder
- Skim milk powder: Skim milk can be substituted for milk (see notes below for amount).
- Sugar
- Instant dry yeast
- Salt
- Butter: For both the dough and butter blocks.
- Chocolate
- Topping salts: pearl salt, rock salt or flaky salt.
How to Make Chocolate Salt Bread
Here’s a quick overview of the process before you dive into the full recipe.
- Make the dough: Make the dough using the autolyse method or straight method if you have a heavy duty spiral mixer. Using the autolyse method is easier on the mixer and you won’t need to let it run as much as you would without it.
- First proof: Let the dough rise until doubled.
- Divide & preshape: Divide dough into triangles, pre-shape and bench rest. and roll around butter and chocolate.
- Roll and Shape: Roll out the dough and add butter block and chocolate at the base and roll down.
- Second proof: Proof shaped dough until puffy and airy.
- Bake: Add salt topping, spray with water, and bake until golden and crispy. Brush with melted butter at the end.

VIDEO: Watch How to Make It
Lisa’s Recipe Tips
- Weigh ingredients: Accurate measurements make a huge difference! Please make sure to use a scale for best results.
- Develop enough gluten: This ensures the dough is soft, fluffy, and chewy, and prevents the chocolate from spilling while allowing butter to seep to the bottom and crisp it.
- Check my Salt Bread Guide: For tips on water temperature, kneading, proofing, and shaping.
Serving Suggestions
Chocolate Salt Bread is best enjoyed slightly warm, when the center is still soft and melty! I love having it for breakfast or as an afternoon snack with coffee or tea, but it also works really well as a dessert. You can turn it into an ice cream sandwich, split it open and fill it with chocolate ganache, whipped chocolate cream, or chocolate diplomat custard, then serve it warm or chilled. If you want to lean into something a little more rich, you can dip it in melted chocolate and finish it with crushed almonds or hazelnuts, or spread Nutella on top for extra sweetness. With the Dubai chocolate trend everywhere right now, I can’t stop thinking about filling it with pistachio cream, nutty tahini, and crispy toasted kataifi for a fun, textured twist that pairs so well with chocolate and salt!!
How to Store and Reheat Leftovers
Chocolate salt bread is best eaten fresh, but leftovers reheat really well if you do it properly. Store at room temperature for up to 2 days in an airtight container. For longer storage, freeze the bread in an airtight container or freezer bag for up to 1 month.
If reheating from frozen, you can either thaw it at room temperature first or microwave it gently. To microwave, wrap the bread in a damp paper towel and heat on low power in 15–20 second intervals, just until it’s no longer frozen. This helps prevent the bread from drying out.
To reheat and re-crisp the exterior, lightly spray or brush the bread with water before reheating.
- Air fryer: Reheat at 170–180°C (340–355°F) for 3–5 minutes until warmed through and the bottom is crisp again. If reheating from frozen, add 1–2 extra minutes and check frequently.
- Oven: Preheat to 180°C (350°F). Place the bread directly on a rack or baking tray and heat for 6–8 minutes, until hot and crisp. This is the best option if you’re reheating multiple pieces at once.
- Toaster oven: Set to 170–180°C (340–355°F) and reheat for 4–6 minutes. Keep an eye on it so the chocolate doesn’t overheat or leak out too much.
Recipe FAQ
Yes! It will be sweeter but really delicious.
You can, with plant-based butter and chocolate.

More Salt Bread Recipes
- Maple Butter Salt Bread
- Shio Pan Focaccia
- Salt Bread Croissants
- Sweet Potato Cheese Salt Bread
- Shio Pan Bagels
Enjoy! If you make this Chocolate Salt Bread recipe, I’d love to hear what you think! Leave a comment and rating below, and if you share it on social media, tag me on Instagram @Okonomikitchen. I can’t wait to see your creations!
Print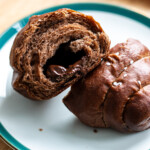
Chocolate Salt Bread
- Total Time: 0 hours
- Yield: 6 servings
- Diet: Vegetarian
Description
Chocolate Salt Bread is a rich, semi-sweet variation of Japanese shio pan. Soft cocoa dough is wrapped around salted butter and chocolate, then baked until the butter melts and the bottom turns fried and crispy. The inside stays soft and tender with a molten chocolate center, finished with salt.
Ingredients
Chocolate Salt Bread Dough
- 1 1/3 cup (170 g) bread flour
- 1/3 cup (30 g) cake flour
- 1 tbsp + 1 tsp (10 g) cocoa powder
- 1 1/2 tbsp (12 g) skim milk powder
- 1.5 tbsp (18 g) sugar
- 2/3 tsp (3.4) instant dry yeast
- 3/4 tsp (4 g) salt
- 1/2 cup + 2 tbsp (150 ml) water
- 1 tbsp (15 g) unsalted butter
Additional Ingredients
- 6 x 10 g salted butter
- 6 x 10 g dark or semi sweet chocolate
- rock salt, pearl salt or flaky salt, for topping
Instructions
Preliminary Notes:
- Please weigh the ingredients with a kitchen scale for success and accurate results.
- Read my salt bread recipe for more information on water temperature, dough temperature, kneading, shaping and proofing.
Kneading the Dough (Stand Mixer)
Option 1: With Autolyse (Optional)
- Add bread flour, cake flour, cocoa powder, and water to the bowl of a stand mixer fitted with the dough hook. Mix on low speed (2–3) for 3 minutes until a rough dough forms. Cover and rest 15 minutes.
- Add milk powder, sugar, salt, and instant dry yeast. Mix on low for 5 minutes. Add butter and mix low for 2 minutes, then medium (3–4) for 2–3 minutes until smooth. Cover and rest 15–25 minutes, then mix again on medium speed for 2–3 minutes until the dough pulls away from the bowl and feels elastic. Shape into a smooth ball.
Option 2: No Autolyse (Heavy-Duty Spiral Mixer)
- Add all dough ingredients except butter to the mixer. Mix until the dough comes together and begins to develop strength. Add butter and continue kneading for a total of 14–18 minutes, until the dough is smooth, stretchy, and passes a simple windowpane test. Shape into a smooth ball.
First Proof
- Using cupped hands, gently pull the dough toward you while rotating to create surface tension, forming a tight, smooth ball. Cover the bowl. Dough temperature should be about 25°C.
- Proof for about 90 minutes at 28–30°C, or until doubled in size
Prepare the Butter & Chocolate Filling
- Cut butter into blocks. If using chocolate bars, cut into chunks, removing any sharp ends. Keep butter refrigerated.
Shaping
- Divide the dough: Lightly dust your work surface. Turn out the dough and gently press to deflate. Divide into 6 equal triangular pieces (about 70 g each), like cutting a pizza. Trim small bits if needed to even out the portions and place scraps in the center of each triangle.
- Pre-shape: For each piece, pinch the two wide corners together to form a rough icicle shape. Place seam-side down, cover, and rest for 10-15 minutes to relax the gluten.
- Final shaping: Working with one piece at a time, place the dough seam side up. Flatten gently with the base of your hands, pressing out excess gas. Roll the dough firmly into a long icicle shape, ensuring even thickness from top to bottom. Press out any air bubbles along the edges using the base of your palm.
- If the dough resists or shrinks, let it rest for a few minutes before continuing.
- Place one frozen butter block and chocolate at the base of the dough. Fold the top edge over the filling and roll downward with slight tension, not too loose.
- Press the tip gently into the dough to secure. Place seam-side down on a baking tray (lined or unlined). Keep covered and repeat with remaining pieces.
Second Proof & Oven Preheat
- Cover and proof at 30-33°C for 55–65 minutes, until doubled, airy, and visibly puffy.
- Preheat the oven 20–30 minutes before baking to the highest temperature (232°C / 450°F).
Pre-Bake Preparation & Baking
- Uncover the dough. Lightly spray with water, then sprinkle with flaky or pearl salt from one edge to the other. Spray lightly 4-5 times.
Steam Oven
- Place bread into the oven and immediately set to steam mode for 3 minutes. Reduce temperature to 210°C Bake 10–12 minutes, until deeply golden and crispy on both sides Rotate the tray during the last 5–8 minutes for even browning
Convection / Conventional Oven
- Lightly spray dough about 10 times before baking (avoid overspraying)
- Once in the oven, quickly spray the oven walls about 15 times and close the door immediately
- Reduce temperature to:
- 190°C / 374°F (convection)
- 200°C / 392°F (conventional)
- Bake 12 minutes, until golden and crisp Rotate the tray during the last 5–6 minutes.
Finish
- Remove from the oven and immediately brush the tops with extra melted butter. Serve and enjoy!!
- Prep Time: 30 mintues
- Cook Time: 15 minutes
- Category: Bread, Dessert
- Method: Baking
- Cuisine: Japanese
Nutrition
- Serving Size: 1 serving
- Calories: 290
- Sugar: 10 g
- Sodium: 380 mg
- Fat: 13 g
- Saturated Fat: 7 g
- Unsaturated Fat: 6 g
- Trans Fat: 0.1 g
- Carbohydrates: 36 g
- Fiber: 3 g
- Protein: 6 g
- Cholesterol: 25 mg


Made these for the Super Bowl (decorated them like footballs), and they were delicious! Richer than normal salt bread but just as delectable. I made the dough the night before and let it proof overnight in the fridge before moving on to the next steps. This is a very thorough recipe to help you succeed — make sure to read the original salt bread recipe for all the tips.
The details made this so easy to follow. It was my first time making salt bread and I’m so happy to have found this collection!
I used orange butter which went so well with Lisa’s chocolate recipe 🙂
I just made these this afternoon and they were delicious.
I tried making someone else’s shio pan recipe earlier this week and it was a flop. While scouring the internet for another recipe, I found the chocolate shio pan and had to make it.
Looking forward to trying the maple and honey butter versions next!
We made this version after the classic and it’s so good! Perfect amount of chocolate, we also added whip cream and it was delicious