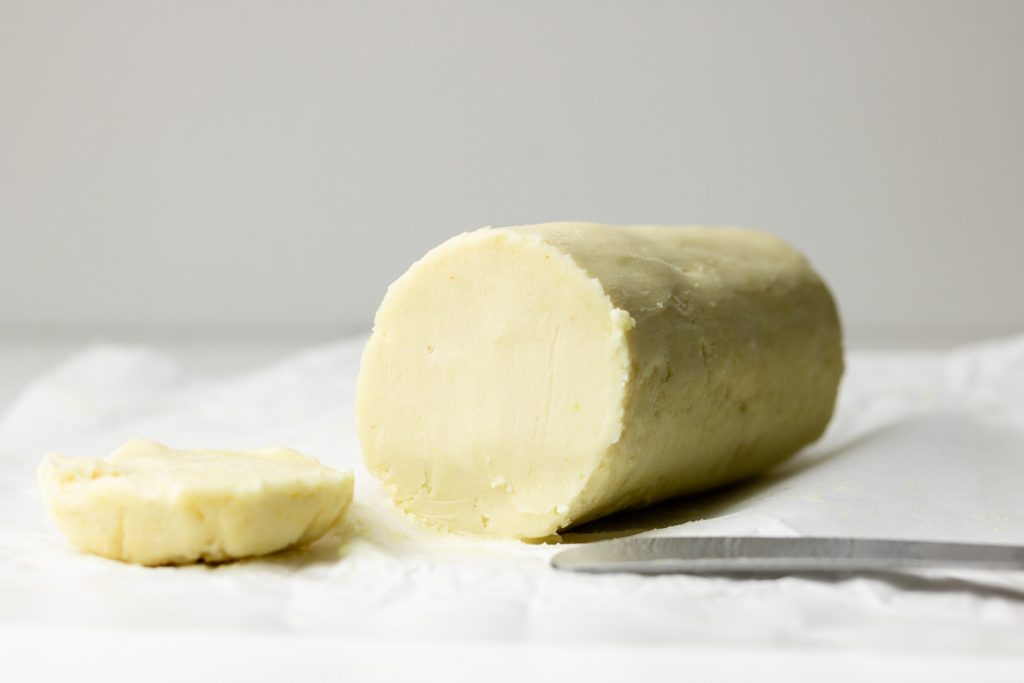
Learn how to make the best vegan butter at home with just 6 ingredients! It’s smooth, creamy, spreadable and melts wonderfully on toast. This homemade vegan butter can be used to make brown butter, and is perfect for baking, cooking and more!

Table of Contents
I love butter. It makes, dare I say everything? taste so gooood!
In Canada, we didn’t have as many selections for vegan butter up until recently. I was on the search for a dairy free butter that was 1. unsalted, for baking 2. whips up nicely, 3. browns.
I’ve been working on this vegan butter recipe since last November for my Brown Butter Miso Chocolate Chip Cookies and Vegan Frosting, and yes it really has taken me this long because I wanted to ensure it ticks off all the marks for what I think, is the perfect vegan butter:
- meltable
- spreadable
- can be used for baking
- can be used for cooking
- can be used for frostings
- that can actually brown
- that can be whipped
- versatile
- unsalted or salted
And I’m so excited to say, the search is finally over. Here we have it, frirends. The ultimate, best homemade vegan butter.
What is Vegan Butter Made of?
Store bought butter varies brand to brand, but they all are comprised of a saturated fat such as palm oil or coconut oil which is what makes it solid and a unsaturated fat such as sunflower, canola or olive oil to make it slightly softer for spread-able-ness. Most of them are binded by an ingredient containing lecithin or pure lecithin.
For this recipe, I used a combination of ingredients and techniques based off of my Vegan Mayonnaise recipe and some of my favourite store bought vegan butters. Here’s what you’ll need:
- Refined coconut oil: be sure to use refined and NOT unrefined or it will taste like coconut.
- Neutral oil: any neutral oil can be used here such as canola, vegetable, grapeseed or sunflower oil. This makes the butter slightly softer because it does not solidify so that it is spreadable.
- Aquafaba: the KEY ingredients for this recipe. It emulsifies with the oils so the mixture doesn’t split. Be sure to use thick aquafaba, it should not be watery. Depending on the brand, you may need to reduce it. To do this, simmer over medium low heat for 10-15 minutes, until the consistency of a creamy dressing. It’s better to have it thicker than thinner.
- Soy OR Coconut cream: makes this butter ultra smooth and creamy. *Updated March 26th, I found that soy cream yields a stronger butter-like flavour thanks to the curdling process when combined with apple cider vinegar.
- Apple cider vinegar: or lemon juice.
- Pecan flour: I’ve found pecans to be the best nut for browning because of its natural toasty and nutty flavours. However, you can also opt to use hazelnut, almond or even cashew flour.
- Turmeric, nutritional yeast & salt: optional for colour and flavour.
How to Make Vegan Butter
- Combine the oils: melt the coconut oil over a stove and stir in the neutral oil. Set aside to cool.
- Blend the ingredients: add the remaining ingredients to a narrow cup or jar and blend until smooth.
- Add the oil: slowly drizzle in the cooled oil while blending on medium low speed, ensuring it catches into the blade. If at any point it stops catching, stop pouring the oil and with the blender still on, slowly lift so the oil goes down. Continue until all oil is blended in, it should be slightly looser than the consistency of mayo. Pour into a bowl or butter mold and then refrigerate until set.
- Optional step: remove from the refrigerator after 20-30 minutes and then scoop it out into another bowl. Use a handle held mixer and whip until softened and fluffy. Use a spatula and mold into a butter log or transfer back into a butter mold/air tight container. This step makes cutting and scooping out the butter easier without making it airy.
How to Make Whipped Butter
If you do like light fluffy butter or if you want to make frostings, this butter also whips fabulously:
- Remove from refrigerator after 30 minutes and transfer to medium size bowl.
- Whip until light and fluffy. Place it back into the refrigerator for 15-20 minutes.
- Repeat 1-2 more times, and then place it back into storing container in the refrigerator.
How to Make Vegan Brown Butter
Okay, the thing I’m MOST excited for about this vegan butter: it browns like a dream. Making dairy free brown butter is pretty much the same as if you were to use dairy butter. It’s a quick process so don’t step away from the stove! To brown the vegan butter:
- Cut into small size pieces (makes it quicker to melt)
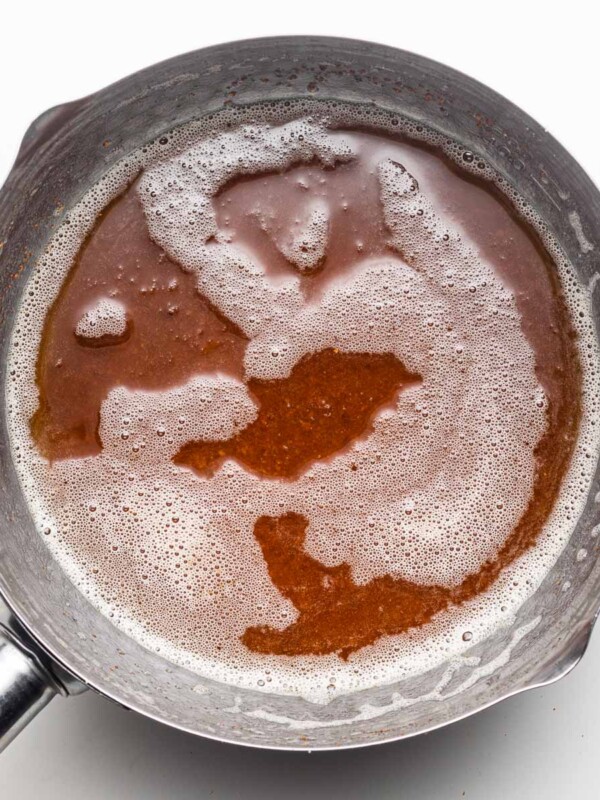
- Add light colour saucepan over low to medium low heat until melted, swirling and stirring continuously so the pecan solids don’t burn.
- Continue to swirl and stir for even browning for about 5-6 minutes. It’ll foam and sizzle quite a bit. If at any point it looks like it’s over-foaming, lift from direct heat, swirl and turn down the heat. Continue until golden brown in colour and nutty and toasty in smell.
- Immediately remove from heat and transfer to another bowl. It is crucial you do not leave it in the saucepan or the residual heat will cause it to burn.
Lisa’s Recipe Tips
- Reduced aquafaba: Aquafaba should be thick in consistency, not watery. Reduce if needed and cool before use.
- Temperature of ingredients: Be sure the ingredients are all relatively the same (about room temperature, slightly cooler).
- Use a narrow jar: Ensure all the ingredients are blended and the oil catches. If the jar is too wide, it won’t catch and the butter may not be as smooth or split.
- Emulsification: SLOWLY drizzle in the oil. This is where there is a tendency the mixture splits if the oil is added too quickly.
- Before refrigerating: Be sure the butter is at room temperature before covering and placing into the refrigerator or condensation may occur. Alternatively, do not cover and refrigerate.
FAQ
I have tried this with a vitamix blender and while it does work, I’ve found immersion blenders to be easier and with more successful and consistent results. To use a blender, slowly drizzle in the oil from the top using a medium low to medium speed. Ensure it does not over heat! I have not tried this in a food processor.
This vegan butter will last for about 7-12 days if properly stored. Be sure to use clean utensils when using.
Yes! It freezes well and lasts anywhere from 6 months before the taste starts to degrade.
Yes. Either will work. Just be sure it is thick.
Recipes to Use this Vegan Butter:
- Whipped Hummus with Burnt Miso Brown Butter Paprika
- Gochujang Brown Butter
- Shoyu Butter Udon
- Sesame Miso Butter Udon
- Brown Butter Caramelized Kimchi
- Roasted Burnt Miso Brown Butter Banana Bread
- Miso Brown Butter Chocolate Chip Cookies (coming soon)
If you recreate this Vegan Butter recipe let me know how you liked it by leaving a comment and rating below or by tagging me on Instagram @Okonomikitchen, I love seeing all of your tasty recreations!
Hungry for more? Be sure to subscribe to my newsletter and follow along on Instagram, Youtube and Pinterest for more deliciousness!
Homemade Vegan Butter (that browns)
- Total Time: 27 minutes
- Yield: 1 cup
Description
Learn how to make the best vegan butter at home with just 6 ingredients! It’s smooth, creamy, spreadable and melts wonderfully on toast. This homemade vegan butter can be used to make brown butter, and is perfect for baking, cooking and more!
Ingredients
- 1/2 cup (112g) refined coconut oil
- 1–1 1/2 tbsp (15 – 22 ml) neutral oil*
- 3 1/2 tbsp (52 ml) reduced aquafaba**
- 1–1 1/2 tbsp (15 – 22 g) soy cream OR coconut cream*
- 1 (5 ml) tsp apple cider vinegar
- 3 tbsp (24 g) pecan or hazelnut flour (preferably superfine)
- small pinch of turmeric for colour, optional
- 1 tsp nutritional yeast for flavour, optional
- 1/4 tsp salt, optional
- 1/4 tsp xanthum gum, optional (for stabilization)
Instructions
- Melt coconut oil over medium low heat until 85% melted. Remove from stove and let residual heat melt the rest. Add in the neutral oil. Let it cool to room temperature.
- Before starting, ensure all ingredients are close to room temperature. Add aquafaba, coconut cream, apple cider vinegar and pecan flour (and turmeric, nutritional yeast and salt if using) to a narrow jar. Use an immersion blender and blend until smooth. Turn off the immersion blender.
- Turn on the blender to low and slowly pour in the oil. Let the oil catch into the blades. You can stop pouring in the oil and slowly move the immersion blender up if the oil is not catching the blades. Ensure it is fully blended and emulsified before adding in more oil. Continue to slowly pour in the oil as you’re blending stoping as you need. If at any point the mixture gets hot, stop and let it cool down first to prevent the mixture from breaking.
- Once all oil is blended, it should be slightly looser than the consistency of mayo.
- Taste and adjust the amount of salt.
- Pour it into a bowl with a lid or butter mold, and then refrigerate until set.
- Remove from fridge when ready to use. It will soften even more as it is left out of the fridge.
To mold the butter:
- Remove from refrigerator after about 30 minutes until just set. If it is completely firm, let it sit at room temperature for 5 minutes. Scrape the butter out into a medium bowl. Use a hand held mixer and whip until fluffy.
- Using a spatula, transfer the butter onto a piece of parchment paper in the middle keeping 2 inches of space on each side. Fold the top piece of parchment to meet the bottom edge. Then use a bench scraper or small tray and tuck the top piece of parchment under the butter. Firmly press forward until a log shape forms. Roll the remaining parchment and then twist the two sides.
- Refrigerate until set and ready to use.
For whipped butter:
- Remove from refrigerator after 30 minutes until just set. Transfer the butter to a medium size bowl. Use a hand held mixer and whip until fluffy.
- Place the bowl back into the refrigerator for another 15-20 minutes and whip again until light and fluffy.
- Transfer to a air tight container and refrigerate until ready to use.
For browning the butter (for 1 stick or 1/2 cup):
- Cut the butter into small pieces (about 1 tbsp size). Add the butter to a small to medium sauce pan (or shallow pot) over medium low to medium heat. Stir or swirl butter until completely melted.
- Once melted, continue to swirl and/or stir for even browning and so it doesn’t burn too quickly. The butter will start to sizzle and foam. If at any point it looks like it is over-foaming remove from the direct heat and swirl the pan. Adjust heat as necessary. Continue until golden brown in colour and smells richly toasty and nutty. For 1/2 cup of butter it will take about 5-6 minutes.
- Remove from heat and immediently transfer to another bowl. Do NOT leave it in the pot as the residual heat will continue to cook the bits of nuts and it will burn.
- Serve or use as desired.
Notes
- *Amount of neutral oil and soy/coconut cream used will dictate the softness of the butter. 1 tbsp for more firm butter (like stick butter for butter creams). For softer butter use 1 1/2 tbsp of each. If you prefer even softer, spreadable butter you can up it to 2 tbsp each. Soy cream is preferred for a stronger butter flavour that comes with curdling.
- **Aquafaba should be thick in consistency. If using aquafaba from a can, simmer over low to medium low heat for about 10 minutes until reduced by 1/3-1/2. Cool before using.
- Helpful Equipment: Small saucepan, immersion blender, hand held mixer
- Nutritional Information Disclaimer: Nutrition information is a rough estimate calculated on an online tool (Cronometer).
- Prep Time: 25 minutes
- Cook Time: 2 minutes
- Category: how-to
- Method: Blender
- Cuisine: Vegan
Nutrition
- Serving Size: 1 tbsp
Okonomi Kitchen is a participant in the Amazon Services LLC Associates Program. When you purchase something through my amazon affiliate links, I earn a small commission that helps me produce consistent content at no cost to you. Thank you for supporting my plant based kitchen!


WOW!! first of all thank you so much for your labor of love and serious R&D. your youtube short came up for me a few months back and i’ve just gotten the chance to test out this recipe today!
i used what i had on hand: black bean aquafaba, homemade cashew flour, coconut cream from the top of an arroy-d boxed coconut milk. i ended up with a heart shaped butter using crinkled parchment paper + a small cookie cutter, as well as a small log. currently enjoying the delicious butter on a marbled rye with yuzu spread 🙂
things i learned today:
– you can use aquafaba from any bean, peas, or even tofu?! the black bean aquafaba was pretty lucscious so i didn’t have to reduce it
– i was nervous about the color but the butter was creamy/gray in hue. i was also out of turmeric + i expect it would’ve come out a nice color if i’d had some! i realize now that i have beet powder – pink heart next time !!
– the butter browned rather quickly, there was a bit of a learning curve there
– i could taste the cashews, don’t think i would use them again here as it’s quite similar to cashew creams. i will have to get some pecans for next time or maybe try almonds 🙂
– this recipe was also much easier than i was anticipating! the immersion blender really does a lot of the heavy lifting
excited to experiment more in the future! especially excited to try baking vegan icebox cookies and your brown butter gochujang caramel.
take care! <3 and thank you again – i had a delicious toast and a lot of fun today because of you and your recipe 🙂
Hey just saw your site it’s great. I love vegan butter. This recipe looks great. Where can I find quantities and full recipe will that be in the E book? Thanks Much
OK It looks like you now have a Doctorate in Vegan Butter Recipe Development. I have to try it after you did all of this work! I’ve tried with soy lecithin before and had very disappointing results, but I’m ready to go at it again thanks to you! Thank you Lisa, can’t wait to try.
Such a simple and straightforward recipe. Thank you so much for this. I’m not vegan but my bfs parents are and I’ve held back making them food because I never seem to think vegan alternatives are as accessible or as good but the fact that you can brown this and it’s so versatile is exactly what I’ve been looking for! You make vegan recipes so interesting and look so good.