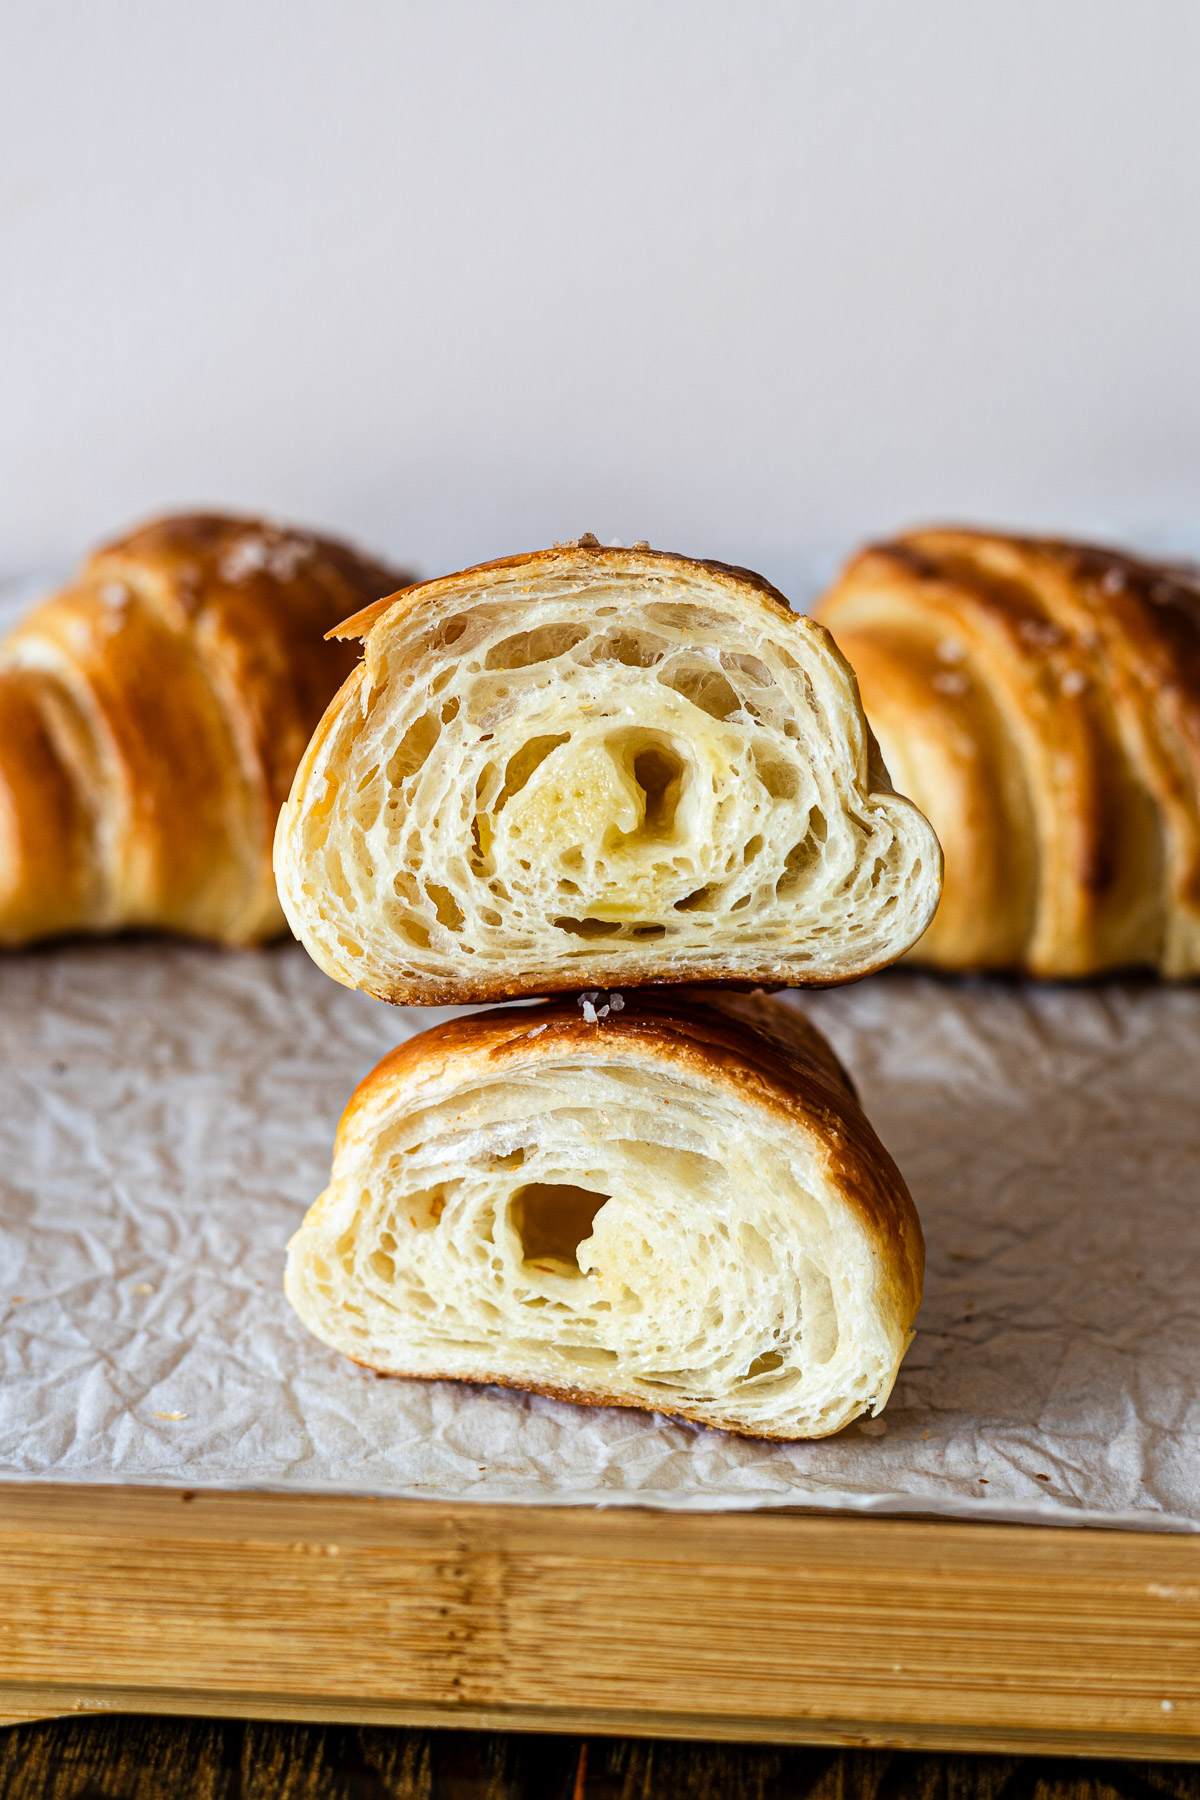
These Shio Croissants combine the buttery, flaky layers of a French croissant with the light, crisp and saltiness of Japanese shio pan. Made with a semi-laminated dough and a butter block rolled inside, this salt bread croissant hybrid bakes up golden and crisp with a soft, tender crumb.

Table of Contents
New Texture! Shio Pan Croissant
Say hello to this buttery loaded legend!!
I love shio pan. It’s such a nostalgic bread I grew up eating since I was around 11 because of my mom’s love for this simple butter bread. She would bake some at home because they didn’t exist in Canada, but every time we visited Japan, we’d do bakery runs throughout the day — so I’ve tried a lot of different types and styles of salt bread.
Salt bread is one of the eight breads I chose to kick off my Japanese bakery series (coming soon!!). I spent a few months in Japan last year and earlier this year visiting bakeries — about six in total — and tried around 14 different salt breads… for research! In the last year, shio pan has gone insanely viral outside of Japan, and honestly, it deserves all the hype. It’s such a simple combination of bread and butter, but what makes it so special is the focus on quality ingredients and technique. (More on that in my full shio pan post soon.)
While I was finalizing my guide to shio pan, I realized I had accidentally deleted all my Japan trip photos and files — so that series has been on pause while I recover what I can. In the meantime, I’ve shared my shio pan bagels and shio pan focaccia, which have both been so well received!
So while waiting to revisit that, I wanted to challenge myself with something laminated — like a pan suisse or croissant. I hadn’t touched laminated dough in over two years but had been craving croissants for a while. When testing, I started with a smaller amount of butter to get used to the lamination process. I had leftover butter blocks from my shio pan bagels, and I thought, what if I added a butter block to the croissant? I hadn’t seen this done before, so I wasn’t sure how it would turn out… and holy moly, guys. It’s incredible.
It took me a few tests to get the exact ratios and measurements but I’m so happy with how these turned out. This one is truly unique and different, nothing like I’ve ever had before but also everything you would imagine if a croissant and shio pan were to become one. If you love croissants, salt bread or bread with butter, this is the baking project for you!!

Why This Recipe Works
Croissants and salt bread, they have a lot in common — the ingredients, the shaping, the buttery layers, the crisp exterior, and the soft, airy interior.
What’s unique about this Shio Croissant is the combination of textures:
- The base crispiness of shio pan
- The flaky, layered top of a croissant
- The soft, slightly chewy interior of Japanese salt bread
- The light airiness of a classic croissant
What I love most is how much easier this recipe is to work with compared to a traditional croissant. Regular croissants use 60–75% butter relative to flour, which makes rolling and laminating tricky. With this shio croissant, we use only 25% butter in the dough and the remaining 35% in a butter block rolled inside. This makes lamination much simpler, reduces the risk of butter tearing the dough or blending in too much, and still gives you all the buttery flavor and flakiness.
Finally, aesthetics play a big role in both croissants and shio pan. Professional croissants look perfect and symmetrical, and Japanese shio pan has standards for even rolls. This version creates lamination mostly on the surface, so perfect spirals aren’t necessary — I actually love the rustic, slightly different look of each shio pan croissant.
Ingredients and Substitutions
Before we get started, here’s what you’ll need for this recipe. I’ve included notes for possible substitutions.
- Bread and Cake Flour: This is really common in Japanese bread making because there are so many different types and brands of flour. Using both bread and cake flour balances structure and tenderness. Bread flour gives enough gluten strength for lamination and a slightly chewy crumb, while cake flour keeps the layers soft and light. Using only all-purpose flour works, but the texture may be slightly different.
- Milk powder: A staple ingredient in many Japanese bakery-style breads. It adds milk flavor and richness while keeping the dough easy to handle. It gives a softer texture without weakening the gluten too much since we’re using water. You can substitute with liquid milk, but the dough will feel tackier and a bit harder to work with.
- Instant dried yeast
- Salt
- Sugar
- Water
- Butter: Unsalted butter for lamination and salted butter for butter blocks rolled inside.
- Salt: Pretzel salt, rock salt, or flaky salt (for topping)
- Egg wash: Made from mixing egg and milk. This is completely optional but it gives a nice deeply brown finish.
How to Make Shio Croissant
Here’s a brief overview before diving into the detailed steps:
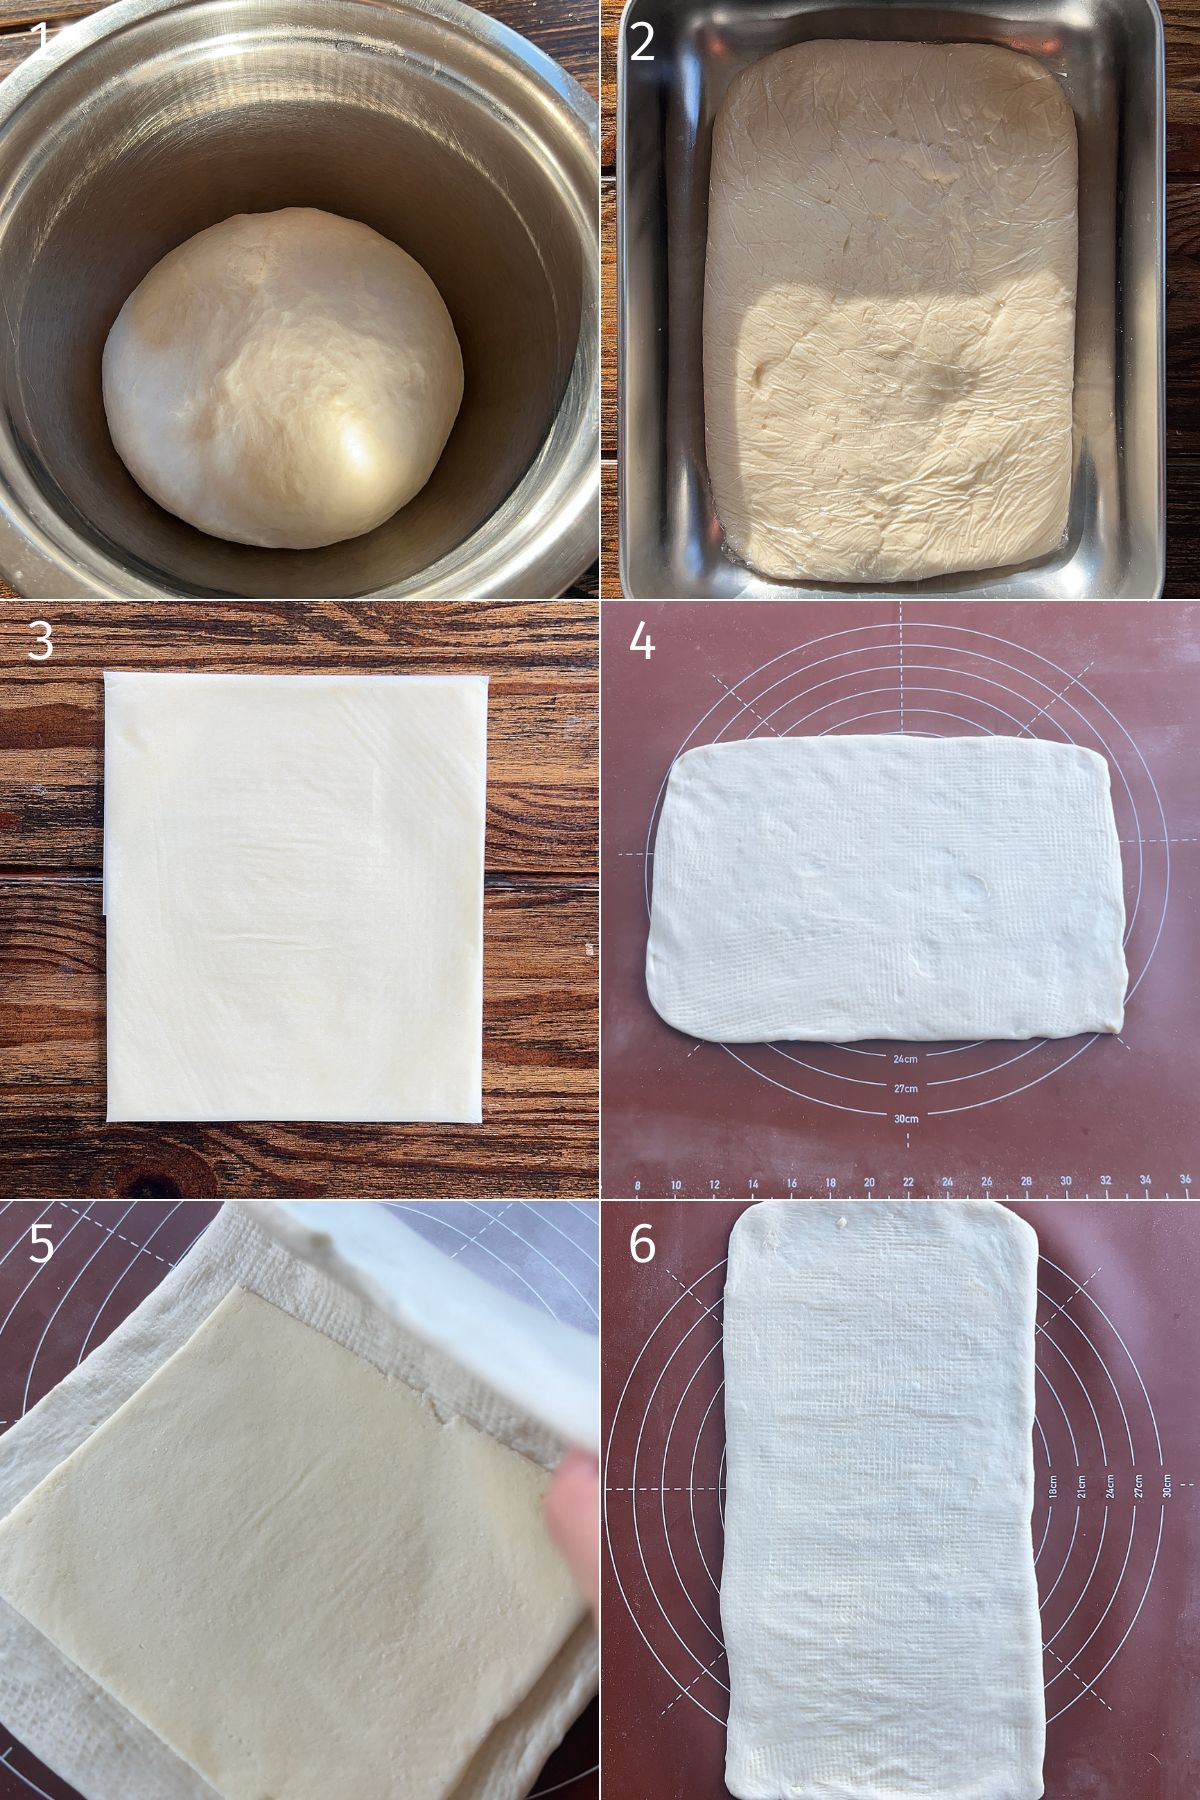

- Make the Dough (1-2): In a large bowl (or stand mixer), combine bread flour, cake flour, milk powder, yeast, salt, sugar, water, and butter. Mix and knead until smooth and elastic — about 10–12 minutes by hand or 6–8 minutes with a mixer. Shape into a ball, cover, and rest 30 minutes. Roll into a 15 × 20 cm rectangle, wrap, and chill overnight (8 hours+).
- Make the Butter Block (3): Shape 49 g salted butter between parchment into a 12 × 14 cm rectangle. Chill until firm but pliable — it should bend without cracking.
- Laminate the Dough (4-8): Roll dough to 25 × 15 cm, place the butter block on one side, and fold to seal. Roll out to 36 × 18 cm and fold into thirds (first turn). Chill 15–20 min, then repeat once more (second turn). Chill again, then roll to 18 × 16 cm. Keep butter and dough at similar firmness to maintain clean layers.
- Cut (9): Make 4 notches on the bottom edge of the dough starting at the very left, so you have 3 pieces 6 cm apart. Then make 3 notches on the top edge between the bottom notches. Connect the notches top to bottom and cut each piece with a knife or pizza butter. You should have 5 full triangles and 2 smaller triangles on the left and right side. Combine the two smaller triangles together. It will look a little rough but it will bake up similarly. Cover the pieces and work with one at a time.
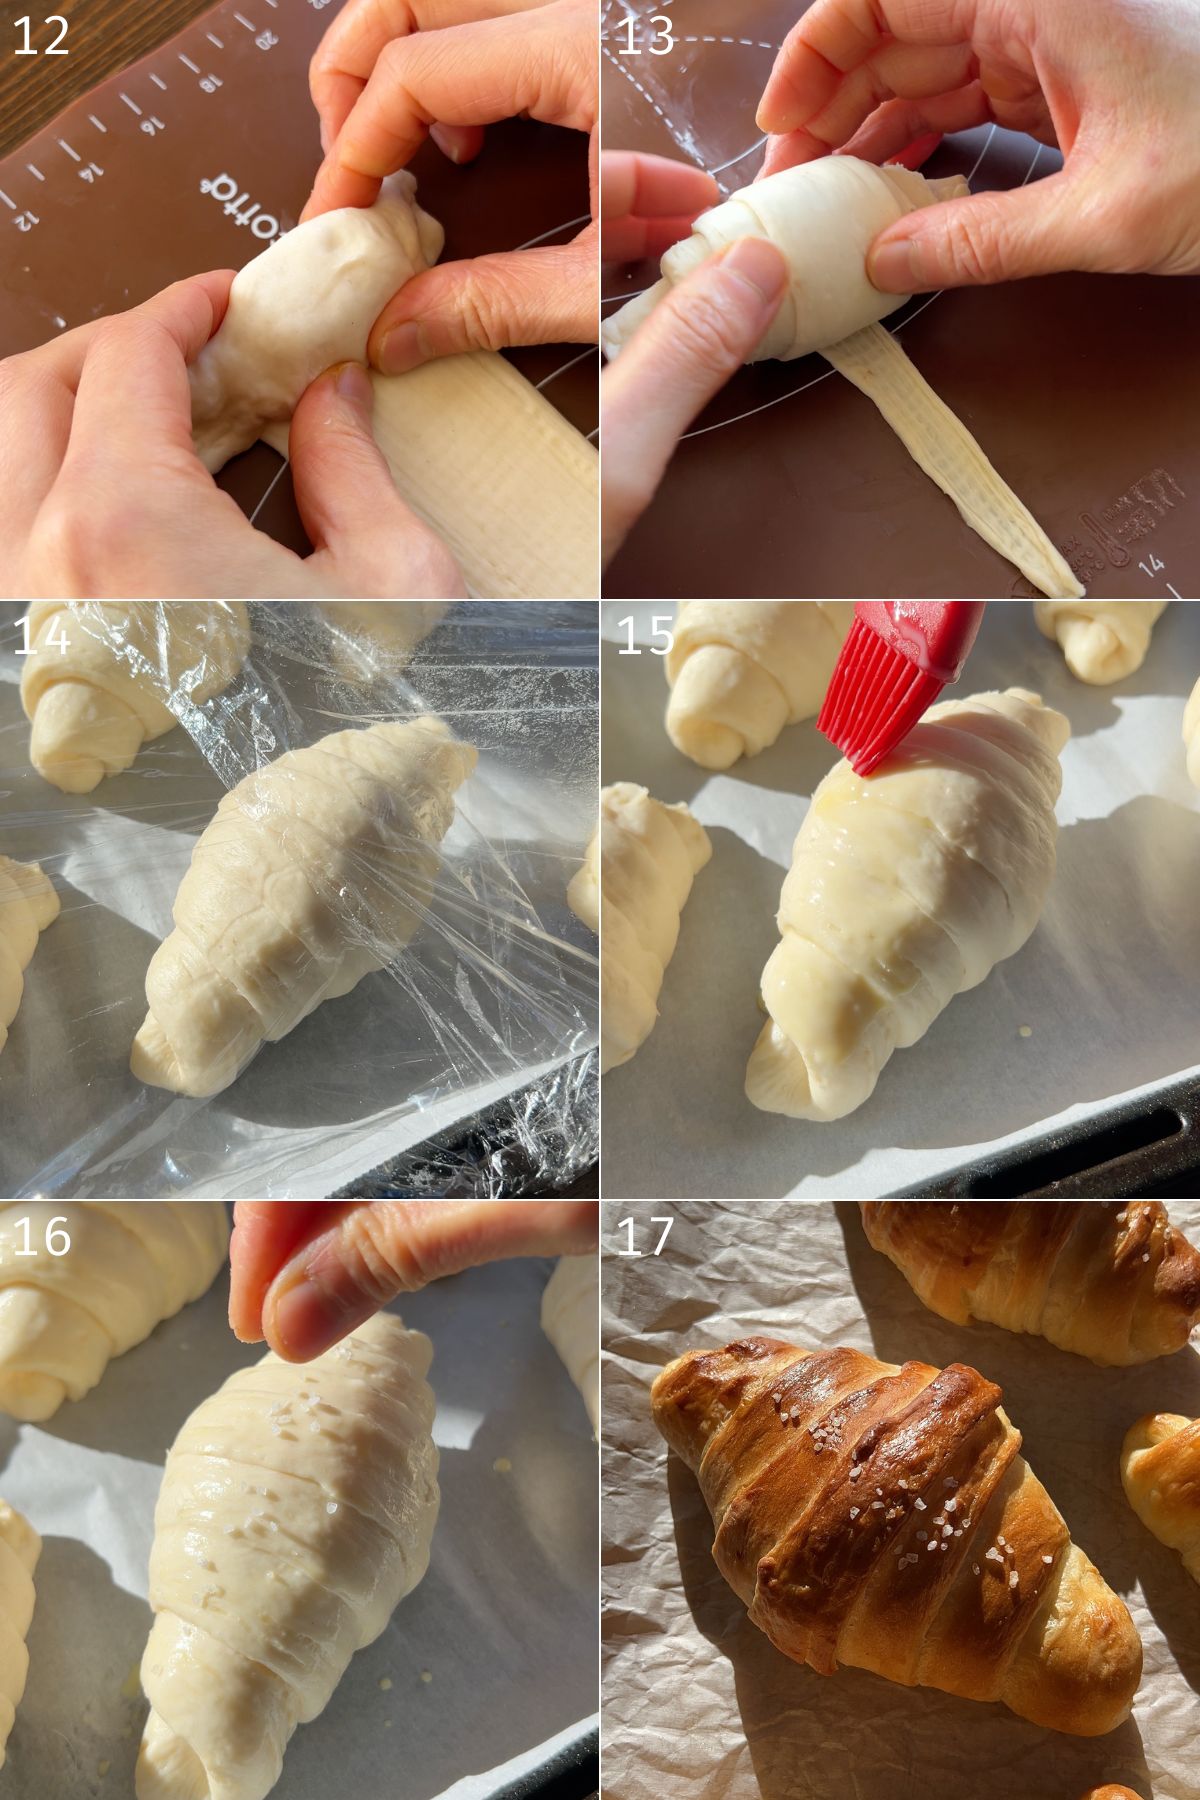
- Shape (10-14): Press the base down onto your work surface. It would be anywhere from 6-8 cm. Use the palm of your hands to flatten the dough first then lift the tail up until the base. Then gently stretch each piece to 35-40 cm with a rolling pin. Place a piece of butter at the base, fold over to seal, and roll down tightly. Place on a tray, tip side down. Cover and proof 90–120 minutes, until puffy. When you press the dough it should spring up very slowly and leave a faint indent.
- Bake (15-17): Preheat to 425°F (218°C). Brush with egg wash, sprinkle flaky salt, and bake 16–18 minutes until golden brown. Cool 10 minutes before serving.
VIDEO: Watch How to Make It

Lisa’s Recipe Tips
- Weigh the ingredients: Precision matters, especially for laminated dough. Using a kitchen scale ensures consistent hydration and texture every time.
- Use a ruler: This will make sure the layers properly match up and at the end, you’re able to cut even pieces.
- Keep the dough and butter the same temperature: Both should be cold (10–16°C (50–60°F)) but pliable — not rock hard or too soft. If one is colder than the other, the butter can crack or melt into the dough, ruining the lamination.
- Use downward pressure to ‘spread’ the butter before rolling: Instead of rolling the dough straight out of the fridge, gently press it to start spreading the butter evenly. Rolling cold dough too aggressively can cause the entire butter block to shift or squeeze out to the sides.
- Use a thicker piece of butter for rolling: If you love that signature butter cavity in the center, start with a slightly thicker butter block. It gives the dough time to bake around the butter before sealing off, creating that dreamy, melty pocket inside.
- Proof sufficiently: Because the dough and butter start cold, the second proof can take much longer than typical bread — anywhere from 90 to 120 minutes. Don’t rush it! You’ll know it’s ready when the dough looks puffy and slightly jiggly, and a gentle press leaves a soft indent that slowly springs back.
How to Store and Reheat Leftovers
This recipe makes a small batch of 6 so I don’t think you’ll have leftovers and to be honest, they really are the best fresh out of the oven. However, if you do have any leftovers you can store them at room temperature in an air tight container for up to 2 days or in the freezer for up to 1 month. To reheat, bake at 375 F / 190 C for 2-3 minutes until crispy on top again or in the toaster oven.

Recipe FAQ
Yes, I actually made a dairy free batch recently! Omit the milk powder and substitute the water with non dairy milk (I recommend soy milk). Use plant based butter.
Most likely, the butter melted into the dough. Keep both butter and dough cold, and follow the folding and chilling steps carefully.

More Japanese Bakery Recipes
- Kare Pan (Japanese Curry Bread)
- Japanese Style Bagels
- Milk France (coming soon)
- Shio Pan (Salt Bread) (coming soon)
- Custard Cream Pan (coming soon)
- Shokupan (coming soon)
- An Pan (Sweet Red bean Paste Bun)
Enjoy! If you make this Shio Croissant recipe, I’d love to hear what you think! Leave a comment and rating below, and if you share it on social media, tag me on Instagram @Okonomikitchen. I can’t wait to see your creations!
Print
Shio Croissant (Salt Bread Croissant)
- Total Time: 12 hours 18 minutes
- Yield: 6 servings
- Diet: Vegetarian
Description
These Shio Croissants combine the buttery, flaky layers of a French croissant with the light, crisp and saltiness of Japanese shio pan. Made with a semi-laminated dough and a butter block rolled inside, this salt bread croissant hybrid bakes up golden and crisp with a soft, tender crumb.
Ingredients
Dough
- 1 + 1/3 cup (170 g) bread flour*
- 1/4 cup (30 g) cake flour*
- 1 1/2 tbsp (12 g) milk powder**
- 2/3 tsp (3 g) instant dried yeast
- 2/3 tsp (3 g) salt
- 1 tbsp (12.5 g) sugar
- 1/2 cup (120 ml) water 18-22°C (65-72°F)
- 2 tsp (10 g) unsalted butter, room temperature
Butter Blocks
- 3.5 tbsp (49 g) unsalted butter — for lamination block
- 5 tbsp (72 g) salted butter — divided into six 12 g pieces (for filling)
Other Ingredients
- 1/2 beaten egg + 1/2 tbsp 2% milk, for egg wash
- pretzel salt, rock salt or flaky salt, for topping
Instructions
Make the Dough
- Combine ingredients: In a large bowl (or the bowl of a stand mixer), mix together the bread flour, cake flour, milk powder, yeast, salt, and sugar. Pour in the water and add the butter.
- Knead the dough:
- By hand: Mix until a rough dough forms, then knead for about 10-12 minutes, until smooth and slightly elastic. The dough should feel soft but not sticky.
- With a stand mixer: Use the dough hook on medium speed for 6–8 minutes, until the dough pulls cleanly from the bowl.
- Shape into a smooth ball, cover, and rest at room temperature for 30 minutes.
- Roll the dough into a 15 × 20 cm rectangle, wrap in plastic wrap, and chill in the fridge overnight (or at least 8 hours).
Make the Butter Block
- Place 49 g salted room temperature butter between two sheets of parchment paper and shape into a 12 × 14 cm rectangle.
- Refrigerate until firm but still pliable — the butter should bend without cracking.
- Tip: if it’s too cold, it will shatter during rolling; if too soft, it will blend into the dough.
Laminate the Dough (After 6-8 hours or overnight)
- On a lightly floured surface, roll the chilled dough to 25 × 15 cm rectangle.
- Place the butter block on the left side of the dough, leaving a 1/2 cm border around the edges. Fold the right side over to encase the butter, and press the edges firmly to seal.
- First roll & fold: Gently press down on the dough from top to bottom with a rolling pin. Roll out to 36 × 18 cm, working from the center upwards and downward. Use your hands or bench scraper to shape it so it’s an even rectangle. Fold the dough into thirds like a letter (this is your first turn). Wrap and refrigerate for 15–20 minutes.
- Second roll & fold: Repeat the same process: press gently, roll to 36 × 18 cm, fold into thirds again. Wrap and chill for another 15–20 minutes.
- After the final chill, roll the dough out to 18 × 16 cm.
- For best results, the dough and butter should be at the same firmness — cold but flexible. This keeps the butter in even layers rather than melting into the dough.
- If at any point the butter feels soft or the dough resists rolling, pop it back in the fridge for 10–15 minutes before continuing.
Cut and Shape
- Mark the bottom edge into three 6 cm sections, then mark the top edge halfway between each to form triangles. You should get 5 triangles; combine the two end pieces to make a 6th. Keep all pieces covered while shaping to prevent drying.
- Working with one piece at a time, gently stretch the base of the triangle in opposite directions so that it’s about 8 cm wide and press down onto your working surface. Then lightly press down the entire piece of dough with your palm to flatten. Carefully lift the tail of the dough up, keeping the base on the work surface.
- Hold the tip of the triangle and use a rolling pin to elongate it to 35–40 cm, pressing gently as you roll.
- Place one 12 g butter piece at the top base, fold the dough over to seal, and roll down tightly into a croissant shape.
- Place each roll on a parchment-lined tray with the tip facing down to prevent unrolling.
- Proof: Cover loosely and let rise for 90–120 minutes, or until puffy and jiggly. When gently pressed, the dough should slowly spring back, leaving a faint indent.
Bake
- Preheat the oven to 425°F (218°C).
- Whisk together the egg and milk if using an egg wash. Brush each croissant with egg wash and sprinkle lightly with flaky salt.
- Bake for 16–18 minutes, or until deeply golden brown.
- Cool for 10 minutes before serving warm. Enjoy!!
Notes
- *Or use 200 grams of all purpose flour.
- **Milk powder can be substituted with 130 ml of 2% milk, omitting the water.
- Depending on your oven, you may need to bake at 210 C/410 F. One of my ovens bakes nicely at 418 while the other bakes perfectly at 210 C.
- Prep Time: 12 hours
- Cook Time: 18 minutes
- Category: Bread
- Method: Baking
- Cuisine: Japanese-French Fusion
Nutrition
- Serving Size: 1 serving
- Calories: 255
- Sugar: 2.1 g
- Sodium: 279 mg
- Fat: 18.3 g
- Saturated Fat: 11.9 g
- Unsaturated Fat: 5.5 g
- Trans Fat: 0.9 g
- Carbohydrates: 19.9 g
- Fiber: 0.8 g
- Protein: 3.3 g
- Cholesterol: 47 mg


The texture of this was insane so flaky and buttery and hate right amount of salt! Loved this