
Learn how to make delicious Japanese Curry Bread with this step by step recipe. With a savory mild curry filling encased in a crispy, chewy and soft crust, this Kare Pan recipe tastes just like the ones you find at Japanese bakeries! (Vegan option + Baked or Air Fried Options)
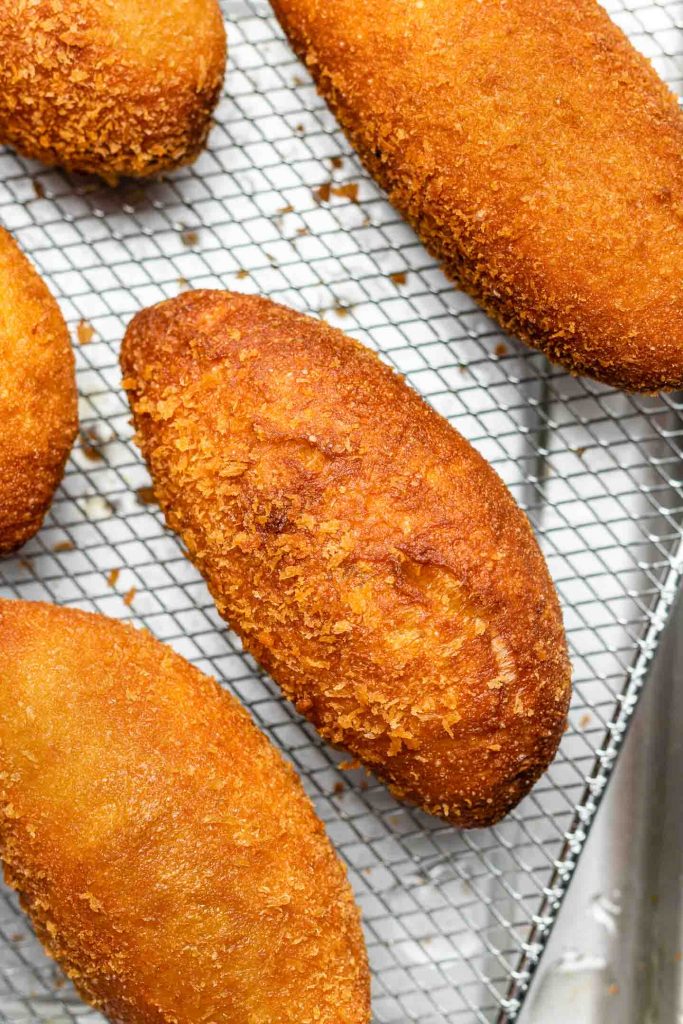
Whenever visiting bakeries in Japan, I ALWAYS got kare pan. I loved comparing kare pan’s from different bakeries, almost like hunting for the best ones! After many curry breads throughout my childhood my ideal kare pan has: a crispy, thin and chewy… yet still soft and a little fluffy crust with a good amount of filling.
Table of Contents
What is Kare Pan?
Kare Pan, also known as Japanese Curry Bread is a savory pastry with a crispy, chewy and soft crust filled with warm Japanese curry. Think… savoy donut. It’s probably one of the most popular savory pastries in Japan and can be found in almost every bakery. They’re even sold by the mass at convenient stores, supermarkets and food stalls!
Ingredients to Make Curry Bread
There are two components to making kare pan:
Curry Filling
It’s very common to use leftover Japanese curry for the filling, but I like to make it specifically for kare pan because I can control the consistency and I prefer to have minced grounds in my curry bread (which my usual go-to curry recipe doesn’t have). If you do decide to use leftover curry, heat it over a stove to thicken it up a bit so it is easier to work with. As for vegetables, you can use anything you have on hand and like! For this recipe, I used a combination of onions, carrots and potatoes and seasoned it with Japanese curry cubes, ketchup and garam masala.
Bread Dough
- Bread flour: This gives the dough its chewy texture and structure. You could use all-purpose flour, but bread flour ensures a better texture for kare pan.
- Cake flour: Lightens the dough for a softer interior, balancing the chewiness of bread flour.
- Milk: Adds richness and moisture to the dough. For a dairy-free option, soy milk works perfectly.
- Sugar: Provides slight sweetness to the dough, helping balance the savory curry filling.
- Instant dry yeast: Helps the dough rise quickly, creating a light and fluffy texture.
- Salt: Enhances the overall flavor and balances the sweetness.
- Butter: I used dairy free butter for this recipe, but feel free to use dairy butter, margarine, or even oil to add richness and tenderness to the dough.
How to Make Japanese Curry Bread (Kare Pan)
Curry Filling:
- Add 1 tbsp of oil to a pan over medium high heat. Add the garlic and onions and cook until the onions become almost translucent. Add the vegan grounds and cook for one minute. Add the potatoes and carrots and fry for 30 seconds and then pour in the soy milk. Cover and reduce to low heat and cook until potatoes are almost cooked through. Add the curry roux blocks, ketchup and garam masala and mix to combine. Cook until the curry has thickened (it should be quite thick, but it will also thicken as it cools). Remove from heat and transfer to a glass container. Once cooled, cover and place in the refrigerator to chill.


Dough
- Hand knead: Add the ingredients except the butter into a bowl and mix together. Be sure to add the salt and yeast on the opposite ends of the bowl (direct salt contact can weaken the yeast). Once a shaggy dough forms, place the dough on to your work surface and knead until the dough starts coming together. Once relatively smooth, add the butter in the middle and knead. Once butter is incorporated, hit the dough on the table and roll upward, until the dough is smooth. Once the dough is smooth, shape into a ball and then place in a bowl and cover. Let it proof for 30-60 minutes (depending on temperature) or until double in size. To check, poke a hole in the middle of the dough— it should not spring back up quickly.
- Stand mix: Add all of the ingredients, except butter into your stand mixer bowl. Turn on the stand mixer to setting 2 and knead for 1 minute. Increase speed to 4 and knead for 8 minutes. Remove the dough from the hook and press in the butter into the middle. Place it back into the stand mixer bowl and turn on to speed 4 and knead for another 5 minutes. Remove from the bowl and then form it into a ball. Cover and let it proof for 30-60 minutes or until double in size.
- Bread machine: Add all the ingredients to your bread machine and turn on bread dough setting. Let it run until primary fermentation is done.
- Flatten the dough to remove air bubbles and then divide into 6 equal pieces. Give them a quick knead and then roll them back into balls. Cover and let them rest for about 10 minutes (this allows the gluten to relax). In the meantime, divide the filling into 6 portions about 40-42g each (approx. 2 tbsp).
- Take a piece of dough and roll it out into a 10×13 inch oval. Add the filling to the top half and then bring the edge from the lower half of the dough upward to meet the edges of the top half of the dough. Be careful not to let the curry touch the edges or it will not seal properly. Firmly pinch the dough to seal it tightly. One sealed, place it seam side down into a silicon baking mat and cover with a damp tea towel to prevent them from drying. Repeat with remaining pieces.
- Add panko to a shallow dish. Brush or spray soy milk around the entire piece of dough and then quickly coat in panko. Place it back onto the silicon mat. Cover with a light damp tea towel as you go.
- Let it proof for 15-20 minutes. **Skip this step if you prefer thin & chewy kare pan bread dough and go straight to frying.
- Add 3 cups of oil to a deep pot and heat to 160-170 C (320-338 F). Place 2-3 pieces of the dough into the oil and fry each side for 2-3 minutes or until golden brown. Place on a wire rack to allow excess oil to drip off. After each round of frying, use a metal skimmer to remove excess panko. Repeat with remaining pieces. Allow them to cool for a few minutes. Serve and enjoy!
How to Bake or Air Fry Curry Bread
- To Bake: Pre-heat oven to 180 C (350 F). Place the curry bread on a lined baking tray and spray with oil on all sides. Bake each side for 15 minutes (total 30 minutes) or until they’re golden brown.
- To Air Fry: Pre-heat air fryer to 180 C (350 F). Place the curry bread in the air fryer basket and spray all sides with oil. Air fry for 6 minutes. Flip and air fry for another 6 minutes (total 12 minutes).
Tips for Making Curry Bread
- Thicken the curry: It is much easier to work with thickened curry so I highly suggest making it a day ahead of time and leaving it to cool and thicken overnight in the fridge (which is why leftovers are great). If your leftover curry is still loose, thicken it up by heating and simmering it over the stove until paste-like.
- Rest the dough and thin out the edges: Resting allows the dough to relax and will be easier to shape. After rolling out the dough, use the rolling pin and/or fingers to pinch the edges thinner. It makes it easier to seal and the thicker base will hold the curry together.
- Keep curry out of the edges: Once the curry touches the edges, it is almost impossible to keep sealed so this is VERY important. If you do have a bit of curry touching the edges, rip a small piece of dough off, cover the spot and knead it in and try to tightly pinch the dough together. Otherwise, I suggest baking the ones that are not properly sealed so that you don’t run into the problem of them exploding when frying.
- Secondary fermentation: The second rise will determine the thickness and fluffiness of the bread. You can skip the secondary fermentation which will create a very thin, chewy and crispy crust whereas leaving it covered for 20-30 minutes will yield a fluffier, thicker crust. The length of fermentation will depend on the temperature in your kitchen but a good rule of thumb to check for doneness is to press on the dough, where it should leave a indentation. This is purely personal preference so try different proofing times and see which you like best!
- Frying: 15-20 seconds after you add the curry bread to the oil, flip and fry for 1 minute. Then flip and fry for another 1 minutes. Repeat until both sides are beautifully golden brown. This method of frying ensures the bread is even throughout and doesn’t cause a large gap on the inside (as shown below).
How to Store Curry Bread
To store curry bread, place it in an airtight container at room temperature for up to 1 day. I don’t recommend storing it in the fridge as the bread turns dry and hard. For longer storage, freeze the bread. To reheat, preheat your oven to 350°F (175°C) and bake for 15-20 minutes, or until heated through and crispy. Alternatively, you can use an air fryer at the same temperature for about 10-12 minutes.
FAQ
Yes, you can, but bread flour gives the dough a chewier texture, which is more traditional for kare pan. All-purpose flour will result in a softer, less chewy texture.
You can use homemade Japanese curry or the store-bought packs for convenience. Just make sure it’s thick enough to prevent spilling during frying.
Use a neutral, high-smoke point oil for frying curry bread, such as vegetable oil, canola oil, or peanut oil. These oils ensure an even, crispy texture without affecting the flavor of the bread.
More Delicious Curry Recipes to Love
- Authentic Vegan Japanese Curry
- Vegan Tofu Katsu Curry
- Japanese Curry Fried Rice
- Pan Fried Curry Buns
- Vegan Curry Udon
- Yaki Curry
- Vegan Pumpkin Curry
SAVE IT FOR LATER! ↓
If you recreate this Japanese Curry Bread recipe let me know how you liked it by leaving a comment and rating below or by tagging me on Instagram @Okonomikitchen, I love seeing all of your tasty recreations!
Hungry for more? Be sure to subscribe to my newsletter and follow along on Instagram, Youtube and Pinterest for more deliciousness!

Japanese Curry Bread (Kare Pan) カレーパン
- Total Time: 1 hour 25 minutes
- Yield: 6 servings
- Diet: Vegetarian
Description
Learn how to make delicious Japanese Curry Bread with this step by step recipe. With a savory mild curry filling encased in a crispy, chewy and soft crust, this Kare Pan recipe tastes just like the ones you find at Japanese bakeries!
Ingredients
Curry Filling*
- 2/3 cup (100 g) onion, diced
- 3–4 cloves (10 g) garlic, minced
- 4–4.5 oz (126 g) ground beef
- 1/2 tsp (2 g) salt
- 1/3 cup (55 g) carrots, finely diced
- 1/2 cup (60-80 g) potatoes, diced
- 1 pack (50 g) Japanese curry roux cubes
- 2 tsp (9 g) ketchup or honey
- 1 tsp (4 g) cocoa powder
- 1 tsp (4 g) garam masala
- 1 1/2 cups (320 ml) water
Dough Option 1 (Soft and Chewy)
- 1 1/2 cup (180 g) bread flour
- 3 tbsp (20 g) cake flour
- 1 1/2 tbsp (20 g) sugar
- 1/2 tsp (3 g) instant dry yeast
- 3/4 tsp (4 g) salt
- 1 tbsp (8 g) milk powder (or substitute water with 1/2 cup + 2 tsp (135 ml) 2% milk)
- 1/2 cup (120 ml) water
- 1 1/2 tbsp (20 g) butter, softened
Dough Option 2 (Soft and Fluffy)
- 1 1/2 cup (160 g) bread flour
- 3 tbsp (40 g) cake flour
- 1 tbsp + 2 tsp – 2.5 tbsp (20–30 g) sugar (I usually add about 24 grams)
- 1/2 tsp (3 g) instant dry yeast
- 3/4 tsp (4 g) salt
- 1 large (20 g) egg yolk
- 1/4 cup + 2 tsp (70 ml) 2% milk
- 3 tbsp + 1 tsp (50 ml) water
- 1.5 tbsp (22 g) unsalted butter
Coating and Frying
- 1 egg or 1/4 cup water or milk
- 1 cup Japanese style panko
- 3 – 4 cup neutral frying oil
Instructions
Curry Filling
- Cook the aromatics: Heat 1 tablespoon of oil in a pan over medium-high heat. Add the minced garlic and diced onions, cooking until the onions become translucent.
- Add the beef: Stir in the ground beef and salt, cooking for about 1 minute until lightly browned.
- Add the vegetables: Mix in the diced potatoes and finely diced carrots. Fry for 30 seconds, then pour in the water. Cover the pan, reduce the heat to low, and let the mixture cook until the potatoes are nearly tender.
- Add the seasonings: Break the curry roux cubes into pieces and add them to the pan along with ketchup and garam masala. Stir well to combine.
- Thicken the curry: Continue cooking until the mixture thickens. It should be quite thick as it will firm up more when cooled.
- Cool and store: Remove from heat, transfer the curry to a glass container, and let it cool. Once cooled, cover and refrigerate.
Dough
By Hand:
- In a mixing bowl, add all ingredients except the butter. Place the yeast and salt on opposite sides of the bowl to avoid direct contact. Mix until a shaggy dough forms.
- Transfer the dough to a work surface and knead until it starts coming together. Once smooth, add the butter to the center and knead it in.
- Knead by hitting the dough against the surface and rolling it upward. Continue until the dough becomes smooth and elastic. Shape into a ball and place in a bowl. Cover and proof for 60 minutes at 30°C, or until doubled in size.
- To check if it’s ready, poke a hole in the dough. If it doesn’t spring back quickly, it’s ready.
With a Stand Mixer:
- Place all ingredients except the butter into the stand mixer bowl. Mix on speed 2 for 1 minute. Increase to speed 4 and knead for 8 minutes.
- Remove the dough from the hook, press the butter into the center, then return it to the mixer. Knead on speed 4 for another 5 minutes.
- Form the dough into a ball, cover, and let it proof for 60 minutes at 30°C until doubled in size.
Using a Bread Machine:
- Add all ingredients into the bread machine. Select the dough setting and let it run until the primary fermentation is complete.
Assembling and Frying
- Shape the dough: Flatten the dough to remove air bubbles and divide into 6 equal pieces, about 63 g each. Take one piece and gather the edges toward the center, pinching to seal and form a ball. Place seam side down, loosely cup with your hands, and roll gently against the work surface to smooth. Repeat with the remaining pieces. Cover as you go, then let rest for 10 minutes to relax the gluten.
- Prepare the filling: Divide the curry filling into 6 portions, about 60-65 g each. You may have some leftover curry.
- Form the curry bread: Roll out each dough ball into a 10×13 cm (4×5 inch) oval. Place the filling on the top half. Fold the bottom half up to meet the top edges, ensuring the curry doesn’t touch the edges. Pinch firmly to seal. Place seam-side down on a non-stick baking tray and cover with a damp towel. Repeat for all pieces.
- Coat: Pour panko into a shallow dish. Brush each dough piece with egg or milk, or spray with water. Then coat evenly in panko, pressing it gently so it sticks to the dough. Place back on the baking tray, covering as you go.
- Final proof: Let them proof for 25-30 minutes at 30°C, or until it looks slightly puffed up and larger in size. Take care not to over proof at this stage or else the seams tend to loosen and puff up too much when being fried. You can also skip this step and go straight to frying for a thinner, chewier textured kare pan.
- Fry: Heat oil in a deep pot to at least 3 inches deep and bring to 170–180°C (338–356°F). Fry 1–3 pieces at a time, seam side down, for 15–20 seconds to set the seam. Flip and fry for 2 1/2–3 minutes, until lightly golden. Flip once more (seam side down again) and fry for another 2–2 1/2 minutes, until evenly golden brown. The bread will continue to cook slightly after frying, so remove before it becomes too dark.
- Drain and cool: Place the fried curry bread on a wire rack to drain excess oil. Remove leftover panko from the oil with a skimmer before frying the next batch. Serve hot and fresh. Enjoy!!
Notes
- Using leftover curry: If using leftovers, you will need about 1 1/3 cup (290-300 grams). Be sure it’s thick in consistency. If it’s still in a runny state, cook it on the stove over medium to remove some of the moisture.
- Prep Time: 70 minutes
- Cook Time: 15 minutes
- Category: Snack
- Method: Frying
- Cuisine: Japanese
Nutrition
- Serving Size: 1 serving
- Calories: 271
- Sugar: 3.1 g
- Sodium: 453 mg
- Fat: 11.6 g
- Saturated Fat: 2 g
- Unsaturated Fat: 8 g
- Trans Fat: 0.03 g
- Carbohydrates: 34.5 g
- Fiber: 1.7 g
- Protein: 7 g
- Cholesterol: 0 g
Okonomi Kitchen is a participant in the Amazon Services LLC Associates Program. When you purchase something through my amazon affiliate links, I earn a small commission that helps me produce consistent content at no cost to you. Thank you for supporting my plant based kitchen!


One of my favourite recipes to make!
Love curry bread and love being able to recreate it! Tastes just like in a Japanese bakery !
Great recipe overall, I made it twice
!
I’m an NYC based Pastry Chef and went to japan for the first time last year, and curry pan was one of my favorite grab and go snacks, I had it almost every other day, while there hahaha, to say I liked it would be an understatement. So when I found the video on IG if the recipe being made, I knew I had to make it soon!
*note: made a couple variations (that were needed for the bread to develop/be to my liking, for me at least)
I made the “soft & fluffy dough” by machine (5qt kitchen aid) and had to add 30g of extra flour to a single batch and 75g extra to a double batch.
I also kneaded both dough by hand fir a few minutes since my hook attachment didn’t reach the bottom of the bowl, (I thought a double batch would help this, but it was still too small of a batch).
Second thing I changed:
I know curry for this is meant to be on the milder side, and it was good, but I added some spice and a tad bit more curry and such to make it a bit more pronounced.
Note: This is just for the dough – I decided on a different filling that I had readily available; I hope that’s okay! ^^;;;
So… I read the recipe, but I *didn’t* read the recipe. I missed the word “substitute” for the milk powder, so I added the milk… AFTER ALL the other ingredients (including the water). Occasionally, I’m incredible in the kitchen, but today was a derp day.
I decided to continue (trying to) follow directions but just decided to add more flour to make it the required consistency: A LOT (maybe about 2c extra lmao) I decided to trust the process and continued following the recipe. Adding the butter made me feel like a little kid playing with playdough which was a lovely surprise! (I’ve never seen any recipe do that before, but it was a great time!)
I don’t think you can screw the dough up.
My “kare”-pan actually turned out incredibly well, and the ingredients for the dough I assume didn’t lose any flavour. The dough raised nicely, and well – I made about 10 altogether! After putting the panko on, letting them rest then frying them, they held their shape, and one puffed up! You don’t know how happy I was that I still had success today! I deep fried mine in a small saucepan, as it was easier for me than heating up the deep fryer.
Now I just need to practice properly folding the dough when I’m making them! Thank you for a great recipe (it’ll become even better once I make it again, when I properly follow it next time!)
Thats amazing, thank you so much for sharing! I’m glad you enjoyed :’)
this curry bread was one of the best I’ve had the dough is perfect texture it’s just like the ones we had in Japan! The filling is also super tasty we’ve eaten it with rice too. Definitely a must make recipe
Literally the best thing I’ve ever put inside my mouth! The crispiness from the bread and the warm & juicy curry filling inside – I’m still thinking about it now….
How much does one batch of the curry filling on your website make? Sufficient for this recipe?
Yes the curry filling for the recipe is enough!
I made this for my home ED assesment in school and got an A+ the teacher thought it was really tasty and now its being served in my school’s cafeteria, i will definitely continue to make this at home.
Hi! Can the first proof of the dough be left in the fridge overnight? Planning to make this in the morning
Yes it can, and no need to adjust the amount of yeast 🙂
vegan minced grounds (1/2 cup)
Minced grounds? What is this? Would help if this was clearer!
any sort of plant based ground ‘beef’ 🙂
Looks very delicious! Can’t wait to make them. Thanks for sharing this awesome recipee. God bless
I made the baked version of these and they came out really well: crispy and golden outside, with a tasty and flavoursome filling. Enjoyed by everyone in my family! (As others have said the filling by itself is great too if you don’t have time for the bread – I’ve made lots of Japanese curry but not with vegan ground meat or garam masala and those were tasty additions.)
There’s a bit of kneading and the recipe multiple proofings. It takes time, but trust me it is worth it. The bread is just so soft and fluffy, the outside is ultra golden and crunchy with panko goodness. I added a pinch of honey and miso to my curry sauce. This was so delicious omg. Its a little tricky to get the technique down to assemble and fold the bread with the curry in it, but if you do it with cold curry as the recipe says, its much easier.
I dream about kare pan and always make extra curry to make this later in the week, or freeze it for another time. This recipe is fantastic. Thank you, Lisa!
I’ve tried freezing the ready made Kare Pan and it was soooooo convenient to have them waiting in the freezer for me to fry when the craving hit. Colder months means it’s time to make some more!
Ahh, this is so good! Honestly, the curry by itself is going to be something I make on its own in the future (I used dehydrated soy as the grounds). I had trouble getting my dough to seal, but I baked them (other than the one I air fried), so it wasn’t a problem. Will definitely make these again (unless I eat all the curry before it cools).
I’m an experienced cook, but don’t know what you mean by “grounds” in this context.
any ground protein of your choice, I used vegan ground beef 🙂
I tried a double recipe for the first attempt and my kids devoured them all within the next day. Now I’m on the hook to make this every weekend. Great recipe, love that it uses grams for everything.
I never thought eating fried bread w a sauce inside would be so freaking delicious! I’m definitely gonna make it again ;3
the recipe was very good, but I will say, if I could go back in time I would divide the dough into five pieces, not six. the dough was a little too thin in areas, which made adding panko breadcrumbs near impossible, and made frying difficult, though most of them turned out fine, with or without the panko coating. I had one curry bread burst in the oil, which was scary, and I feel that the dough was just stretched too thin. I made mine by hand, and I kneaded for a total of 7 minutes before resting for 45 minutes, forming the curry breads and resting for another 20 minutes, since my kitchen is hot so my doughs always rise quickly. I also added the small amount of butter in liquid form when making the dough, since I don’t have a stand mixer, and it was fine. my only note for those making it at home by hand is to divide the dough into five, not six, and don’t roll it out to 10 x 13 inches. that was way too large for me, and attempting to make an oval that large made the dough extremely paper thin, which won’t work. I can’t spread 1/4 cup flour’s worth of dough into an oval bigger than a foot long without it being paper thin. I would recommend rolling out to 5 x 8 inch ovals, and gathering the dough overhanging both sides of the hardened curry you placed in the middle and bringing those sides upward and pinching them together. if you try to fold hotdog style, by bringing one side of the overhanging dough over to meet the other side, the curry is going to roll out. by bringing both sides upward after pinching the edges closed, you avoid that issue. once you pinch closed, roll the formed curry bread over a couple times to smooth it out. that method worked better for me when I made them. again, my dough was too thin to coat with panko, so I had to fry them mostly without it, but they were still good. if you’re making this recipe by hand, I would highly recommend following the suggestions I’ve given above to avoid a blowout in your oil. also, I will tell you that you need to use about 2 and a half inches of oil in a thick bottomed pot. don’t use more or you will have a hard time keeping your curry breads turned the way you want them. they will float however they wish if you have too much oil in your pot. so “three cups of oil” might be right for a large pot, but if you’re using a smaller pot, it will be way too much oil. you need about 2 and a half inches of oil regardless of the size of your pot so that you can control the way that your curry breads are positioned. you don’t want them to float like a doughnut, you want them to slightly touch the bottom of your pot so that they don’t flip and turn on their own while frying. hopefully, by implementing the changes I mentioned I’ll be able to roll them in panko and have an easier fry time the next time I make this recipe. thank you for the recipe by the way! they tasted great, regardless of my little explosion.
Blown away by this recipe. 10/10 would recommend. And it’s so forgiving! I was not confident I was following each step correctly but the end product was amazing.
I also grew up eating karepan, and I love this recipe!
I brought these to a friend’s potluck to share, and word spread quickly about how delicious these are. They were the first item to disappear!
I did have some issues with the widget to scale the recipe up, so ended up doing quick math to scale up manually. Other than that 1 minor thing, this recipe is perfection!!
The kare pan has been a hit with everyone who’s tried it. It was a little tricky to get the seam right the first time but even the exploded ones tasted amazing!
Do you think this recipe could work with pizza dough?
I’m not sure as I haven’t tried. If the pizza dough is high hydration it may be difficult to mold.
Amazing recipe! It was very easy to make and super delicious. I may have messed up the dough as this was my first attempt, but I will definitely make it again!
So easy to make and it came out exactly as pictures!! So delicious 😋