These Chinese Hand-Pulled Noodles (La Mian) are irresistibly chewy and bouncy, perfect for soups, stir-fries, or tossing in sauce. This easy step-by-step recipe guides you to make authentic, restaurant-quality noodles at home with just flour, water, and salt!

Table of Contents
- What Are Hand Pulled Noodles?
- Why This Recipe
- Ingredients and Substitutions
- How to Make Easy Hand Pulled Noodles at Home (Step by Step)
- Step 1. Make the Dough
- Step 2. Divide and Roll Out the Dough
- Step 3. Pull Noodles
- Step 4. Cook the Noodles
- Serving Suggestions
- How to Store Leftovers
- VIDEO: Watch How to Make It
- Lisa’s Recipe Tips
- Recipe FAQ
- More Homemade Noodles Recipes
- Hand Pulled Noodles Recipe
What Are Hand Pulled Noodles?
Hand-pulled noodles, or La Mian (拉面), are a type of Chinese noodle made by repeatedly stretching and folding dough until it forms long, elastic strands. This traditional technique creates noodles with a unique chewy, bouncy texture that can’t be replicated with machine-made varieties. Originating from Lanzhou in northwest China, hand-pulled noodles are a staple in Chinese cuisine, often served in rich broths or stir-fried with savory sauces.
Unlike knife-cut or extruded noodles, La Mian relies on precise dough hydration, gluten development, and hand-pulling techniques to achieve the perfect stretch. Whether thin and delicate or wide and ribbon-like, these noodles are known for their silky texture and ability to absorb bold flavors.
Why This Recipe
I’ve tested this hand-pulled noodle recipe multiple times to perfect it for home cooks. After extensive trials with different flours, hydration levels, and resting times, I’m confident that if you follow this recipe closely, you’ll be able to make thick, chewy noodles just like the ones from your favorite noodle spot.
This recipe:
- Ensures precise measurements for perfectly bouncy, chewy noodles at the ideal thickness.
- Provides three variations—thin, flat, and wide noodles—so you can choose your favorite style.
- Includes detailed tips, tricks, and troubleshooting notes to set you up for success.
That being said, making hand-pulled noodles requires experience and practice. Different flours from various regions may yield slightly different results, and hydration levels can vary. Temperature also affects resting time. As you gain experience, you’ll learn to recognize the signs that indicate when the dough is ready to be pulled.
Ingredients and Substitutions
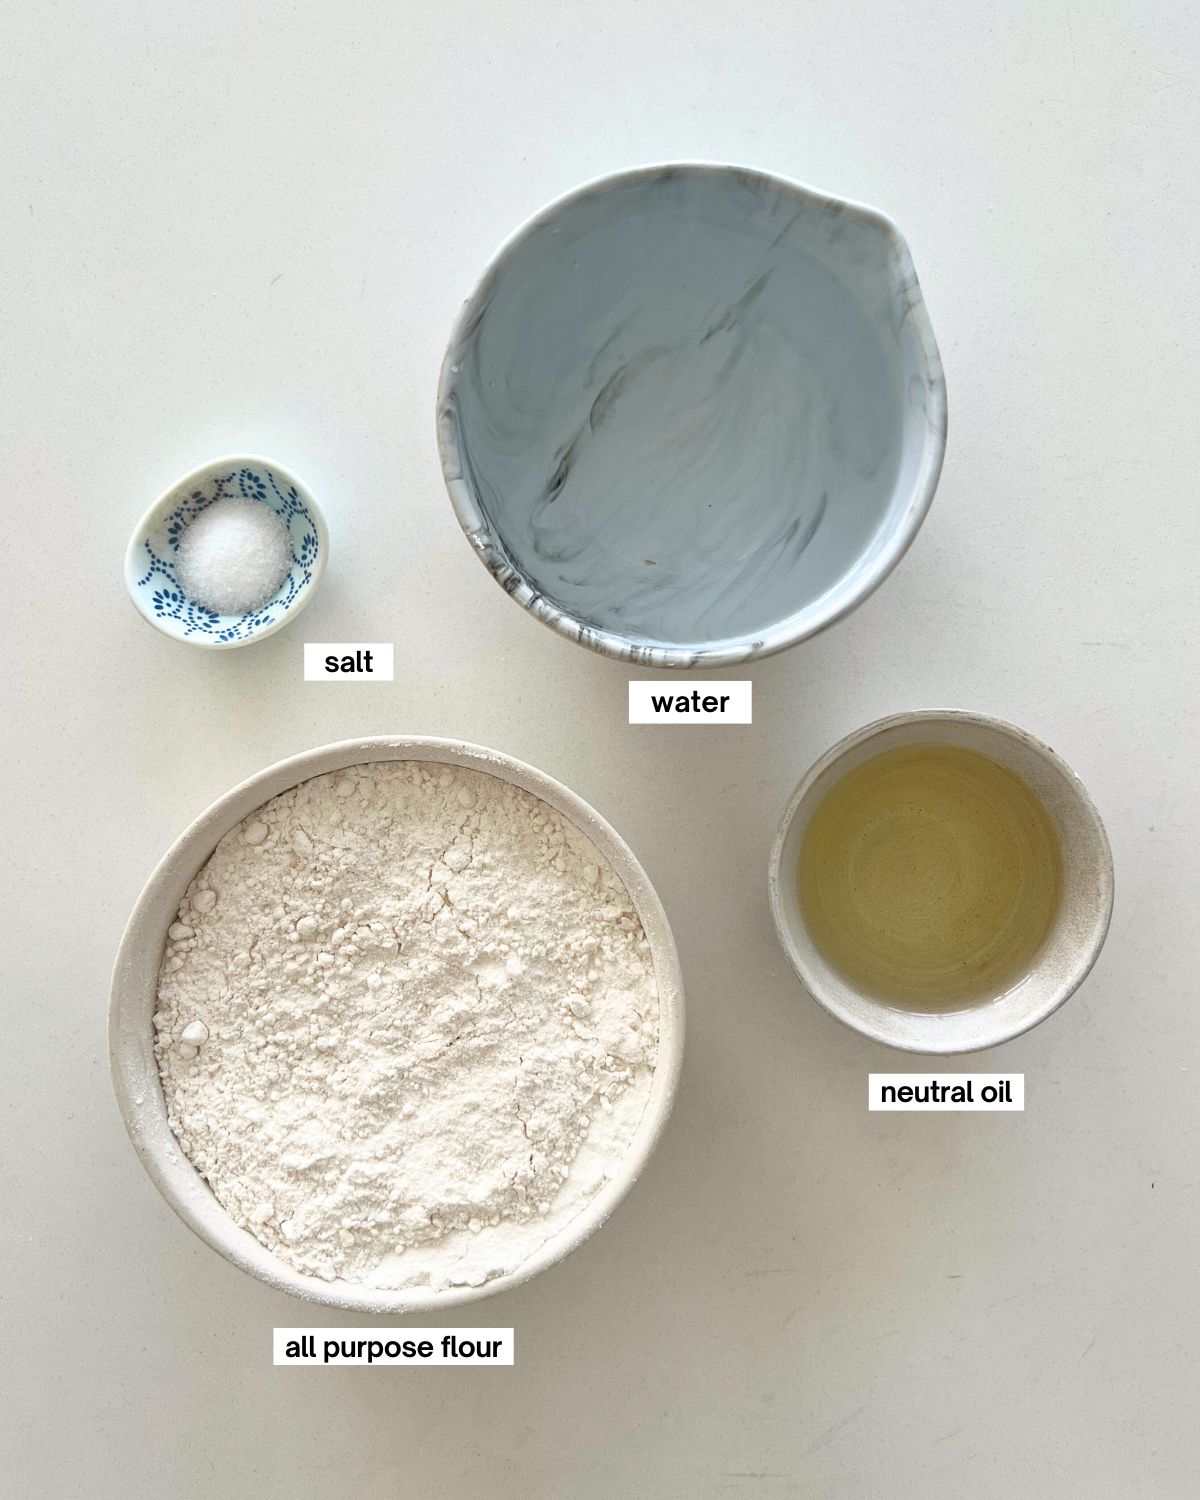
These homemade wheat noodles require just 4 ingredients: flour, water, salt and oil.
All Purpose Flour vs. Bread Flour
All purpose flour or medium-gluten flour (10-11g protein per 100g) works best for hand-pulled noodles, as it provides the right balance of elasticity and stretch. While most all-purpose flour in the US falls within this range, always check the nutrition label since it varies by country. Canadian all-purpose flour tends to have a higher protein content, so if using it, you may need to adjust hydration slightly. High-gluten flour (13g+ protein) can be used but makes the dough harder to stretch and more prone to breaking.
Water
Adjust the temperature of the water depending on the temperature of your kitchen. Generally, room temperature should work but in the winter use slightly warmer water. Cold water is harder for flour to absorb and if the dough is cold, it feels tougher to knead. A cold dough also makes it harder to form into a dough ball, roll out and stretch.
Salt
Salt plays a crucial role in the structure and texture of hand-pulled noodles. It strengthens the gluten network, making the dough more elastic and easier to stretch without tearing. Typically, 1-2% salt relative to the flour weight is used, striking a balance between elasticity and chewiness. Additionally, salt enhances the overall flavor of the noodles, ensuring they don’t taste bland even when served with mild sauces or broths. For noodles, use you can use kosher salt or sea salt.
How to Make Easy Hand Pulled Noodles at Home (Step by Step)
Step 1. Make the Dough
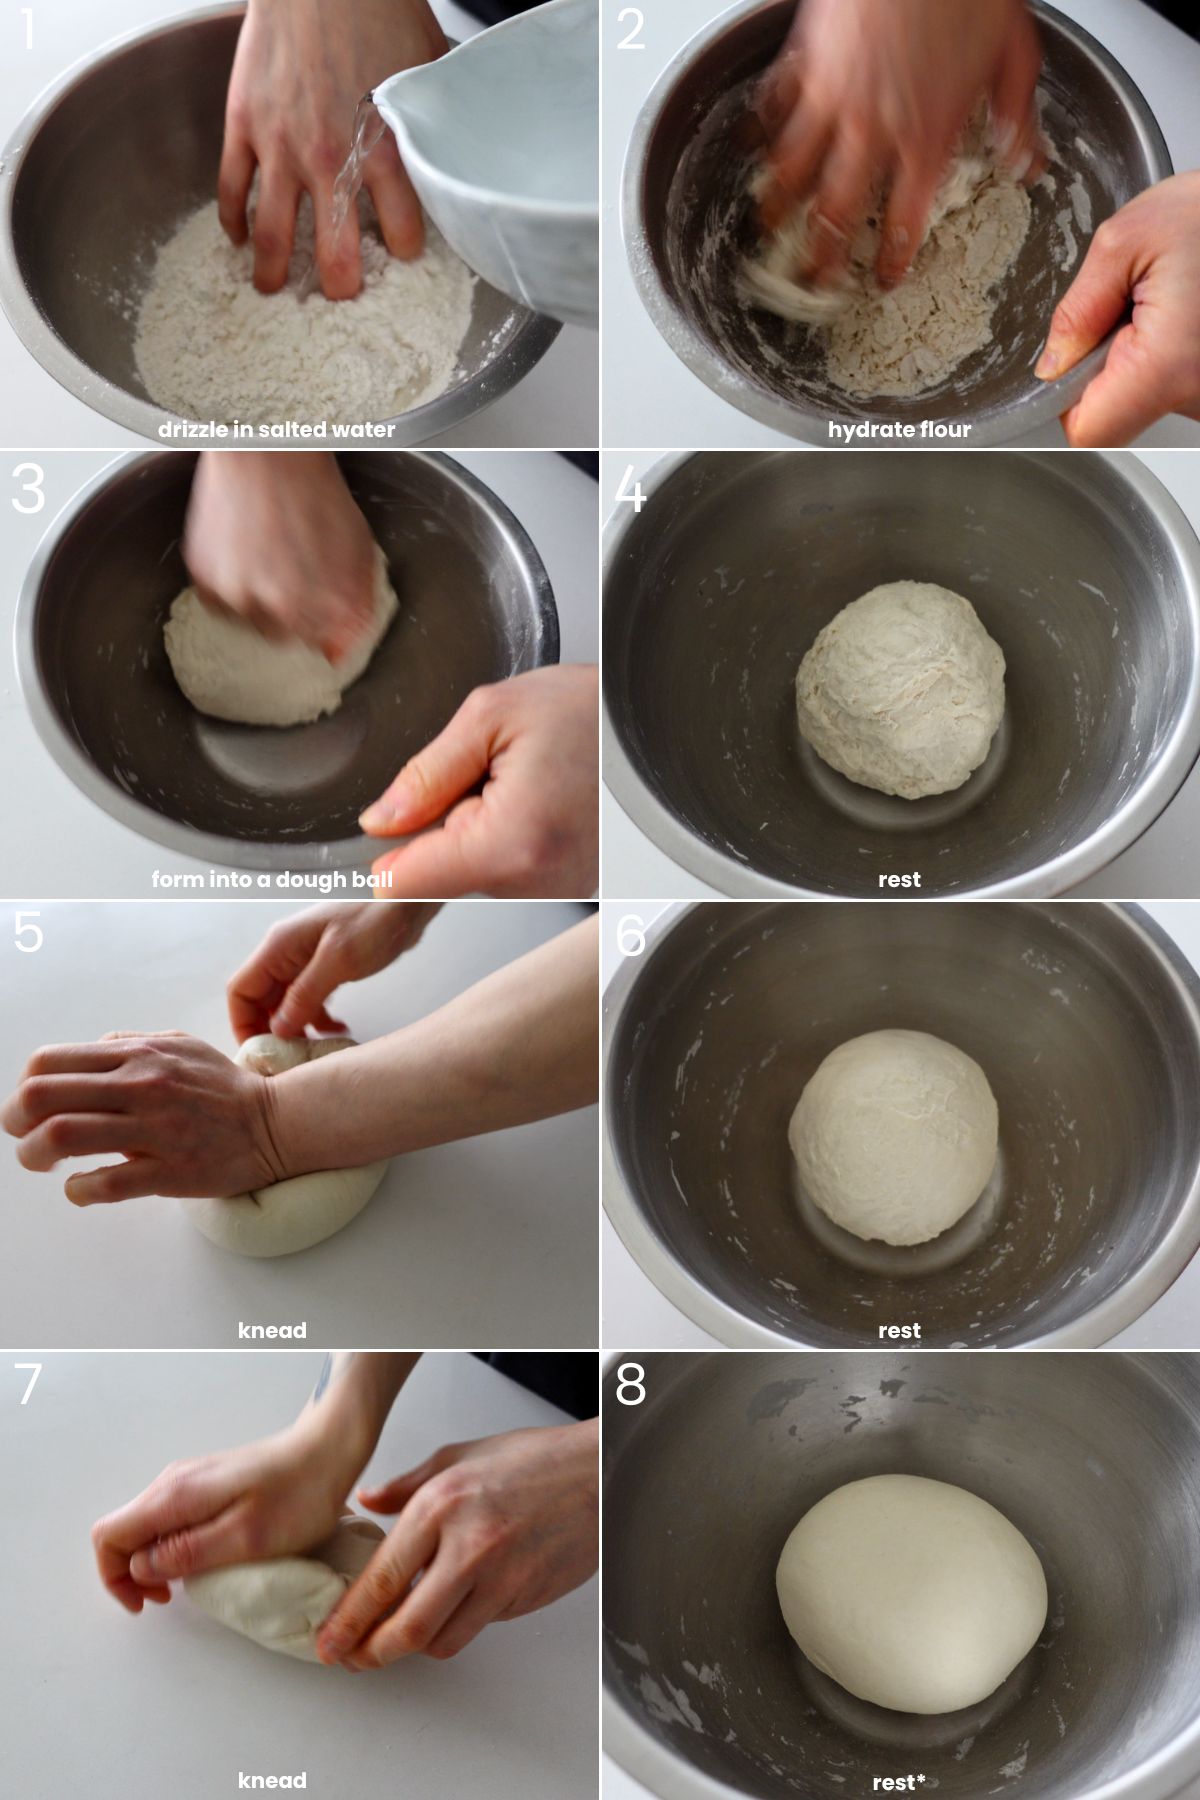
- Make dough: Slowly pour in the water while mixing the flour to evenly hydrate the dough. This makes it easier for the flour to absorb the water. Once the flour is shaggy, squeeze the dough to form a rough dough ball. Cover and rest for 20 minutes.
- Set 1: Knead until you feel the dough start to toughen up again. Cover and rest for 20 minutes.
- Set 2: Knead until the dough is smooth. If the dough feels like its resisting or tight before it becomes smooth, perform one more set. Cover and rest for 5 minutes. You can skip the 5 minute rest and go stright to dividing but the dough relaxes and is easier to handle.
Step 2. Divide and Roll Out the Dough
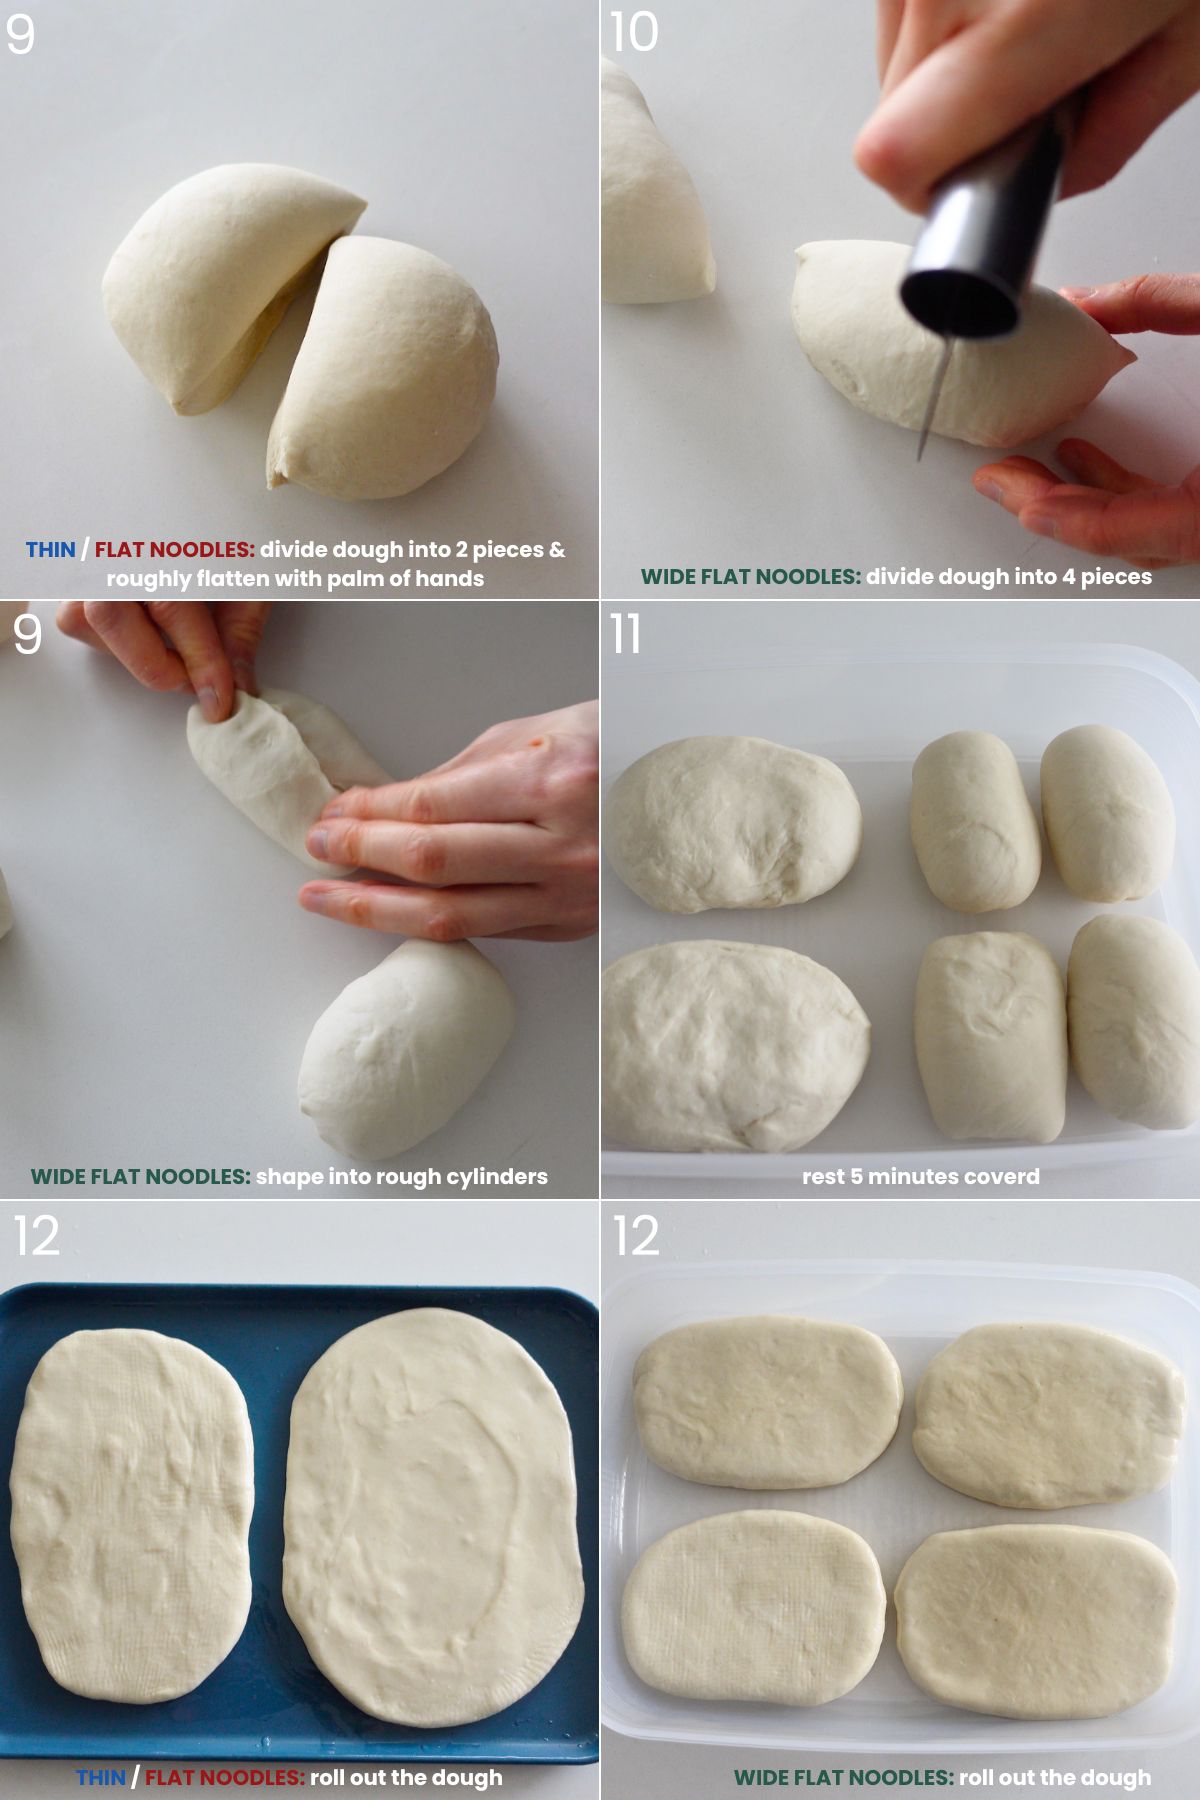
- For thin noodles: divide the dough into half. Flatten with the palm of hands with the cut edge facing down. Rest and roll out 3/4-1 cm thick.
- For flat noodles: divide dough in to half Flatten with the palm of hands with the cut edge facing down. Rest and roll out 1/2 cm thick.
- For wide flat noodles: divide into 4 pieces. Shape into a rough cylinder. Rest and roll out 7 x 12 cm and 1/2 cm thick
- You can skip the rest and try to roll it out right after cutting but a short rest will make it easier for the dough to roll out and not want to shrink back.
Step 3. Pull Noodles
Pulling Thin Noodles

- Cut the dough into 1 cm pieces and keep them covered.
- Hold each end of a piece lightly and stretch to arm’s length. It should pull smoothly and effortlessly. Bounce it on the counter, fold in half, and repeat until it reaches the desired length.
- Lay noodles on the counter without overlapping. If space is limited, dust with flour to prevent sticking.
Pulling Flat Noodles

- Slice the dough into 3–4 cm pieces and keep them covered.
- Hold each end of a piece lightly and stretch it to arm’s length. Bounce it on the counter a few times until it reaches the desired length.
- Lay the pulled noodles on the counter without overlapping. If space is limited, lightly dust with flour to prevent sticking.
Pulling Wide Flat Noodles

- Press chopsticks into the dough to create an indent. You can skip this step and just pull the same as thin and flat noodles but I love the ripples from the tearing and how thin yet wide they get.
- Loosely hold both ends with your thumbs while resting the dough on your fingers. Pull in opposite directions, then bounce it on the counter a few times until it reaches the desired length.
- Tear along the indent. For wider noodles, gently stretch them widthwise before cooking.
- Lay the pulled noodles on the counter without overlapping. If space is limited, lightly dust with flour to prevent sticking.
Step 4. Cook the Noodles
Cook the noodles in boiling water for 1-2 minutes.
Serving Suggestions
You can serve these fresh homemade noodles with just about anything you like! Here are some suggestions:
- Vegan Zha Jiang Mian
- Garlic Chili Oil Noodles
- Spicy Cumin Lamb Noodles
- Biang Biang Noodles with Chili Oil
- Spicy Peanut Noodles
- Chili Crisp Sesame Noodles
- Lanzhou Beef Noodle Soup
- Taiwanese Been Noodle Soup
- Scallion Oil Noodles
It doesn’t even have to be Chinese flavours, they work wonderfully with marinara, ragu, cream sauces and more.
How to Store Leftovers
Storing Cooked Noodles
- Refrigeration: Store in an airtight container for up to 3 days. Undercook slightly to maintain texture when reheated.
- Freezing: Store in a freezer-safe container for up to 3 months.
- Reheating: Boil for 1 minute or microwave with a splash of water to loosen.
Storing Uncooked Noodles
Uncooked noodles are best stored after dividing and before they’re pulled.
- Refrigeration: Oil generously, cover and store in fridge for up to 3 days. Allow it to come to room temperature before pulling.
- Freeze: Let it rest at room temperature for 2-4 hours. Then transfer into a air tight bag or container and freeze dough for up to 3 months. Allow it to come to room temperature before pulling.
- Refrigeration after pulling: Best enjoyed fresh but can be stored in an airtight container, dusted with rice flour and wrapped in plastic wrap. Note that the texture may change.
- Freezing after pulling: Dust with rice flour, separate strands, freeze on a tray, then transfer to a container. Cook straight from frozen.
VIDEO: Watch How to Make It
Lisa’s Recipe Tips
- Know the Protein Content of the Flour: This will help determine how much water to use and whether you need a shorter or longer resting time.
- Weigh the Ingredients: A precise flour-to-water ratio is crucial for achieving the right elasticity. Use a kitchen scale for accuracy.
- Rest the Dough Sufficiently: If at any point the dough feels tough or resisting, cover and let it rest until it relaxes.
- Work With Room Temperature Dough: Cold dough is too tight and resistant to stretching. Letting it come to room temperature allows the gluten to relax and hydration to even out, making the dough more pliable, preventing breakage, and ensuring a perfectly chewy, elastic texture.
- Practice & Don’t Aim for Perfection: Aside from the weight of the dough, don’t worry about rolling out the dough with perfect measurements or slicing them all into exactly the same size pieces. It’s okay if the dough tears here and there, especially for the flat wide noodles. The imperfections and ripples actually help hold on to sauces because its textured. Practice also helps with getting to know when the dough is ready and how much it can be stretched.
Troubleshooting
- Dough is too tough or too soft: If the dough feels too tough and resists stretching, it may be too dry; add a little more water and knead until smooth. If it’s too soft and sticky, sprinkle in a bit more flour and knead until it firms up. Proper hydration is key for easy stretching.
- Noodles keep breaking: This is usually a gluten development issue. Make sure to knead the dough thoroughly and let it rest long enough so the gluten network can form properly. Using high-protein flour also helps strengthen the dough. Make sure the dough is also room temperature.
- Dough isn’t stretching properly: If the dough is stiff and difficult to stretch, it likely needs more resting time to relax the gluten. Also, using the right flour—such as bread flour or a high-protein all-purpose flour—ensures the right elasticity for smooth pulling.
- Noodles turn out too chewy or mushy: If your noodles are too chewy, they may need a slightly longer cooking time. If they turn mushy, they are overcooked—boil just until they float and have a firm but springy texture. Rinsing with cold water after boiling can also help maintain the right consistency.
Different Variations of Hand-Pulled Noodles


- Thin, bouncy Lanzhou-style noodles: 1/2 cm thick or less
- Flat Noodles (similar to Knife Pare noodles): 2-2.25 cm wide
- Wider Biang Biang-style noodles: 4-4.5 cm wide
Recipe FAQ
Yes, but fresh hand-pulled noodles have the best texture when eaten immediately. If storing, dust with rice flour to prevent sticking and refrigerate for up to 24 hours. For longer storage, freeze in portioned bundles and cook straight from frozen.
Yes! Thin noodles work great for stir-fries. Undercook them slightly so they don’t become too soft when tossed with sauces in the pan.
If your noodles keep tearing, the dough likely hasn’t rested long enough or is too cold. Proper resting (at least 1–2 hours at room temperature) allows the gluten to relax, making the dough more elastic and easier to stretch. If the dough has been refrigerated, let it warm up before pulling.
You can rest the dough at room temperature for up to 6 hours for optimal elasticity. If storing longer, keep it in the fridge for up to 3 days, but let it return to room temperature before pulling to prevent tearing and improve stretchability.
Yes. Once the dough comes together in the beginning, knead it for about 5 minutes. Cover and rest for 45 minutes. Then knead for another 5 minutes. Divide and then rest for 10 minutes before shaping.
More Homemade Noodles Recipes
- Scissor Cut Noodles
- Hand Torn Noodles
- Homemade Udon Noodles (coming soon)
- Ramen Noodles (coming soon)

Enjoy! If you make this Hand Pulled Noodles recipe, I’d love to hear what you think! Leave a comment and rating below, and if you share it on social media, tag me on Instagram @Okonomikitchen. I can’t wait to see your creations!
Print
Hand Pulled Noodles
- Total Time: 6 hours 12 minutes
- Yield: 2 servings
- Diet: Vegan
Description
These Chinese Hand-Pulled Noodles (La Mian) are irresistibly chewy and bouncy, perfect for soups, stir-fries, or tossing in sauce. This easy step-by-step recipe guides you to make authentic, restaurant-quality noodles at home with just flour, water, and salt!
Ingredients
- 255 g (approx. 2 cups) all purpose or bread flour*
- 140–155 water (approx. 1/2 cup + 1 tbsp – 1/2 cup + 2 tbsp + 1 tsp), room temperature**
- 1/3 tsp (1.6 g) salt
- oil, for coating the dough
Instructions
Make the Dough
Option 1: Prepare the Dough By Hand
- Dissolve salt in water.
- Add the flour to a mixing bowl and slowly drizzle in half the water, stirring with chopsticks or your fingers in a claw motion. Once absorbed, add the remaining water gradually.
- Mix until the dough forms a shaggy mass. Gather everything into a ball, pressing down to incorporate any remaining dry flour. If there are still dry spots after a few minutes, lightly sprinkle more water where needed and knead it in. Knead for 2 minutes to bring everything together.
- Set 1: Cover and let it rest for 20 minutes. Knead for 2-3 minutes.
- Set 2: Rest for 20 minutes. Then knead once more for 2 minutes.
- Assess the dough: If the dough is still not smooth do one more set of resting and kneading. Otherwise, shape it into a smooth ball by pinching the bottom ends and place it seam side down. Cover, and rest for 5 minutes before dividing (you can skip this rest but it will be easier to handle rested).
Option 2: Prepare the Dough Using a Stand Mixer
- Dissolve salt in water.
- Add the flour to the stand mixer bowl and attach the dough hook. Start mixing on low speed (1-2) while slowly pouring in the water along the side of the bowl.
- Mix until a shaggy dough forms (2-3 minutes). If any dry flour remains, drizzle in a small amount of additional water.
- Increase to medium-low speed (2-3) and continue kneading for another 3 minutes until the dough is cohesive but slightly rough.
- Cover and rest for 20 minutes, then knead again on setting 3 for 1 minute to smooth it out.
- Shape the dough into a smooth ball by pinching the bottom ends together. Place it seam side down, cover, and let it rest for 5 minutes before dividing.
Divide & Shape the Dough
- Thin Noodles: Divide into 2 portions (~200g each). Roll into a 3/4 cm thick oval or rectangle.
- Flat Noodles: Divide into 2 portions (~200g each). Roll into a 1/2 cm thick oval or rectangle.
- Wide Flat Noodles: Divide into 4 portions (~100g each). Roll into a 3×4.75-inch oval or rectangle, ~1/2 cm thick.
- Optional Before Rolling the Dough: For thin and flat noodles, roughly flatten the dough with the palm of your hands with the cut edge facing down to form a oval-like shape. For wide flat noodles, flatten each portion with the palm of your hands and pinch the short ends together to form a cylinder-like shape. Place it seam-side down, cover, and let it rest for 5-10 minutes. Allowing the dough to rest for a few minutes makes it easier to roll out without it wanting to shrink.
- Coat each piece generously with oil, cover tightly with plastic wrap (removing any air pockets), and let them rest at room temperature for at least 2-6 hours.
- Note: If using higher protein flour (i.e. flour with >13% protein) or your environment is cold, the dough may need the longer resting time (5-6 hours) to become pliable for pulling.
Pull the Noodles
- Bring a large pot of water to a boil.
- Thin noodles: Lay the dough flat and slice into 1/2-1 cm-wide strips using a sharp knife or bench scraper. Flip each strip on its side to prevent sticking. Hold both ends of a strip, gently stretch it apart, then bounce it on the counter a few times until it reaches the desired length (about arms length or 5 ft). The center pieces may naturally stretch more than the end pieces, depending on how the dough was rolled.
- Flat noodles: Slice the dough into 3-4 cm-wide strips, keeping slight gaps between cuts. Stretch each strip by holding both ends and bouncing it on the counter to elongate.
- Wide flat noodles: Use a chopstick to press a dent in the center of each piece. Stretch the dough by pulling both sides apart while bouncing it on the counter. Tear along the indentation, leaving either separate strands or a connected loop. Optionally, stretch width wise for a wider noodle if desired.
- Note: If the dough resists stretching, let it rest longer before pulling. Dough that hasn’t rested enough may be tougher to stretch and can tear or cook up thicker.
Cook the Noodles
- Thin & Flat Noodles: Boil for 1-1.5 minutes. Under cook by 30 seconds if using for stir fries.
- Wide Flat Noodles: Boil for 1-2 minutes. Under cook by 30 seconds if using for stir fries.
- For storing: Undercook by 30 seconds to prevent over-softening when reheated.
Serve or Store
- To serve: Toss with your favorite sauce, stir-fry, or broth.
- To store: Rinse under cold water, coat lightly with oil, and refrigerate for up to 2 days or freeze for up to 3 months.
- To reheat: If unseasoned, boil in hot water for 20-30 seconds until heated through. If seasoned, microwave for 40 seconds or until warm. You may need to add a teaspoon of water to loosen the noodles.
Notes
- *Identify protein content of the flour. If the flour has <12% protein use less water and rest for shorter amount of time before pulling. If the flour has >13% protein, use higher amount of water and rest for longer amount of time before pulling. I use All Purpose Robin Hood Flour and find that 5-6 hours gives me the more relaxed dough that is easiest to pull.
- **In the winter use slightly warmer water and in the summer use room temperature water.
- Less hands on approach: Instead of doing sets of kneading and resting, you may also knead for 5-6 minutes, cover and rest for 45 minutes. Knead for another 5 minutes and then rest for 5 minutes before moving onto the dividing section. This method works great but I find the texture of the noodles to be slightly less bouncy in terms of texture.
- Overnight method: After rolling out the dough, let it rest for 2-4 hours at room temperature and then transfer it to the fridge and then let it come to room temperature before pulling. You can also place it straight into the fridge and then let it sit at room temperature the next day for 2-4 hours. The rolled out and oiled dough will last in the fridge for up to 3 days.
- Prep Time: 10 minutes
- Rest Time: 6 hours
- Cook Time: 2 minutes
- Category: Main dish
- Method: Stove top
- Cuisine: Chinese
Nutrition
- Serving Size: 1 serving
- Calories: 260
- Sugar: 0.3 g
- Sodium: 580 mg
- Fat: 0.8 g
- Saturated Fat: 0.1 g
- Unsaturated Fat: 0.6 g
- Trans Fat: 0
- Carbohydrates: 54 g
- Fiber: 2 g
- Protein: 8 g
- Cholesterol: 0 mg


These noodles were so chewy and fun to make! I made the wide noodles and the resting made them really easy to stretch and pull. I had trouble with dry dough before but the amount of water was perfect. Paired the with the cumin noodles and it was so good!