
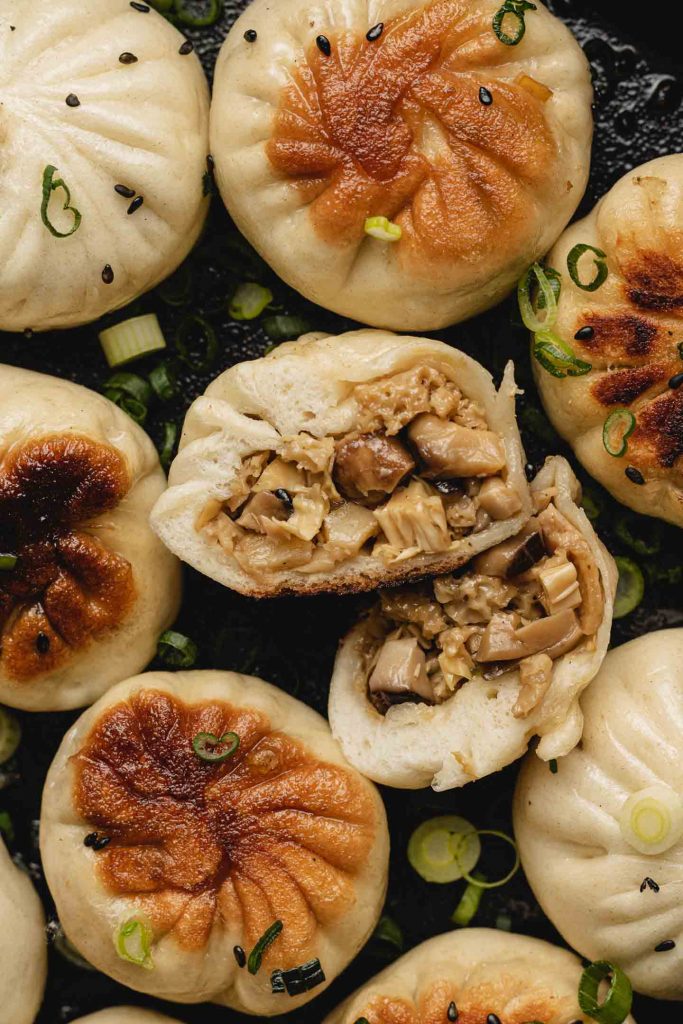
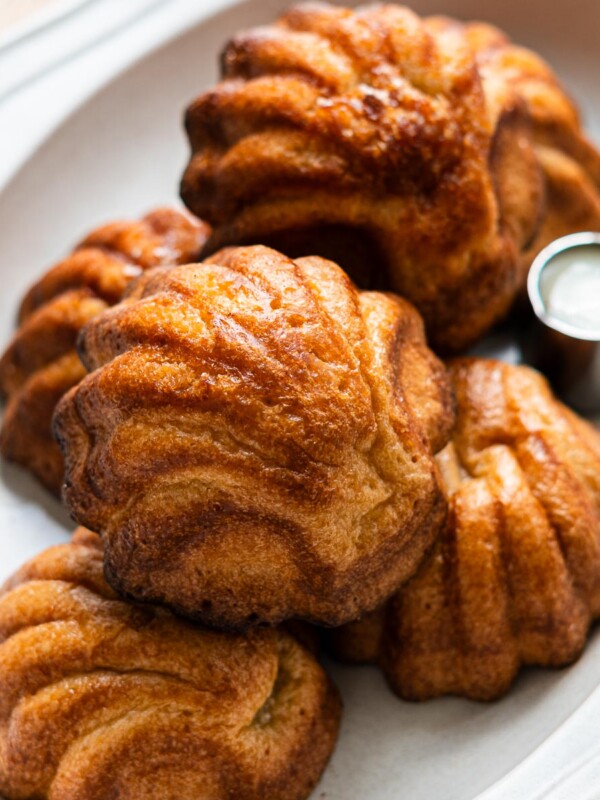
Sheng jian bao (生煎包), or sheng jian mantou (生煎馒头) are pan fried buns with a partially leavened dough, stuffed with a flavourful vegetable filling thats juicy and delicious. This recipe will help you achieve the most authentic pan fried soup dumplings around!

Step by Step: How to Make Pan Fried Vegetable Buns
This hybrid style of a bao and dumpling is not the easiest recipe to make, especially because it involves a jellied soup stock. However, if you follow these instructions along with the tips as precisely and carefully, the effort is well worth it! Lets break the recipe down into steps for a fluid work-flow:
- Preparing the jellied stock – Prepared the night before.
- Preparing the filling – I soak the dried ingredients the night before so its ready the next day. Make the filling before the dough, about 2 hours before serving.
- Making the dough – Begin making the dough 1 1/2 hours before serving.
- Assembling the buns
- Pan frying the buns

Preparing the jellied soup stock
Typically, a gelatinized stock is made from pork bones. However, to keep this vegan we’re using kombu dashi and the soaking water from the shiitake mushrooms (both packed with umami and flavour) with making a similar jelly with agar. Agar breaks down when it is heated up again, perfect for that juicy filling we’re after.
Simply add the dashi stock, soaking water and agar to a sauce pan and bring it to a boil over medium high heat. Lower the heat and simmer while whisking for about 3-4 minutes. Pour into a shallow dish and let it set in the fridge overnight.

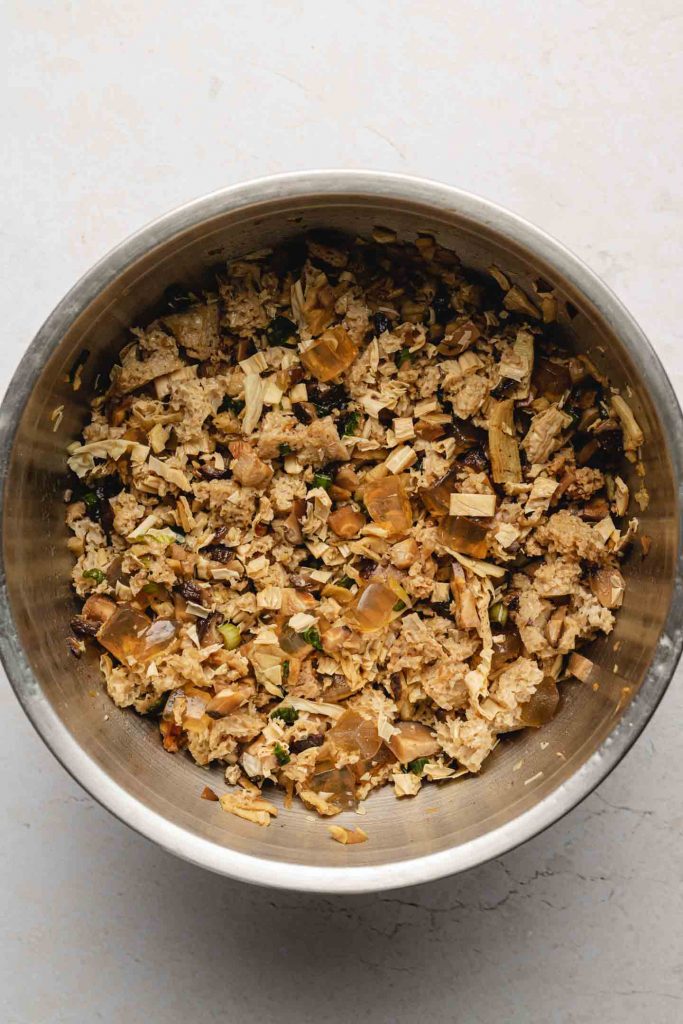
Preparing the filling
For a meaty texture, I used a combination of wheat gluten, dried bean curd sticks and shiitake mushrooms. You can also use soy curls or TVP (any dried meat-substitute). I used 50g of bean curd sticks and 50g of wheat gluten.
Soak them until soft (I do this overnight), squeeze out the excess liquid and then chop them finely. Place them into a large bowl. Add in the scallions, ginger, garlic, soy sauce, black soy sauce, shaoxing wine, sesame oil, sugar, white pepper and salt. Give it a good mix. Cut the jellied soup stock into 1/4 inch x 1/4 inch cubes. Carefully fold it into the filling. The total weight of the filling is about 562g. Keep the filling covered and stored in the fridge until dough is ready.
Making the dough
The dough can be made in an electric mixer or by hand. Add flour, yeast and salt (be sure the yeast is not touching the salt) to a electric mixer. Start with a low speed (setting 2) and pour in the water slowly. Increase the speed (setting 4) and let it run for about 6-8 minutes or until a smooth, elasticity dough forms. Cover and rest for 10 minutes (15-20 minutes if your kitchen is cold).
NOTE: Most recipes will call for a rest period of 30 minutes. However, pleating can take some time (especially if it’s your first time) so the yeast will continue to proof during that time, so it is better to start early or the dough will be over proofed for these style of buns. Alternatively, you can keep the dough covered in the fridge to prevent it from over-proofing.

Assembling & pleating the buns
This recipe makes 28 pieces. The dough is about 18-19g per bun and 18-20g of filling.
Once the dough rests for 10 minutes, knead with your hands for a minute and then divide it into 28 equal size pieces. Cover the dough (keep half in the fridge) with a damp kitchen cloth to prevent them from drying out. Roll out the dough using a wooden rolling pin into a 3.5 inch diameter circle. Place about 18-20g of filling (1-2 tbsp) in the middle and pleat, securing tightly.
Note: You really want to pay attention to sealing the wrapper at securely as possible for these buns because of the soup stock inside (see video for pleating).
Pan Frying
The final stretch and the most satisfying part!
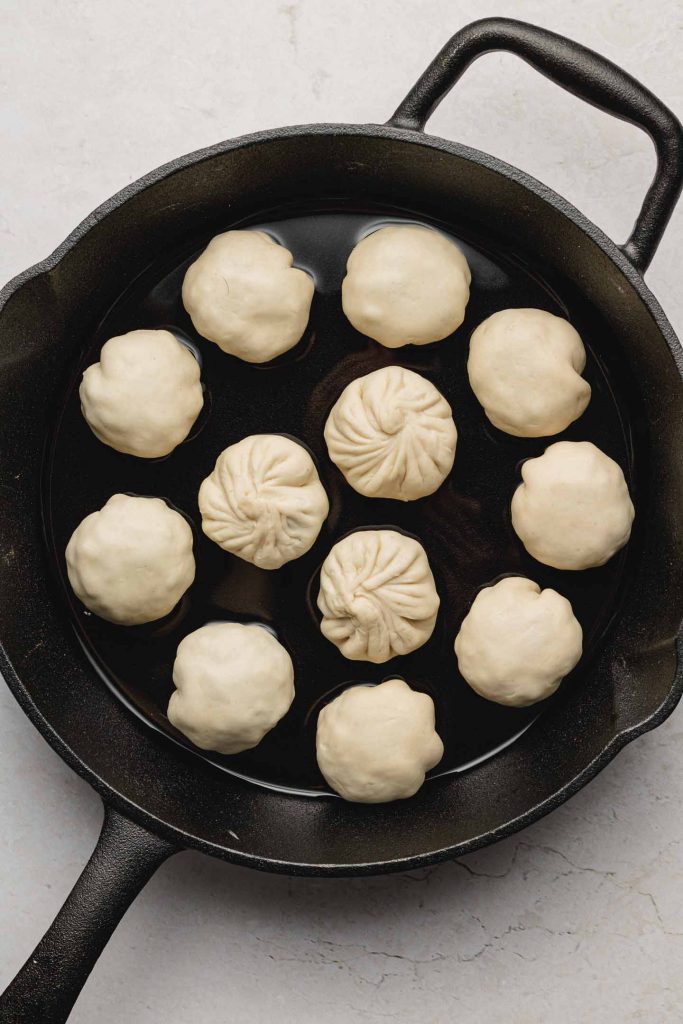
Add a thin layer of oil to a heavy bottom pan (I used a cast iron skillet). Because these are so delicate, be sure to use a WELL seasoned cast iron skillet or non-stick pan so when removing them, they don’t burst open.
Place the buns onto the pan with 1 1/2 inches between each one. Pan fry them over medium heat for 5-7 minutes or until lightly golden. Do not be tempted to turn up the heat or touch the buns during the 5 minutes– they are still raw and super delicate and any puncturing will cause the soup to leak out. Carefully check one to see the bottom.
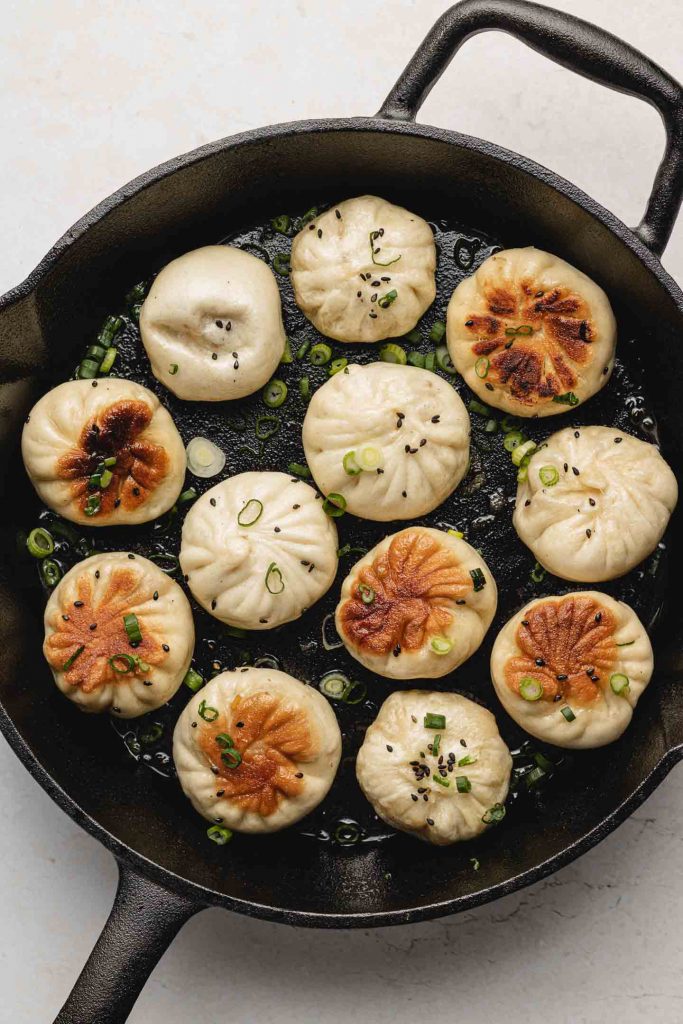
Pour 1/4 cup of water, or enough to cover 1/3 of the buns height and quickly cover with a lid. Reduce the heat to medium low and cook for 8-10 minutes or until water has mostly evaporated.
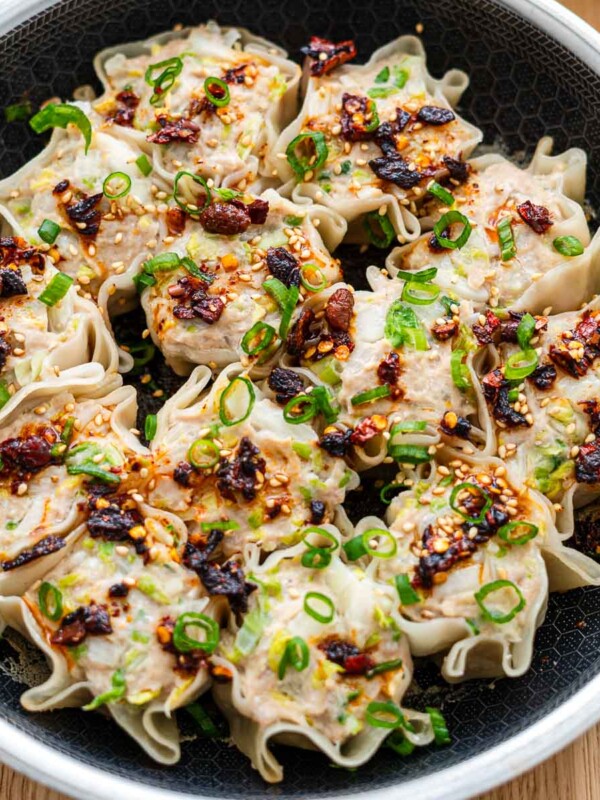
Uncover the pan and sprinkle on sesame seeds and green onions. Cover for another 1 minute (this just helps the sesame seeds and scallions stick a little better). Then remove the cover and cook for another 1-2 minutes to allow excess water to evaporate and the bottom to get it crispy.
Carefully remove the buns using a blunt spatula– a silicon one is perfect for this. Serve right out of the pan with your dipping sauce of choice or chili oil and enjoy!
Make Ahead & Storage
This is one of those recipes I HIGHLY recommend serving immediently after cooking because the filling contains soup. If you let the buns sit, the wrapper will absorb the juices and the filling is less soup-y. The bun its self maintains its integrity pretty well and won’t go soggy but slightly dry out on the outside.

Final thoughts & key takeaways
- An efficient work flow: I find it super helpful and efficient to prepare the jelly and soaking the dry ingredients the night before so that you’re sure it is ready for the next day.
- Keep the filling cool: Because agar melts pretty easily when heat is introduced, keep half of the filling in the fridge while you work on half the batch or keep the bowl of filling over a bowl of cold water.
- Timing for the dough: timing is key for the success of this recipe. It is crucial you do not overproof the buns for a true, authentic texture. You’ll know you’ve successfully achieved that semi-leavened wrapper if the buns have a divot or cave in in the middle.
- Texture of the dough: You’re looking for a dough that is soft, elastic like but not overly wet where it droops down. A dry dough will cause tearing and an overly wet dough will make it difficult to pleat. If your dough is too dry, add 1 tsp of water at a time and knead until you achieve that soft dough consistency. If your dough is too wet, knead on a floured surface or introduce a very small amount of flour until the right texture.
- Pleat side up or down: Traditionally, the pleats are cooked faced down. However, if you’re not sure if you’ve sealed the buns tightly (or if its your first time pleating) cook them pleat side up. You don’t want to lose any of that soupy goodness!
- Watch the heat: These buns get cooked for quite a long time so you don’t want to start off with a deep golden bottom. Aim for a light crust on the bottom over a medium heat (medium-low for an induction stove since they tend to run hotter). If you want to crisp up the bottom or make it even more golden brown, you can let it pan fry at the end until desired crust.
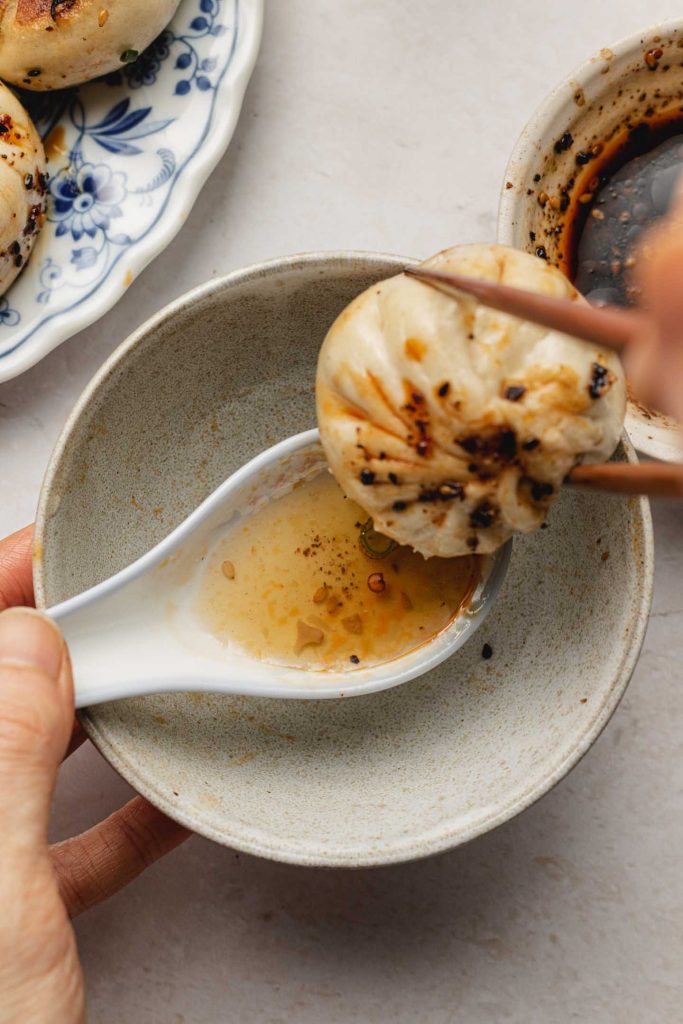
- Be careful of the hot soup (!!): The soup is SUPER hot when biting into it. How I like to eat it is to bite open the side or top of the bun, blow on it to cool and drink the soup first and then bite into the bun. Or I’ll pour the soup out onto a deep spoon to let it cool just a bit and bite the bun and drink the soup together. You’ll find your own preferred way!
More delicious vegan buns & dumplings to make:
- Yeast Free Pan Fried Stuffed Buns (2 ways!)
- Lazy Dragon Vegetable Roll
- Yeast Free Crispy Bottom Curry Buns
- Vegan Char Siu Bao
- Vegan Gyoza
- Vegan Zongzi
- Simple Vegan Wontons (Coming soon)
- Pan Fried Soup Dumplings / Cheater SJB (coming soon)
If you recreate this Vegan Sheng Jian Bao recipe let me know how you liked it by leaving a comment and rating below or by tagging me on Instagram @Okonomikitchen, I love seeing all of your tasty recreations!
Hungry for more? Be sure to subscribe to my newsletter and follow along on Instagram, Youtube and Pinterest for more deliciousness!

Vegan Sheng jian bao
- Total Time: 1 hour 30 minutes
- Yield: 28 pieces
Description
Sheng jian bao (生煎包), or sheng jian mantou (生煎馒头) are pan fried buns with a partially leavened dough, stuffed with a flavourful vegetable filling thats juicy and delicious. This recipe will help you achieve the most authentic pan fried soup dumplings around!
Ingredients
Jellied stock:
- 1 cup kombu dashi stock
- 1/2 cup shiitake soaking water
- 1.5g agar powder (a tiny bit more than 1/2 tsp)
Dough
- 332g all purpose flour
- 28g corn starch
- 170ml-190ml lukewarm water
- 4g instant yeast
- 2g salt
Filling (for 28)
- 5–6 dried shiitake mushrooms, rehydrated (102g after soaked and dried)
- 100g of dried yuba, soy curls and/or wheat gluten* (I used a combination of yuba and wheat gluten)
- 50g bamboo shoots finely chopped, optional (40g after being patted dried)
- 2 garlic clove, minced (6g)
- 1 tbsp ginger, minced (14g)
- 2 scallions, sliced
- 1 tbsp soy sauce (15ml)
- 1/2 tsp black soy sauce (3ml)
- 1 tbsp shaoxing wing (15ml)
- 1 tsp sesame oil (5ml)
- 1/2 tsp sugar (3g)
- 1/4 tsp white pepper
- 1/2 tsp salt
- 130g of the jellied stock, cut into 1/4 inch pieces
Instructions
Prepare the Jellied stock:
- Add the dashi stock and agar to a small saucepan and bring it to a boil over medium high heat. Lower the heat and simmer for 3 minutes, whisking continuously. Pour into a shallow dish and set in fridge 2-3 hours or preferably overnight.
Prepare the filling:
- Soak the wheat gluten, dried bean curd sticks and shiitake mushrooms for 30 minutes. Drain and squeeze any excess liquid out. Finely chop them along with the bamboo shoots. Place them into a large bowl. Add in the scallions, ginger, garlic, soy sauce, black soy sauce, shaoxing wine, sesame oil, sugar, white pepper and salt. Give it a good mix. Cut the jellied soup stock into 1/4 inch x 1/4 inch cubes. Carefully fold it into the filling. The total weight of the filling is about 562g. Keep the filling covered and stored in the fridge until dough is ready.
Make the dough:
- Electric Mixer: Add flour, yeast and salt (be sure the yeast is not touching the salt) to a electric mixer. Start with a low speed (setting 2) and pour in the water slowly. Increase the speed (setting 4) and let it run for about 6-8 minutes or until a smooth, elasticity dough forms. Cover and rest for 10 minutes (15-20 minutes if your kitchen is cold).
- By hand: Add the flour, yeast and salt to a bowl (ensure salt does not touch yeast). While stirring with a pair of chopsticks, drizzle the water in starting with the lesser amount. Once it begins to clump, knead with your hands until you get a smooth, elastic-y dough (about 10-15 minutes of kneading). Cover with a damp kitchen cloth and rest for 10 minutes (15-20 minutes if your kitchen is cold).
- NOTE: Most recipes will call for a rest period of 30 minutes. However, pleating can take some time (especially if it’s your first time) so the yeast will continue to proof during that time, so it is better to start early or the dough will be over proofed for these style of buns. Alternatively, you can keep the dough covered in the fridge to prevent it from over-proofing.
Assemble the buns:
- Divide the dough into 28 18-19 gram pieces.
- Roll out dough into 3.5 inch diameter. Place 1-2 tbsp filling (18-20g) in the middle and pleat it closed.
Cooking process:
- Add a thin layer of oil to the pan. Place buns into the pan leaving 1 1/2 inch between each one and pan fry until bottom lightly brown over medium heat (about 5 minutes). Do not turn up the heat or touch the buns as they are still raw and delicate. Any puncturing of the buns will cause liquid to leak out.
- Pour 1/4 cup fo water or enough to cover 1/3 of the buns height, and quickly cover with a lid. Reduce heat to medium low and cook 8-10 minutes or until water is mostly gone.
- Uncover and sprinkle on sesame seeds and green onions. Cover for another 1 minute (this just helps the sesame seeds and scallions stick a little better). Then remove the cover and cook for another 1-2 minutes to allow excess water to evaporate and the bottom to get it crispy.
- Carefully remove the buns using a blunt spatula (I used silicon spatula) to prevent any puncturing.
- Serve with your dipping sauce of choice or chili oil and enjoy!
Notes
- *For the dried meat substitute, I used a combination of 50g wheat gluten and 50g bean curd sticks. The gluten weighed 155g and the bean curd sticks weighed 92g after being rehydrated and dried.
- Helpful Equipment: wooden rolling pin, cast iron skillet, electric mixer, mixing bowls
- Nutritional Information Disclaimer: Nutrition information is a rough estimate calculated on an online tool (Cronometer).
- Prep Time: 60 minutes
- Cook Time: 30 minutes
- Category: entree
- Method: stove top
- Cuisine: vegan, chinese
Nutrition
- Serving Size: 1 serving
SAVE IT FOR LATER! ↓
Okonomi Kitchen is a participant in the Amazon Services LLC Associates Program. When you purchase something through my amazon affiliate links, I earn a small commission that helps me produce consistent content at no cost to you. Thank you for supporting my plant based kitchen!


This dumplings are DELICIOUS! The flavour profile is insane and even though the recipe is quite complex it’s all really comprehensive and the steps are easy to follow, so it’s 100000% worth it. Thank you so so much for sharing this recipe it made my dumpling dreams come true!
I made them last night for Lunar New Year and they were very good and surprisingly easy to make ! Just follow the workflow described in the post and you’ll have a pan full of piping hot dumplings to stuff your face with in what seemed like no time for me ! I just took advantage of the raising time of the dough to make the filling (I had made the jellied stock beforehand) and it went so smoothly.
The dough is very soft and pliable and so easy to work with. I probably overcooked the dumplings or cut the jelly in too small pieces as the filling was not very soup-y but still very moist and juicy. Next time I think I’ll infuse the broth with a bit more flavour (probably ginger). Can’t wait to make these again !
A quick update: I had a bit of leftover stuffing and made a few more dumplings 2 days after and they were even better ! So if you can, make the filling the day before so that the flavours can develop and enhance.
I made slight variations to the stuffing to use what I had on hand but wow, I gotta say this recipe is DELICIOUS! I have always fumbled asian cooking until now, will definitely be making these regularly, thank you for sharing your recipe 💜
Really bloody delicious! Has that “meaty” quality that I have been looking for in a vegan SJB. I followed the recipe in entirety and it’s really worth the effort. I followed the advice to skip the 30 min rest as I’m a bit slow + it’s Aussie summer and it worked out perfectly with no overproved dough. I’m planning on making this for CNY!
I’m SO happy to hear you enjoyed this recipe!! I hope you have a wonderful Lunar New Year <3