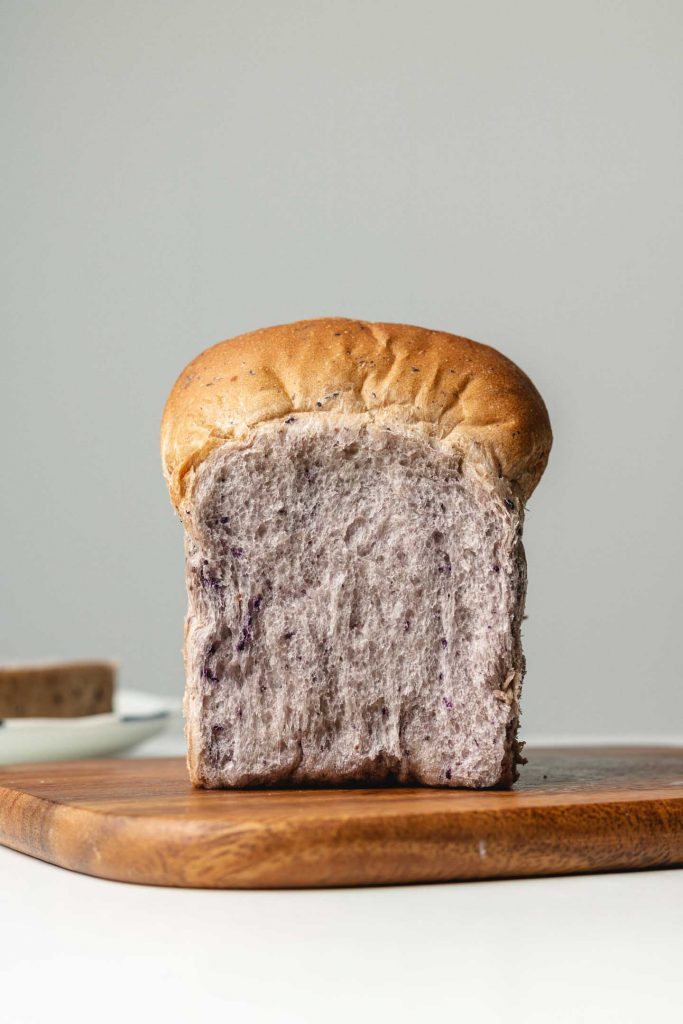
Light and fluffy, blueberry scented yeast bread 💙
If you recreate this Blueberry Yeast Bread recipe let me know how you liked it by leaving a comment and rating below or by tagging me on Instagram @Okonomikitchen, I love seeing all of your tasty recreations!
Hungry for more? Be sure to subscribe to my newsletter and follow along on Instagram, Youtube and Pinterest for more deliciousness!

Blueberry Yeast Bread
- Total Time: 4.5 hours
- Yield: 4 servings
Description
Light and fluffy, blueberry scented yeast bread 💙
Ingredients
Units
Version 1 (Classic Sandwich Bread Texture)
- 64 g frozen blueberries, thawed
- 75–80 ml unsweetened soy milk*
- 190 g bread flour
- 18 g sugar
- 3 g instant dry yeast
- 2.5 g salt
- 14 g butter
- 110 g frozen blueberries, thawed
- 30–35 ml milk
- 180 g bread flour
- 12.5 g sugar
- 3 g instant dry yeast
- 2.5 g salt
- 10 g butter
Instructions
- Blend the thawed blueberries and soy milk until smooth. Mixture should be at room temperature.
- Bread machine: Add the ingredients to a bread machine and run one bread cycle.
- Stand mix: Add all the ingredients to a stand mix with hook attachment and knead for 5-6 minutes, or until a smooth dough forms.Place dough in a lightly greased container or bowl, cover and rest for 1 hour or until double in size.
- Hands: Knead for about 8-12 minutes, depending on how much you can knead during that time or until a smooth dough forms. Place dough in a lightly greased container or bowl, cover and rest for 1 hour or until double in size.
- During this time, thoroughly grease a 7 x 3.25 inch loaf pan. If using a larger loaf pan (8.5 x 4.5 or 9 x 5), double the ingredients.
- Transfer dough to a floured surface and degas the dough with your hands. Divide the dough into two and form it into a ball. Cover and rest for 10-15 minutes to relax the gluten.
- Flatten the dough again with your hands and shape the dough. You can make one sandwich loaf or two small loafs. Use a rolling pin and roll out the dough. Fold one side inward, and then the other side on top. Use the heel of your hands or rolling pin to press down and remove any air bubbles. Roll the dough from the top down like a cinnamon roll and then pinch the end seam. Place seam side down into prepared loaf pan. Cover with greased cling wrap or a bowl and let it rise until almost double in size. The time will depend on the temperature of your kitchen. To check, make an indent in the dough. It should spring back up slowly. If it springs back quickly, proof longer. If it stayed dented, it is over-proofed.
- Once almost ready, pre-heat oven to 400 F (200 C). Bake for 5 minutes and then reduce temperature to 350 F (180 C) and bake for another 25-30 minutes, or until hallow when you tap it. If it browns too quickly, tent it with foil.
- Immediately remove from loaf pan and cool on a wire rack. Once completely cooled, slice and serve!
Notes
- *soy milk ingredients should contain only soy beans, water and salt. Using soy milks with other ingredients causes inconsistent dough. It can be substituted with water but the flavour will be less milky and less moist.
- Prep Time: 4 hours
- Cook Time: 30 minutes
- Category: bread
- Method: baking
Nutrition
- Serving Size: 1 serving
Okonomi Kitchen is a participant in the Amazon Services LLC Associates Program. When you purchase something through my amazon affiliate links, I earn a small commission that helps me produce consistent content at no cost to you. Thank you for supporting my plant based kitchen!


Took me a while to finally follow this recipe all thanks to my busy schedule but it was surely worth the wait! My kids also joined me in preparing this. Thank you for the recipe!!
Oops forgot to rate it – 5 stars of course!
I absolutely LOVE this recipe!! Yeasted breads have always been tough for me but this recipe was so easy to follow and the end result was so great. Subtly sweet but such a pretty color! Will definitely keep making this with different fruits!!
I made this a couple of days ago and it came out perfectly! The recipe was super simple to follow but you’d never know it was so simple with how tasty it is. The cutest little loaf of bread!
Made it! Loved it! The color is so fun and my kids were so excited to make sandwiches for tomorrow’s lunch to show off to their friends. This one is definitely a keeper!
I doubled the recipe for a bigger loaf pan like you suggested. Honestly I don’t think I’d make any changes at all. Such a fun and squishy bread!