This Panuozzo Dough (pizza sandwich bread) bakes up a crisp, golden crust with an airy, tender interior — perfect for sandwiches or stuffing with your favorite fillings. Made with simple ingredients and a slow fermentation, it develops deep flavor and a light, chewy texture. Bake it the same day, or keep the dough in the fridge for up to 5 days for fresh bread anytime — it also freezes well for future use.
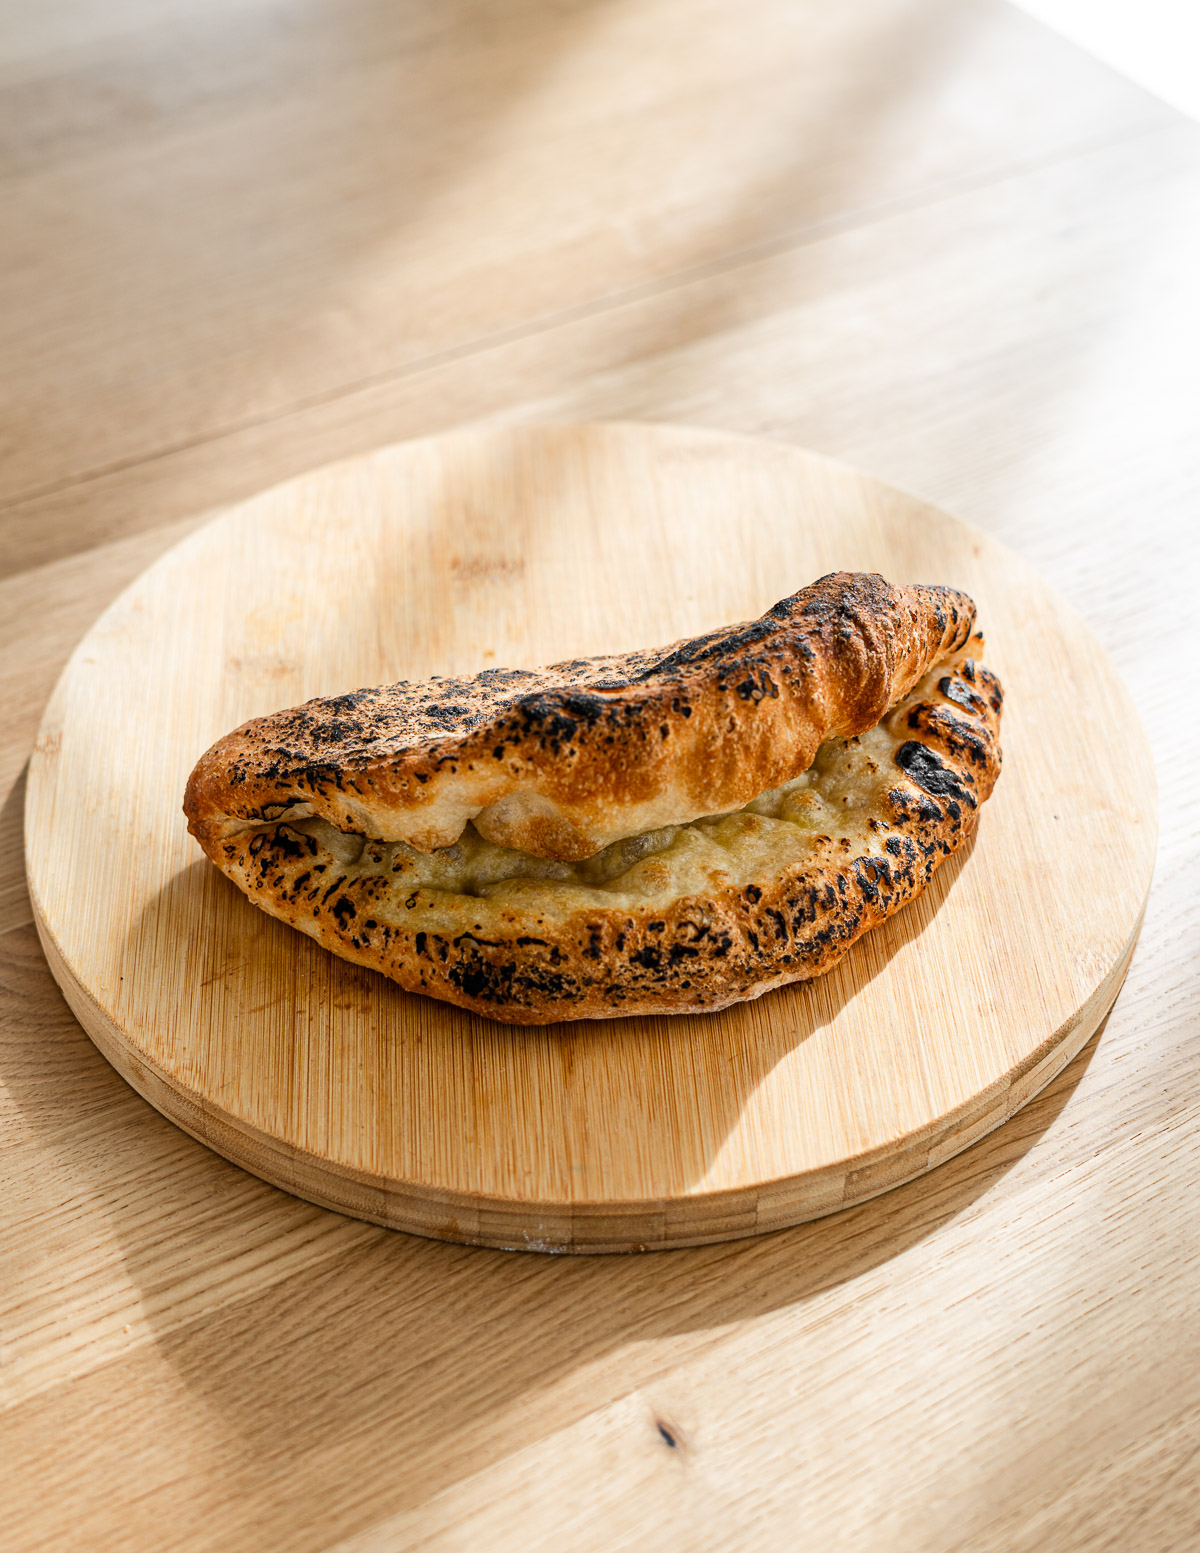
Table of Contents
- What is Panuozzo?
- Why This Recipe Works
- Ingredients and Substitutions
- What Type of Flour to Use
- How to Make Panuozzo (Pizza Sandwich Dough)
- How to Stretch Pizza Dough for Sandwiches
- VIDEO: Watch How to Make It
- Lisa’s Recipe Tips
- Dough Hydration for Home Ovens
- Sandwich Fillings and Variations
- How to Store Pizza Dough
- Recipe FAQ
- More Easy Bread Dough Recipes
- Panuozzo Dough (Pizza Sandwich) Recipe
I’m currently in my pizza phase and have been testing a bunch of pizzas to try and make a mighty delicious pizza — all with just a home oven until I can invest in a proper pizza oven. I’ve been going around Toronto, eating my way through top-rated spots for ~research~, and discovered panuozzo at a place called Crudo. I had their Il Crudo and Mortadella, and it was one of the best sandwiches I’ve ever had— I had to try and recreate it. PRONTO.
Sometimes I didn’t get around to making pizza, left dough out to overproof, or simply had leftovers from pizza night. After chatting with a few pizzerias and doing some research, I learned that panuozzo is often made from Neapolitan pizza dough!
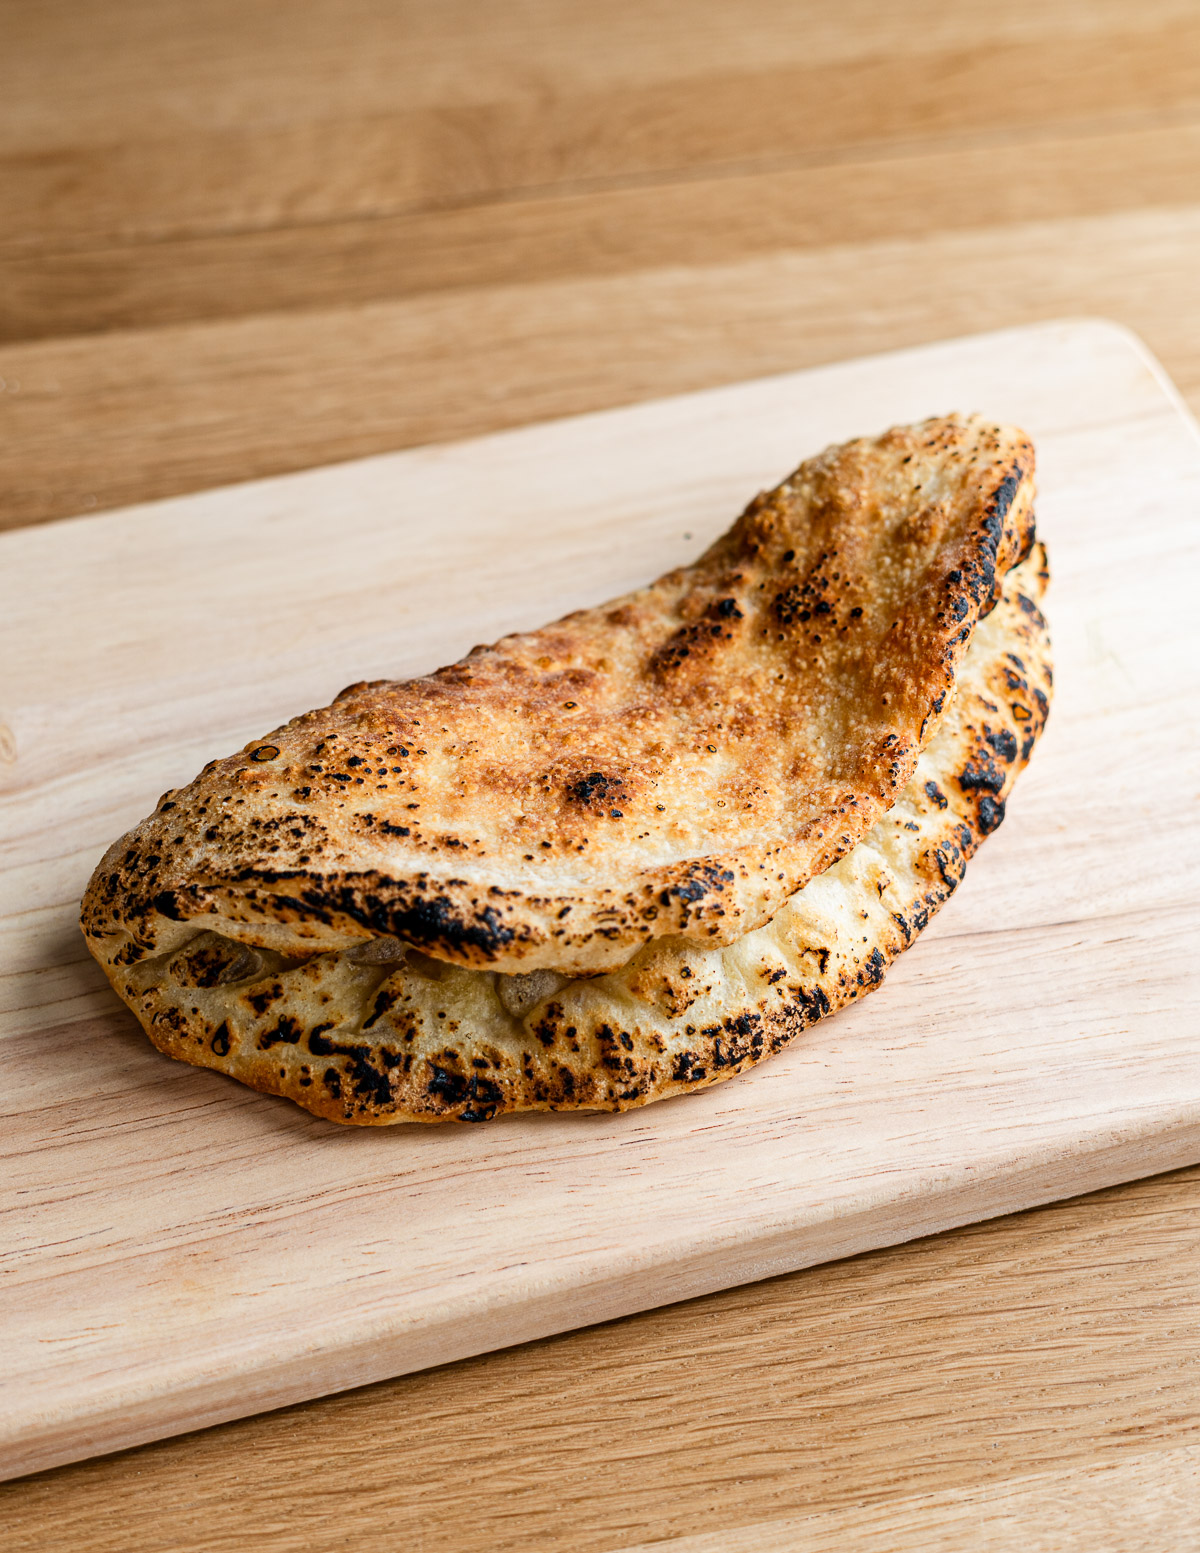
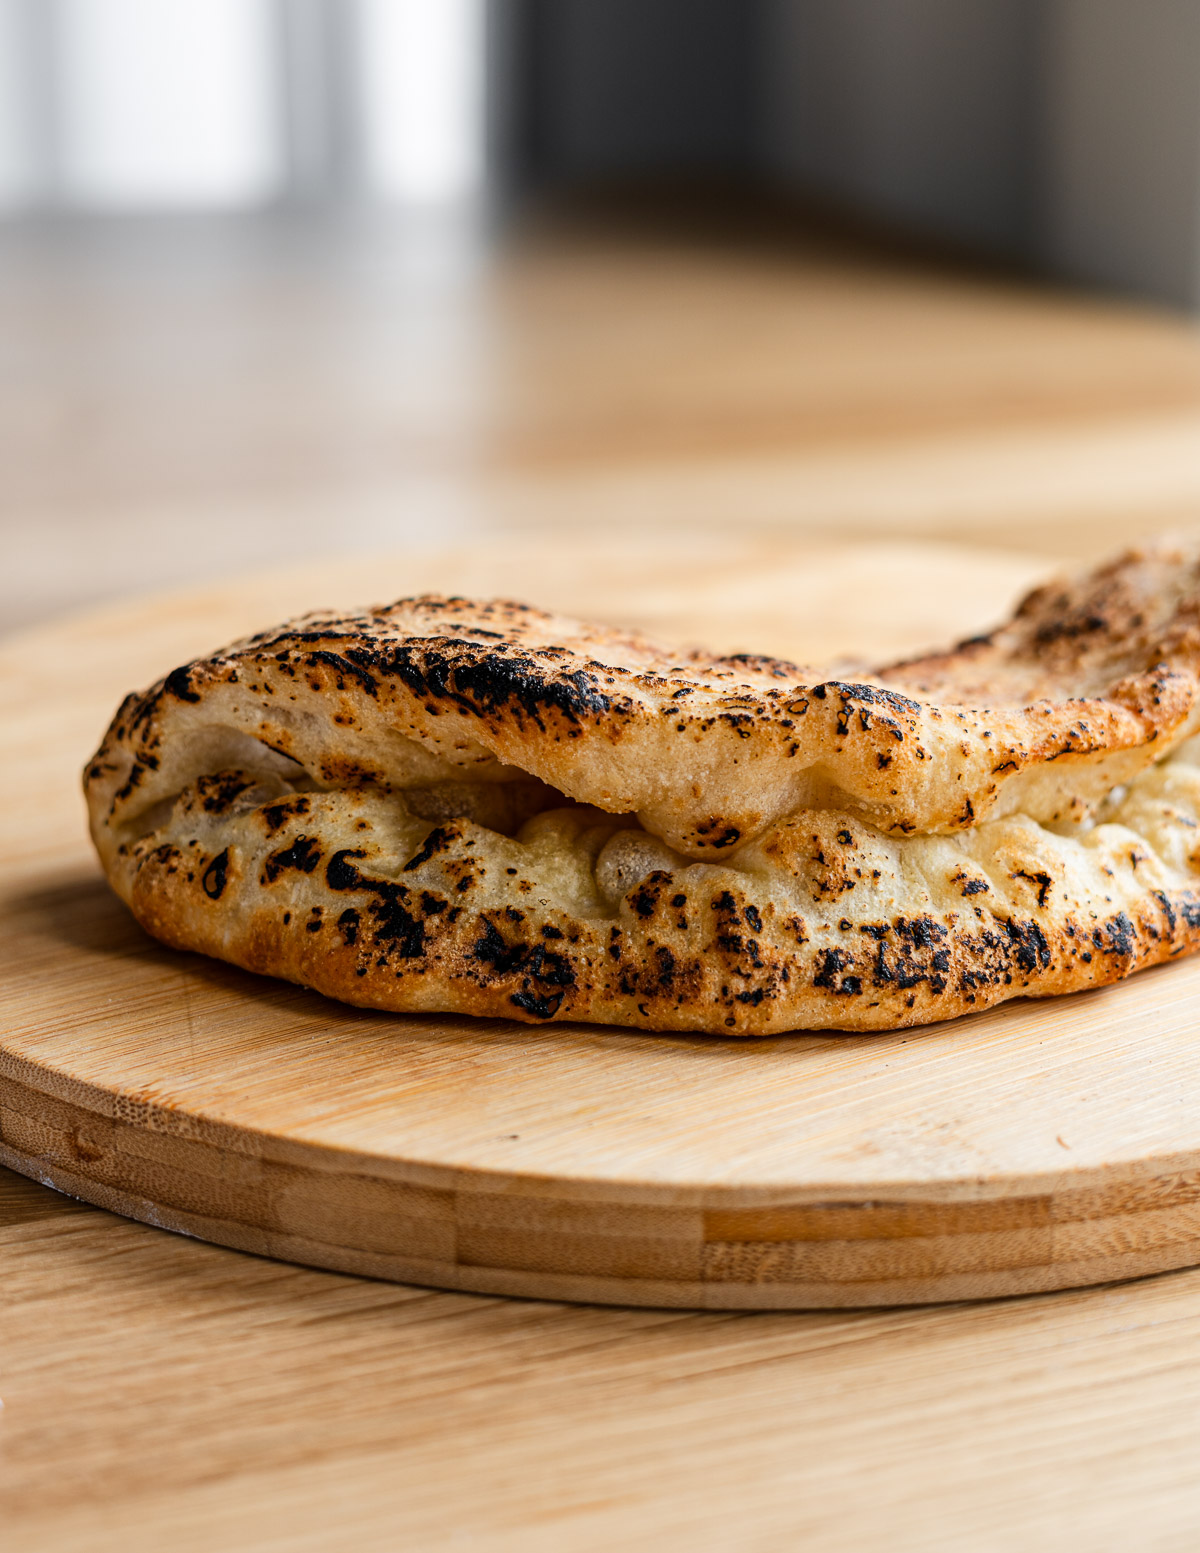
I’ve been experimenting with different shapes and styles — some are stretched and baked, others are folded and baked. I personally love the folded version; the interior is always stunning when you open it.
This panuozzo dough has now become my go-to sandwich bread. I will always have pizza dough in my fridge or freezer. Just like with anything I get obsessed with (hi, focaccia, bagels, and salt bread), I’ve tested, tweaked, and re-tested this recipe more times than I’d like to admit to make sure it’s perfect and easy for anyone to make. So I HOPE YOU LOVE IT AS MUCH AS I DO!! OKAY, lets get into it.
What is Panuozzo?
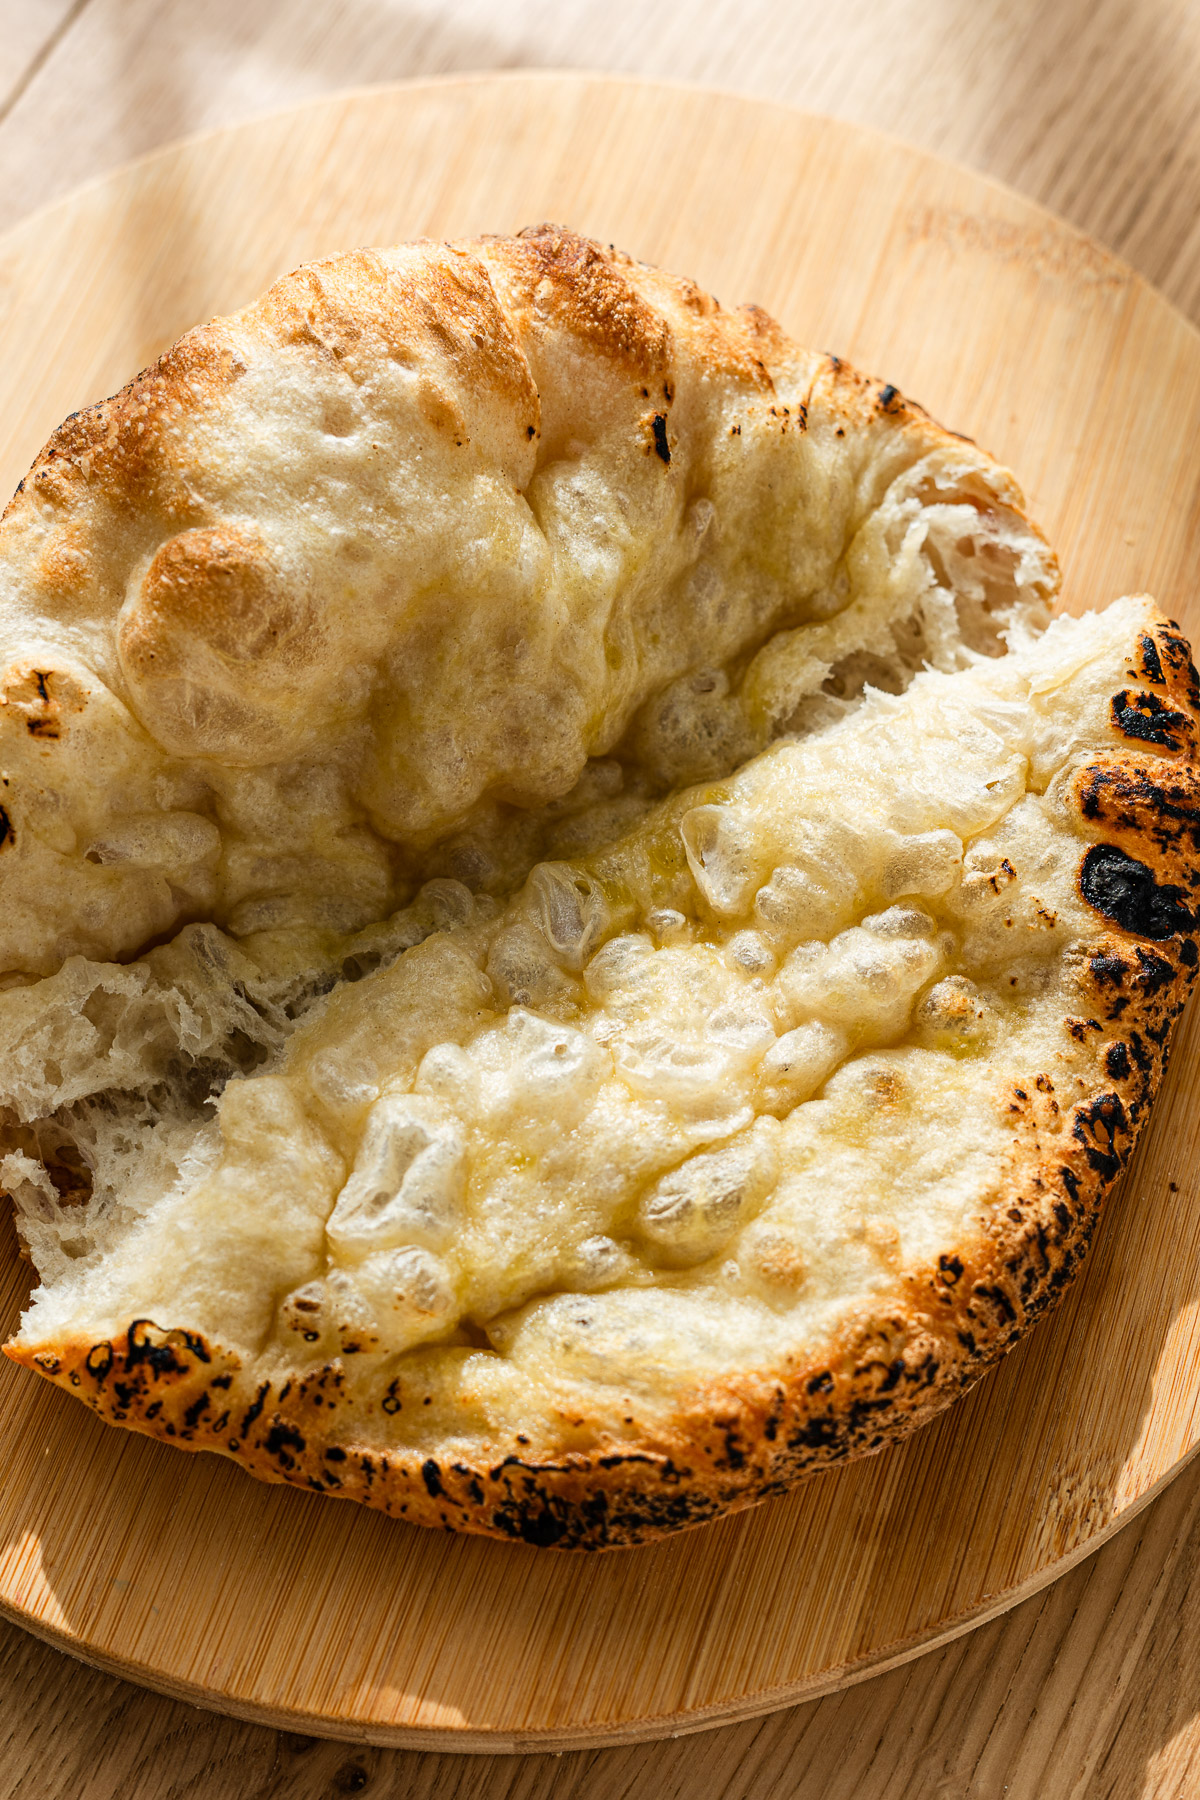
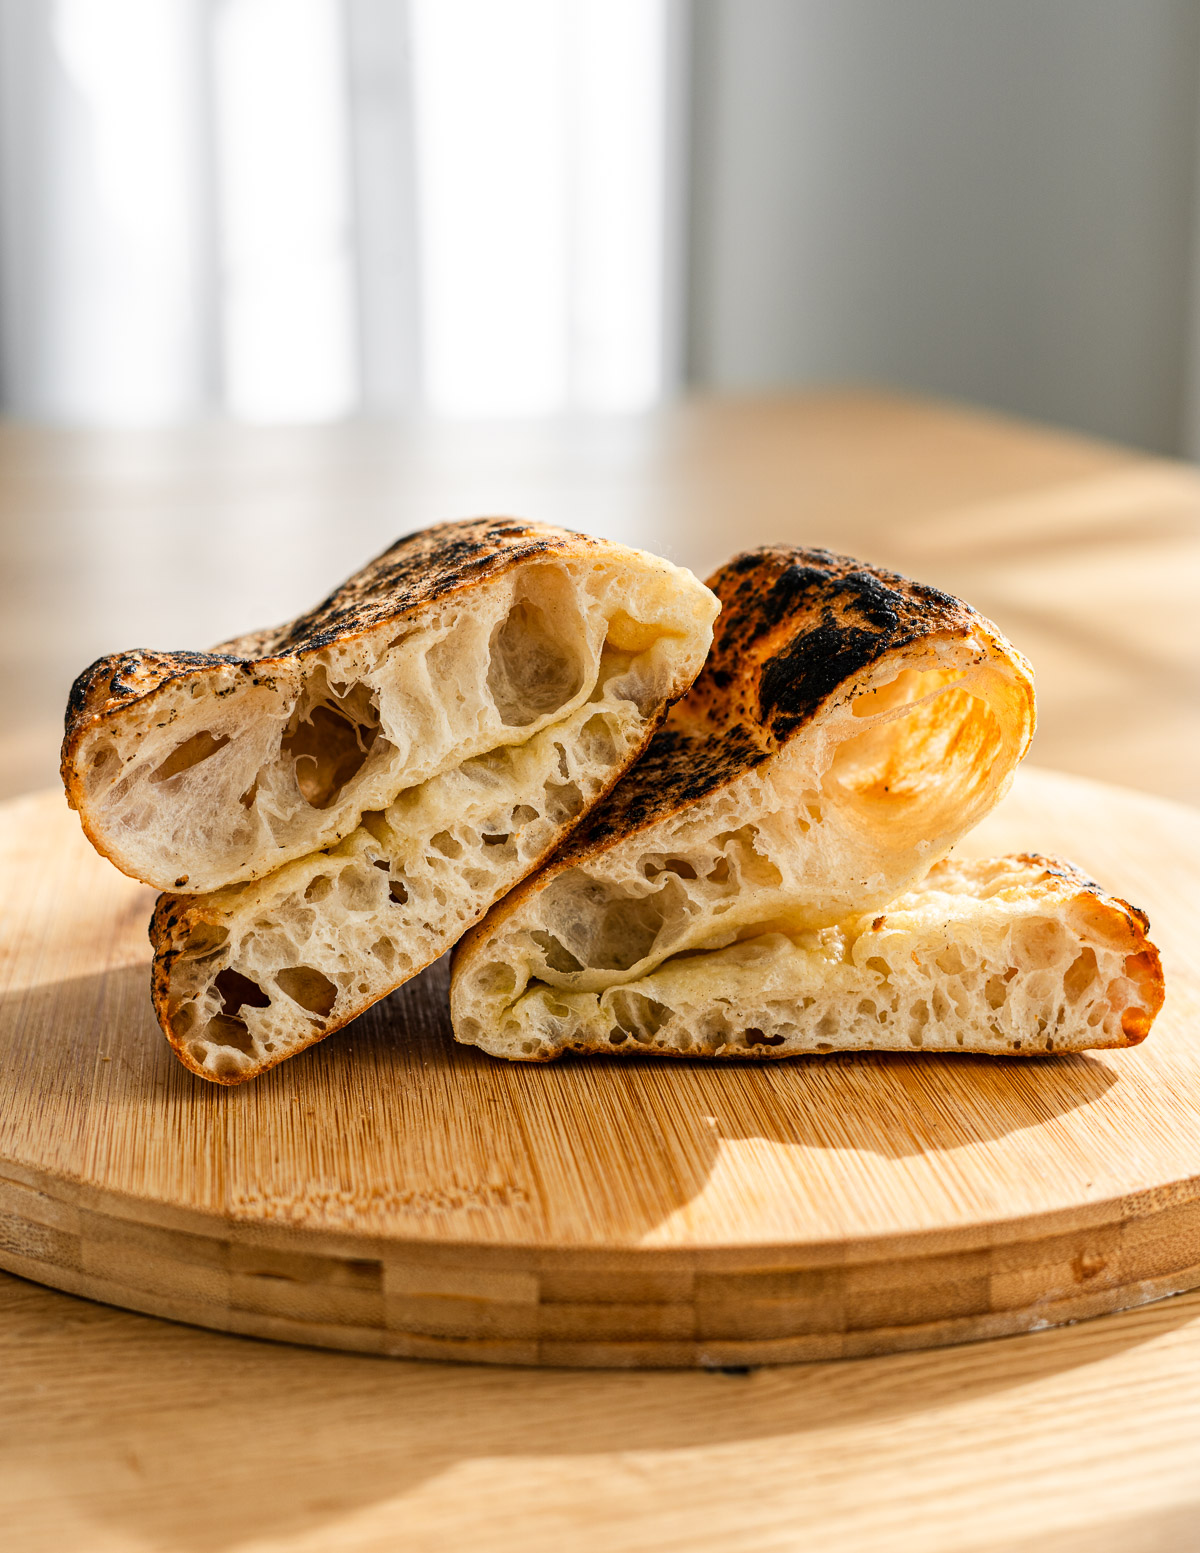
Panuozzo is a traditional Italian sandwich made from Neapolitan-style pizza dough that’s baked, sliced open, and filled like a panini. It originated in Gragnano, near Naples, and is known for its airy crumb and crisp yet chewy crust. Unlike focaccia or standard sandwich bread, panuozzo uses Neapolitan pizza dough, giving it a light, bubbly interior and foldable structure that makes it perfect for hearty fillings like cured meats, cheese, and roasted vegetables.
Why This Recipe Works
This panuozzo dough is designed for home bakers and works reliably every time because:
- High hydration: Creates an open, airy crumb, tender interior and crisp crust. The added water encourages better oven spring in a home oven and gives that light, moist and slightly chewy interior.
- Long, cold proof: Develops deep flavor and structure without intensive kneading. Slow fermentation strengthens the gluten network naturally and improves browning, extensibility, and overall texture.
- No knead: Minimal hands-on time, so it’s beginner-friendly. Stretch and folds strengthen the dough gradually, creating elasticity without intensive kneading.
- Forgiving dough: Easy to shape without worrying about tearing. Because panuozzo doesn’t need to be perfectly round like pizza, it’s more flexible and less stressful to stretch.
- Home oven friendly: No special pizza oven or equipment needed— a standard metal tray is all you need. High hydration compensates for lower home oven temperatures.
- Utilizes leftover or over proofed pizza dough: If your pizza dough has fermented longer than intended, panuozzo is a perfect way to use it. The relaxed gluten structure increases extensibility, making it easier to stretch while still baking up light and airy.
Ingredients and Substitutions
This is a lean, pizza-style dough made with basic pantry staple ingredients. Precise measurements are in the recipe card below.
- Bread flour, 00 pizza flour, or all-purpose flour: See the section below for detailed guidance on flour choices and how they affect dough texture.
- Instant dry yeast: Easiest to use, but you can also substitute active dry yeast by dissolving it in lukewarm water first.
- Sugar: Just a small amount to promote browning and enhance crust color.
- Salt: Use fine sea salt in the dough so it dissolves easily, and flaky salt for sprinkling on top before baking.
- Olive oil: Adding a bit of olive oil to the dough helps keep the crumb softer, especially if you plan to bake ahead of time. It will also be used to grease the bowl, drizzle in the center, and brush on top of the dough before baking for extra flavor and browning.
What Type of Flour to Use
Flour choice makes a noticeable difference in both texture and handling, especially in high hydration doughs like this one.
For most home bakers, bread flour is the easiest to work with. It has a higher protein content (usually around 12–13%), which means stronger gluten development and better water absorption. Because it absorbs more water, the dough feels slightly more stable and less sticky at higher hydrations. If you’re new to working with 72–80% hydration doughs, bread flour will feel the most manageable.
00 pizza flour has a slightly lower protein content than bread flour but is milled much finer. It produces a more tender chew and thinner, crisper crust. However, 00 flour can feel stickier at the same hydration level because of how finely it’s milled and how it hydrates. If using 00 flour, you may find the dough feels looser at higher hydration levels, so starting closer to 68–72% is often more comfortable unless you’re experienced with wetter doughs.
All-purpose flour sits in between but varies by brand. It typically has lower protein than bread flour, so it absorbs slightly less water. This means if you use the same hydration as bread flour, the dough may feel softer or more slack. When using all-purpose flour, you may need to reduce hydration slightly for easier handling, especially if your brand is closer to 10–11% protein.
In short:
- Bread flour → strongest structure, easiest handling for beginners
- 00 flour → lighter chew, slightly trickier at high hydration
- All-purpose → softer result, may need slightly less water
All three work — you may just need to adjust hydration based on how your dough feels rather than sticking rigidly to one percentage.
Semolina vs. Flour When Shaping
When shaping panuozzo, you can use either semolina or regular flour to dust your surface. Semolina doesn’t absorb into the dough as quickly and creates a subtle texture on the bottom after baking, which some people prefer for added crunch. Regular flour gives a softer finish and blends more seamlessly into the dough. With high hydration dough, semolina can make transferring easier because it acts almost like ball bearings underneath, but both options work well! It ultimately comes down to texture preference and what you have on hand.
How to Make Panuozzo (Pizza Sandwich Dough)
This is a slow-fermented, high-hydration dough that relies on time instead of heavy kneading. It’s really easy to make! Here’s an overview of the panuozzo dough recipe:

- Mix flour, yeast, sugar, salt, and water until a shaggy dough forms.
- Rest (autolyse) for 30 minutes.
- Add olive oil (if using) and perform stretch and folds. Do 2–3 total sets of stretch and folds, resting 30 minutes between each.
- Bulk ferment overnight (8–12 hours).
- Divide and shape into dough balls.
- Cold ferment for at least 24 hours and up to 5 days for best results. (See below for same day)
- Remove from fridge, bring back to room temperature.
- Shape by gently stretching the dough.
- Drizzle with olive oil and fold in half. Drizzle top with more olive oil.
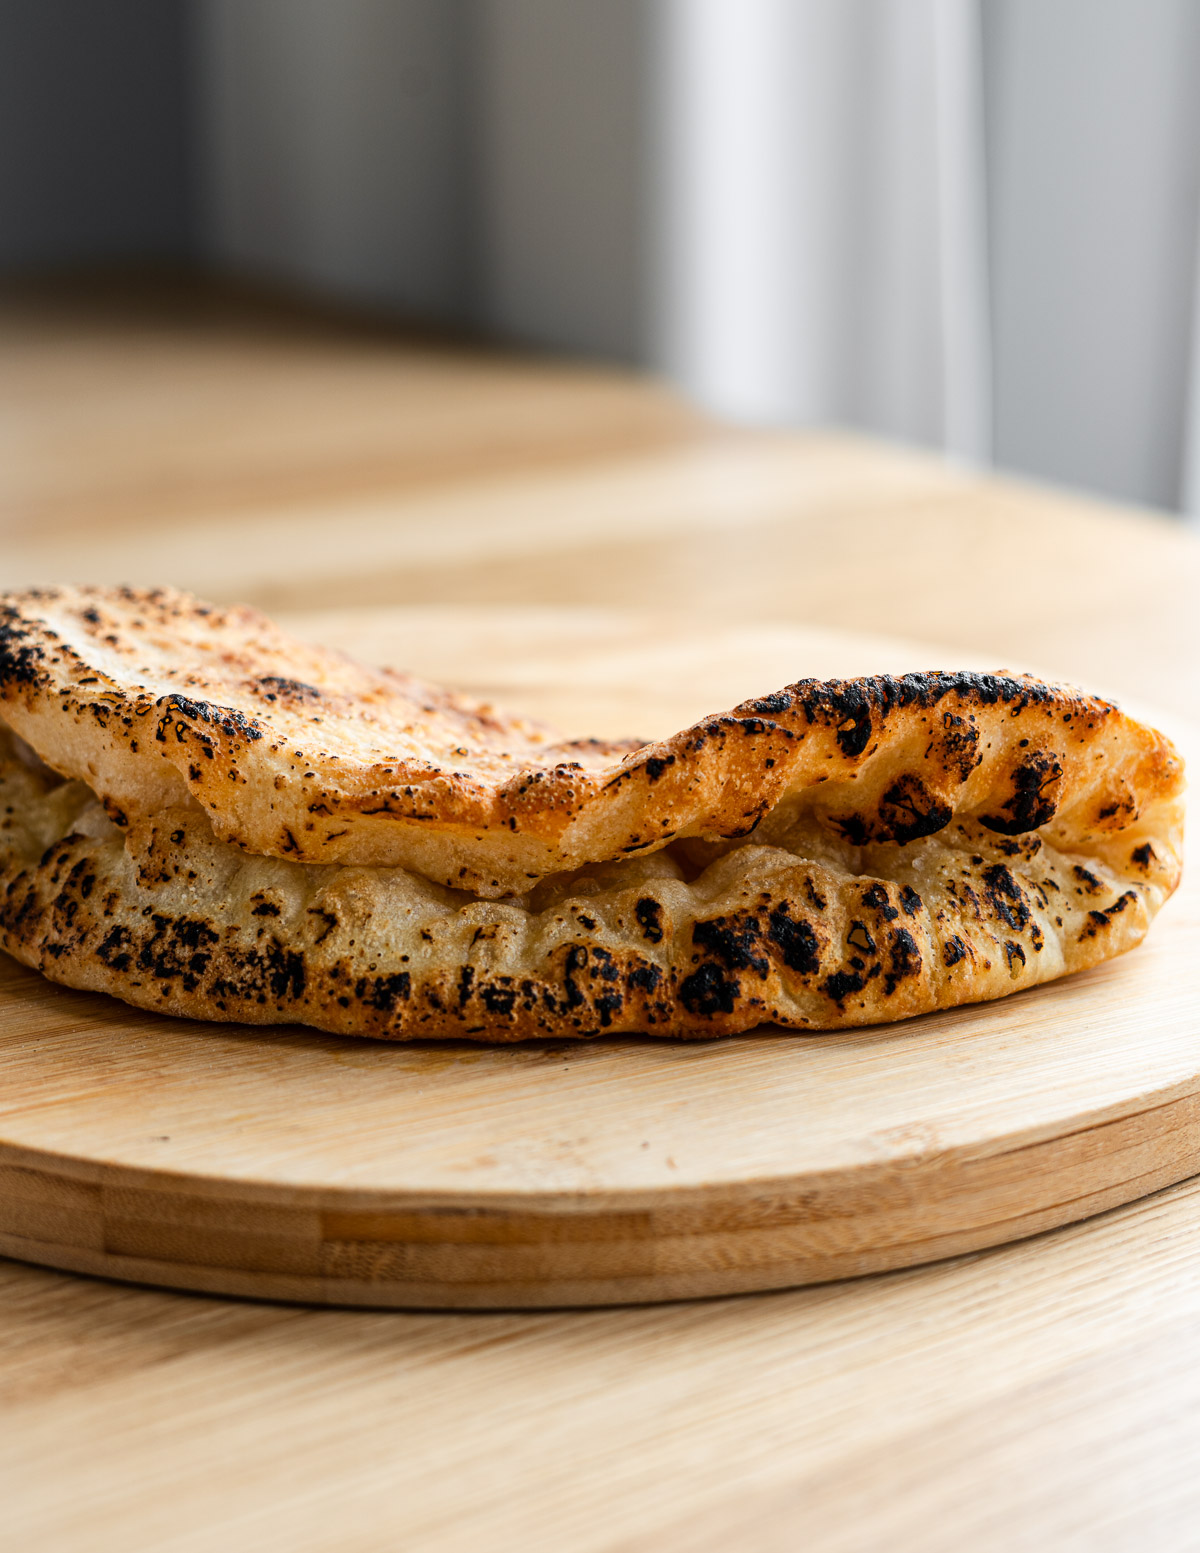
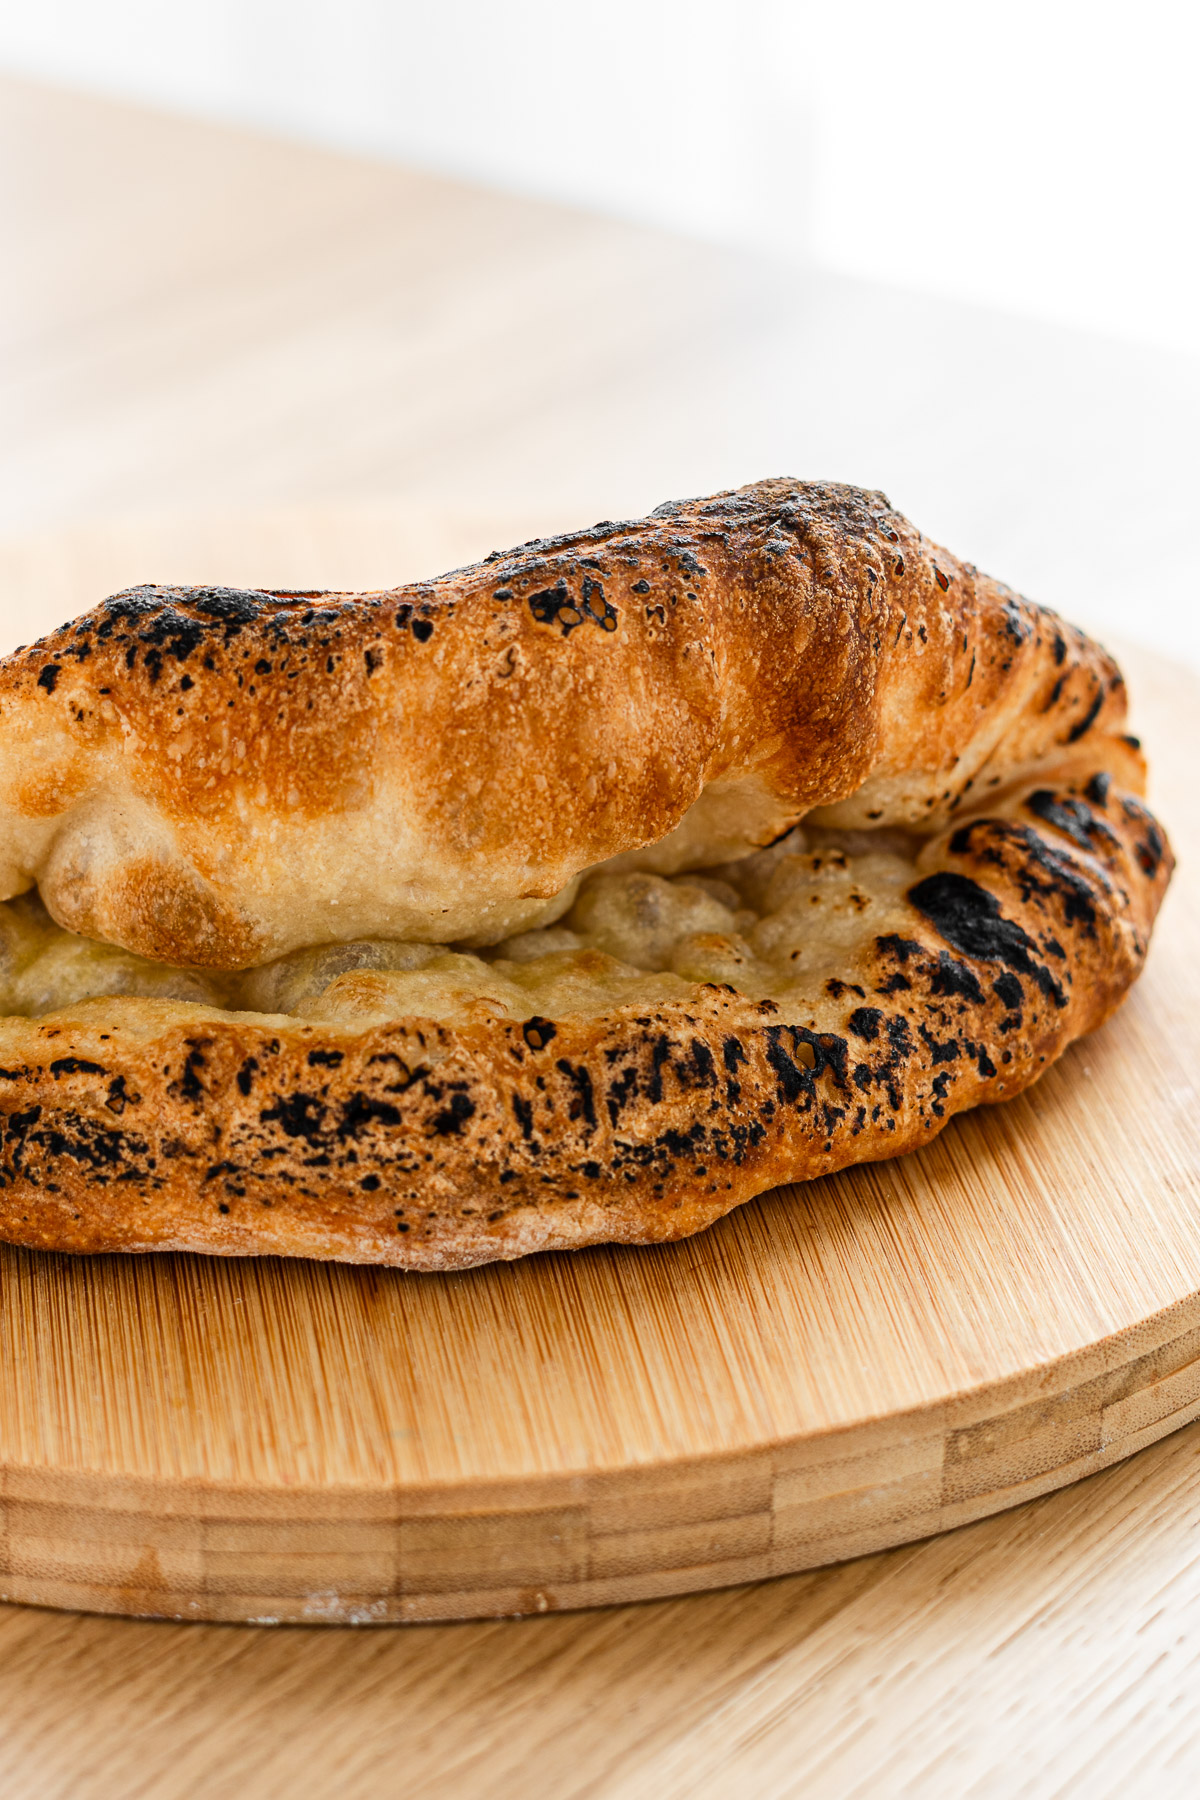
- Bake at high heat. After baking, torch for extra char.
How to Stretch Pizza Dough for Sandwiches
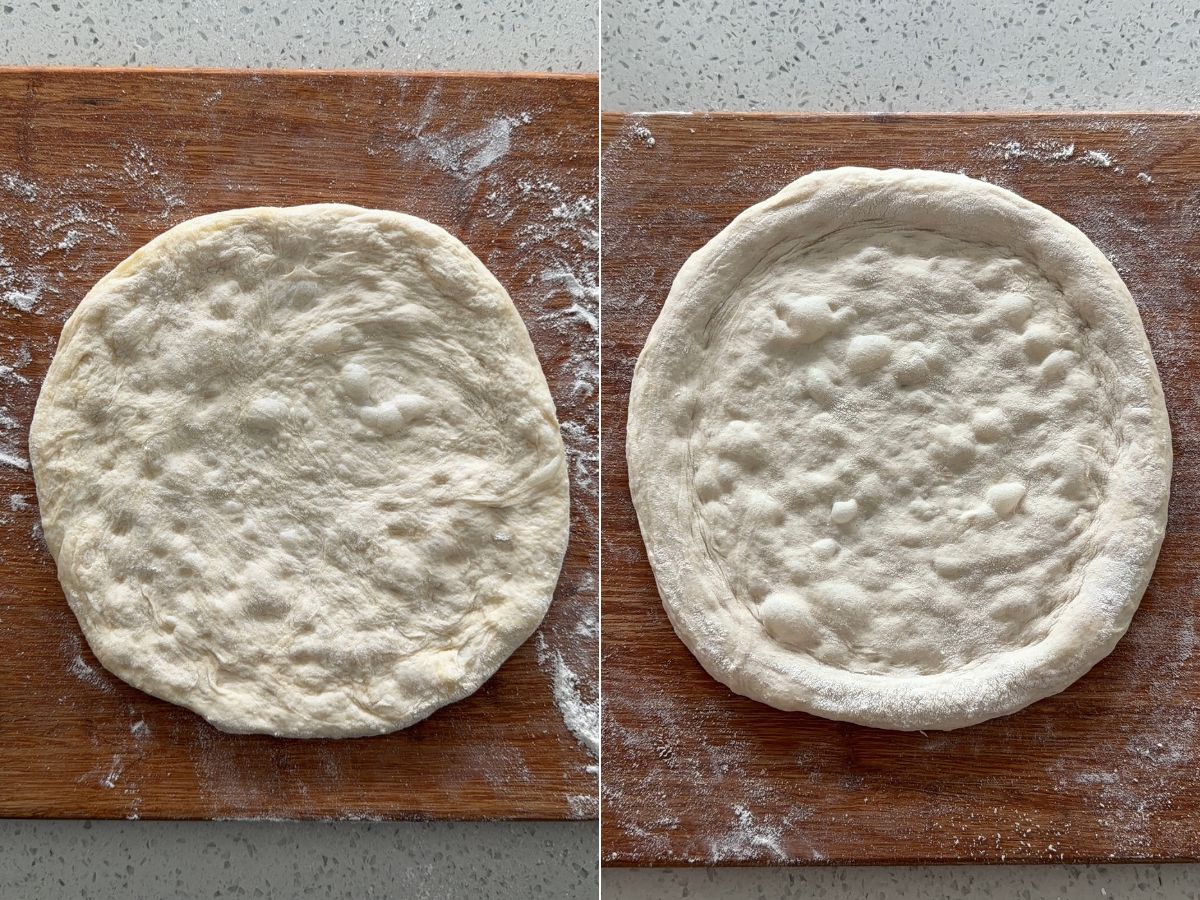
Stretching panuozzo dough is similar to stretching Neapolitan pizza dough, though slightly more forgiving since perfect roundness and rim for the crust is not required. There are a few ways to shape panuozzo dough but here’s how I do it:
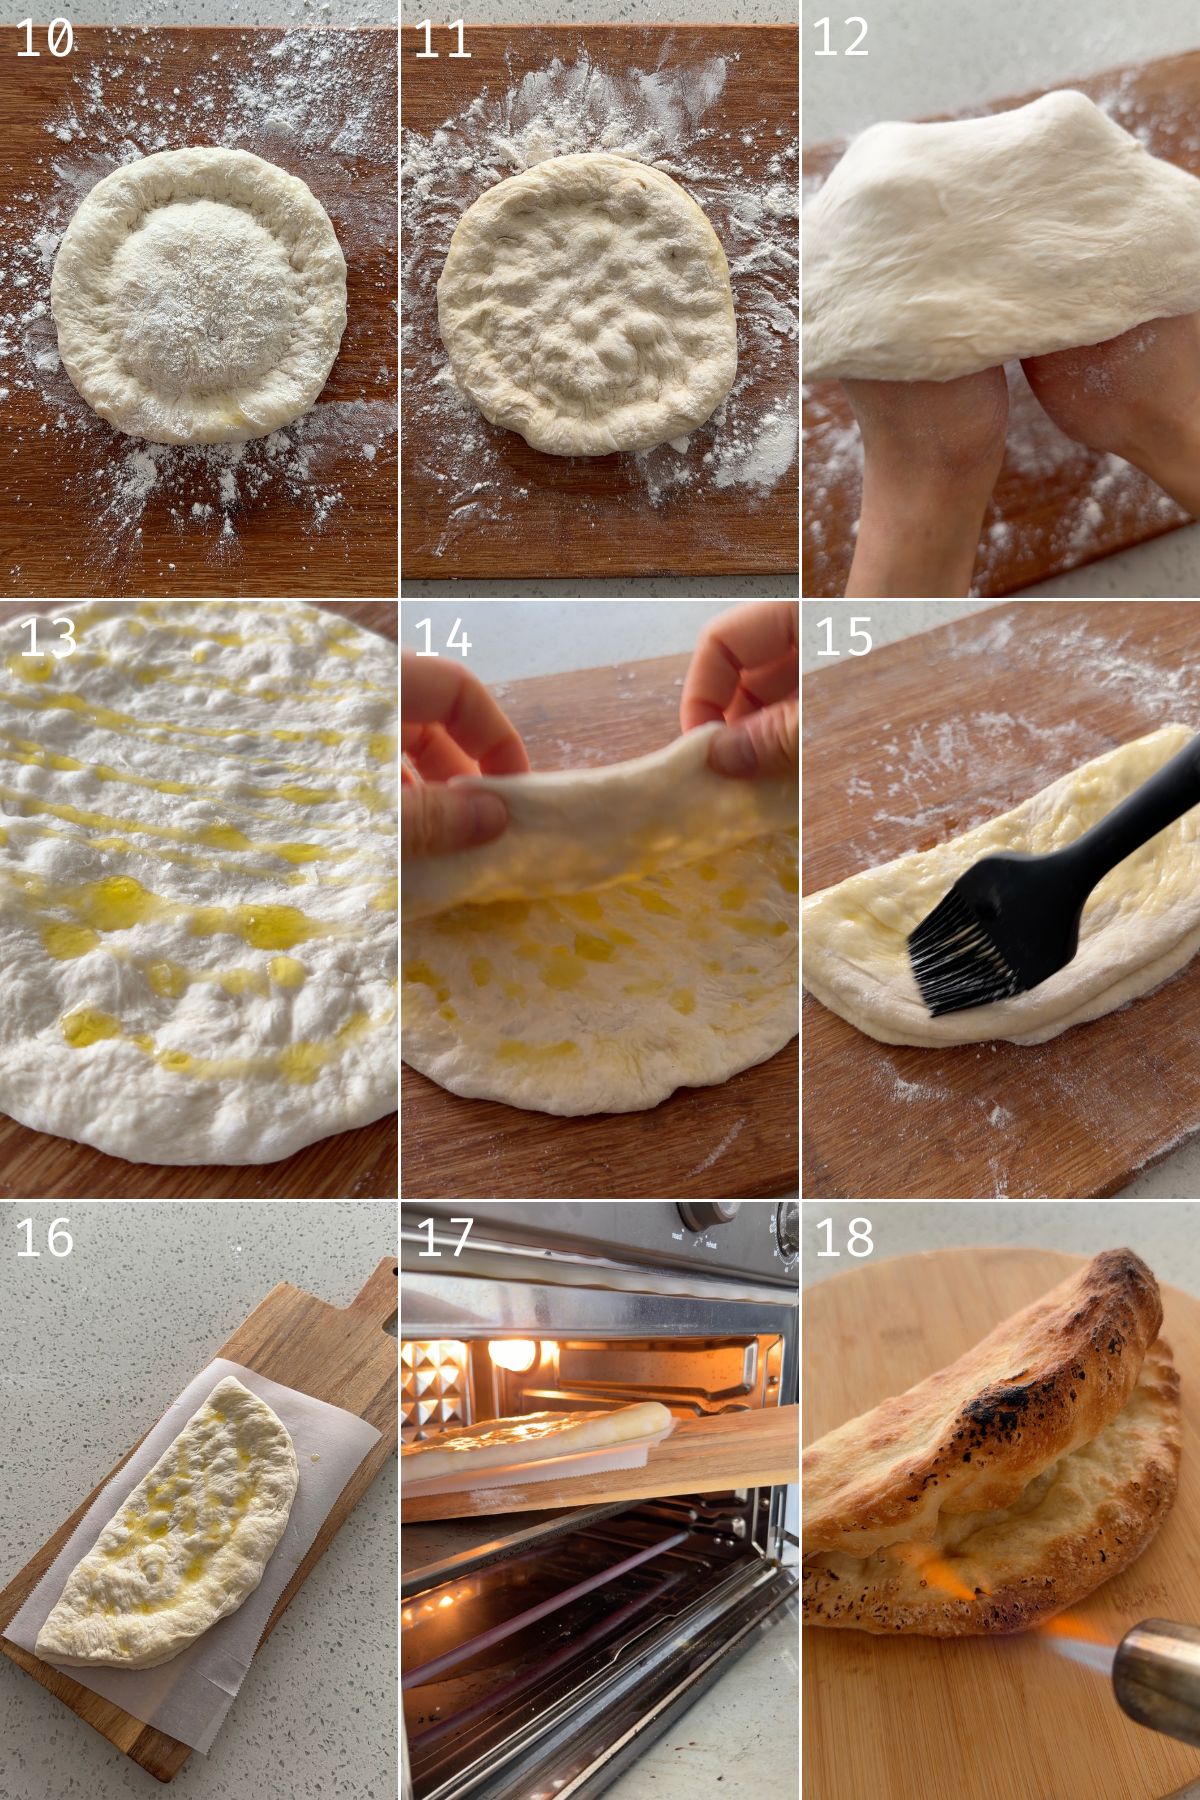
Start by placing the dough on a generously floured surface. Gently dimple (around the edge with your fingertips to form a light rim. While a defined crust isn’t required, keeping the perimeter slightly thicker creates contrast and improves texture after baking.
From there:
- Gently dimple the entire surface of the dough within the perimeter
- Lift the dough and drape it over the backs of your hands
- Let gravity assist as you gently rotate and stretch
This method preserves internal air pockets better than rolling it out or pulling directly from the edges on the counter. Stretch to approximately 20 cm (8 inches), thin but not tearing.
VIDEO: Watch How to Make It
Lisa’s Recipe Tips
- Make the dough in advance: A slow, long fermentation develops deeper flavor, improves gluten structure, and gives a tender, airy crumb. Plan ahead and let it rest in the fridge— the extra time really pays off.
- Handling high-hydration dough: This dough can feel sticky, so wet your hands, touch it as little as possible, and work quickly. When shaping, use plenty of flour or semolina to prevent sticking and help preserve the air pockets.
- Torch the crust: For extra flavor and a lightly charred finish, you can use a kitchen torch after baking. It gives a professional-looking crust and adds texture contrast.
- Dough hydration: Higher hydration ensures the crumb stays soft and airy in a home oven while still producing a crisp, golden crust. It’s the key to that focaccia-like interior and foldable, panuozzo-ready crust.
- Utilize leftover or overproofed dough: If your pizza dough has relaxed too much, panuozzo is a perfect way to use it. The relaxed gluten makes it easier to stretch and still produces an airy, tender sandwich bread.
Dough Hydration for Home Ovens
Panuozzo dough is a high-hydration dough, meaning it has a higher percentage of water relative to flour than typical pizza or sandwich dough. This extra water helps the dough stay soft and tender inside while forming a crisp, golden crust with open, airy pockets.
Neapolitan-style pizza dough, which is the basis for panuozzo, is usually lower hydration — around 58–65% — and bakes in extremely hot ovens in just a minute or two. That intense heat cooks the dough so quickly that it retains moisture, giving a soft, sometimes slightly wet center.
Home ovens are much cooler and take longer to bake the dough. If you tried using a 60–65% hydration dough at home, most of the water would evaporate, leaving a dry, tough crust. By increasing the hydration to around 72–75% for panuozzo, you compensate for the longer bake time, resulting in a tender, airy interior while still achieving a crisp, golden exterior.
Sandwich Fillings and Variations
This panuozzo dough recipe has become my go-to for sandwiches and I’ve made so many different variations! Here are some of my favourites, both classic and non-traditional:
Classics
- Mortadella: Layer pesto, fresh mozzarella or provolone, mortadella, tomatoes, arugula, and drizzle with balsamic glaze. A classic Italian-inspired combo.
- Mortazza: mortadella, burrata, and pistachio.
- Prosciutto & Cheese: Prosciutto, fresh mozzarella or burrata, arugula, and olive oil.
- Antipasto: Fill with roasted peppers, olives, salami, artichokes, and provolone for a colorful, flavorful option.
- Roasted Veggie: Roasted zucchini, peppers, eggplant, and provolone or mozzarella— perfect for a vegetarian version.
- Caprese: Fresh mozzarella, tomato, argula and balsamic glaze— simple but so good!
- Chicken Parmesan: Breaded chicken cutlets, marinara, and mozzarella for a hearty, Italian-American favorite.
- Meatball Sub: Homemade or store-bought meatballs, marinara, and mozzarella— classic comfort food.
- Chicken Caesar: Pair some crispy chicken with caesar salad like my miso caesar salad or lap cheong caesar salad.
Fusion and Non-Traditional
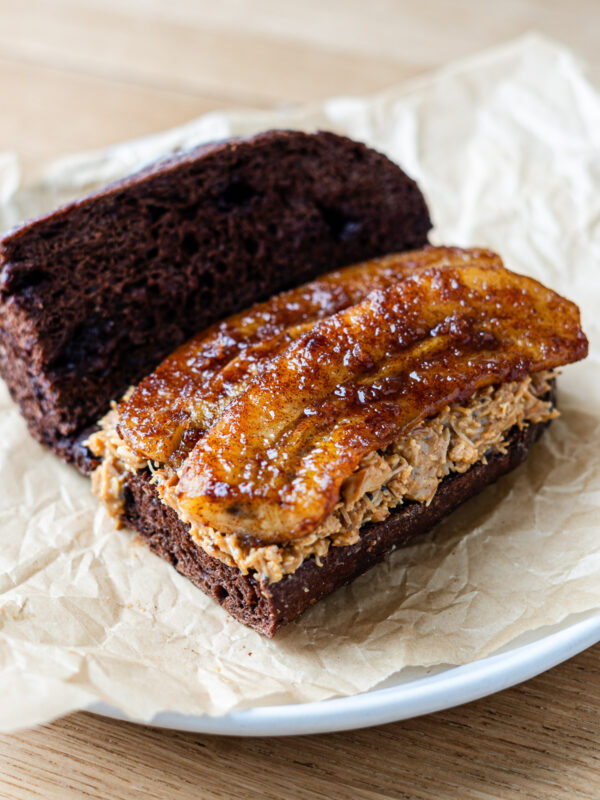
- Cinnamon Sugar: This has been my daily nightcap for the last 2 weeks! It’s like a cinnamon sugar toast hot pizza pocket. The inside gets al melty and gooey like the middle of a cinnamon roll. Oh, and I highly recommend drizzling it with cream cheese glaze or dip in cream cheese frosting.
- Japanese Egg Salad: Tamago sando meets Panuozzo!! I love the contrast of crispy chewy bread with the creamy flavourful egg salad.
- Bánh Mì Inspired: Add pate, Vietnamese mayo, pickled daikon and radish, cilantro, cucumbers, cold cuts or your favourite protein.
- Japanese Sweet Potato and Cheese: Just like my Japanese sweet potato grilled cheese but with panuozzo dough. I love using a mix of a melty cheese like gouda or mozzerella with a funkier creamy cheese like gorgonzola or cream cheese.
- Panuozzo Grilled Cheese: Pile in shredded cheese (cheddar, mozzarella, fontina work well), bake or grill, and drizzle with (hot) honey.
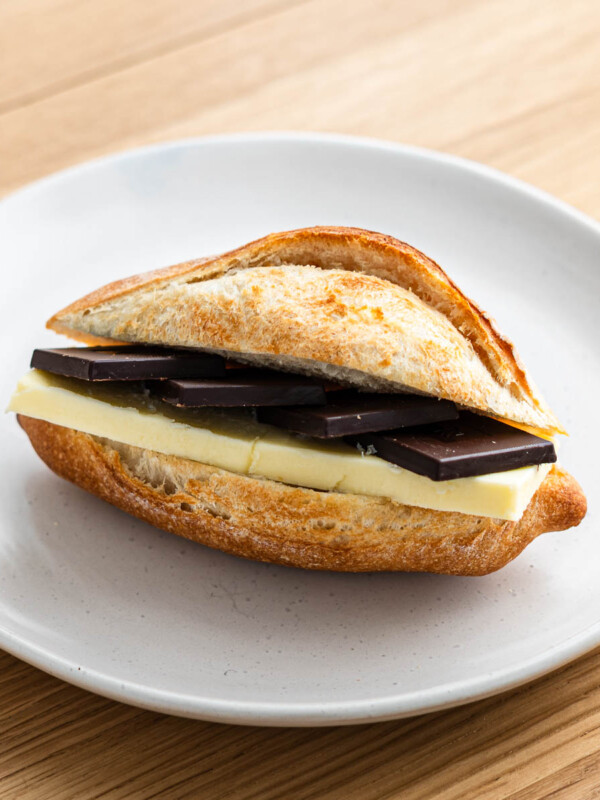
- Strawberry Prosciutto: Layer camembert or ricotta, arugula, prosciutto, sliced strawberries, and balsamic glaze for a sweet-savory combination.
I could go on and on but to sum it up, the variations are endless.
How to Store Pizza Dough
Before Baking
- Fridge: Up to 5 days in an airtight container
- Freezer: Lightly oil the dough ball, wrap tightly and freeze individual dough balls for up to 2 months. When planning to use, thaw overnight in the fridge, then bring to room temperature before stretching.
After Baking
- Room Temperature: Place in a paper bag for up to 1 day. Avoid refrigerating, as it can cause the bread to stale more quickly.
- Freezer: Once cooled, transfer into air tight bags for up to 3 months.
- Reheat: When ready, place into the oven at 375°F for 5–7 minutes to warm and crisp back up.
Recipe FAQ
Yes, most pizza dough recipes will work. Lean, higher hydration dough gives the best airy interior and crisp crust, while enriched or lower hydration doughs will bake softer and more bread-like. It depends on the texture you prefer.
Yes. It will bake much faster and develop more char due to the higher heat, so rotate it frequently and watch closely. Expect it to cook in about 60–90 seconds depending on temperature.
Yes, simply divide the dough into smaller portions and reduce the baking time slightly. Mini panuozzo work well for appetizers or party sandwiches. Avoid stretching them too thin so they don’t over-crisp.
More Easy Bread Dough Recipes
Enjoy! If you make this Panuozzo Dough recipe, I’d love to hear what you think! Leave a comment and rating below, and if you share it on social media, tag me on Instagram @Okonomikitchen. I can’t wait to see your creations!
Print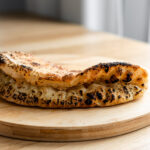
Panuozzo Dough (Pizza Sandwich)
- Total Time: 23 minutes
- Yield: 2 servings
- Diet: Vegetarian
Description
This Panuozzo Dough (pizza sandwich bread) bakes up a crisp, golden crust with an airy, tender interior— perfect for sandwiches or stuffing with your favorite fillings. Made with simple ingredients and a slow fermentation, it develops deep flavor and a light, chewy texture. Bake it the same day, or keep the dough in the fridge for up to 5 days for fresh bread anytime!
Ingredients
- 200 g bread flour, 00 pizza flour or all purpose flour (100%)
- 136–160 ml water (68-80%)
- 1 g yeast (0.5%)
- 2 g sugar (1%)
- 6 g salt (3%)
- 4 g olive oil (2%), optional
Instructions
Preliminary Notes
- As always, I recommend using a kitchen scale to measure the ingredients for best results.
- Flour: I’ve made this recipe using Robin Hood 00 pizza flour, bread flour and all purpose flour with great results but with minor differences in texture. 00 pizza flour produces an airy, tender chew with a crisp shell. Bread flour adds more structure and chew, making the panuozzo sturdier. All-purpose flour yields a slightly softer crust, less chew, and a tighter crumb.
- Hydration: (If you’re new to high-hydration doughs, start at the lower range)
- 68–72% is easier to handle, slightly tighter crumb
- 75–80% → airier interior, more open structure, requires gentler handling
- Temperature & Environment: Fermentation speed depends heavily on temperature. Instead of thinking in strict times, think in terms of dough behavior.
- A cold environment is around 18–20°C — typical of winter kitchens or cool basements.
- A moderate environment is 21–23°C — standard room temperature.
- A warm environment is 24–27°C — summer kitchens or homes with poor airflow.
- Anything above 28°C is considered hot, where dough can overproof quickly.
- Water temperature: Adjust your water to help control fermentation.
- Cold kitchen → use lukewarm water (30–35°C)
- Moderate room → room temperature water
- Warm kitchen → cool water (18–20°C)
- Hot climate → cold water and consider refrigerating overnight
Make the Dough
- Mix the Dough: In a bowl, combine the flour, yeast, sugar, and salt. Pour in the water and mix until no dry flour remains and a rough, shaggy dough forms. At this stage the dough will look uneven and slightly sticky. Cover the bowl and let it rest for 30 minutes (autolyse)
- Adding Olive Oil & First Strengthening: After the rest, add the olive oil if using. Olive oil is not essential, but it helps keep the crumb softer and adds subtle richness. To incorporate, squeeze and fold the dough in your hands until the oil is absorbed. If you’re not using oil, perform a set of stretch and folds around the bowl until the dough tightens slightly. Cover and rest for another 30 minutes.
- Stretch & Folds: This dough typically needs 2–3 sets, but it depends on hydration and how the dough feels. Lower hydration doughs strengthen quickly and may only need two sets. Higher hydration doughs benefit from three sets to build structure. To perform a stretch and fold, lift one side of the dough, stretch it upward without tearing, and fold it over itself. Rotate the bowl and repeat on all sides. If the dough is very wet, coil folds work better: lift the center, allow the ends to fold underneath, rotate, and repeat. After each set, the dough should feel smoother and more elastic. If it still looks rough or tears when stretched, cover and rest another 30 minutes before doing one final fold.
- Overnight Proof: Cover the dough and let it proof for 8–12 hours. In a moderate room temperature environment, this can happen on the counter overnight. In a warm climate, it’s safer to proof in the refrigerator to prevent over-fermentation. By morning, the dough should look airy, slightly domed, and dotted with bubbles.
- Dividing & Balling: Generously flour your work surface and gently turn the dough out, allowing it to fall naturally from the bowl. Avoid pulling or forcing it— preserving gas bubbles is key. Lightly flour the top and divide into two equal portions, roughly 170–185 grams each depending on hydration.
- To shape: Gather the edges toward the center and pinch to seal. Flip seam-side down and, using cupped hands, gently drag the dough toward you to create surface tension. Place each dough ball into a lightly oiled airtight container.
- Cold Fermentation (Optional but Recommended): From here, you can bake the same day or refrigerate the dough for up to 5 days. I love the texture after 48 hours. A longer cold fermentation deepens flavor and really improves the texture.
Preparing to Bake
- For Same day: Let the dough rest at room temperature for 45–60 minutes until relaxed and slightly puffy.
- For Cold proof: Remove it from the fridge:
- warm environment → about 2 hours
- cold environment → about 3 hours
- The dough is ready when it feels airy, slightly jiggly, and stretches easily without snapping back.
- Preheat: your oven with a metal tray inside to the highest temperature it gets to (ideally 500°F/ 260°C).
- Shaping the Panuozzo: Dust your work surface generously with flour or semolina. Gently turn out the dough, taking care not to degas it. Lightly flour the top, flip it over, and use your fingertips to dimple the dough, leaving about a 1.5 cm perimeter. While a defined crust isn’t required for panuozzo, leaving slightly thicker edges creates bubbly contrast and texture. Lift the dough and drape it over the backs of your hands, letting gravity do most of the work as you gently rotate and stretch— it shouldn’t take much effort, as the dough is very relaxed. This method preserves air pockets better than stretching from the edges on the counter. Stretch until thin but not tearing, about 20 cm (8 inches). Drizzle olive oil and sprinkle flaky salt in the center, then fold the dough in half. Add a little more olive oil on top before baking.
- Bake: Transfer to parchment paper that’s placed on a metal tray. Slide the panuozzo onto the hot tray and quickly close the oven door. Bake for 5 minutes or until deep golden. Then switch to broil for 2–3 minutes until charred to your liking. For extra charred flavor, you can lightly torch parts of the crust after baking.
- Finish: Once baked, the panuozzo is ready to split and fill.
- Prep Time: 15 minutes
- Cook Time: 8 minutes
- Category: Bread / Sandwich Bread
- Method: Baking
- Cuisine: Italian
Nutrition
- Serving Size: 1 pannuozo bread
- Calories: 386
- Sugar: 1.3 g
- Sodium: 1200 mg
- Fat: 3 g
- Saturated Fat: 0.4 g
- Unsaturated Fat: 2.6 g
- Trans Fat: 0 g
- Carbohydrates: 77 g
- Fiber: 2.7 g
- Protein: 10 g
- Cholesterol: 1200 mg


What a great way to use leftover dough, but we also make this dough specifically for sandwiches because it’s that good! It was perfect on the first try