
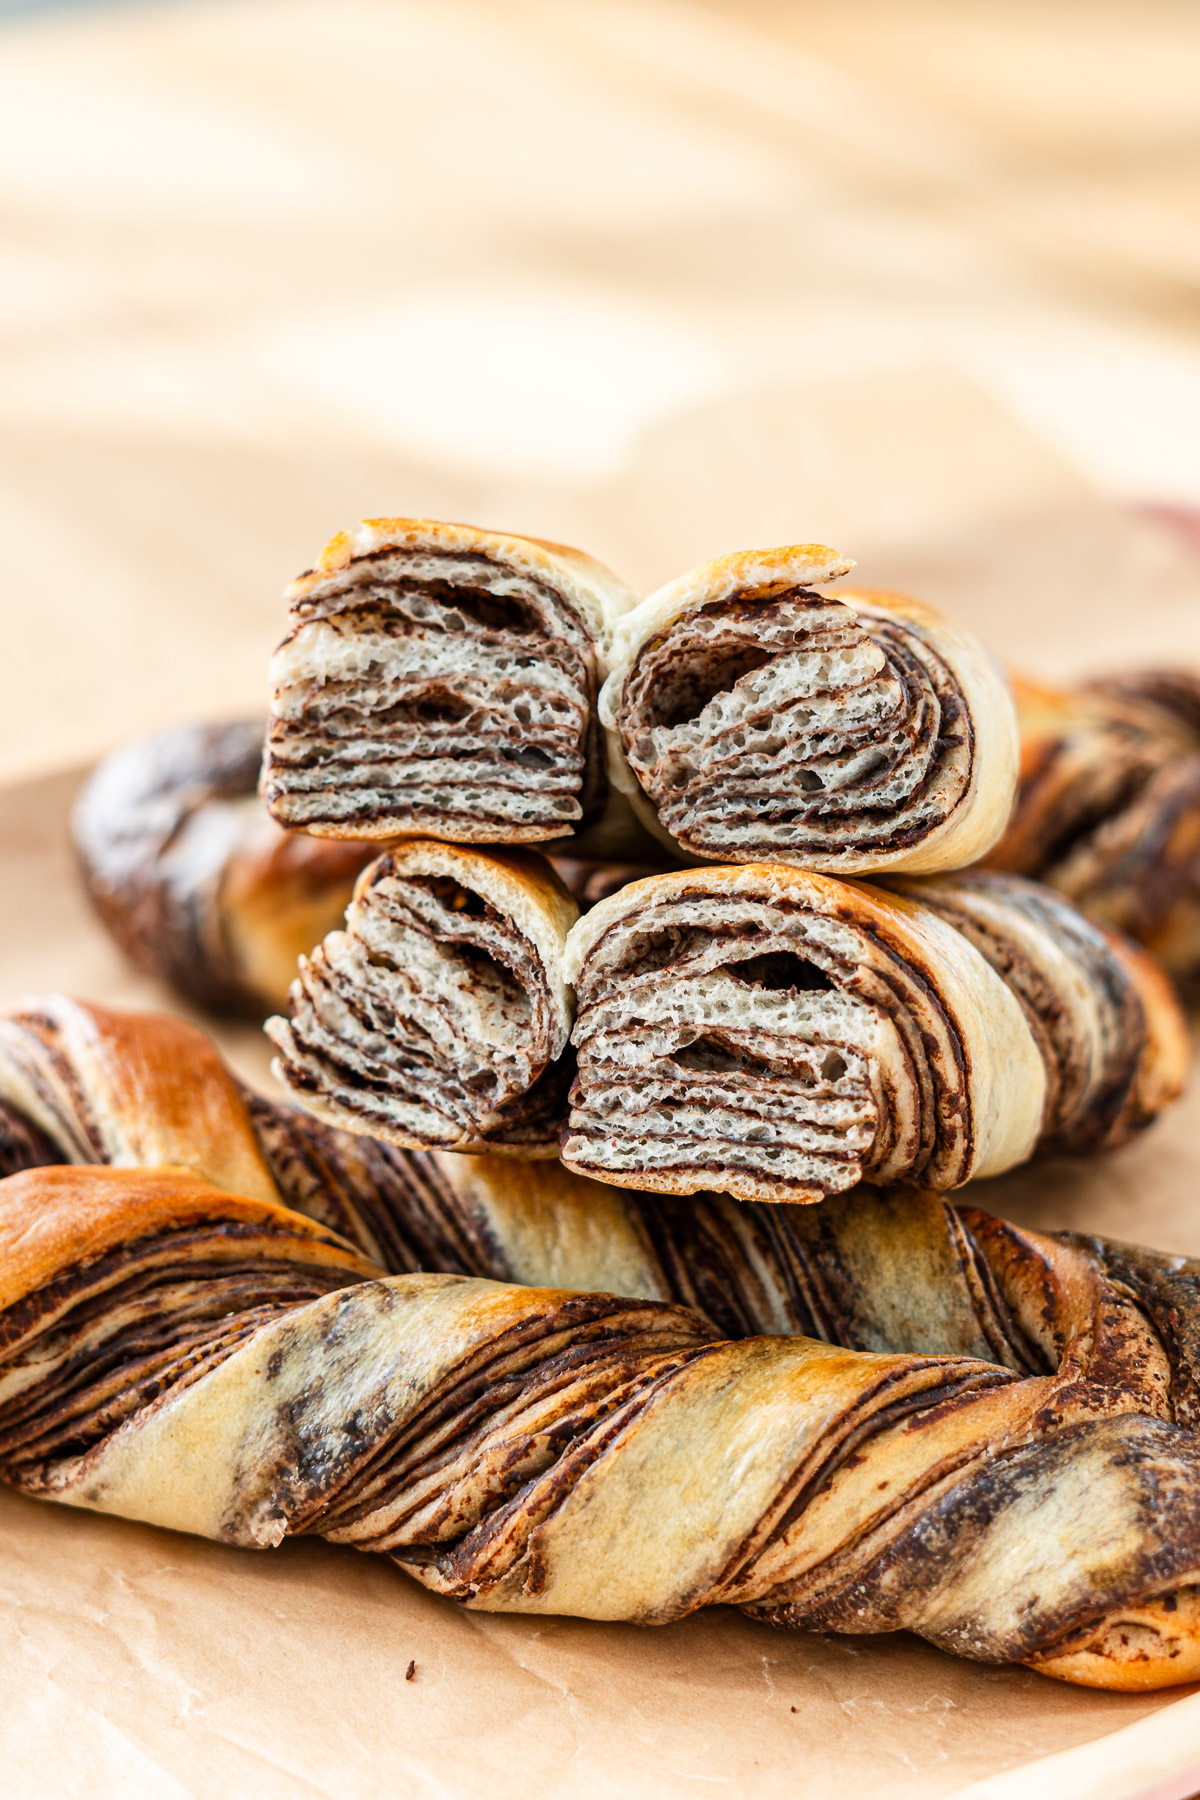
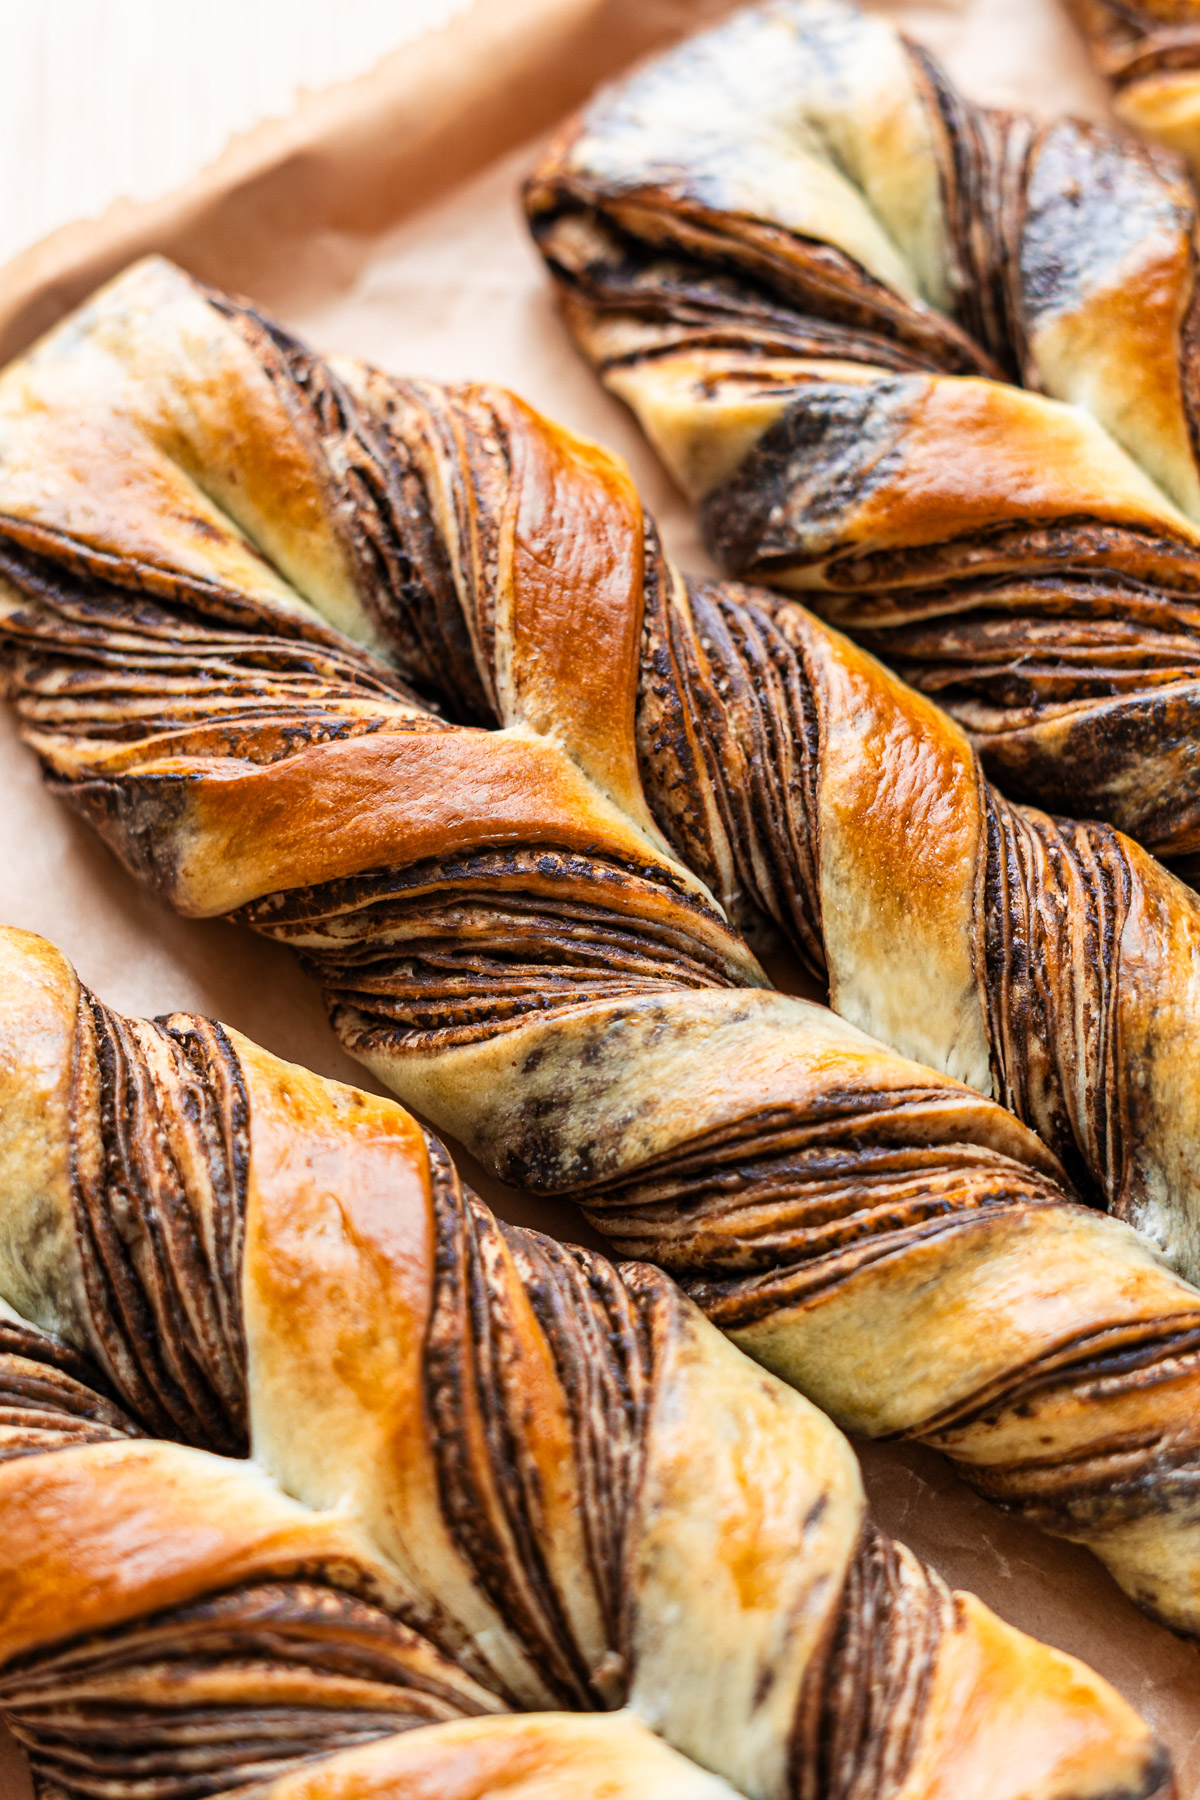
This Chocolate Marble Twist Bread is soft and lightly sweet, with a cocoa chocolate layer folded into the dough to create a marbled pattern throughout. Each piece is shaped into a simple twist and baked until fluffy with chocolate swirls throughout.
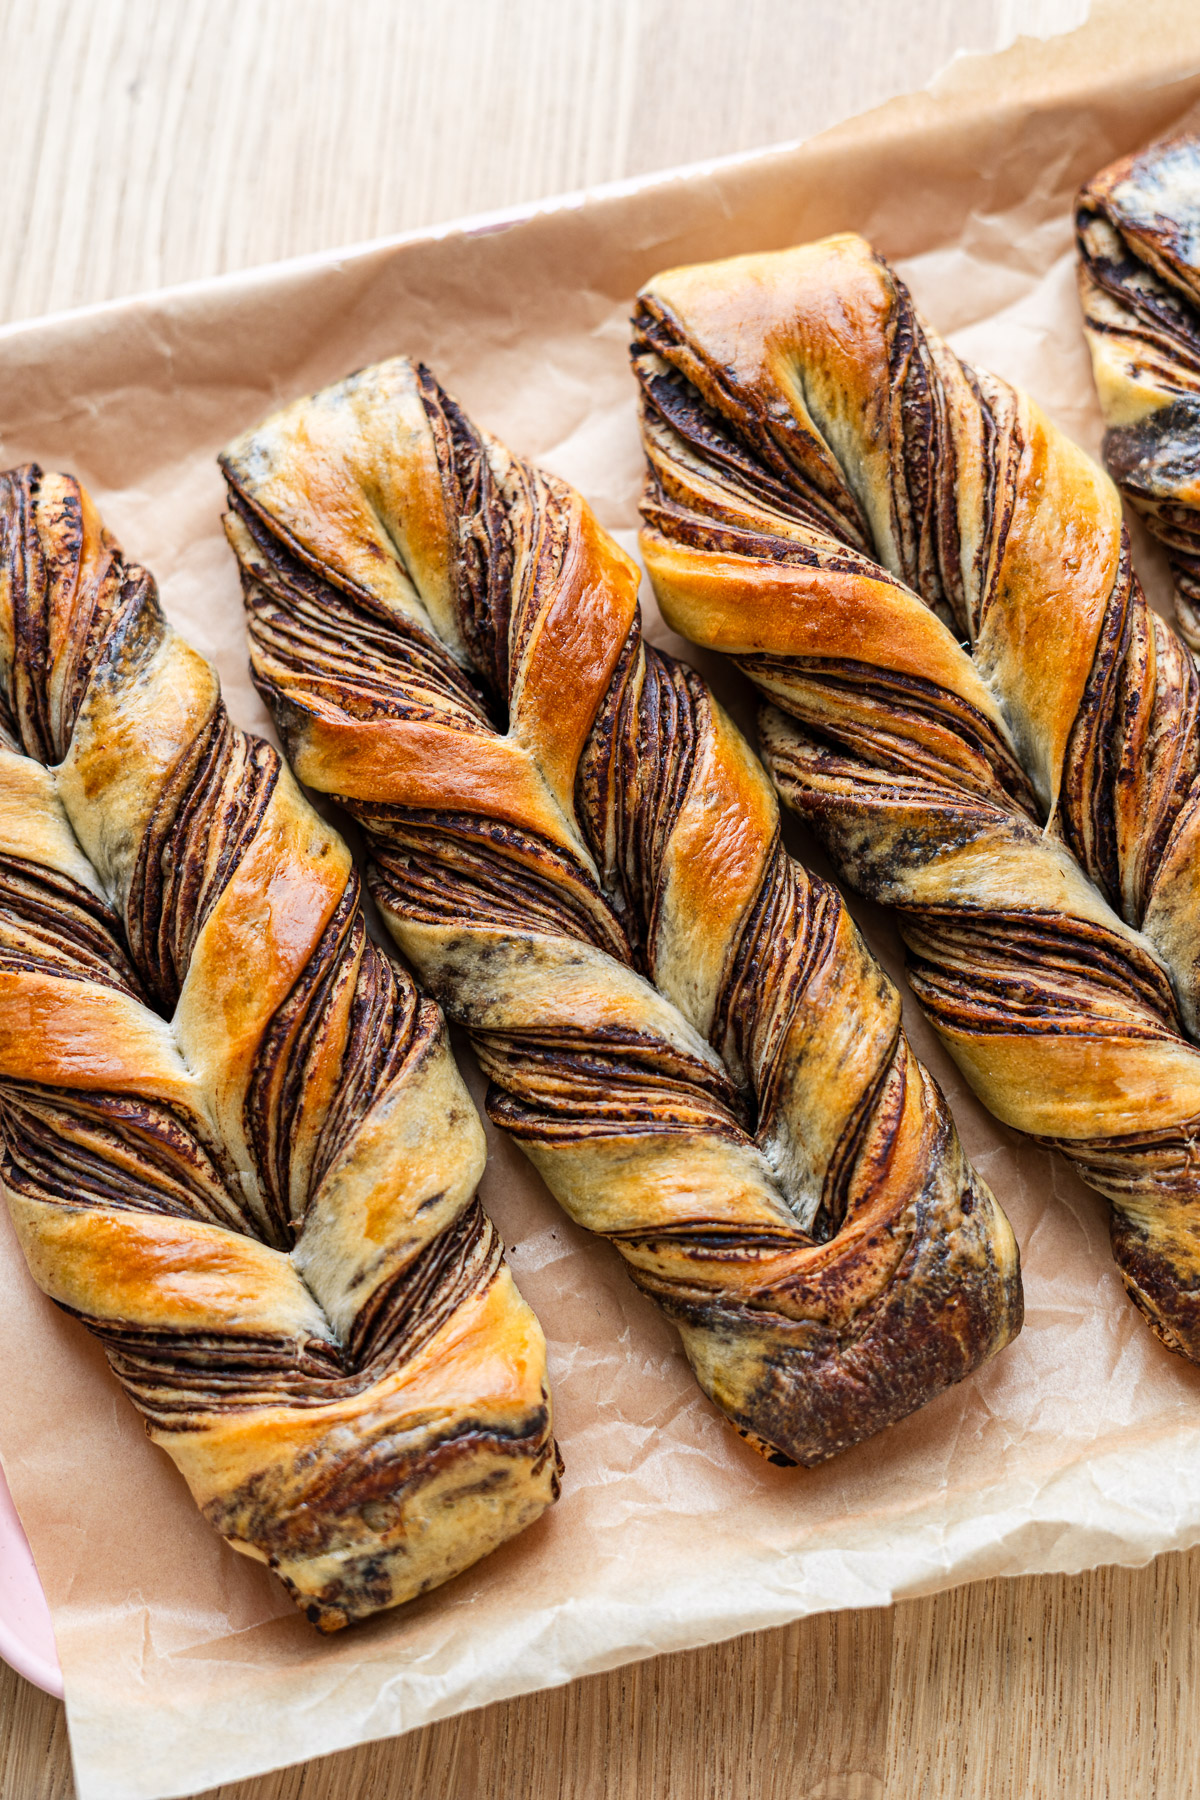
Table of Contents
Laminated Chocolate Marble Bread
With Valentine’s Day right around the corner, here’s an easy chocolate marble bread that’s just as delicious as it is stunning!! The bread is soft and fluffy with layers of chocolate marbled throughout. There are several ways to shape chocolate marble bread, but for this recipe, I’m using a simple twist method that gives it that twist-stick bread look.
It’s perfect for breakfast, snacking, or dessert—and makes a great edible gift, too! While there is a bit of lamination involved, it’s much easier than croissants and quicker overall since you don’t need to chill the dough after every turn.
Ingredients and Substitutions
Here’s everything you’ll need to make this chocolate marble twist bread:
The Chocolate Sheet
- Cake flour: Holds together the chocolate sheet while keeping it soft and flexible. Can use all-purpose flour with a little cornstarch.
- Cocoa powder: Adds chocolate flavor and helps firm the sheet. Dutch-processed gives a darker, smoother taste.
- Sugar: White or light brown sugar.
- Milk: Can substitute with non-dairy milk.
- Chocolate: Dark or semisweet chocolate works best here.
- Egg white: It can be omitted but the egg whites help maintain clean chocolate layers.
For the bread portion, you’ll need basic bread dough ingredients like all purpose flour, instant dry yeast, sugar, salt, egg, milk and butter.
How to Make Chocolate Marble Twist Bread
This recipe is built around three main parts: making a chocolate sheet, preparing an enriched dough, then enclosing and distributing the chocolate through rolling and shaping.
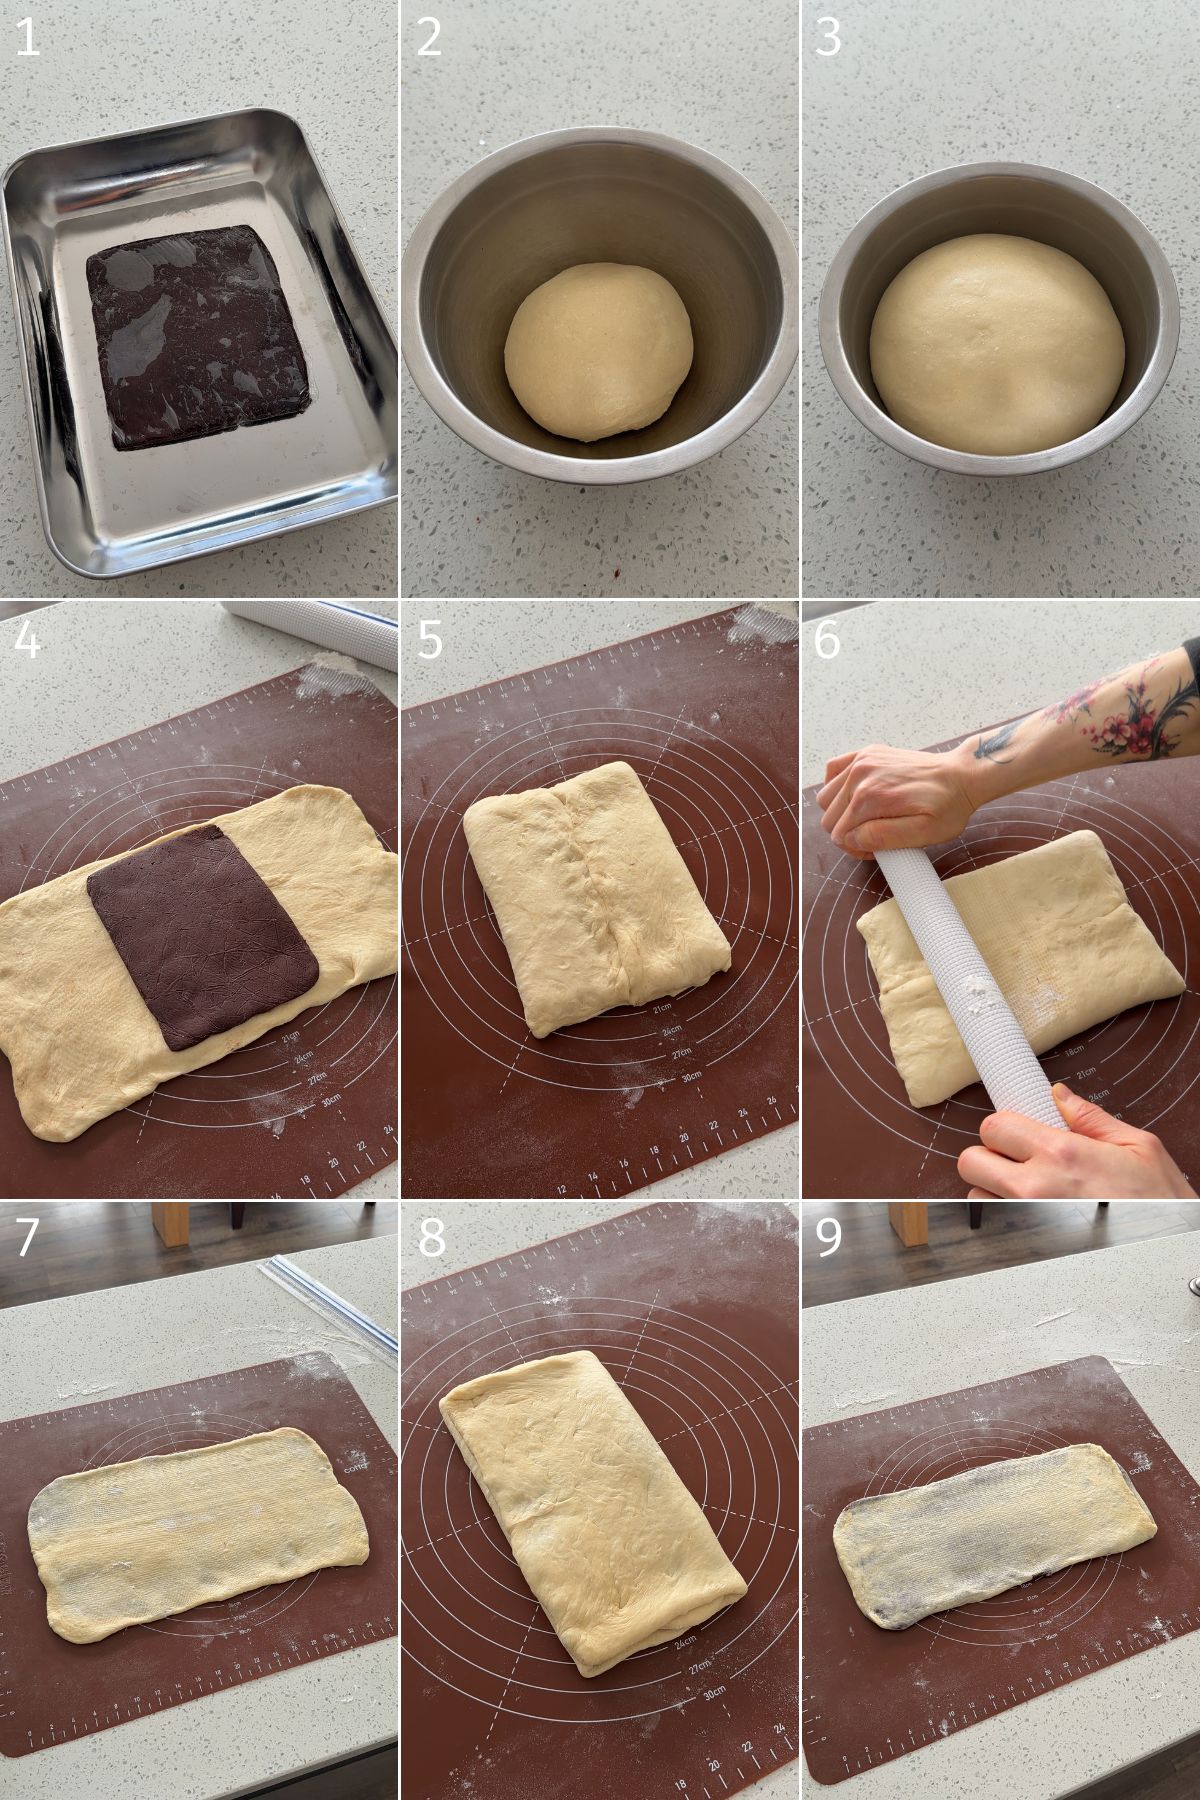
- Make the chocolate sheet: Mix the dry ingredients with milk and cook until thick and glossy. Add egg white and butter, then chill the mixture into a firm rectangle. This becomes your chocolate insert.
- Prepare the bread dough: Combine the flour, yeast, sugar, salt, water, and egg-milk. Knead until smooth, then incorporate butter and develop gluten until elastic. Let the dough rise until doubled in size.
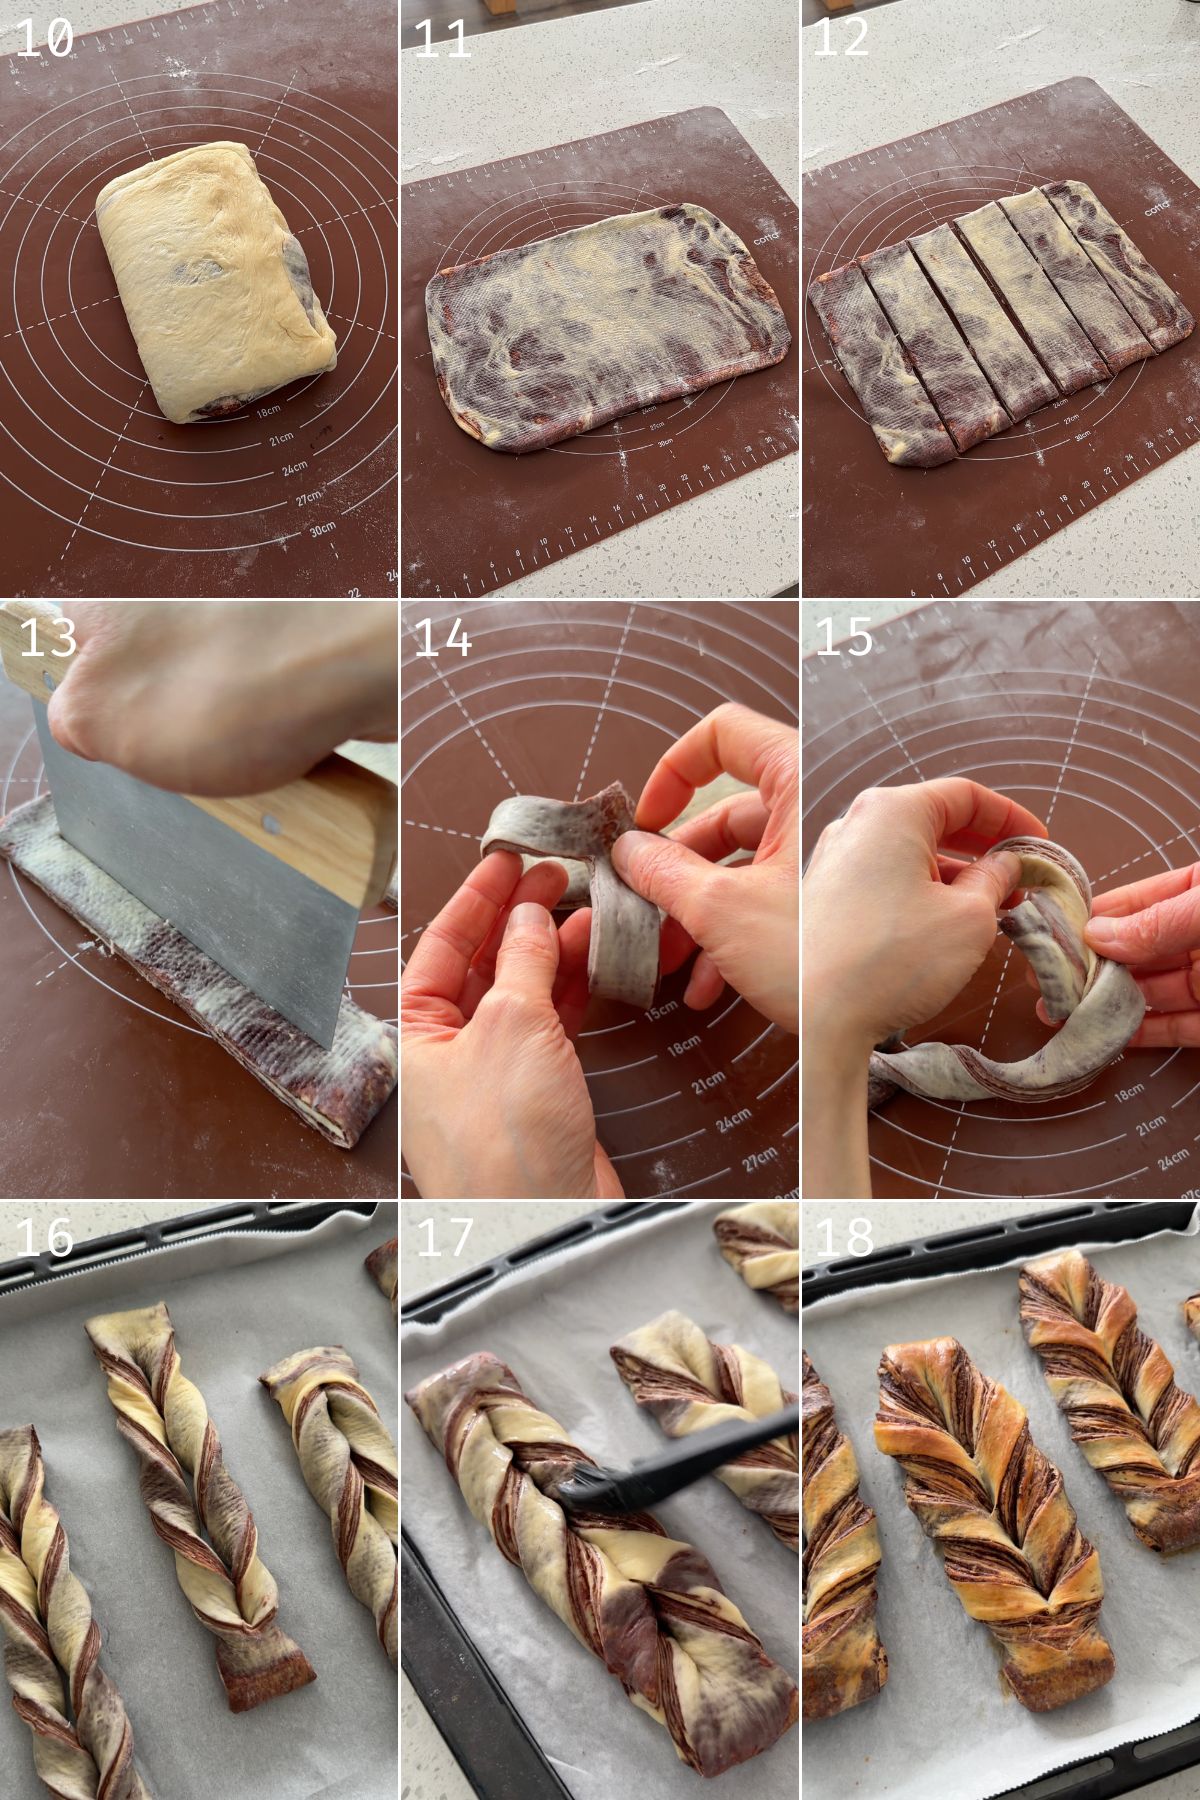
- Enclose and roll: Roll the risen dough out, place the chilled chocolate sheet in the center, and fold the dough over. Press and roll gently so the chocolate disperses without leaking. Fold into thirds like a letter. Repeat this process two more times.
- Shape the twists: After final rolling, trim edges, cut the dough into strips, and slice lengthwise while leaving the ends attached. Loop the ends in opposite directions for clean twist, then place them on a baking tray.
- Proof and bake: Let the shaped dough proof until puffy, brush with egg wash, and bake until lightly golden brown.
VIDEO: Watch How to Make It
Lisa’s Recipe Tips
- Chocolate consistency: Make sure your chocolate sheet isn’t too soft or it will seep out while rolling. It should feel like a thick paste before wrapping in plastic.
- Even marbling: Press the rolling pin down firmly on the dough, starting from the center and moving up, then down. This ensures the chocolate spreads evenly, preventing it from gathering at the edges.
- Twist technique: Loop the top and bottom edges in opposite directions (over and under, under and over) for a clean, attractive twist. Looping them in the same direction can make the twist look a little wonky.
How to Store and Reheat Leftovers
- Storage: Keep at room temperature in an airtight container for 1–2 days
- Freezing: Place into freezer safe containers or bags and freeze for up to 1 month.
- Reheating: Microwave for 15-20 seconds with a damp paper towel wrapped around it. You can also toast it in a toaster oven for ~1 minute until the outside is slightly crisp.
Recipe FAQ
Yes, but your bread will be chewier and firmer. A mix of bread and cake flour keeps it soft with good structure.
Swap milk for soy milk and butter for plant-based butter.
More Chocolate Bread Recipes
- Chocolate Bagels
- Chocolate Salt Bread
- Chocolate Baguette
- Chocolate Focaccia
- Dubai Chocolate Salt Bread
Enjoy! If you make this Chocolate Marble Twist Bread recipe, I’d love to hear what you think! Leave a comment and rating below, and if you share it on social media, tag me on Instagram @Okonomikitchen. I can’t wait to see your creations!
Print
Chocolate Marble Twist Bread
- Total Time: 42 minutes
- Yield: 6.5 buns
- Diet: Vegetarian
Description
Ingredients
Chocolate Sheet
- 12 g cake flour
- (or 10 g all-purpose flour + 2 g cornstarch)
- 8 g cocoa powder
- 20 g sugar
- 60 ml milk
- 50 g chocolate, finely chopped
- 20 g egg white
- 5 g salted butter
Bread Dough
- 200 g all-purpose flour
- (or 180 g bread flour + 20 g cake flour)
- 3 g instant yeast
- 3 g salt
- 20 g sugar
- 80 ml water
- 65 g total egg + milk
- (about 30 g whole egg + 35 ml milk)
- 20 g unsalted butter, softened
Egg Wash
- 10 g egg (reserved from earlier)
- 5 ml milk
Instructions
Make the Chocolate Sheet
- In a medium microwave-safe bowl, whisk together the cake flour, cocoa powder, sugar, and milk until smooth. Microwave for 30 seconds, then stir.
- Add the finely chopped chocolate and stir until mostly melted.
- Separate the egg whites from the yolk. Measure 20 g egg white and add it to the bowl. Whisk the remaining egg and set it aside for later.
- Microwave the mixture for 1 minute total, heating in 20-second intervals, stirring well each time.
- Add the butter and mix until fully incorporated. Microwave for another 20-30 seconds, just until the surface edges look slightly dry. Using a spatula, knead the mixture lightly— it should form a thick paste.
- Spread the chocolate paste onto plastic wrap and shape it into a 15 × 12 cm rectangle. Wrap tightly, place on a metal tray, and refrigerate until firm.
Make the Bread Dough
Prep
- Measure 10 g egg from the reserved egg and set aside for the egg wash.
- Use the remaining egg and combine with milk to make 65 g total egg + milk.
Stand Mixer Method
- Add the flour, yeast, sugar, salt, water, and egg–milk mixture to the bowl of a stand mixer. Mix on low speed until a shaggy dough forms. Increase to medium speed and knead for 6–8 minutes, until the dough becomes smooth and elastic.
- Add the butter and continue kneading until fully incorporated and the dough passes the windowpane test.
- Shape into a ball, place in a lightly greased bowl, cover, and let rise at 30°C for 60 minutes or until doubled in size.
Hand Kneading Method
- In a large bowl, mix the flour, yeast, sugar, salt, water, and egg–milk mixture until a rough dough forms. Transfer to a clean work surface and knead for 10–12 minutes, until smooth and elastic.
- Knead in the butter gradually until fully absorbed.
- Shape into a ball, place in a lightly greased bowl, cover, and let rise at 30°C for 60 minutes or until doubled in size.
Shape the Dough
- Once doubled, remove the dough from the bowl. If sticky, lightly dust with flour.
- Roll the dough into a 28 × 17 cm rectangle. Place the chilled chocolate sheet in the center. Fold the left and right sides over the chocolate sheet, pinching to seal. Pinch the top and bottom edges to fully enclose the chocolate.
- Using a rolling pin, press down on the dough firmly, starting from the middle upward and then downward (or left and right) to evenly distribute the chocolate. Do not roll straight through immediately—this prevents uneven spreading. Roll out to 36 × 20 cm. Fold the dough into thirds.
- Rotate 90 degrees and roll again to 36 × 20 cm. Fold the dough into thirds.
- Rotate another 90 degrees and roll to 29 × 17 cm.
- Trim about 1 cm from the edges to straighten. Cut into 6 equal strips, about 4.5 cm wide each.
- Slice each strip lengthwise down the center, leaving 2 cm intact at both the top and bottom. Loop the top edge over the center opening and the bottom edge under it, making sure they loop in opposite directions for a clean twist.
- Take the two end pieces and twist them together for a extra mini twist bread.
- Place on a lined baking sheet, leaving space between each piece.
Proof & Bake
- Cover and proof at 30°C for 60 minutes, or until about 1.5× in size.
- Preheat the oven to 392°F (200°C).
- Whisk together the reserved 10 g egg and 5 ml milk. Let the dough surface dry slightly, then lightly brush with egg wash.
- Bake for 12–14 minutes, or until golden brown on both sides.
- Prep Time: 30 minutes
- Cook Time: 12
- Category: Bread, breakfast, snack, dessert
- Method: Baking
- Cuisine: Japanese
Nutrition
- Serving Size: 1 serving
- Calories: 265
- Sugar: 12 g
- Sodium: 150 mg
- Fat: 11.5 g
- Saturated Fat: 6.8 g
- Unsaturated Fat: 4.2 g
- Trans Fat: 0.2 g
- Carbohydrates: 34 g
- Fiber: 2.3 g
- Protein: 7 g
- Cholesterol: 38 mg





These wee surprisingly easy to make and came out so delicious!!