Description
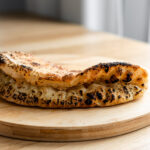
This Panuozzo Dough (pizza sandwich bread) bakes up a crisp, golden crust with an airy, tender interior— perfect for sandwiches or stuffing with your favorite fillings. Made with simple ingredients and a slow fermentation, it develops deep flavor and a light, chewy texture. Bake it the same day, or keep the dough in the fridge for up to 5 days for fresh bread anytime!
Ingredients
Units
- 200 g bread flour, 00 pizza flour or all purpose flour (100%)
- 136-160 ml water (68-80%)
- 1 g yeast (0.5%)
- 2 g sugar (1%)
- 6 g salt (3%)
- 4 g olive oil (2%), optional
Instructions
Preliminary Notes
- As always, I recommend using a kitchen scale to measure the ingredients for best results.
- Flour: I’ve made this recipe using Robin Hood 00 pizza flour, bread flour and all purpose flour with great results but with minor differences in texture. 00 pizza flour produces an airy, tender chew with a crisp shell. Bread flour adds more structure and chew, making the panuozzo sturdier. All-purpose flour yields a slightly softer crust, less chew, and a tighter crumb.
- Hydration: (If you’re new to high-hydration doughs, start at the lower range)
- 68–72% is easier to handle, slightly tighter crumb
- 75–80% → airier interior, more open structure, requires gentler handling
- Temperature & Environment: Fermentation speed depends heavily on temperature. Instead of thinking in strict times, think in terms of dough behavior.
- A cold environment is around 18–20°C — typical of winter kitchens or cool basements.
- A moderate environment is 21–23°C — standard room temperature.
- A warm environment is 24–27°C — summer kitchens or homes with poor airflow.
- Anything above 28°C is considered hot, where dough can overproof quickly.
- Water temperature: Adjust your water to help control fermentation.
- Cold kitchen → use lukewarm water (30–35°C)
- Moderate room → room temperature water
- Warm kitchen → cool water (18–20°C)
- Hot climate → cold water and consider refrigerating overnight
Make the Dough
- Mix the Dough: In a bowl, combine the flour, yeast, sugar, and salt. Pour in the water and mix until no dry flour remains and a rough, shaggy dough forms. At this stage the dough will look uneven and slightly sticky. Cover the bowl and let it rest for 30 minutes (autolyse)
- Adding Olive Oil & First Strengthening: After the rest, add the olive oil if using. Olive oil is not essential, but it helps keep the crumb softer and adds subtle richness. To incorporate, squeeze and fold the dough in your hands until the oil is absorbed. If you’re not using oil, perform a set of stretch and folds around the bowl until the dough tightens slightly. Cover and rest for another 30 minutes.
- Stretch & Folds: This dough typically needs 2–3 sets, but it depends on hydration and how the dough feels. Lower hydration doughs strengthen quickly and may only need two sets. Higher hydration doughs benefit from three sets to build structure. To perform a stretch and fold, lift one side of the dough, stretch it upward without tearing, and fold it over itself. Rotate the bowl and repeat on all sides. If the dough is very wet, coil folds work better: lift the center, allow the ends to fold underneath, rotate, and repeat. After each set, the dough should feel smoother and more elastic. If it still looks rough or tears when stretched, cover and rest another 30 minutes before doing one final fold.
- Overnight Proof: Cover the dough and let it proof for 8–12 hours. In a moderate room temperature environment, this can happen on the counter overnight. In a warm climate, it’s safer to proof in the refrigerator to prevent over-fermentation. By morning, the dough should look airy, slightly domed, and dotted with bubbles.
- Dividing & Balling: Generously flour your work surface and gently turn the dough out, allowing it to fall naturally from the bowl. Avoid pulling or forcing it— preserving gas bubbles is key. Lightly flour the top and divide into two equal portions, roughly 170–185 grams each depending on hydration.
- To shape: Gather the edges toward the center and pinch to seal. Flip seam-side down and, using cupped hands, gently drag the dough toward you to create surface tension. Place each dough ball into a lightly oiled airtight container.
- Cold Fermentation (Optional but Recommended): From here, you can bake the same day or refrigerate the dough for up to 5 days. I love the texture after 48 hours. A longer cold fermentation deepens flavor and really improves the texture.
Preparing to Bake
- For Same day: Let the dough rest at room temperature for 45–60 minutes until relaxed and slightly puffy.
- For Cold proof: Remove it from the fridge:
- warm environment → about 2 hours
- cold environment → about 3 hours
- The dough is ready when it feels airy, slightly jiggly, and stretches easily without snapping back.
- Preheat: your oven with a metal tray inside to the highest temperature it gets to (ideally 500°F/ 260°C).
- Shaping the Panuozzo: Dust your work surface generously with flour or semolina. Gently turn out the dough, taking care not to degas it. Lightly flour the top, flip it over, and use your fingertips to dimple the dough, leaving about a 1.5 cm perimeter. While a defined crust isn’t required for panuozzo, leaving slightly thicker edges creates bubbly contrast and texture. Lift the dough and drape it over the backs of your hands, letting gravity do most of the work as you gently rotate and stretch— it shouldn’t take much effort, as the dough is very relaxed. This method preserves air pockets better than stretching from the edges on the counter. Stretch until thin but not tearing, about 20 cm (8 inches). Drizzle olive oil and sprinkle flaky salt in the center, then fold the dough in half. Add a little more olive oil on top before baking.
- Bake: Transfer to parchment paper that’s placed on a metal tray. Slide the panuozzo onto the hot tray and quickly close the oven door. Bake for 5 minutes or until deep golden. Then switch to broil for 2–3 minutes until charred to your liking. For extra charred flavor, you can lightly torch parts of the crust after baking.
- Finish: Once baked, the panuozzo is ready to split and fill.
- Prep Time: 15 minutes
- Cook Time: 8 minutes
- Category: Bread / Sandwich Bread
- Method: Baking
- Cuisine: Italian
Nutrition
- Serving Size: 1 pannuozo bread
- Calories: 386
- Sugar: 1.3 g
- Sodium: 1200 mg
- Fat: 3 g
- Saturated Fat: 0.4 g
- Unsaturated Fat: 2.6 g
- Trans Fat: 0 g
- Carbohydrates: 77 g
- Fiber: 2.7 g
- Protein: 10 g
- Cholesterol: 1200 mg