
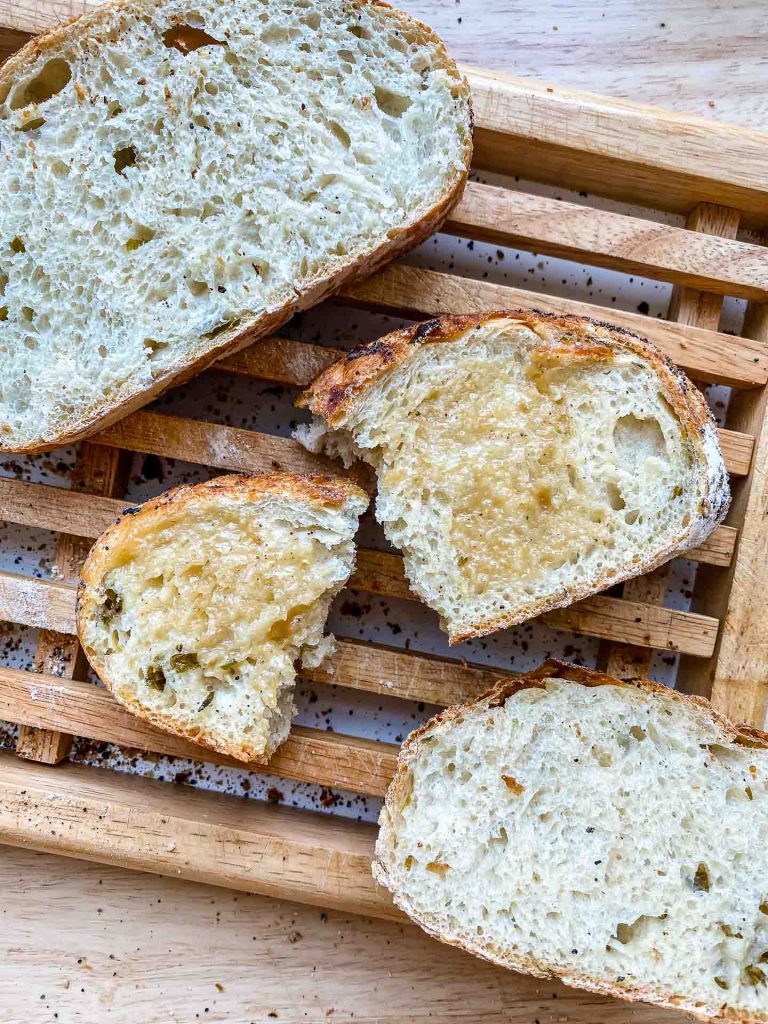
This No Knead Bread is my go-to bread recipe! It’s ridiculously easy to make with just 5 basic ingredients. With a beautifully golden crust and soft and chewy crumb, it’s perfect for toast, sandwiches, soups and more. Make it overnight or within 2 hours, both options included!
If you’ve been following along on Instagram, you’ve probably noticed that I’ve been on a huge bread baking kick lately. Something about making fresh bread at home is so therapeutic and satisfying, especially during the colder months. It makes our kitchen smell like a bakery, giving all the cozy vibes!! Plus, it’s soup season, and whats soup without some delicious fresh bread?
So today, I thought I would share my morning bread baking routine ft. two incredibly easy no knead bread recipes: an overnight no knead bread and the quicker version of it that takes about 2 – 2 1/2 hours. The only active hands on time is the initial mixing of the ingredients and then shaping it just before baking. It’s completely fool proof, forgiving and really hard to mess up!
I personally prefer the overnight method because the longer the dough proofs, the better the texture and the more flavourful it is. It’s a lot more porous and has a sourdough-like flavour, but both versions still bake up beautifully! Beautiful golden crispy crust with a soft and chewy crumb. Perfect for soup bowls, dunking in soup, sandwiches, toast and so much more!!
Ingredients for No Knead Bread
All you need is 5 basic pantry staple ingredients to make this bread!
- Bread flour: this type of flour is what gives it that chewy texture, however you can also substitute with all purpose flour. Please note that that bread will slightly differ in texture.
- Water: It should be slightly warmer than room temperature (95°F / 35°C).
- Active Dry Yeast: For the overnight version you will only need 1 gram because it is a slow rise, which also makes for tastier bread. If using the faster method, you will need 4 grams.
- If using instant yeast: use half the amount. So for the overnight method, use 1/8 (0.5 g) instant yeast and for the faster method use 1/2 tsp (2 g ) instant yeast.
- Cane Sugar: makes a soft and tender crumb and helps with browning of the crust, however it can be omitted for the overnight version. For the quicker version, it feeds the yeast for a faster rise so do not omit.
- Salt: For flavour.
How to Make Overnight No Knead Bread
Here’s a rundown of how to make overnight no knead bread:
- Mix the dough: Add all of the ingredients into a Tupperware with a cover (or bowl), and mix everything together until well combined and there are no remaining bits of flour. The dough will be sticky and wet, this is normal.
- Proof dough overnight: Cover the Tupperware (or bowl with a shower cap/cover), and let it rise at room temperature for a minimum of 12 hours (up to 20).
- Heat oven AND baking dish: Place the baking appliance you are using into the oven and preheat to 500°F (260°C).
- Shape dough: Generously flour a piece of parchment paper and transfer the dough on top. If adding in any seasonings/ingredients sprinkle on top. Use a bench scrapper to pull the edges towards the middle, almost to the other side to cover the filling ingredients. Sprinkle more flour and then carefully flip onto another piece of parchment paper so the smooth side is facing up. Use a bench scrapper to shape the dough into a round circle. If your oven is not yet preheated, cover until ready.
- Bake: Once preheated, score the top of the dough ball and drizzle olive oil down the cut. Sprinkle any seasonings if using. Spray with water 3-4 times and then cover with the lid. Reduce the heat to 450°F (230°C) and bake for 30 minutes. Remove the cover and bake for another 10 minutes or until crust is golden brown. Remove from oven, uncover and lift edges of the parchment paper to remove the bread. Transfer to a cooling rack and allow it to cool for at least 20 minutes before slicing into it.
For the faster method (2 – 2.5 hours):
Follow all the steps above, but instead of letting it rise for 12 hours, proof for just 1 – 1 1/2 hours or until double in size.
No dutch oven / baking dish with cover:
If you do not have a dutch oven or a baking dish with a cover, you can use a cast iron skillet or baking dish. Before placing into the oven, spray the top with water generously, about 10 times. Quickly place it into the oven and spray another 10 times. Bake at 480°F (250°C) for 5 minutes. Reduce heat to 450°F (230°C) and bake for another 30 minutes, or until top is golden brown to your liking.
No Knead Bread Variations & Add-ins
What I love about this bread is how customizable it is! You can add all sorts of flavours/seasonings for different variations:
- Scallions: Finely chop some scallions and fold them in when shaping the dough into a dough ball in step 4.
- Garlic: Either stir in 1 clove of fresh minced garlic into the dough in step 1 or fold roasted garlic in step 4.
- Fresh herbs: Fold them in during step 4.
- Dry herbs: Stir them in during step 1.
- Chili oil: Drizzle/brush some on top prior to baking (instead of olive oil).
- Everything bagel seasoning: Stir them in during step 1 or sprinkle on top prior to baking.
- Black pepper / other dried spices: Stir them in during step 1 or sprinkle on top just before baking.
- Top with fancy flaky salt: Sprinkle on top before baking.
Tips & Tricks for the Best No Knead Bread
- Use a kitchen scale: As always, I highly recommend using a kitchen scale when baking.
- Use a thermometer: Check the temperature of the water and oven. The temperature of both these is crucial! If the water is too hot it will destroy the yeast. If the oven temperature is off, it may not rise properly and/or create the perfect crust.
- Do NOT add more flour: The measurements in the ingredients list is correct. The dough is very sticky and wet, do not be tempted to add more flour to the initial mixing of the dough.
- Spray with water: Spraying with water adds steam to the initial part of baking, forming a crisp crust and prevents the outside layer from drying, resulting in a higher higher rise.
- Soak the everything bagel seasoning: if you don’t want them burn soak seasonings that contain seeds and/or garlic and onion granules first. I don’t mind it so usually skip this step, but it also depends on long (how golden) you like your crust. If you tend to like a darker crust, I would soak them first to prevent super burnt seasonings.
More easy and delicious bread recipes:
- No Knead Bubble Bread
- Rice Cooker Bread
- Favourite Healthy Banana Bread
- Miso Garlic Butter Focaccia
- No Secondary Proof Focaccia
- Miso Chili Oil Focaccia
SAVE IT FOR LATER! ↓
If you recreate this No Knead Bread recipe let me know how you liked it by leaving a comment and rating below or by tagging me on Instagram @Okonomikitchen, I love seeing all of your tasty recreations!
Hungry for more? Be sure to subscribe to my newsletter and follow along on Instagram, Youtube and Pinterest for more deliciousness!

Easiest No Knead Bread
- Total Time: 12 hours 15 minutes
- Yield: 1 loaf
Description
This No Knead Bread is my go-to bread recipe! It’s ridiculously easy to make with just 5 basic ingredients. With a beautifully golden crust and soft and chewy crumb, it’s perfect for toast, sandwiches, soups and more. Make it overnight or within 2 hours, both options included!
Ingredients
Traditional Overnight Method
- 2 cups + 3 tbsp (300g) bread flour
- 1 cup minus 1 tbsp (225ml) warm water (95°F/35°C)
- 1/4 (1 g) active dry yeast
- 1/2 tsp (3 g) salt
- 1/2 tsp (3 g) sugar
Faster Method (2-2.5 hours)
- 2 cups + 3 tbsp (300g) bread flour
- 1 cup minus 1 tbsp (225ml) warm water (95°F/35°C)
- 1 tsp (4 g) active dry yeast
- 1/2 tsp (3 g) salt
- 1 tsp (5 g) sugar
Instructions
Traditional Method
- Night before: Add the bread flour, salt, sugar and yeast to a Tupperware (or mixing bowl) and mix. Add the warm water (it should be slightly warmer than room temperature) and then mix until well incorporated. The dough will be quite wet and sticky (this is normal). Spread the dough across the Tupperware, cover and let it rise overnight (12 – 20 hours) at room temperature.
- The next day: Pre-heat oven to 500°F.
- Flour a piece of parchment paper. Remove the dough out of the Tupperware onto the parchment paper. Sprinkle any add-ins in the middle if using and then use a bench scraper to bring the sides towards the middle to cover. Sprinkle a bit more flour on top and then carefully flip the dough onto another piece of parchment paper so the smooth side is facing up. Keep it covered until oven is preheated.
- Once oven is ready, uncover and cut along the top about 2 mm deep. Drizzle some olive oil between the cut. Sprinkle any seasonings (ie. everything bagel seasoning) if using.
- Transfer the ball of dough (with the parchment paper) into a baking dish, spray wth water about 3-4 times and cover. Reduce heat to 450°F and then bake for 30 minutes. Remove the lid and then bake for an additional 10 minutes or until top is golden brown to your liking.
- Remove from oven and allow it to cool for at least 20 minutes. Serve and enjoy!
Faster Method (2-2.5 hours)
- Add the bread flour, salt, sugar and yeast to a Tupperware (or mixing bowl) and mix. Add the warm water (it should be slightly warmer than room temperature) and then mix until well incorporated. The dough will be quite wet and sticky (this is normal). Spread the dough across the Tupperware, cover and let it proof for 1 – 1 1/2 hours, or until double in size.
- Pre-heat oven to 500°F. Flour a piece of parchment paper. Remove the dough out of the Tupperware onto the parchment paper. Sprinkle any add-ins in the middle if using and then use a bench scraper to bring the sides towards the middle to cover. Sprinkle a bit more flour on top and then carefully flip the dough onto another piece of parchment paper so the smooth side is facing up. Keep it covered until oven is preheated.
- Once oven is ready, uncover and cut along the top about 2 mm deep. Drizzle some olive oil between the cut. Sprinkle any seasonings (ie. everything bagel seasoning) if using.
- Transfer the ball of dough (with the parchment paper) into a baking dish, spray wth water about 3-4 times and cover. Reduce heat to 450°F and then bake for 30 minutes. Remove the lid and then bake for an additional 10 minutes or until top is golden brown to your liking.
- Remove from oven and allow it to cool for at least 20 minutes. Serve and enjoy!
If using baking tray or uncovered baking dish:
- Spray the top with water generously, about 10 times. Remove pre-heated baking pan/dish from oven. Transfer dough with the parchment paper onto the baking dish. Quickly place it into the preheated oven and spray another 10 times. Reduce heat to 480°F (250°C), and bake for 5 minutes. Reduce heat to 450°F (230°C) and bake for another 30 minutes, or until top is golden brown to your liking.
Notes
- Recipe adapted from Jim Lahey’s no knead bread.
- Helpful Equipment: kitchen scale, 2 L Tupperware, bowl, bowl cover, bench scrapper, spray bottle, parchment paper, dutch oven or casserole dish, baking pan
- Nutritional Information Disclaimer: Nutrition information is a rough estimate calculated on an online tool (Cronometer).
- Prep Time: 12 hours
- Cook Time: 50 minutes
- Category: Bread
- Method: Baking
Nutrition
- Serving Size: 1/6 of the loaf
- Calories: 182
- Sugar: 0.5g
- Sodium: 195mg
- Fat: 0.8g
- Saturated Fat: 0.12g
- Unsaturated Fat: 0.04g
- Trans Fat: 0
- Carbohydrates: 36.6g
- Fiber: 1.2g
- Protein: 6g
- Cholesterol: 0
Okonomi Kitchen is a participant in the Amazon Services LLC Associates Program. When you purchase something through my amazon affiliate links, I earn a small commission that helps me produce consistent content at no cost to you. Thank you for supporting my plant based kitchen!


So easy, quick and delicious! It tastes like sourdough without it being sour. One of the best bread recipes i’ve tried. Outside is crispy and centre is fluffy and moist. However the many loaves i’ve made though tend to be very flat, but i think that’s just my baking dish.
Hii! It was my first bread and it was a success! So easy and not intimidating at all! If I can do it, you can! Gooooo 🙂 Crust is delicious and the crumb too <3
Perfect for lazy people like me.
I lost count how many times I’ve made this bread in the past two weeks!! I can’t resist, it’s literally the easiest bread to make, and doesn’t bake up too large so my home of 2 can finish it easily. It always comes out consistent, delicious, crusty, and suuuper soft inside. Will be making it again this weekend.
This is my favourite bread recipe of all time! It’s so simple and easy, yet makes the most amazing bread! I love all of your recipes Lisa, thank you so SO much for sharing them with us all!
I never thought I could make bread that tasted this good, and it was so EASY! I’m in the process of making it again as we speak. I used all-purpose flour and it still turned out great. Thank you so much for this recipe, Lisa!!!
Absolutely amazing! So easy, simple ingredients, delicious taste. I never knew bread making could be this easy!
This was my first time making bread ever and I gotta say that it was much easier than I thought bread making was! I was impatient so I did the short time version and wow did it come out good. Crispy exterior and soft interior. I didn’t have a casserole dish so I ended up using a roasting pan since that has a lid lol. Didn’t realize till later that there were notes for people who didn’t have the equipment lol. (It was pretty cool and funny seeing the bread in a big roasting pan tho so 100% worth it lol.) I got so excited that I actually made two loafs back to back with different flavors. Both turned out excellent. When I have my next day off I’m definitely gonna try the overnight version. Highly recommend this recipe.
Thanks for the great recipe! I did the overnight rise and it turned out so well with an amazing crust. I used a mix of flours – white, wholemeal and wholemeal rye – and added extra water to get the dough consistency described.
I baked mine on a pizza stone and used a wet hand to dampen the top, as I have no kitchen spray bottle. Worked just fine.
Thank you again.
I just made this bread with some fresh herbs I had in my kitchen (rosemary, thyme, sage and parsley ).
It was super easy and came out so good!
Can’t wait to try some other toppings:-)
This was very easy to do and turned out awesome! I made it on New Years Day to start the year off fresh. Will definitely be making it frequently!
Super useful and user-friendly recipe with just a few minutes of work and a wonderful result!
I love that the loaf is smaller than “standard” so it is completely manageable for a single person to finish in a few days. Toasts well, slices amazing, great for sweet and savory toppings and accompaniments. Thank you! <3
Okay WHAT?! 🤩🤩 delicious, fluffy bread is this easy to make?! my goodness. the crust on the outside is perfectly crunchy with the right burnt flavor and it really does squish so beautifully in your mouth. Lisa made an incredibly easy to make recipe through what I’m sure is trial and error in ways that we’ll never see or know. This recipe really is fool-proof…I just followed her directions and BAM i became a baker of bread overnight, just like the dough of this bread. Also, the everything bagel seasoning with scallions is EVERYTHING. My mom said that we’ll never buy bread again!! Thank you so so much for creating a universally easy and delicious bread recipe for us!!! This bread can be dipped in soups, used for hearty sandwiches, and makes for really great croutons or breadcrumbs–which I did!!
Super easy and convenient for people who need freshly baked bread in the morning! The recipe is simple but the result is incredible. Everyone should try this bread ✨✨✨
I love my new go-to bread recipe! This turned out amazing even with all purpose flour. I bet the chew would be even better with bread flour. I used the cast iron pan method and the notes for the instant dry yeast measurements were super helpful! I prepped my dough to rise before heading to work on Thanksgiving and had a loaf of bread for the feast that evening. I added green onion and fried garlic cloves before baking. I also live in a very low humidity area so adding extra water for doughs is nothing new to me so to anyone who does as well: make sure you dough is very sticky and wet like the recipe describes or it won’t turn out as great. Thank you so much for all the love and care you put into your recipes, Lisa!
Most delicious bread I’ve EVER made thanks to this recipe! Making some more at the moment, can’t get enough. Give this a try if you want an easy/delicious bread recipe to follow; can’t go wrong 🙂
Wow, turned out amazing. Making bread has never been so easy. Really crispy crust and soft on the inside.
Especially nice toasted with butter and jam!
This recipe was so easy to make and I’ve already recommended it to a couple friends and colleagues! The bread had a lovely crust and a wonderfully chewy interior.
I really appreciated the instructions for the variations. I followed the overnight instructions and also the baking instructions for without Dutch oven since I don’t own one.
Also added a ton of scallion. It was so tasty that it barely lasted the day shared between 4 people.
Omg this is a great recipe! I could not believe How easy this is and the taste is lovely!!