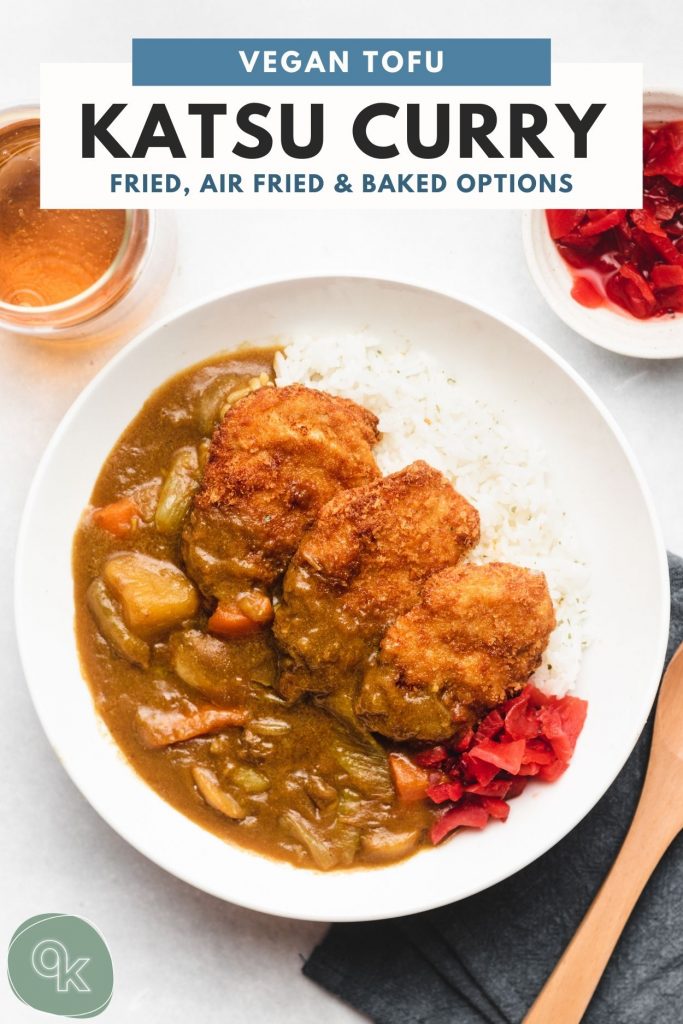
This vegan tofu katsu curry combines crispy, golden tofu katsu with a rich and savory Japanese curry sauce, creating the perfect plant-based comfort meal. Served over fluffy rice, it’s a hearty, high-protein dish that captures the bold flavors of traditional katsu curry with a vegan twist. Ideal for weeknight dinners or a satisfying lunch! (Gluten free option)
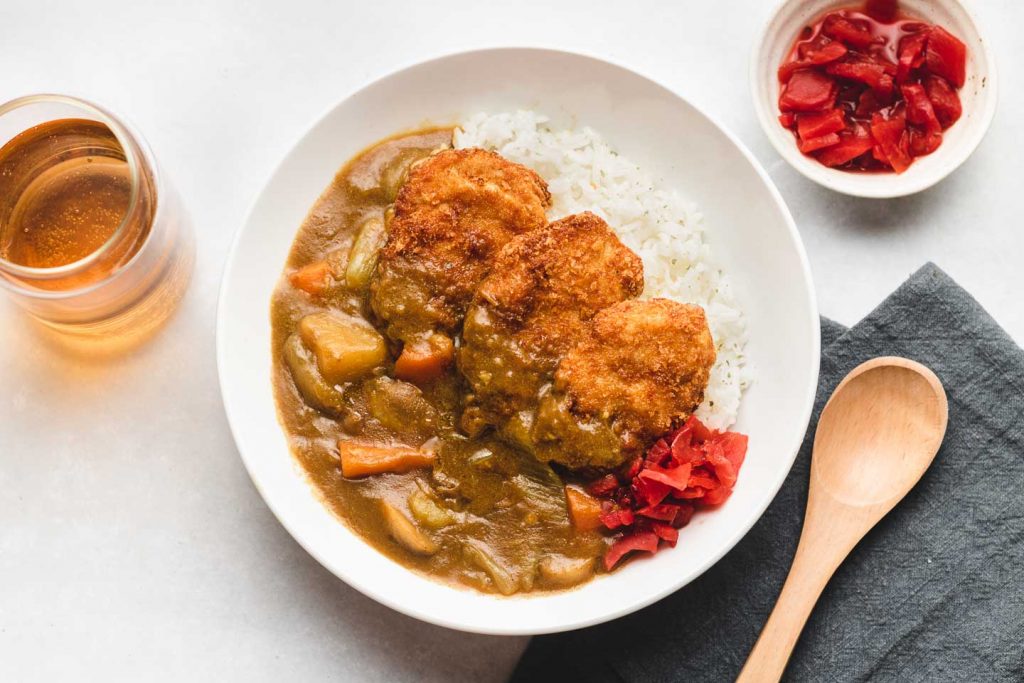
Table of Contents
Katsu and curry and two national home comfort dishes in Japan. And when you take two comfort foods and put them together, you’re left with the ultimate hearty, satisfying and incredibly delicious meal.

What is Katsu Curry?
Katsu Curry (カツカレー) is Japanese curry topped with a light and crispy panko-breaded is a combination of Japanese Curry and a panko-breaded cutlet. In Japan, curry is a frequent dinner of choice because of how quick, easy and make-ahead friendly it is. However, adding katsu to it makes it extra special (in our family, we only had it for special occasions).
The combination of a crispy crunchy cutlet mixed with a rich and flavourful curry sauce.. you really just gotta try it to experience the magic.
Vegan Katsu Curry
Katsu is typically made from pork or chicken cutlets but tofu is my favourite option for a vegan and vegetarian version. It’s the perfect substitute because of how meaty the texture is and how easily you can make it look like real cutlets too!
Vegan Katsu Curry Ingredients
To make vegan katsu curry, you’ll need one recipe of Japanese curry and rice. For the katsu, you’ll need:
- Tofu Katsu: Choose between classic tofu katsu or yuba katsu.
- Vegan Japanese Curry: Choose between homestyle chunky Vegan Japanese Curry or Smooth Vegan Japanese Curry (Coco Ichi Style)
How to make vegan tofu katsu curry
There are three components to katsu curry:
- Curry: Choose between a diner style smooth curry like my Coco Ichi-style Curry or family style Vegetable Japanese Curry with chunks of vegetables. I highly recommend making the curry the night before or earlier in the day so that the flavours have time to mature and mingle together.
- Katsu: There are several types of tofu you can choose from to make tofu katsu such as yuba, traditional tofu, medium firm tofu, firm tofu and extra firm tofu (more info below). Choose whatever you like! You can also opt to air fry or bake instead of deep fry.
- Rice: Use Japanese short grain rice if available. Cook the rice about one hour before serving.

Quick & Easy With Leftovers
Making katsu kinda sounds like a lot of work. You gotta cook the rice, the curry and the katsu but, it’s actually very quick and easy to make if you’re efficient with your time (aka multi-tasking). To make it even faster, you can use leftover curry!
I’ll purposely make extra curry and tofu katsu to keep in the fridge or freezer. And then when I feel like katsu curry, I’ll make the katsu fresh (from frozen) and then serve it with warmed up left over rice and curry. It takes me under 15 minutes to put together.
How to Store Katsu Curry
- Refrigerator: Leftover katsu curry can be stored in an airtight container in the fridge for up to 3-4 days. Keep the tofu katsu separate from the curry sauce to prevent the breading from getting soggy.
- Freezer: For longer storage, freeze the curry sauce in an airtight container for up to 1 month. The tofu katsu can be frozen separately, but it’s best to reheat it separately to maintain its crispiness. To defrost, place both in the fridge overnight and reheat on the stovetop or in the microwave.
- Reheating: Reheat the curry on the stove over low heat, adding a little water or broth to thin it out if needed. For the tofu katsu, reheat it in the oven or air fryer at 350°F for about 10 minutes to restore its crispiness. Avoid microwaving the katsu as it can become soggy.

More Vegan Curry Recipes to Try
- Authentic Vegan Japanese Curry
- Japanese curry powder
- Japanese kabocha curry
- Homemade curry roux cubes
- Yaki Curry
- Curry udon
- Curry fried rice
SAVE IT FOR LATER! ↓
If you recreate this Vegan Tofu Katsu Curry recipe let me know how you liked it by leaving a comment and rating below or by tagging me on Instagram @Okonomikitchen, I love seeing all of your tasty recreations!
Hungry for more? Be sure to subscribe to my newsletter and follow along on Instagram, Youtube and Pinterest for more deliciousness!

Tofu Katsu Curry (Vegan)
- Total Time: 1 hour 30 minutes
- Yield: 4 servings
- Diet: Vegan
Description
Crunchy tofu katsu served with white rice and a rich Japanese curry sauce! So hearty, flavourful and is truly the ultimate comfort dish. (Vegan + Gluten free option)
Ingredients
Curry
- 1 recipe of Vegan Japanese Curry: Diner style (smooth sauce) or Family style (chunks of vegetables)
Vegan/Vegetarian Katsu
- 1 recipe of tofu katsu or yuba katsu
For serving
- 4 servings of cooked Japanese short grain rice
- fukushinzuke
- ryakyo
Instructions
- Prepare one batch of curry, preferably the night before or earlier in the day to allow flavours to mature and mend together.
- Prepare tofu katsu or yuba katsu.
- Add one serving of rice to one side of the bowl. Ladle curry on the other open side. Place katsu on top or against the rice. Add more curry to top off the katsu if desired. Serve with fukushinzuke and ryakyo, and enjoy!
Notes
- Helpful Equipment: temperature thermometer
- Nutritional Information Disclaimer: Nutrition information is a rough estimate calculated on an online tool (Cronometer).
- Prep Time: 30 minutes
- Cook Time: 60 minutes
- Category: Maindish
- Method: Stove Top
- Cuisine: Japanese
Nutrition
- Serving Size: 1 serving
Okonomi Kitchen is a participant in the Amazon Services LLC Associates Program. When you purchase something through my amazon affiliate links, I earn a small commission that helps me produce consistent content at no cost to you. Thank you for supporting my plant based kitchen!


This SLAYS. Will be adding this to the weeknight dinner rotation.
I made the katsu for ramen last night. I did the air fryer method…really good katsu. Thank you!
This turned out so incredibly GOOD! The tofu was so crispy (I chose to shallow fry it) and complemented the silky texture of the curry sauce very well. I had never tried this dish before making this recipe, and I was BLOWN away at how much I enjoyed it. I’m not vegan, but the aqua faba as an egg replacer in the coating worked out so well that I’ll now consider using it instead of egg when frying from here on out. I loved this recipe and will definitely be making this often 🙂
I have been meaning to try this recipe for the longest time and finally came around to it. It is probably the best form of tofu I have ever made! I froze firm tofu and opted for the deep fry method; I actually forgot to add oil in the wet mixture so the Panko did not stick as well. However, I repeated step 4 about 3x and this helped with the Panko sticking and I think this made for an extra crispy tofu katsu! Also, I did not have aquafaba on hand so I used unsweetened soy milk and added some salt to the flour mix to season the katsu a bit more. Despite these slight changes, the result was still delicious.
Highly recommend this tofu katsu recipe– it is so crunchy and the texture is insanely close to what I remember of meat. As for the taste, it would make any tofu-hater convert to a tofu-lover 😉
Lovely delicious recipe! Easy to follow, and having a variety of ways to cook the tofu was helpful. The four different ways to prepare the tofu were particularly useful – I used the salt water method and it worked nicely! Would definitely make this meal again in the future!
The fried tofu katsu is surprisingly really good despite not having any salt or seasonings!! The first time I made it, I didn’t freeze the tofu and squeeze out excess water which was a mistake because the panko didn’t stick as well. The second time, I froze and thawed it once which made the panko stick better, but I’m sure it would be ever BETTER if I froze and thawed it a second time like the instructions said haha. I’m just impatient 😂 The curry itself is AMAZING and I made homemade pickled radishes to go along with it. Thank you so much for the recipe, Lisa! ❤️
I recently had Japanese curry at a local restaurant and was head over heels on how delicious it was and surely the cook in my wanted to recreate it at home, and OH BOY!!! thank you so much Lisa for this recipe, I made it for the first time and it was
1. so easy to make
2. so quick
3. I could experiment with differnet kakushi aji
4. IT WAS DELICIOUS!!
thank you so so so much!! <3
I used regular medium firm tofu /pressed for 30 mins (I forgot to freeze my tofu) and followed the recipe and still turned out really good!
Ps.make sure to cook lots of rice cause you will come back for more
I made this last night and it was sooo good! I didn’t get all the moisture out of the tofu before freezing it (oops!) but it still came out just fine. My boyfriend even asked what kind of meat it was!
I used the air fry method, and I didn’t use enough oil which meant it didn’t get as dark as I wanted on the first go. My second batch browned much more nicely with more oil. But it cooked all the way through in the time listed on the recipe! It was crispy and delicious and everything I wanted in a katsu!! 😀
I made this last night and it was sooo good! I didn’t get all the moisture out of the tofu before freezing it (oops!) but it still came out just fine. My boyfriend even asked what kind of meat it was!
I used the air fry method, and I didn’t use enough oil which meant it didn’t get as dark as I wanted on the first go. My second batch browned much more nicely with more oil. But it cooked all the way through in the time listed on the recipe! It was crispy and delicious and everything I wanted in a katsu 🙂
Thanks for sharing this recipe and for all the preparation instructions, I used the Press, freeze & freeze technique, and now I always have a tofu in the freezer.
The tofu katsu came out amazing! I never breaded anything with aquafaba before so I’ve even learned something new here 🙂
This recipe was excellent, thank you! The tofu Katsu was the most successful breading/ frying recipe I’ve ever used… and I’ve been vegetarian for almost 15 years, so I’ve made a lot of tofu! The curry was just like from our favorite Japanese restaurant. I added the soy sauce and cocoa for hidden flavors and will try others next time I make this to experiment.
This recipe looks great! My family loves tofu Katsu curry from our favorite restaurant, but I have never cooked it myself. I have one question before I make this… when I make the curry, should I leave out the soy curls if I am making tofu, or do you still add them?
This is so good! I made the curry powder yesterday and then made this today (airfried tofu version). It’s so so good. Thank you!
Yum yum yum!!!! I’ve always been too lazy to make the katsu but if you have the time definitely do it! This was so delicious thank you so much for your recipes!
Thank you for trying this recipe Samara! So happy to hear it was a hit!
I made this using the oven method, and for a no-oil method, the resulting texture was really interesting! It was so satisfying to be able to cook this at home this easily.
Like an other commenter, I also swapped out some key ingredients (potato starch instead of the cornstarch listed here as an aquafaba alternative) but the result turned out really OK (even though the panko didn’t stick that much at first).
I also enjoyed learning about the freeze and boil method to “dry” the tofu!
Thanks for trying this recipe, Sylvain! Glad it worked out for you in the end 🙂
Even though I chose to be cheap and swap out some key ingredients (cornflakes are definitely not the same as panko), it still came out great and really tasty and crunchy. This was also my first time pressing tofu using the freeze and boil method, so I really appreciate the instructions on how to do so. Great for beginners!
So happy to hear you enjoyed this recipe, Gina! Thanks so much for the review 🙂