This classic Oyakodon (Japanese Chicken and Egg Rice Bowl) is a quick, easy, and comforting meal made with tender chicken, silky eggs, and a savory dashi-based sauce over steamed rice. Ready in under 30 minutes, this one-pan Japanese rice bowl is perfect for busy weeknights.

Table of Contents
This Japanese chicken and egg rice bowl is a dish I grew up eating regularly, and it holds a special place as a comforting meal in my life. My mom would often prepare it for us because it’s a quick one pan dish, making it a reliable go-to meal. Not only is it affordable and economical, but she also made it for my friends when they came over, and it was always a hit with everyone. The simple yet delicious combination of flavours made it a favourite among all who has had it.
What is Oyakodon?
Oyakodon (親子丼) is a classic Japanese dish featuring a savory-sweet combination of tender chicken, eggs, and onions simmered in a flavorful dashi-based sauce, all served over a bed of steaming rice. The name “oyakodon” translates to “parent-and-child rice bowl,” reflecting the use of chicken (the parent) and eggs (the child) in the recipe. This comforting and versatile dish is cherished for its simplicity and satisfying flavors, making it a popular choice for quick, home-cooked meals.

Ingredients for Oyakodon
Oyakodon uses affordable ingredients that are common in many Japanese kitchens. If you regularly cook Japanese food, you might already have all of these ingredients in your pantry!
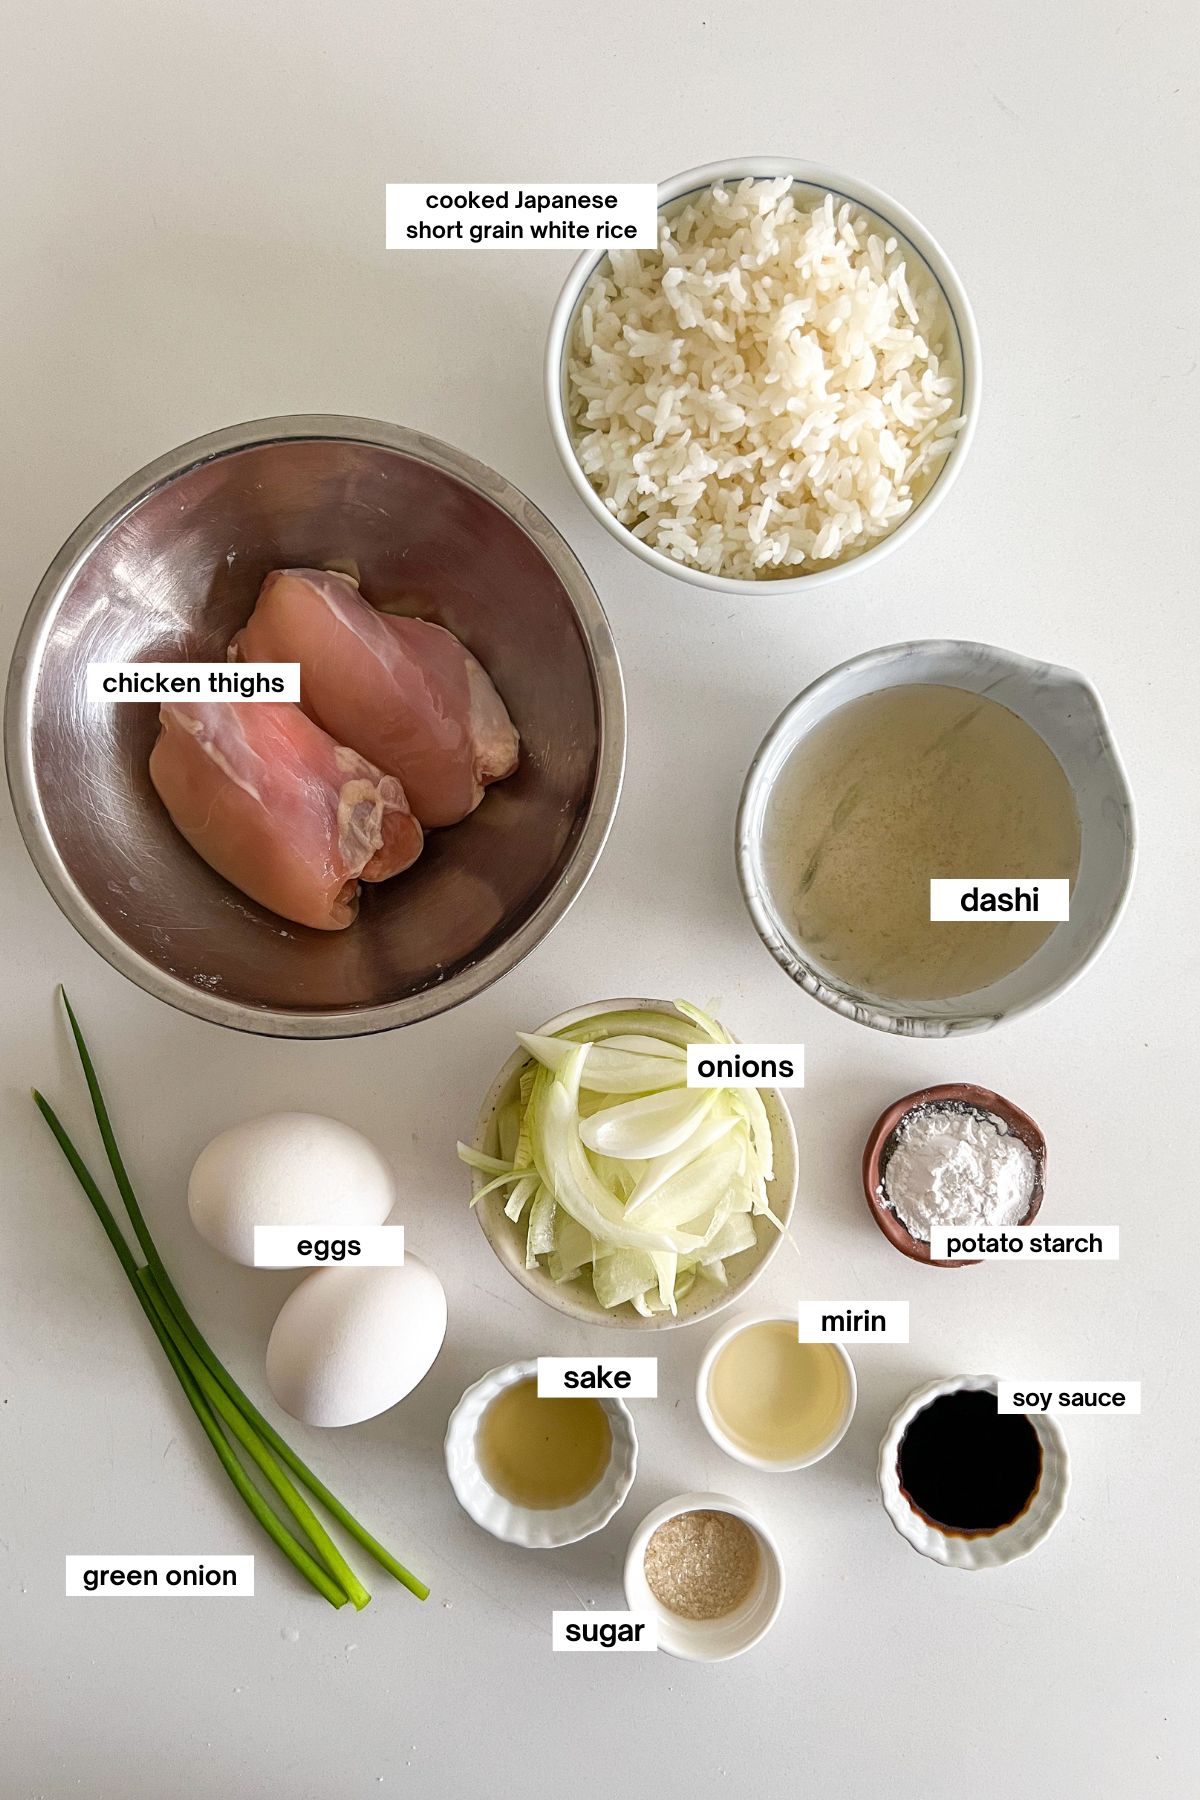
- Chicken Thigh: Tender and juicy, chicken thigh is ideal for oyakodon because of its rich flavor and tender texture. While chicken breast can be substituted, it may lack the same depth of flavor.
- Potato Starch: Coating the chicken in potato starch adds a tender texture to the chicken while thickening the broth, keeping it from separating. This is optional but highly recommended for a smoother finish.
- Sake: Japanese rice wine adds depth and subtle complexity to the dish, while also tenderizing the chicken and balancing out any gaminess.
- Onions
- Dashi Stock: The cornerstone of Japanese cooking, dashi stock made from kombu (kelp) and bonito flakes provides an umami-packed base for the sauce.
- Soy Sauce
- Mirin
- Sugar
- Eggs
- Japanese Short Grain Rice
Optional Toppings for Oyakodon
- Nori: Adds a touch of seaweed flavor and helps keep the runny egg from seeping down to the bottom of the bowl.
- Mitsuba: This herb adds a fresh, crisp flavor, or substitute with green onions if necessary.
- Shichimi Togarashi: This seven-spice blend gives the dish a spicy kick and complexity.
- Sansho Pepper: A unique pepper that provides a citrusy spice with a numbing effect.
- Egg Yolk: Add an extra egg yolk for a richer, more creamy oyakodon.
How to Make Oyakodon
This chicken and egg rice bowl is quick and easy to make, taking just 20 minutes for a comforting home-cooked meal. The key to perfecting it lies in the egg texture, which can be adjusted to your personal preference. Here’s how to make it at home:
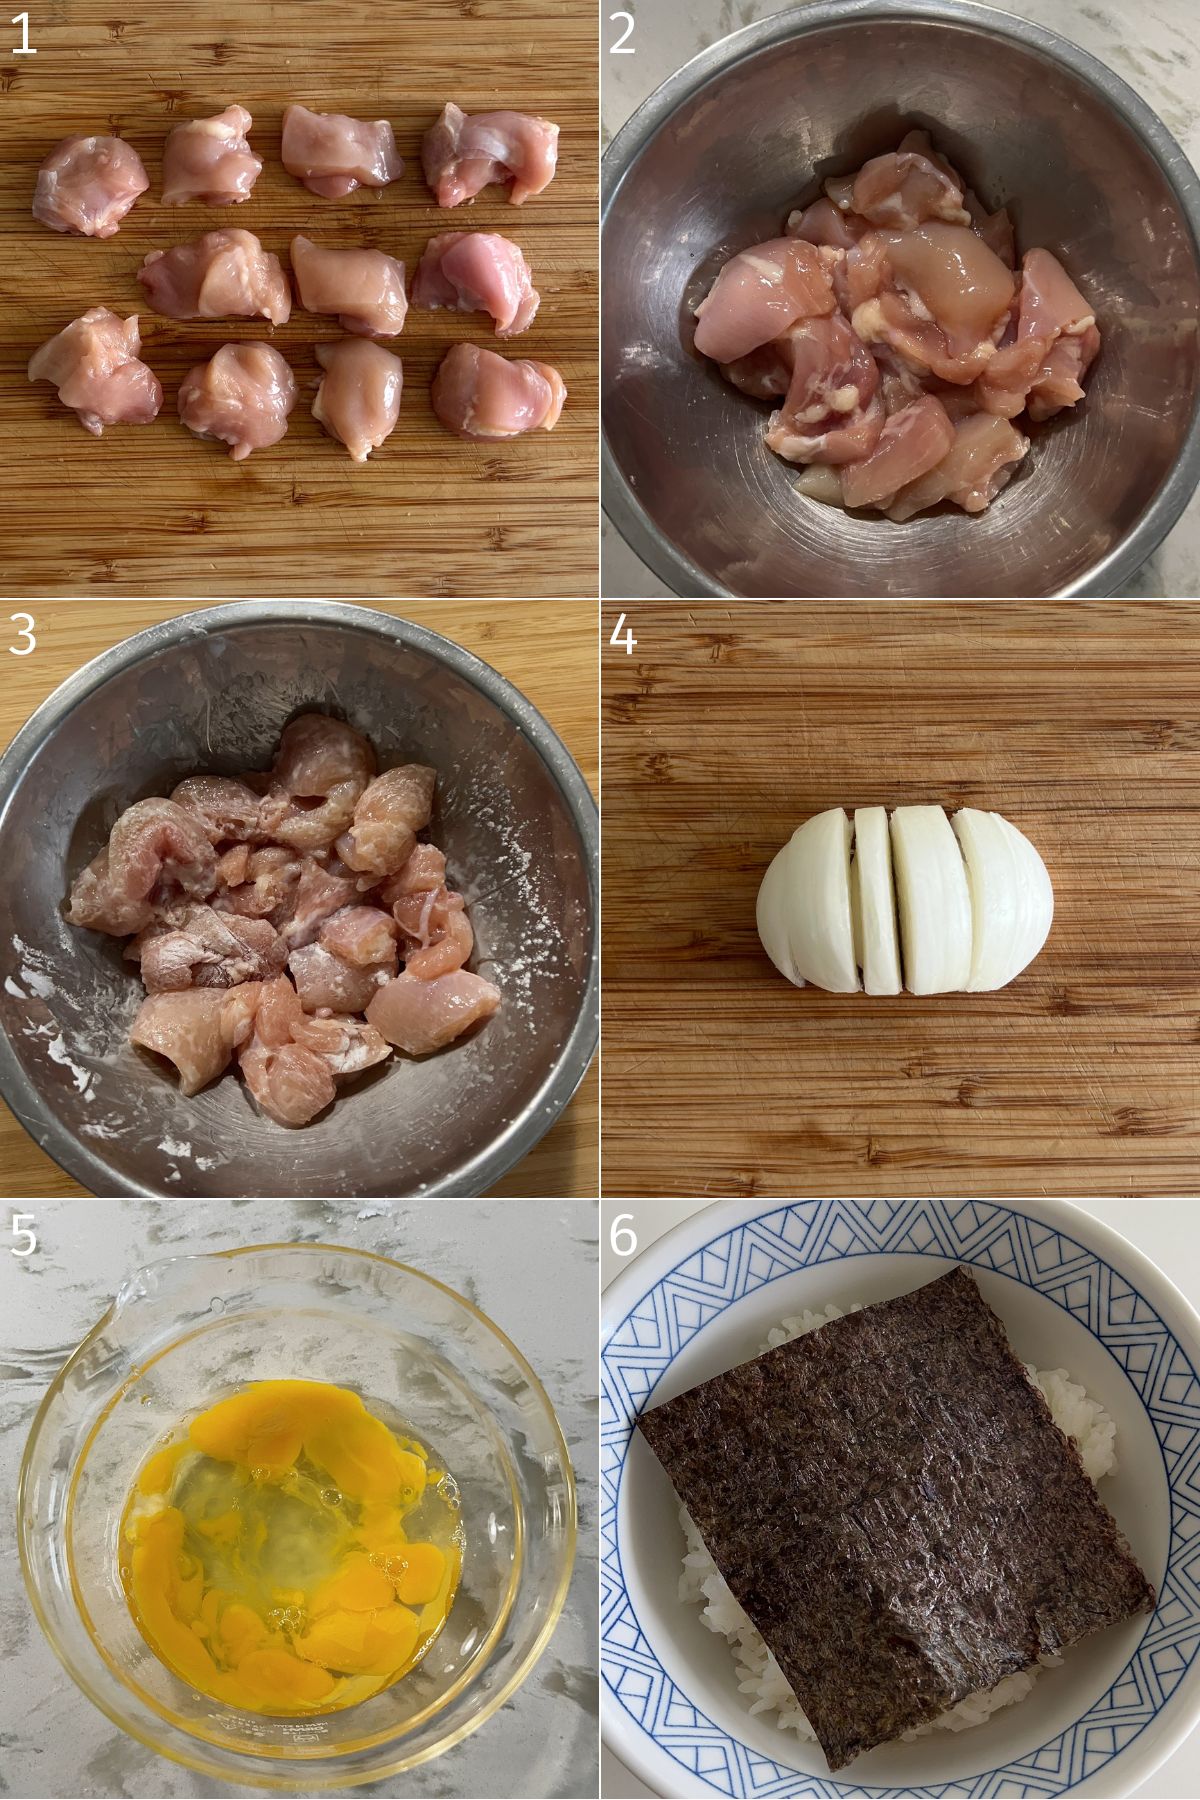
- Prepare Ingredients (1-6): Cut chicken into bite-sized pieces. Toss the chicken in sake and sugar. Let it rest for 15-30 minutes (optional, but recommended). Then toss in salt and potato starch. Slice the onions. Beat eggs lightly, cutting through the whites a few times. Prepare rice and place nori on top.
- Cook Chicken and Onions (7-8): Add the dashi, soy sauce, mirin, sake and sugar. Add the onions and scatter the chicken on top. Heat over medium and once it comes to a simmer, reduce to medium low to low heat. Flip the chicken and cook until the chicken is cooked through.
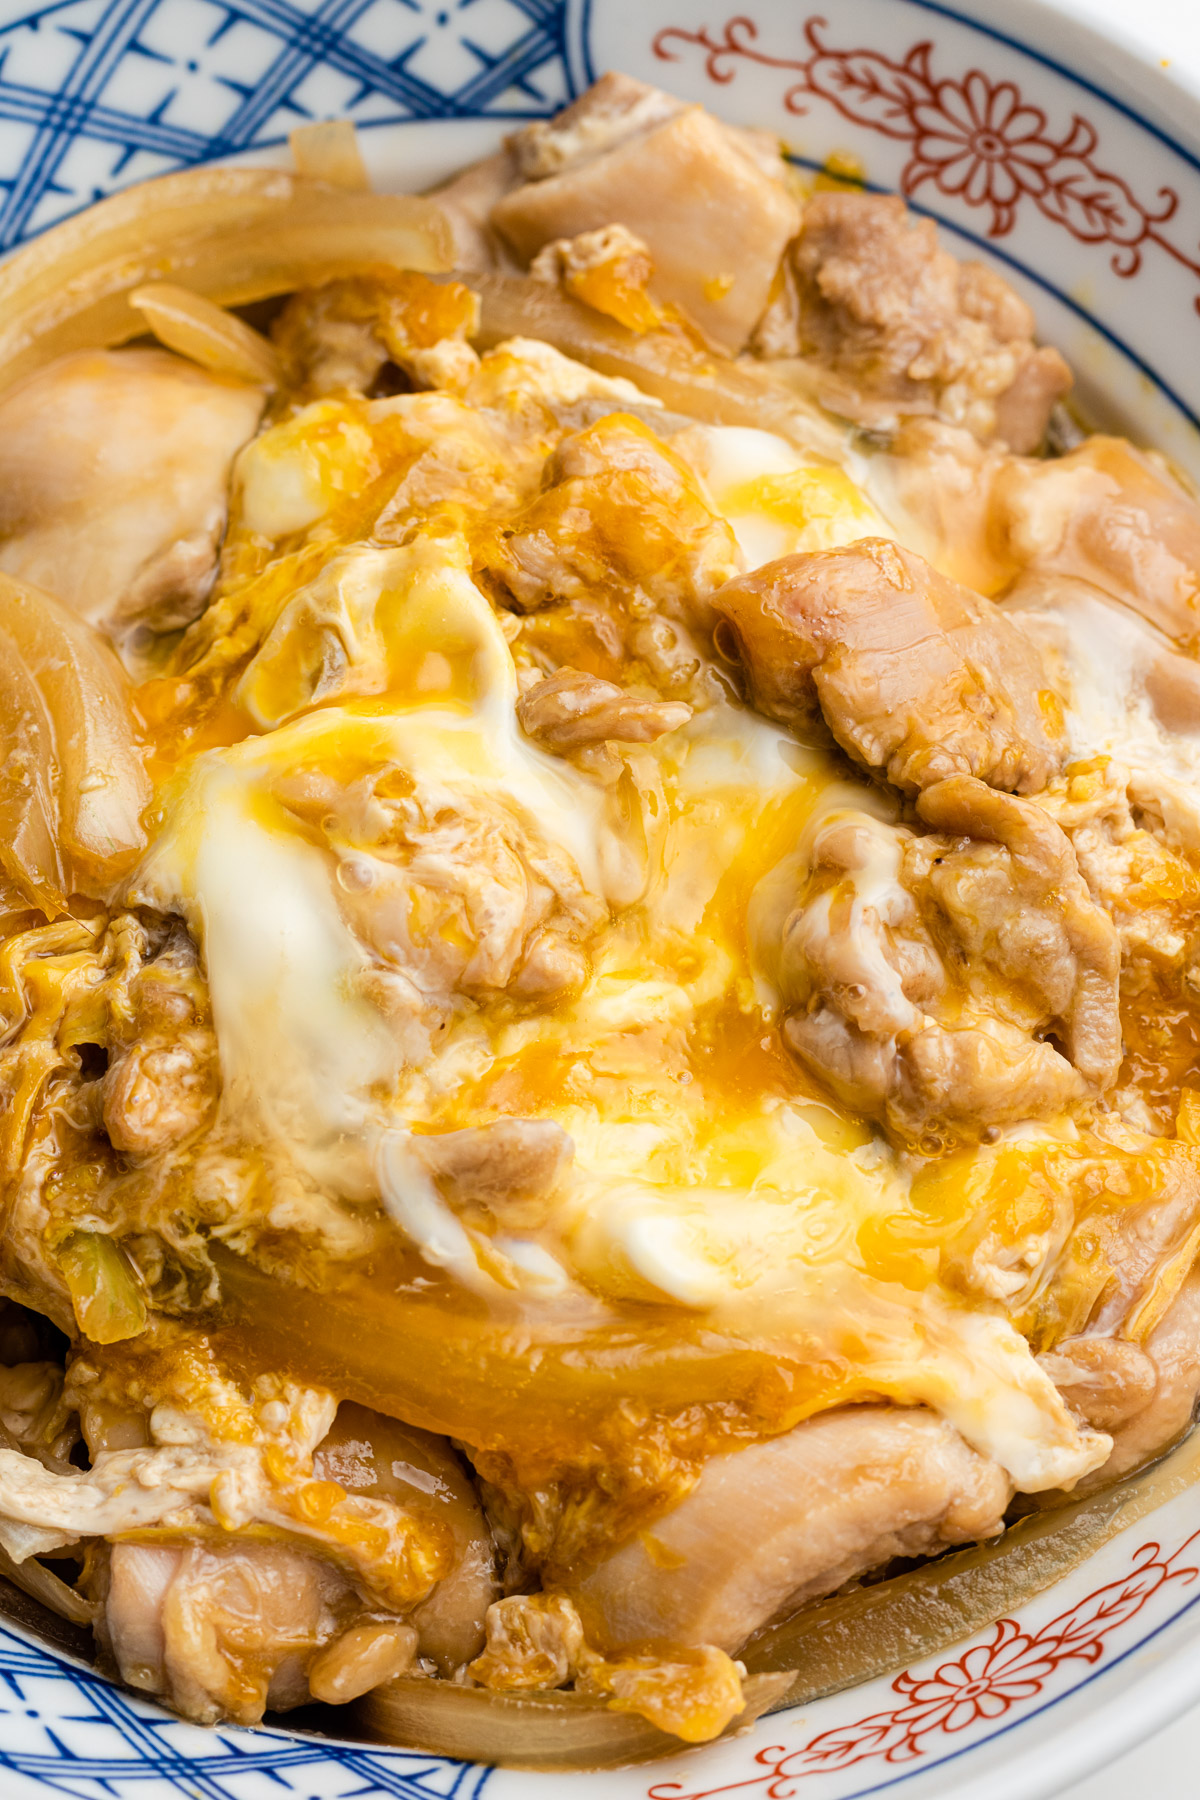
- Add 2/3 of Eggs (9-10): Pour 2/3 of the eggs (adding mostly the whites) gently over the chicken and onions, starting from the middle outward. Cook uncovered until the egg whites are partially set but still runny.
- Add remaining eggs (11-12): Pour the remaining eggs. Cook just under to how you like it (it will continue to cook from residual heat). Optional for runny oyakodon: Add 1 extra whisked egg yolk to the pan.
- Serve: Slide the oyakodon onto a bowl of steamed rice in one smooth motion using the handle if using oyakodon pan or small pan. Use a large flat spoon if scooping out of a larger pan. Garnish with scallions, sansho pepper and schimi togarashi. You can also reserve the extra yolk to place it on top of the donburi.
Note: The directions are written and shown in order of steps, however as you get used to it you cook efficiently and intuitively. For example, I’ll leave the chicken to rest for 15 minutes and in the mean time slice the onions, prepare the seasoning in the pan, whisk the egg, cut nori and scallions for serving. Then go back to the chicken, toss in salt and potato starch and then start cooking. While waiting for the chicken to cook, I’ll prepare the rice in a bowl with the nori on top because once the eggs are in, it’s a quick process. I’ll often have miso soup on the side and make that as I’m waiting for the chicken to cook.

Lisa’s Recipe Tips
My grandpa had a lot of friends in the restaurant industry so we were always spoiled with really good food and I remember my mom always asking them ‘how do you make it taste this good?!’ and they were happy to share their little tips and tricks to make it ‘restaurant quality’. By no means do you have to follow these steps to make delicious Japanese food, but give them a try to see if they’re worth incorperating!
- Slicing the onions: If you cut an onion vertically along the grain, it will have a crunchy texture. However, if you cut it horizontally, perpendicular to the grain, it will have a soft texture. Try cutting it in different ways to suit your taste. Thin cuts will ‘melt’ into the eggs more whereas larger cuts will make the onions stand out more.
- Cut the chicken into thin slices to allow the flavor to penetrate more easily:
The taste of chicken can change depending on how you cut it. Using the Japanese cutting technique “sogigiri” to cut the chicken increases the surface area, making it easier for flavors to penetrate and enhancing the umami flavor. The pieces should be bite-sized, around 10-15g each. If they’re too small, they will overcook, and if too large, the flavor won’t penetrate properly. - Coat chicken in potato starch: Although optional, this is our secret tip to keep the chicken soft and tender while adding some body to the broth. It gives it the ‘toro toro‘ texture that we love!
- Add soy sauce later to allow the ingredients to absorb the flavor of the broth.
The basic order of seasonings, known as “sashisuseso,” should be followed. If you add soy sauce first, it can overpower the other flavors. Start by simmering the ingredients in just dashi and mirin, then add the soy sauce later. This is preference and optional! Feel free to add it in the beginning with the rest of the seasonings if you find it easier. - Use Room Temperature or Warm Eggs: Room temperature eggs cook more evenly and faster. To warm them up, place the eggs in a bowl of hot water for a few minutes before using.
- Mixing the eggs: To achieve a partially soft-cooked texture in your oyakodon, avoid mixing the eggs too much. Use chopsticks to ‘cut’ the egg whites about 5 to 6 times, and at this time you may break the yolk. Then gently mix the entire mixture for 3 to 4 seconds. You still want to see large swirls of yolk. The contrast of whites and yolks where some parts are cooked and some parts are slightly under makes it interesting to eat. Whisking the eggs until the yolks and whites are combined will result in a uniform texture with a fluffy texture which isn’t bad, just preference!
- Add the egg 2 separate times: Most people add the eggs 2 separate times. For my method, I add a yolk at the end so in total it is 3 separate times. You can choose which you prefer. The first time, try to add most of the whites in first because they take longer to cook than the yolks. Add remaining egg mixture (more yolk than white) the second time. And then finally drizzle in the last yolk for a creamy texture.
- Add eggs towards the center outward: The outer areas of the pan are hotter and cook the eggs faster than the center. By adding the eggs towards the middle, you ensure they cook more slowly and evenly, preventing overcooking.
- Keep an eye on the temperature: If the heat is too high, the soup will run out and the eggs may overcook or stick to the pan. If the temperature is too low, the eggs will not heat up enough.
- Cook the rice on the firmer side: When making oyakodon, the rice will soak up the broth, so it’s best to cook it a little on the firm side.

Oyakodon Pan
In Japan, an oyakodon nabe pan is often used to make a single portion of oyakodon. This pan has a unique shape and handle, designed to easily transfer the egg, chicken, and sauce onto the bed of rice all at once. While an oyakodon pan makes serving easier and gives a cleaner look, it’s not essential for making delicious oyakodon. When using a frying pan, a small non-stick frying pan (about 13-15 cm) is ideal as it allows you to transfer the chicken and egg mixture more easily. If you’re using a medium-sized pan (about 20-22 cm) and cooking two portions at once, you’ll need to scoop out the mixture when serving. To keep as much of the chicken and egg mixture together as possible, use a large flat spoon, such as a casserole spoon. If you’re interested in a oyakodon pan, you can find it on amazon or bento&co (use OKONOMIKITCHEN for 10% off!)
Variations
There are many variations of oyakodon, each with its own unique take. In my family, my grandma, grandpa, and mom all made oyakodon slightly differently. My grandma and mom preferred separating the egg whites and yolks, while my mom liked the yolks cooked through. My grandpa, on the other hand, would whisk the eggs together before adding them to the pot, resulting in a fluffier and more uniformly colored egg. There’s no right or wrong way to make oyakodon—it’s all about personal preference! I encourage you to use this oyakodon recipe as a guideline and adjust the seasonings, ratios, and technique to your liking.
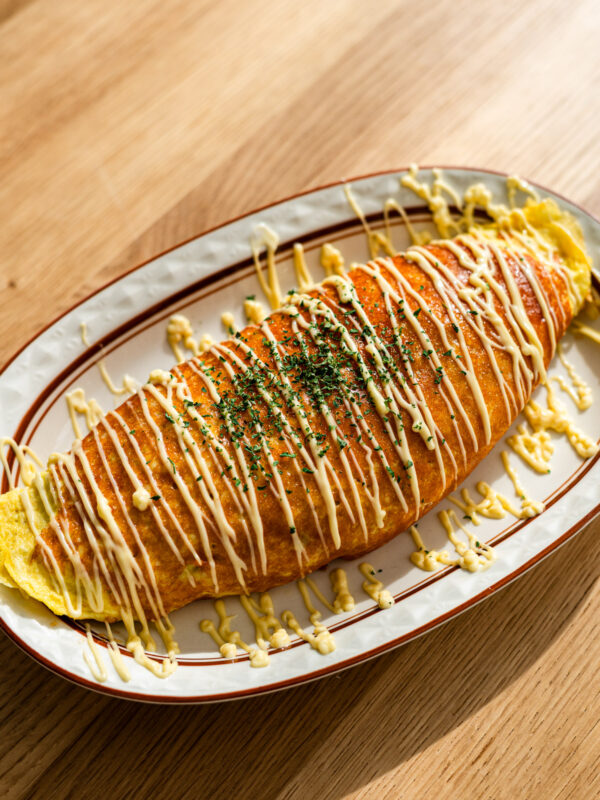
Method for fluffy oyakodon: Whisk the eggs instead of just ‘cutting’ the egg whites. After the chicken has cooked, bring the heat up to medium high to high to get it bubbling. Pour the eggs in at once and swirl the pan. The eggs will cook in about 20 seconds (it will look just set). It will resemble the look of tamagoyaki. For reference, it looks like the photo above in the oyakodon pan.
How to Store Leftovers
To store leftovers, allow it to cool to room temperature before transferring it to an airtight container. Store the container in the refrigerator for up to 3 days. When ready to enjoy again, reheat oyakodon thoroughly in the microwave until heated through. Be careful not to overheat, as this can cause the chicken and eggs to overcook and lose their tender texture.
Recipe FAQs
Yes, you can use chicken breast, but chicken thighs are preferred for their juiciness and richer flavor. If using chicken breast, be mindful that it may cook faster and could become drier.
Oyakodon is best enjoyed freshly made. If you need to prepare it in advance, you can cook the components separately and combine them just before serving.
You can use tofu or a meat alternative instead of chicken. For the eggs, substitute with a vegan egg replacement such as Just Egg. Adjust the seasoning to taste for the best results
Yes, check out my one pot rice cooker oyakodon recipe!
This may be because there was not enough broth or the eggs sank to the bottom. Add the eggs when the broth is bubbling (but not over boiling), the bubbles will keep it afloat. After adding the eggs, slightly reduce the heat and gently shake the pan to avoid sticking—don’t stir with chopsticks, as this may cause the eggs to leak down towards the bottom. Use chopsticks only when transferring the dish to a bowl, and just to lightly loosen the edges.

More Classic Donburi Recipes to Try
- Gyuudon (Japanese Beef Bowl)
- Katsudon (Pork Cutlet and Egg Rice Bowl)
- Teriyaki Tofu Donburi
- Sous Vide Oyakodon
- Natto Donburi
Enjoy!! If you make this Oyakodon recipe, let me know! Leave a comment, rating and if you decide to share it on socials, tag me on instagram @Okonomikitchen. I’d love to hear from you!
Print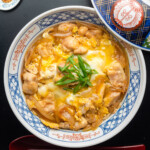
Oyakodon (Chicken and Egg Rice Bowl)
- Total Time: 20 minutes
- Yield: 1 serving
Description
This classic Oyakodon (Japanese Chicken and Egg Rice Bowl) is a quick, easy, and comforting meal made with tender chicken, silky eggs, and a savory dashi-based sauce over steamed rice. Ready in under 30 minutes, this one-pan Japanese rice bowl is perfect for busy weeknights.
Ingredients
- 2–3 pieces (120–150 g) of chicken thigh, skinless
- 1/2 tbsp sake
- 1/4 tsp sugar
- 1 tsp potato starch, optional
- pinch of salt
- 1/4 (50 g) onion
- 2 large eggs
Seasoning
- 1/4 – 1/3 cup dashi stock*
- 1 tbsp soy sauce
- 1 tbsp mirin
- 1 tbsp sake
- 1 tsp sugar
For Serving
- 1 portion (225-250 g) cooked rice
- 1/4 sheet of nori (or enough to cover the rice)
- 1–2 springs of mitsuba or scallions
- 1 egg yolk
- schimi togarashi
- Japanese sansho pepper
Instructions
Oyakodon Pan / Small Pan Method
- Cut and Season the Chicken: Remove excess fat and connective tissue from the chicken thigh using scissors or a knife for the best texture. Starting at the thickest part of the thigh, cut the chicken lengthwise into 2-3 cm width pieces, along the grain. Next, slice it at a right angle to the tendons using the sogi-giri method. Hold the knife at a slight angle (about 30-45 degrees) to the chicken and make thin, diagonal slices against the grain. Continue making these slices to create bite-sized pieces. Aim for each piece to be 2-3 cm x 2-3 cm and about 10-15 grams each. It doesn’t have to be precise but try to slice them evenly so they cook at the same rate. Gently rub the sugar onto the chicken. Place it into a bowl and sprinkle with sake and sugar. Let it rest for 15-30 minutes (optional). Then toss in salt and potato starch.
- Prepare Eggs: Crack the eggs into a bowl. When mixing the eggs, mix by cutting the egg whites. Once the big egg whites are cut through, cut the egg yolks. Don’t whisk the eggs, instead, you should see swirls of yolks around the whites.
- Prepare the Broth and Cook the Chicken and Onions: Thinly slice the onions top to root. Add dashi, mirin, sugar, onions and chicken to a cold oyakodon pan or small pan. Heat the pan over medium heat. Once simmering, reduce heat to medium low to low so its gently simmering.
- Add Soy Sauce and Simmer: Flip the chicken and add soy sauce and continue to simmer for 2-3 minutes, or until chicken is no longer pink. This allows the chicken to soak up the flavors of the dashi and mirin before the soy sauce is added. This step is optional, feel free to add the soy sauce in step 2 with the other seasonings.
- Add Eggs 2 Times: Increase heat to medium. Drizzle 2/3 of the eggs with chopsticks breaking the stream in a circular potion starting from the middle outward. Do not pour too close to the edge as it cooks much faster in that area. Aim to add majority of the egg whites (they naturally fall out in larger amounts) as they take longer to cook. Reduce heat to medium low to maintain a gentle simmer. Cook uncovered for about 30 seconds or until you start seeing the egg whites just set. Pour in the remaining eggs and top with mitsuba if using (allows the mitsuba’s aroma to develop). Cook for another 10-20 seconds uncovered or until cooked to your liking (this will depend on heat level). Note that the eggs will continue to cook from the residual heat so cook it just under how you would like it served.
- Add garnish and serve: Prepare a bowl of rice. Ideally, you want to use a donburi that is the size of the pan. Add a piece of nori on top (optional, but it helps keep the eggs and seasonings from sliding through all the rice). Slide the contents onto a bowl of rice. Add the extra yolk here if desired. Top with green onions if using and serve with schimi and sansho pepper. Enjoy!!
Larger Frying Pan Method
- If using a medium size pan, double the recipe and follow the same steps as above. Instead of sliding the chicken and egg mixture, use a large flat spoon such as a casserole spoon to transfer the chicken and egg on top of the rice.
Notes
- *Use homemade dashi, hon dashi (dashi granules) or dashi packets.
- Prep Time: 10 minutes
- Cook Time: 10 minutes
- Category: Entree
- Method: Stove top
- Cuisine: Japanese
Nutrition
- Serving Size: 1 serving
- Calories: 807
- Sugar: 15 g
- Sodium: 1003 mg
- Fat: 20 g
- Saturated Fat: 3 g
- Unsaturated Fat: 5.5 g
- Trans Fat: 0
- Carbohydrates: 102 g
- Fiber: 1 g
- Protein: 45 g
- Cholesterol: 373 mg
Okonomi Kitchen is a participant in the Amazon Services LLC Associates Program. When you purchase something through my amazon affiliate links, I earn a small commission that helps me produce consistent content at no cost to you. Thank you for your support!


This looks like such a comforting and simple rice bowl 🍚
I like how oyakodon keeps everything really minimal but still manages to feel warm and satisfying with the combination of sauce, chicken, and egg.
It’s also the kind of meal that feels quick enough for a weekday but still has that homemade comfort food vibe.
One of my favourite Japanese meals. The tips were very helpful and I got the hang of cooking timing.
Every time I come back to look for more inspiration for new recipes I’m absolutely blown away. This one takes the cake!!! I’ve found a brand new staple dish for breakfast, lunch, AND DINNER!
This Oyakodon recipe is absolutely fantastic! The instructions were clear and easy to follow, and the dish turned out perfectly balanced with its savory, slightly sweet flavors. The chicken was tender, the egg was beautifully silky, and the dashi broth tied everything together so well. It felt like a warm, comforting hug in a bowl. This has definitely become one of my go-to recipes for a quick and satisfying meal. Highly recommend!
So easy and fast to make and very tasty! It kind of became a dish I make at least once a week 🙂
Tried this recipe last week and definitely adding this to our dinner rotation!
Super easy recipe to follow. Made it last week with a rice cooker and it came out delicious!
Such an easy and flavorful recipe! I made this, but used meatballs instead of chicken bc that’s what I had on hand. I top it off with shrimp tempura ☻ Came out great!
I’ve made this before but following your measurements and adding dashi stock really upped it 😋😋 also fab for a fridge clean out recipe i will def be going back to !! <3 i would leave more than 5 stars if i could!
Made this last week for the family and they loved it. I appreciate how easy yet satisfying this recipe is to make + eat. Other than the pepper, had everything in my fridge/pantry which was great.
delicious!