Katsudon is a classic Japanese comfort dish featuring a crispy fried pork cutlet simmered in a savory dashi-based sauce with onions and eggs, all served over a bowl of steamed rice. This hearty meal combines the perfect balance of umami flavors and tender textures, making it a favorite in Japanese households and restaurants alike. Learn how to make your version of the perfect katsudon recipe at home for a satisfying and flavorful lunch or dinner.

Table of Contents
What is Katsudon?
Katsudon is a popular Japanese dish featuring a crispy, deep-fried pork cutlet (tonkatsu) served over steamed rice, topped with a savory-sweet sauce made from dashi, soy sauce, and mirin. Traditionally, the cutlet is simmered with onions and beaten eggs, creating a rich, flavorful layer that soaks into the rice. The name “katsudon” combines “katsu” (short for tonkatsu, meaning pork cutlet) and “don” (short for donburi, meaning rice bowl). Loved for its comforting mix of textures and flavors, katsudon is a classic dish enjoyed in Japanese homes and restaurants.
History of Katsudon
Katsudon is believed to have originated in the early 20th century, with various theories surrounding its creation. One popular story is that it was invented by a restaurant owner who wanted to provide students with a hearty meal before exams, believing the word “katsu,” meaning “victory,” would bring them good luck. Another theory suggests that katsudon evolved from a simple dish of tonkatsu (breaded pork cutlet) served over rice, which eventually gained popularity as a quick, filling meal. Over time, katsudon has evolved with various modern twists, such as crispy katsudon, where the cutlet retains its crunch, and sunny-side-up katsudon, which adds a rich egg yolk on top.
Variations of Katsudon
There are many variations of katsudon, especially today, with so many food spots offering unique twists to stand out. It often comes down to personal preference. My grandma, for example, always topped her katsudon with extra katsu at the end because she loved the added crispy texture, while my mom preferred the traditional version where the katsu soaks up all the sauce with a runny egg. Despite the variations, the core flavors remain the same: a savory-sweet blend of dashi, soy sauce, and mirin, served with egg and a pork cutlet. Here are some key differences to traditional katsudon in comparison to crispy katsudon.
Traditional vs. Crispy Katsudon
Traditional katsudon features a deep-fried pork cutlet (tonkatsu) that’s simmered in a savory-sweet sauce made from dashi, soy sauce, mirin, and sugar. As it cooks, the cutlet soaks up the sauce, becoming tender and juicy, but losing its original crispiness. The eggs and onions are added toward the end, creating a soft, custard-like texture that ties everything together. The flavors strike a balance between savory, sweet, and rich, making for a comforting and filling dish. Traditional katsudon is all about that cozy, comforting vibe where the cutlet and sauce meld together with the rice and egg.
On the other hand, crispy katsudon keeps the pork cutlet crunchy by serving it on top of the rice without simmering it in the sauce. The cutlet is fried until golden brown, then the sauce and eggs are cooked separately and poured over the rice right before serving. This version highlights the contrast between the crispiness of the pork and the softness of the rice and egg, giving you a bit of a crunch in every bite. The fried cutlet steals the show, with the sauce and eggs acting as a flavorful backdrop, adding a lighter touch while still bringing in those rich, savory flavors. It’s a great option for those who love a bit of crunch in their meal.
Katsudon Ingredients
Here are the basic ingredients you’ll need to make katsudon:
- Pork tenderloin: Typically pork chops are used and pounded into <1cm in width which makes for a thin tonkatsu. My mom uses tenderloin because it’s smaller, can be kept thick and perfect for frying into crispy cutlets. Thicker katsu is easier to keep tender and juicy. Additionally, there is more surface area with multiple pieces of tonkatsu which means more of that fried panko goodness.
- All-purpose flour
- Egg + oil: For battering and for the dish. Adding a small amount of oil to the egg dredge helps the breading adhere better to the pork cutlet during frying. It also contributes to an even, golden-brown crust by promoting better heat conduction and crisping during cooking. The oil in the egg mixture helps prevent the panko from soaking up too much oil in the pan, resulting in a lighter, crispier katsu.
- Panko breadcrumbs: Japanese-style breadcrumbs that give the katsu its signature crispy texture. In Japan, nama panko (raw panko) is used to make super light and crispy katsu. However, dried panko works well, just be sure to use a brand with larger pieces.
- Dashi stock: A light, savory broth made from kombu and bonito flakes, forming the base of the katsudon sauce.
- Soy sauce
- Mirin
- Sugar
- Onion
- Rice
- Scallions
How to Make Katsudon (How to use this recipe)
There are so many ways to make katsudon and little adjustments can change the flavour and texture of the dish. My mom follows the same basic steps but will change certain things depending on her mood. Use this recipe as a blueprint! Make the recipe as is first and then take notes on what you would change. Experiment with different methods and change things along the way to find your perfect katsudon. My mom always says ‘適当が一番’ which means casually is the best. She never measures anything and just goes by visuals, smell and taste.
- Make the tonkatsu: use the recipe below which uses pork tenderloin or use my tonkatsu recipe which uses pork chops.
- Cook the onions in the broth until tender
From here, you can either:
- Add the tonkatsu on top and then the egg (traditional katsudon)
- Cook the egg and then add the tonkatsu (crispy katsudon)
- Add half of the tonkatsu, add the egg and then top with crispy tonkatsu (hybrid)

Recipe Tips
- Tenderize the pork: When making tonkatsu, lightly pound the pork with a meat tenderizer. This breaks down the connective tissue, making the meat softer and more tender. If you pound it thoroughly, the muscle fibers will break down to the point where the pork becomes soft enough even to cut with chopsticks. It will also prevent excess shrinking which is often the cause of the breading detaching from the meat (left photo above).
- Brush off excess flour and egg: It’s crucial to remove any excess flour and egg to ensure the breading adheres properly. If there’s too much, the coating may detach during cooking (left photo above). Properly brushing off the excess helps the coating stick firmly, creating an even and intact layer as it cooks (right photo above).
- Double coat: The flour, egg, and panko coating prevents moisture and flavor from escaping. The flour absorbs moisture from the meat, while the egg creates a barrier that hardens during frying. Double coating ensures a thicker, crispier outer layer that locks in the juices, giving you a juicier tonkatsu.
- Maintain Frying Temperature: Fry the tonkatsu at 160-170°F (71-77°C) for optimal results. If the temperature is too low, the meat will absorb excess oil and not cook through properly. If it’s too high, the panko will brown too quickly before the meat is fully cooked.
- Cooking the eggs: Add the eggs to the katsudon mixture in 2-3 portions. This ensures they cook evenly and achieve a soft, slightly runny texture that complements the dish perfectly.
How to Store Katsudon
To store katsudon, separate the tonkatsu from the rice and sauce to prevent it from becoming soggy. Keep the pork cutlet in an airtight container lined with paper towels and refrigerate it, while the sauce with eggs and onions can be stored in a separate container. Both can be refrigerated for up to 2 days. Reheat the tonkatsu in the oven or air fryer to restore some crispness before assembling the dish.
Recipe FAQ
Yes! For katsudon, people typically use pork loin chops. However, my mom preferred using tenderloin because it’s smaller (cooks faster) and can be kept thicker, making it more tender and juicy for katsu. If you’re using pork loin for tonkatsu, you’ll need to cut the tendons between the fat and lean meat. These tendons, made of collagen, shrink and harden when heated, causing the meat to curl and the batter to peel off. By cutting them with a knife beforehand, you prevent this curling. Tenderloin, on the other hand, doesn’t have tendons, so there’s no need to worry about this step. For pork loin chops, follow my tonkatsu recipe!
Yes, you can definitely use store-bought tonkatsu (fried pork cutlet) to save time! Just reheat it in the oven or air fryer to maintain its crispiness before adding it to the simmering sauce. While fresh tonkatsu is best for optimal texture, using pre-made cutlets is a great shortcut.
Katsudon isn’t typically meant to be completely crispy. The pork cutlet (tonkatsu) is fried to be crispy initially, but once it’s simmered in a savory sauce made of dashi, soy sauce, and mirin, it softens as it absorbs the liquid. The dish is a balance between tender, flavorful tonkatsu and the lightly crispy edges that may remain. The egg and sauce are integral parts of katsudon, and part of the comfort comes from the cutlet being soaked in the rich broth.
If you do prefer a crispy katsudon you can add the katsu after the egg has been cooked. Simmer the sauce with the onions and egg first, then briefly dip the tonkatsu in just before serving, allowing it to soak up the flavor without becoming soggy. Do not cover the pan to keep the top surface crispy. Another option is to add the egg over the rice and then top it off with crispy katsu.
Yes, if you want to make a lighter version, you can bake or air-fry the pork cutlet instead of deep frying it. Follow my air fryer chicken katsu recipe but replace with pork. Baking at 400°F (200°C) for 20-25 minutes, flipping halfway through, gives a nice crispy crust.
Yes, you can also use a different protein, like chicken or tofu, to suit your dietary preferences. I also have a vegan katsudon recipe!
Enjoy!! If you make this Katsudon recipe, let me know! Leave a comment, rating and if you decide to share it on socials, tag me on instagram @Okonomikitchen. I’d love to hear from you!
Print
Katsudon (Pork Cutlet Egg Rice Bowl) かつ丼
- Total Time: 1 hour 5 minutes
- Yield: 1 serving
Description
Katsudon is a classic Japanese comfort dish featuring a crispy fried pork cutlet simmered in a savory dashi-based sauce with onions and eggs, all served over a bowl of steamed rice. This hearty meal combines the perfect balance of umami flavors and tender textures, making it a favorite in Japanese households and restaurants alike. Learn how to make your version of the perfect katsudon recipe at home for a satisfying and flavorful lunch or dinner.
Ingredients
Katsu (2 servings)
- 12–14oz pork tenderloin, 3 cm / 1.2 inch thick*
- 1 tsp salt
- 1 large egg
- 2 tsp oil
- 1/4 cup all purpose flour
- 2 cups panko
Katsudon (1 serving)
- 1/2 cup (100 ml) dashi stock
- 1 1/2 tbsp soy sauce
- 1 1/2 tbsp mirin
- 2 tsp sugar
- 1/2 medium (60 g) onion, sliced
- 2 large eggs
- scallions, for garnish
Instructions
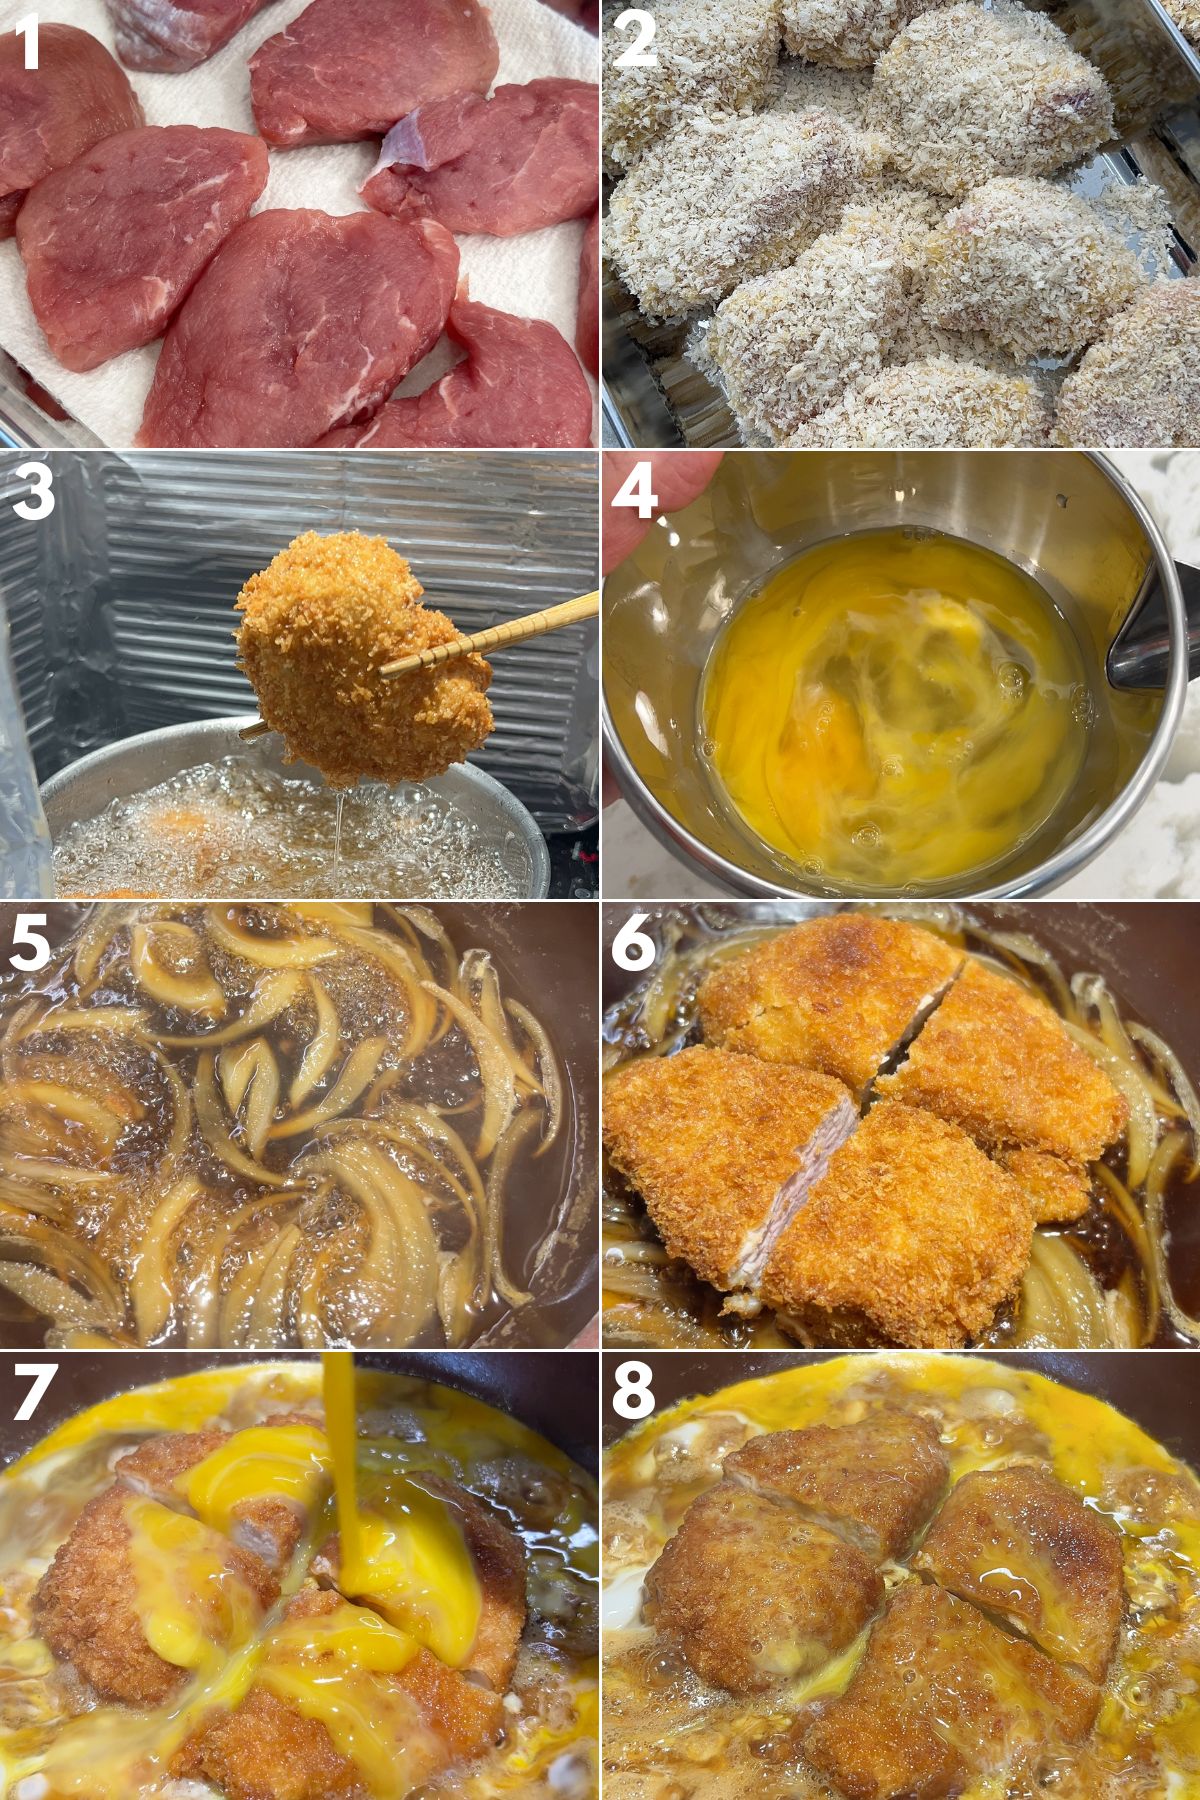
- Prepare the Pork: Slice the pork tenderloin into about 3 even pieces, about 1.2 inches (3 cm) thick. Place the pork slices between two pieces of plastic wrap or parchment paper, then use a meat mallet or tenderizer to pound each piece. Do not over pound so that they become too thin. Shape them back into their original shape.
- Season and Rest: Sprinkle the pounded pork pieces with salt on both sides. Place them in a container lined with a paper towel. Put another paper towel on top, press down gently, and cover the container. Refrigerate for 1 hour to let the pork rest (you can skip this step but this helps make it more moist and tender).
- Set Up Breading Station: After 1 hour, remove the pork from the fridge. Prepare three shallow dishes or trays:
- Tray 1: Add the flour.
- Tray 2: In a bowl, whisk together 2 large eggs with 1 tablespoon of oil until well combined. The oil helps the egg mixture adhere to the pork and makes the coating crispier.
- Tray 3: Add the panko breadcrumbs.
- Bread the Pork: Take one pork slice and lightly coat it in the flour, shaking off any excess. Dip the floured pork into the egg mixture, ensuring it’s fully coated, then let the excess drip off. Coat the pork in flour and egg one more time to build a thicker crust. Press the pork into the panko breadcrumbs, making sure it’s fully covered. Gently press the panko onto the pork to help it adhere. Set aside on a plate. Repeat for the remaining pork slices.
- Fry the Katsu: In a deep pot or pan, heat enough oil to submerge the pork to 160°C (320°F). If you don’t have a thermometer, test the oil by dropping in a small piece of panko—if it sizzles gently, the oil is ready. Fry 3 pieces of katsu at a time, being careful not to overcrowd the pot. Cook for about 2 minutes on the first side. Flip the katsu and fry for another 1-2 minutes or until the breading is golden brown and crispy. Once done, remove the katsu and drain on a wire rack, keeping the pieces vertical for a few seconds to allow excess oil to drip off. Repeat with the remaining katsu.
- Slice the Katsu: Once all the katsu pieces have been fried and slightly cooled, slice each piece into half. Set aside.
- Prepare the Simmering Sauce: In a large skillet or frying pan, combine the dashi, soy sauce, mirin, sake, and sugar. Stir the mixture until the sugar is fully dissolved. Heat the pan over medium heat and bring the mixture to a simmer. Taste and adjust as needed.
- Cook the Onions: Once the sauce is simmering, add the thinly sliced onions to the pan. Simmer the onions in the sauce for about 4-5 minutes, or until they are soft and translucent.
- Add the Katsu: Gently place 2 pieces (3 pieces if you want all of the katsu to be soaked in the broth) of katsu into the pan, arranging them in a single layer on top of the onions. The katsu should absorb some of the sauce while still maintaining its crispy texture.
- Drizzle with Egg: Lightly beat eggs in a bowl. Turn off the heat and pour about 2/3 of the beaten eggs evenly over the katsu and into the sauce, directly over the pork and onions. Turn the heat back on over medium low to medium (to a gentle simmer) and cover the pan with a lid and cook for about 30 seconds, allowing the eggs to set slightly while still remaining soft and runny.
- Final Egg Addition: After the eggs have begun to set, remove the lid and drizzle the remaining 1/3 of the beaten eggs over the katsu and sauce. Turn off the heat, cover the pan again, and let the residual heat gently finish cooking the eggs for another 30 seconds.
- Assemble the Katsudon: Scoop a portion of steamed rice into individual bowls. Run a spatula around the pan to loosen the egg and then carefully slide the katsu, eggs, and onions from the pan onto the rice. Place one piece of crispy katsu on top if desired.
- Garnish and Serve: Garnish the katsudon with freshly chopped scallions. Serve immediately and enjoy!
- Prep Time: 15 minutes
- Rest time: 30 minutes
- Cook Time: 20 minutes
- Category: Entree
- Method: Stove Top
- Cuisine: Japanese
Nutrition
- Serving Size: 1 serving
- Calories: 700
- Sugar: 10g
- Sodium: 900mg
- Fat: 35g
- Saturated Fat: 8g
- Unsaturated Fat: 25g
- Trans Fat: 0
- Carbohydrates: 80g
- Fiber: 3g
- Protein: 40g
- Cholesterol: 250mg
Okonomi Kitchen is a participant in the Amazon Services LLC Associates Program. When you purchase something through my amazon affiliate links, I earn a small commission that helps me produce consistent content at no cost to you. Thank you for your support!


Absolutely loved this recipe! The instructions were simple, the dish looks delicious, and your storytelling made it even more enjoyable to read. Can’t wait to try this at home. Thank you for sharing such wonderful recipes!
Tried this recipe last week and definitely adding this to our dinner rotation!
Made this recipe with the air fryer @375 and flipping halfway and it turned out surprisingly good! I have only used chicken for katsu in the past but the pork was a great switch up! Thanks for the recipe!
Such a delicious and easy recipe to follow 😋 Definitely becoming a go-to in our rotation!
I made just the katsudon part with leftover tonkatsu and it turned out delicious!
Very easy to follow the recipe too!
I would love to try Lisa’s Tonkatsu recipe other day. I find really interesting to keep one slice of pork outside the broth to keep the crispyness on that one.
Thank you for sharing!