
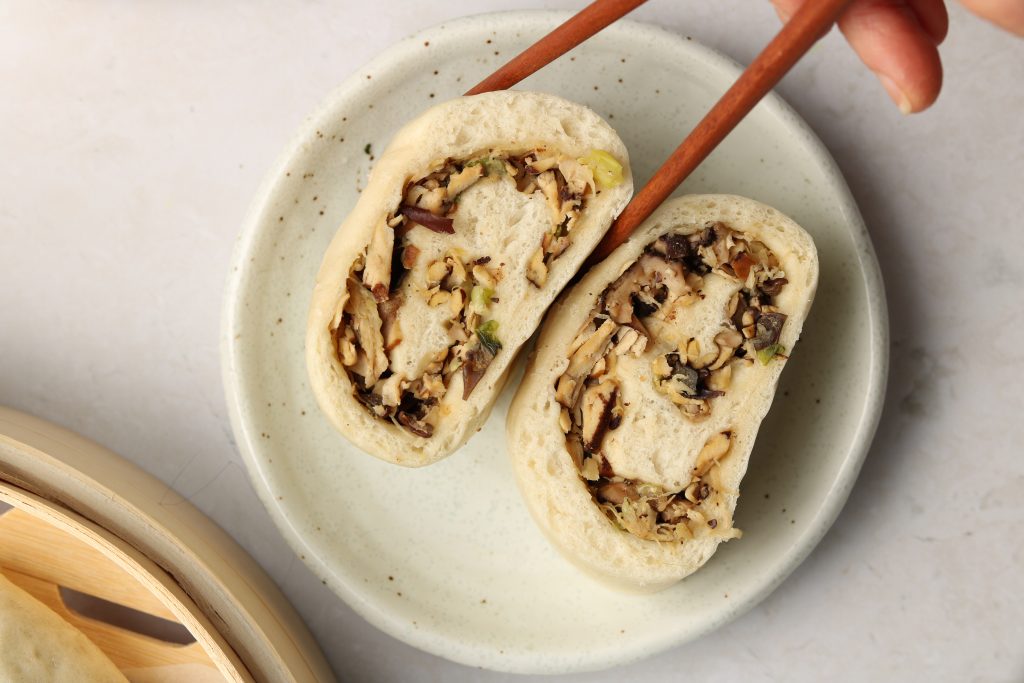
Friends, get ready to bao down to this beast: the Lazy Dragon.
What is Lazy Dragon Roll?
Baos and steamed buns are found all across China– however the Lazy Dragon (懒龙) is a traditional Beijing style steamed bun. Often eaten for breakfast or as a snack, it’s one of the locals favourite street foods.
While stuffed baos (baozi) require stuffing and wrapping each individual bun, this lazy dragon is incredibly easy to make which is probably why this was the first steamed bun variation my grandma ever taught me how to make. It’s perfect for anyone getting into making homemade steamed buns! As a bonus, not only does it look pretty cool (it looks like a giant dragon, eh?) but it’s also really fun to make, versatile and so delicious.
How to Make the Lazy Dragon
The Ingredients
For the Bao Bun
For the bao bun, I used my fool proof recipe adapted from my grandmother. Her recipe calls for the basics: water, sugar, yeast, flour, baking powder (optional) and salt (and sometimes she also adds oil depending on the texture she wants). I personally prefer a soft and fluffy bao so swapped the water for oat/soy milk and replaced some of the flour with corn starch. This is my current absolute favourite, tried and true bao recipe that is extra fluffy. Of course, feel free to use your favourite bao recipe if you prefer.
The Filling
You can really stuff these lazy dragon rolls with anything you like! In Beijing, they’re typically found filled with pork but to keep these vegan, I used a blend of tofu, vegetables and some seasonings:
- Five Spice Tofu: I love using five spice tofu for things like baos and dumplings because it makes such a flavourful filling without needing to add a large amount of sauces that tend to make the bun portion a little soggy when used in excess. However, you can also use smoked tofu if you can’t find five spice tofu.
- Shiitake Mushrooms: Another ingredient I always reach for when making vegetable stuffed buns.
- Wood Ear Mushrooms: Adds a bit of texture so it’s not just mushy filling.
- Scallions: Can also substitute with chives.
- Aromatics & Flavour: ginger, sesame oil, soy sauce, pepper & salt. Feel free to adjust the amount and/or add in chives, white pepper, garlic… etc.
The Directions
This steamed bun recipe is incredibly easy to make, and if you’ve ever made baozi (steamed filled buns) before, then it’ll be a piece of cake!
- Make the dough: Mix the water, sugar, oil and yeast together in a bowl and let it rest for 10 minutes. In the meantime, add the flour, sugar, baking powder and salt to a stand mix bowl (or bowl if kneading). Pour the wet ingredients into the dry. Start with low speed and then increase to medium speed. Let it mix until the dough comes together (about 3-4 minutes). The dough should be soft and stretchy but not too sticky.
- Knead & Proof: Take dough out, knead a few times until the dough is smooth and shape into a ball. Place back into the bowl and cover with a damp kitchen towel and keep it in a warm area until doubled in size (about 1 – 1.5 hours).
- Make the filling: While the buns are proofing, make the filling. Shred the cabbage and then cook over the stove until softened or microwave covered for 1 minute. Squeeze all the excess liquid out. Finely chop the shiitake mushroom, tofu and wood ear mushrooms. Remove excess liquid if there is any and then toss everything together. Add the seasoning ingredients and mix until well combined.
- Remove air bubbles: Once dough risen, punch it down, knead the dough well to get rid of air bubbles (about 5 mins). Cover with the bowl and rest for another 5 minutes.
- Make the lazy dragon: Roll the dough out into a rectangle, spread the filling and then roll it up. Seal the two ends and then pinch the open seam to seal.
- Rest: Place the lazy dragon into a steamer basket lined with steaming paper (or parchment paper with holes in it) and let it rest for another 15 minutes.
- Steam: Place over cold water (basket should be 1 ½ inch above the water). Turn the heat to high and then once it begins to boil, bring down the heat to medium and steam for 15 minutes. Turn off heat and rest for 5 minutes WITHOUT removing the cover. This is super important to prevent the bao from shrivelling.
Tips & Trouble-shooting
- Hand kneaded dough: You can make this recipe without a stand mix. Simply add the ingredients to a bowl and knead with your hands until the dough is nice and smooth. It’ll take 10-15 minutes depending on your kneading skills.
- Proof quicker: Depending on where you live and the temperature of your room, proofing can take up to 2 hours. During the winter, I’ll heat up a cup of water in the microwave for two minutes and then keep the covered bowl inside the microwave for the first proofing. For me, it takes about 1 hour – 1.5 hours.
- Under/Over-proofing: This can cause the bun to collapse or be too dense. To test if its done proofing, poke a hole in the middle with your finger– it should pop up slowly and leave a light indentation. If it pops up quickly, it’s under-proofed. If it stays indented, then it’s over-proofed.
- Start with cold water: There are some methods that start with warm water but for me, this just works every time.
- Do not open the lid when steaming: It prevents even steaming and the change in temperature will affect the steaming process of the dough.
- Open the lid 5 minutes after removing from the heat: A sudden change in temperature is what causes buns to collapse. Leave the buns in the steamer for 5 minutes after steaming time is complete.
More Baos & Buns to Try!
- Black Sesame Lazy Dragon (coming soon)
- Basic Steamed Bun (coming soon)
- Fluffy Mantou (coming soon)
If you recreate this Lazy Dragon Roll recipe let me know how you liked it by leaving a comment and rating below or by tagging me on Instagram @Okonomikitchen, I love seeing all of your tasty recreations!
Hungry for more? Be sure to subscribe to my newsletter and follow along on Instagram, Youtube and Pinterest for more deliciousness!
Lazy Dragon Roll
- Yield: 6 servings
Ingredients
Bao
- 120–135g warm milk
- 16g sugar
- 3g instant yeast
- 10g grapeseed oil
- 200g all purpose flour
- 9g corn starch
- 2g baking powder
- 1/8 tsp salt
Filling
- 4 oz five spice tofu (112g // or smoked tofu)
- 2 cups shredded cabbage (180g)
- 4 shiitake mushrooms (70g)
- 1/4 cup wood ear mushrooms (34g)
- 1 tsp ginger, minced
- 2 tsp sesame oil
- 1 1/2 tbsp soy sauce (23g)
- 1/4 tsp pepper
- 1/2 tsp salt
Instructions
- To a bowl, add the water, sugar and yeast and stir. Let it rest for 10 minutes and then add in the oil.
- In the meantime, add the add flour, sugar, baking powder and salt to the stand mix bowl. Pour the wet ingredients into the dry. Start on low speed and then increase to medium speed and let it mix until the dough comes together (about 3-4 minutes). The dough should be soft but not too sticky.
- Take dough out, knead a few times until the dough is smooth and shape into a ball. Place back into the bowl and cover with a damp kitchen towel and keep it in a warm area until doubled in size (about 1 – 1.5 hours).
- While the buns are proofing, make the filling. Shred the cabbage and then cook over the stove until softened or microwave covered for 1 minute. Squeeze all the excess liquid out. Finely chop the shiitake mushroom, tofu and wood ear mushrooms. Remove excess liquid if there is any and then toss everything together. Add the seasoning ingredients and mix until well combined.
- Once dough risen, punch it down, knead to get rid of air bubbles (about 5 mins). Cover with the bowl and rest for another 5 minutes.
- Roll the dough out into a rectangle, spread the filling and then roll it up. Seal the two ends and then pinch the open seam to seal.
- Place the lazy dragon into a steamer basket lined with steaming paper (or parchment paper with holes in it) and let it rest for another 15 minutes.
- Place over cold water (basket should be 1 ½ inch above the water). Turn the heat to high and then once it begins to boil, bring down the heat to medium and steam for 15 minutes. Turn off heat and rest for 5 minutes WITHOUT removing the cover. Slice and enjoy warm!
Notes
- Helpful Equipment: bamboo steaming basket, steaming paper, wooden rolling pin, food processor
- Nutritional Information Disclaimer: Nutrition information is a rough estimate calculated on an online tool (Cronometer).
- Method: steaming
- Cuisine: vegan, chinese
Nutrition
- Serving Size: 1 serving
SAVE IT FOR LATER! ↓
Okonomi Kitchen is a participant in the Amazon Services LLC Associates Program. When you purchase something through my amazon affiliate links, I earn a small commission that helps me produce consistent content at no cost to you. Thank you for supporting my plant based kitchen!


So easy to make and soooo delicious!
It yeilds a lot, I chopped half of it up and put the pieces in the freezer to enjoy later.
Omg, I almost never leave reviews but this is one of the most delicious things I’ve ever made!!
Are there more stars on the rating? I cannot believe how easy this was and how flavorful the filling is, despite the number of ingredients being pretty low! I soaked and chopped up some soy curls and cooked them in five spice and some soysauce instead of using five spice tofu, but followed the recipe exactly otherwise. I couldn’t stop eating the filling on its own – will definitely have to make a double batch next time to put over rice! So delicious and so much less intimidating than making individual buns (包子), plus the ratio of bread to filling is better too! Love.