These Hojicha White Chocolate Cookies are rich, toasty, and perfectly chewy, with deep roasted tea flavors balanced by creamy white chocolate. Toasted milk powder adds extra nuttiness, making them even more flavorful. If you love hojicha or tea-based desserts, these are a must-bake!

Table of Contents
Most people know and love matcha, but I’m personally team hojicha. The deep, roasted flavors of hojicha make it incredibly comforting and pair beautifully with sweet treats. I made these hojicha cookies to be crisp on the edges with a chewy middle and not too sweet. The brown butter enhances the toasty notes, while the creamy white chocolate balances it out with a touch of milky sweetness. These taste like a hojicha latte in cookie form!
What is Hojicha?
Hojicha is a Japanese green tea that is roasted over charcoal, giving it a warm, toasty flavor with subtle caramel and nutty notes. Unlike matcha, which has a slightly grassy and bitter taste, hojicha is naturally smooth and less astringent due to the roasting process. It is also lower in caffeine compared to other green teas, making it a great option for those looking for a milder tea.
Ingredients & Substituions
Before you begin, gather your ingredients. Here’s what you’ll need:
- Unsalted butter: For this recipe, I’ve opted for melted butter to create a more fudgy chewy texture in the middle. You can use room temperature butter and cream it with the sugar for less fudgy-ness if you prefer. You can also use melted brown butter!
- Milk powder: Since developing my brown butter chocolate chip cookie recipe with milk powder, I truly believe this ingredient makes the cookie chewier and more flavourful. Using toasted milk powder will give it a slightly toasty-milk flavour and milk powder will give it a slightly sweet milk flavour which compliments the hojicha flavour. You can find milk powder in the baking section or shelf stable milk aisle at the grocery store. If you don’t have it, I recommend using brown butter for some of that rich nutty flavour and adding an additional tbsp of flour.
- Light brown sugar
- Granulated white sugar
- Egg + egg yolk
- All-purpose flour
- Cornstarch: Keeps the cookies soft and tender.
- Hojicha powder: I use hojicha co brand and this hojicha powder from amazon.
- White chocolate: I’ve also made this with cream cheese chocolate chips and dark chocolate chips! Use your favourite chocolate 🙂
How to Make Hojicha Cookies
Here’s a quick overview of the steps to make these hojicha white chocolate cookies:

- Prepare ingredients: Whisk all the dry ingredients together in a bowl and set aside. Chop the white chocolate is using bars and sift through a large colander to remove small shards (or keep them in, but the cookies may spread more).
- Toast the milk powder: Over medium heat, add the milk powder and use a spatula to move it around occasionally so it doesn’t burn. Cook until golden in colour. You may skip this step and use un-toasted milk powder if you wish.
- Mix the wet ingredients: In a mixing bowl, whisk together the melted butter, brown sugar, and granulated sugar. Add vanilla, egg, and egg yolk, whisking until slightly lighter in color.
- Combine the dry and wet ingredients: Gradually fold the dry ingredients into the wet mixture. Just before fully combined, add the white chocolate and fold until evenly incorporated.
- Chill the dough: Scoop the dough into portions and refrigerate overnight for the best flavor and texture.
- Bake the cookies: Preheat the oven to 350°F (175°C). Arrange chilled cookie dough balls on a lined baking sheet and bake for 12-14 minutes until the edges are golden and the center is set. Let cool before enjoying!

Lisa’s Recipe Tips
- Use a kitchen scale: For accurate and consistent results, please use a kitchen scale.
- Make sure the dough is cool before adding in the chocolate: The dough should feel room temperature to make sure the chocolate doesn’t melt into the dough.
- Don’t over-mix after adding the flour: Add the white chocolate just before the dry ingredients are fully incorporated to avoid overmixing.
- Use a circular cutter or bowl to swirl cookies after baking: This helps achieve perfectly round cookies.
How to Store and Freeze Leftovers
- Before Baking: Store the cookie dough in the fridge for up to 3 days or freeze in vacuums sealed bags for up to 3 months. If frozen, place in the fridge overnight and bake. If baking straight from frozen, add an additional 2-3 minutes to baking time.
- After Baking: Keep the cookies in an airtight container at room temperature for up to 3 days. For longer storage, freeze in vacuums sealed bags for up to 3 months.
Recipe FAQ
Matcha is a finely ground green tea with a grassy, umami flavor, while hojicha is roasted, giving it a deep, nutty, and caramel-like taste.
Hojicha has a warm, toasty, slightly smoky flavor with subtle sweetness, making it a great pairing for desserts.
Yes! You can halve the recipe for a smaller batch or double it to share.
Substitute the egg for flaxafaba or your choice of vegan egg. You can use store bought dairy free butter or homemade vegan butter that browns.
Yes! The toasted milk powder gives a nutty rich flavour but you can use brown butter instead for extra nuttiness or to replace the milk powder. Add an additional tablespoon of flour if not using milk powder.
More Tea Cookies to Try
- Matcha Chocolate Chip Cookies (coming soon!)
- Matcha Latte Sandwich Cookies
- Matcha Ganache Sandwich Cookies

Enjoy! If you make this Hojicha White Chocolate Cookies recipe, I’d love to hear what you think! Leave a comment and rating below, and if you share it on social media, tag me on Instagram @Okonomikitchen. I can’t wait to see your creations!
Print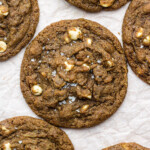
Hojicha White Chocolate Cookies
- Total Time: 40 minutes
- Yield: 14 cookies
- Diet: Vegetarian
Description
These Hojicha White Chocolate Cookies are rich, toasty, and perfectly chewy, with deep roasted tea flavors balanced by creamy white chocolate. Toasted milk powder adds extra nuttiness, making them even more flavorful. If you love hojicha or tea-based desserts, these are a must-bake!
Ingredients
- 1 cup (227 g) unsalted butter
- 2 tbsp (16 g) toasted milk powder or milk powder, optional
- 1/2 cup + 2 tbsp (125 g) light brown sugar
- 1/2 cup + 2 tbsp (125 g) granulated white sugar
- 2 tsp vanilla
- 1 large egg + 1 egg yolk
- 1 + 3/4 cup (225 g) all-purpose flour
- 1 tbsp (10 g) corn starch
- 2 tbsp (12 g) hojicha powder
- 3/4 tsp baking soda
- 1/4 tsp baking powder
- 1/2 tsp salt
- 2 bars (200-250 g) white chocolate, chopped or or 1 1/4 cup white chocolate chips
Instructions
- Prepare ingredients: In a bowl, whisk together the flour, cornstarch, hojicha powder, baking soda, baking powder, and salt and set aside. Chop the white chocolate bar. Sift through sieve (not fine mesh) to remove small shards of chocolate. You can skip this step but your cookies may spread a bit more.
- Toast the milk powder: Over medium heat, add the milk powder to a small pan and toast until golden. Stir frequently so it doesn’t burn. You can skip toasting it and using it as is if you prefer.
- Mix the wet ingredients: In a mixing bowl, whisk together the melted butter, brown sugar, and granulated sugar until well combined. Add in the vanilla, egg, and egg yolk, then whisk until the mixture becomes slightly lighter in color.
- Combine the dry ingredients: Gradually add the prepared dry ingredients to the wet ingredients, folding with a rubber spatula. Just before fully mixed, add the chopped white chocolate and fold until incorporated.
- Chill the dough: Use a cookie scoop (70 g for 14 cookies or 60 g for 16 cookies) to portion the dough. Press extra white chocolate pieces on top if desired. Place on a plate, cover, and refrigerate overnight.
- Bake the cookies: Preheat the oven to 350°F (175°C). Arrange chilled cookie dough balls on a lined baking sheet, spacing them apart. Bake for 12-14 minutes, or until the edges are golden and the centre is pale but set. Let cool on the baking sheet before transferring to a wire rack.
- Prep Time: 15 minutes
- Cook Time: 25 minutes
- Category: Dessert
- Method: Baking
- Cuisine: Japanese
Nutrition
- Serving Size: 1 serving
- Calories: 355
- Sugar: 29.1 g
- Sodium: 186 mg
- Fat: 19.9 g
- Saturated Fat: 12.1 g
- Unsaturated Fat: 7.3 g
- Trans Fat: 0.5 g
- Carbohydrates: 41 g
- Fiber: 0
- Protein: 3.9 g
- Cholesterol: 61.6 mg
Okonomi Kitchen is a participant in the Amazon Services LLC Associates Program. When you purchase something through my amazon affiliate links, I earn a small commission that helps me produce consistent content at no cost to you. Thank you for your support!


Hi! Can I swap the all purpose flour for cake flour?
you can but they will be softer!
These are OUTSTANDING!! I discovered hojicha during my travels in Japan earlier this year and I knew I had to experiment with it in baking! I couldn’t see where to add the toasted milk powder in the recipe instructions, so I did that first and let it cool before whisking it with the dry ingredients. I also made them smaller as is my preference, ~40g balls which made 24 cookies and took 12 mins in the oven. Crispy edges and soft centres, just how I like them! Thank you for this recipe!