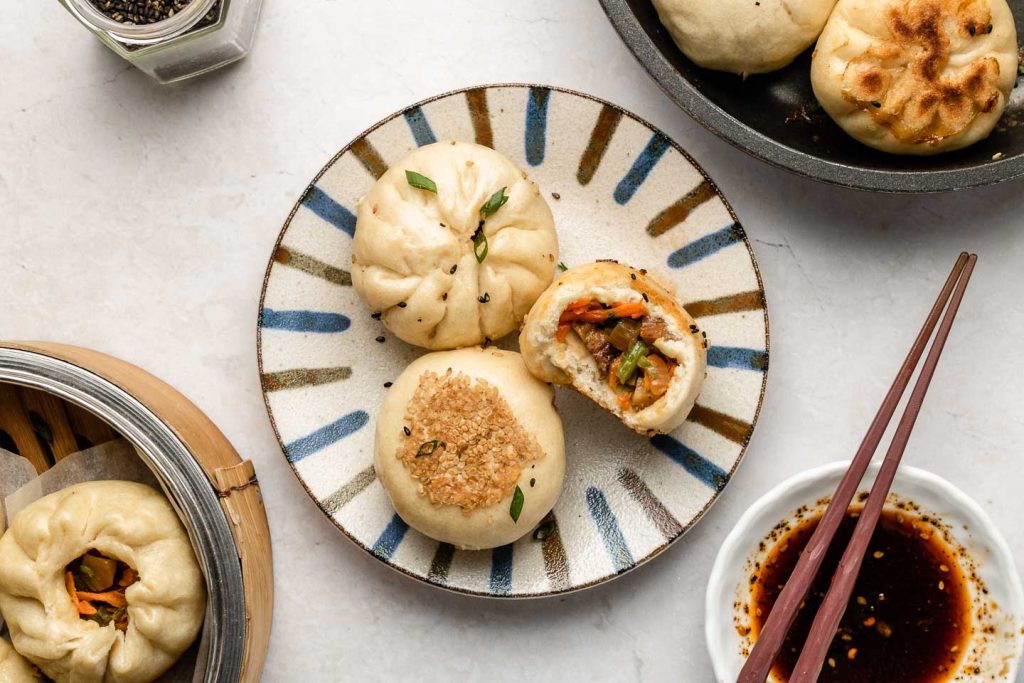
Fluffy stuffed bao buns made without yeast for a quick and easy snack or meal! Stuff with your favourite fillings and steam or pan fry them.
If you recreate this Yeast Free Stuffed Bao Buns recipe let me know how you liked it by leaving a comment and rating below or by tagging me on Instagram @Okonomikitchen, I love seeing all of your tasty recreations!
Hungry for more? Be sure to subscribe to my newsletter and follow along on Instagram, Youtube and Pinterest for more deliciousness!

Yeast Free Stuffed Buns
Ingredients
- 250g bao or cake flour* (about 1 1/2 cup + 3.5 tbsp)
- 1 tbsp baking powder (14g)
- 1-2 tbsp sugar, optional 28g
- 1/4 tsp salt
- 2 tbsp neutral oil (30ml)
- 125ml-140 oat milk (start with lesser amount, I use exactly 128ml)
- Filling of choice
Instructions
Bao Dough
- Stand mix: Add bao flour, baking powder, sugar and salt into the bowl of the electric mixer. Start on low speed and then add in the lesser amount of oat milk and oil. Bring to medium speed (setting 4) and let it run until the dough comes together. You may need to stop to scrape the sides of the bowl and knead with your hands a few times to bring it together. If It seems dry even after kneading with your hands, add remaining amount of liquid (and 1 tsp at a time more, as needed). The dough should be mostly smooth, moist but not too sticky where you can’t handle the dough. Cover and rest the dough for 15 minutes. In the meantime, prepare your filling.
- Hands & Bowl: Whisk the dry ingredients together in a bowl. While mixing with chopsticks, pour in the oat milk and oil. Keep mixing until the water is mixed into the flour and then switch to your hands. Knead the dough until mostly smooth. If the dough seems dry after kneading with your hands for a few minutes, add remaining liquid (1 tsp at a time more as needed). The dough should be stretchy, moist and sticky, but not too wet that it sticks to your hands. Cover and rest the dough for 15 minutes. In the meantime, prepare your filling.
Rolling, rilling & pleating
- Place the dough on to your work surface and divide it into 10 pieces (depending on size). Work with one at a time, covering the other ones with a damp kitchen cloth to to prevent them from drying.
- Flatten the dough with the palm of your hands and roll into a 4 – 4 1/2 inch circle, aiming to keep the middle thicker and the outside thinner.
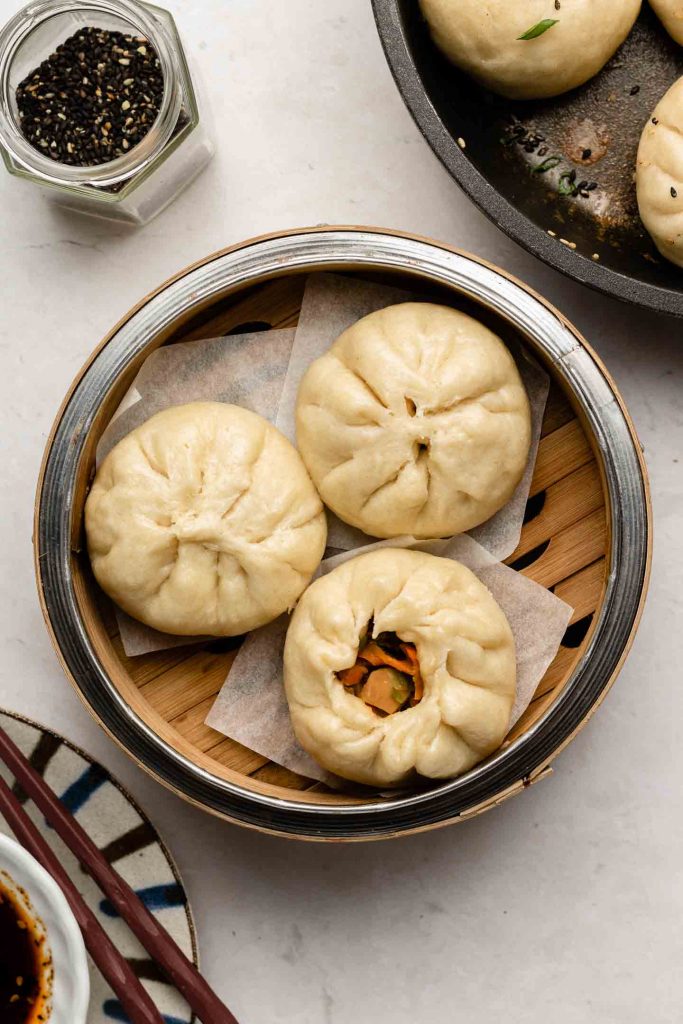
- Place the dough on your hands, add some filling (about 1 heaping tbsp) and pleat to cover the filling. Place on a small piece of parchment paper and then into the bamboo steamer basket or tray.
Cooking
- TO STEAM: Steam for 10 minutes over medium high heat. Turn off and remove it away from the heat. Let it sit for 3-5 minutes and then remove the lid. Serve and enjoy immediately.
- TO PAN FRY: Heat pan with oil over medium heat. While waiting, lightly wet the bottom of the buns and dip into sesame seeds. Add the buns to the pan and cook until the bottom is golden and crispy. Add hot water into the pan, covering just about 1/3 of the height of the buns and quickly cover with a lid. The water should be at a rumbling simmer– cook for 8-10 minutes or until the water is mostly evaporated. Remove the lid, sprinkle on sesame seeds and scallions. Serve and enjoy with your favourite dipping sauce.
Notes
- If using all purpose flour, use 200g all purpose flour plus 50g corn starch
- Helpful Equipment:
- Nutritional Information Disclaimer: Nutrition information is a rough estimate calculated on an online tool (Cronometer).
SAVE IT FOR LATER! ↓
Okonomi Kitchen is a participant in the Amazon Services LLC Associates Program. When you purchase something through my amazon affiliate links, I earn a small commission that helps me produce consistent content at no cost to you. Thank you for supporting my plant based kitchen!


First time making steamed Bao buns. Used this recipe for the dough and the filling from the curry pan fried buns. Turned out great 😊
Today, I went to the beach front with my kids. I found a sea
shell and gave it to my 4 year old daughter and said “You can hear the ocean if you put this to your ear.”
She put the shell to her ear and screamed. There was a hermit crab inside and it pinched her ear.
She never wants to go back! LoL I know this is totally off topic but I had to
tell someone!
Can you tell if you know the way to make buns white? Folllowing your recipe my buns turned out to be yellowish…
This is so easy to make and delicious, thank you nom nom nom
So glad you enjoyed, Patricia! 🙂