
Yaki Onigiri (焼きおにぎり) are Japanese grilled rice balls coated in a sweet & savoury soy sauce with a crispy smoky crust on the outside. Learn how to make this popular Japanese dish easily at home. They’re freezer friendly, portable and great for packed lunches too!

Today I’m finally getting around to sharing my absolute favourite variation of Japanese rice balls: Yaki Onigiri!
Yaki onigiri is one of the most popular food items in Japan. You’ll see them everywhere: convenient stores, department stores, little pop up shops on the street, carts, at izakayas and many other restaurants.
What is Yaki Onigiri?
Directly translating: yaki (焼き) = grilled & onigiri (おにぎり) = rice ball, so you get grilled rice ball. They have a crispy outside that is almost burnt giving it a ton of flavour and on the inside, you have fluffy soft rice that is typically flavoured with a soy sauce based sauce.
These simple grilled rice balls have a special place in my heart. My mom would make them regularly for lunch and pack them in our bento boxes every Saturday for Japanese school. And during the summer when we were in Japan, we would stop by our favourite store right outside of our apartment that made the most delicious smoky Yaki Onigiri.

Sauce for Yaki Onigiri
The most common sauces used for Yaki Onigiri is simple soy sauce or miso, which is what you’ll also find in convinient stores in Japan. Each household and recipe has their own spin to it by adding in mirin, sake, dashi and sugar. My mom would often switch it up by using terriyaki sauce, unagi sauce or mentsuyu too because they tend to be sweeter which we loved as kids.
How to Make Yaki Onigiri + Tips
Yaki Onigiri in Japan
Traditionally, Yaki Onigiri is grilled over charcoal outside, giving it its distinct smoky-grilled flavour. At home in Japan, my mom used to use a mini kitchen safe grill that also worked wonderfully. I haven’t yet gotten my hands on one for my home in Canada so we’ve been making it on the stove because setting up our large BBQ grill can sometimes be a hassle. Although you don’t get that smoky flavour to the rice balls, you’ll still be able to achieve a similar crispiness. If you do have access to a grill, I highly encourage you to use it!
How to Make it Home
It starts with Japanese short grain rice. I highly recommend using a Japanese rice cooker as it produces the most consistent results and perfect rice for onigiri.
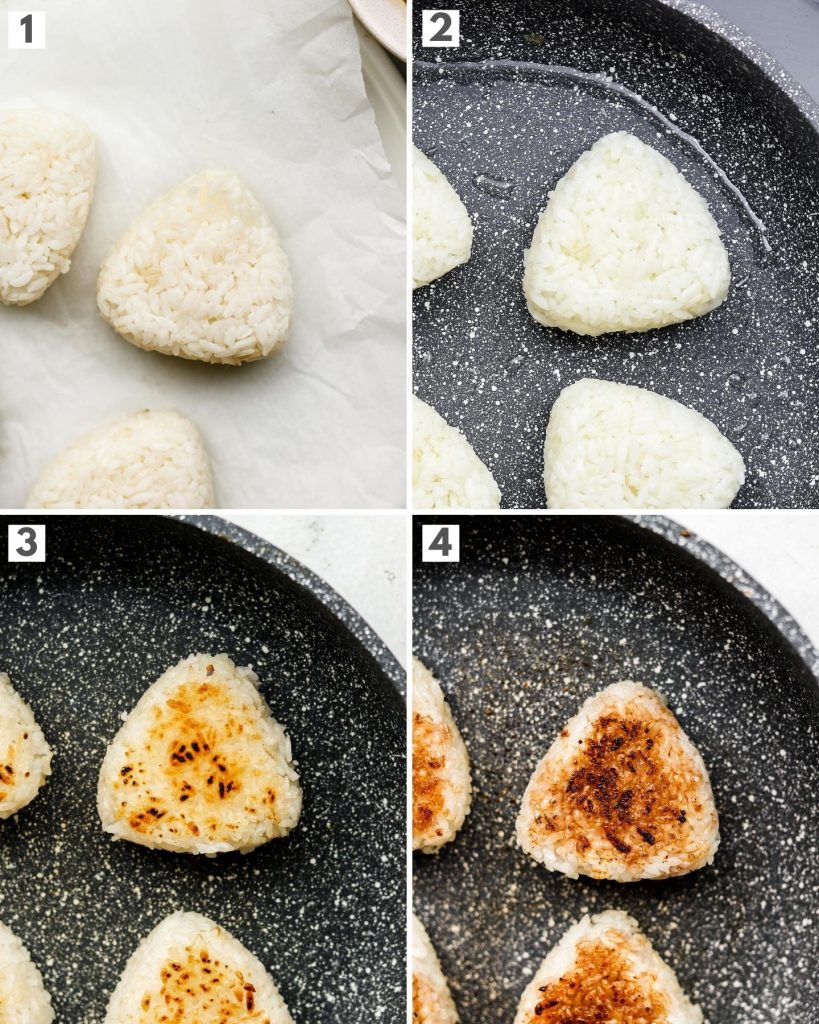
Forming the rice balls, is the most intimidating part for most people but with practice, you’ll be able to form the rice balls quite easily and quickly. The trick is to rub your hands with vinegar and salt so they don’t stick to your hands. Be sure to firmly press the rice without actually squishing the grains. I’ve shared how to make onigiri step by step both from scratch and using molds in my Ultimate Guide to Onigiri.
Once you’ve completed making your rice balls, all there left to do is grill both sides , brush with the sauce and grill one last time to let it crisp up.
Because the sauces contain sugar, it tends to burn very quickly. Each side only needs seconds to crisp up so don’t leave them unattended. If using only soy sauce, you won’t run into this problem as much.
Moms tip: If using a non non-stick pan or an older pan, she recommends placing parchment paper between the rice ball and the pan. We do this with Japanese Pancakes too, to prevent them from burning. This way, the sugars are less likely to over burn.

Yaki Onigiri is best served fresh but can also be made ahead of time and be placed in the freezer for meal prep. To freeze, wrap each onigiri with cling wrap or reusable wrap. Then place them into a freezer safe bag, removing all the air inside before sealing.
When ready to serve or pack, reheat the onigiri in the microwave for 30-50 seconds until warm. Do not let them thaw in the fridge or room temperature as that causes the rice balls to turn gritty, hard and in-edible. With freezing, you do lose the crispiness but the flavour is still bold and delicious.

Pair onigiri with…
- Vegan Gyoza
- Miso Soup
- Corn Soup
- & these are a great addition to bentos and packed lunches too!
I hope you try and enjoy making and eating Yaki Onigiri as much as my family and I do!

If you recreate this Yaki Onigiri recipe let me know how you liked it by leaving a comment and rating below or by tagging me on Instagram @Okonomikitchen, I love seeing all of your tasty recreations!
Hungry for more? Be sure to subscribe to my newsletter and follow along on Instagram, Youtube and Pinterest for more deliciousness!

Yaki Onigiri (Grilled Rice Balls)
- Total Time: 0 hours
- Yield: 4 onigiri
Description
Yaki Onigiri made with Japanese white rice, coated in a sweet-savory soy sauce and grilled until crispy. These Japanese grilled rice balls are great for lunches, snacking and are freezer friendly too!
Ingredients
Rice Balls
- 1 1/2 cooked Japanese short grain rice (320g)
- 4–5 tbsp soy sauce, mentsuyu or Vegan Japanese Unagi sauce (see notes below for a quick sauce recipe)
Instructions
- Allow the cooked rice to cool down to a point where you can handle it with your hands. Be sure not to let it completely cool. Cover the rice cooker bowl with a damp towel as you work to prevent the rice from drying out.
- Wet your hands with water and rub vinegar between your hands. Dip our pointer finger into some salt and rub between your hands, this will help prevent the rice from sticking to your hands. Take about 1/4 heaping cup of rice and shape into a onigiri, either a circle or triangle shape. See my guide to making onigiri for in depth instructions. You can also use a onigiri mold.
- Lightly oil a pan over medium heat. Grill each side until golden brown, about 2-3 minutes. Flip them once to prevent the onigiri from breaking. You can also grill the 3 sides of the onigiri if making triangle shaped onigiri.
- Bring the heat to a medium low and generously brush with the sauce. Flip and brush the other side with sauce while the previous side cooks (takes around 15-20 seconds, be sure to not let it burn). Flip once more to grill the other side. Remove from the pan, serve and enjoy!
Notes
- Yaki Onigiri Sauce: In a sauce pan over medium heat add 1 tbsp + 2 tsp mirin, 1 tbsp + 1 tsp sugar, 2 tbsp soy sauce, 2 tsp sake (optional or add more mirin), and 1/4 tsp kombu dashi powder (optional but adds flavour). Whisk until mixture comes to a boil. Once it begins to boil, reduce the heat to low and simmer for 5-8 minutes. Remove from heat and allow it to cool completely.
- Gluten Free: Use gluten free soy sauce or tamari.
- Helpful Equipment: onigiri mold, Japanese rice cooker, basting brush
- Nutritional Information Disclaimer: Nutrition information is a rough estimate calculated on an online tool (Cronometer).
- Prep Time: 10 minuntes
- Cook Time: 5 minutes
- Category: Entree
- Method: Stove Top
- Cuisine: gluten free, Japanese, Vegan
Nutrition
- Serving Size: 1 onigiri
- Calories: 124
- Sugar: 2.7g
- Sodium: 693mg
- Fat: 1.9g
- Saturated Fat: 0.3g
- Unsaturated Fat: 1.5g
- Trans Fat: 0
- Carbohydrates: 23.1g
- Fiber: 1.3g
- Protein: 3.2g
- Cholesterol: 0
SAVE IT FOR LATER! ↓

Okonomi Kitchen is a participant in the Amazon Services LLC Associates Program. When you purchase something through my amazon affiliate links, I earn a small commission that helps me produce consistent content at no cost to you. Thank you for supporting my plant based kitchen!


These used to be my favorite when living in Japan, so I was super happy that I found this recipe. Incredibly easy to make, incredibly yummy in taste!
I made this with homemade kimchi, inside it was so good !
so delicious, I love the texture of grilled rice so much so this was an automatic win for me!
Delicious! Even better than the ones from Lawson that I used to get as a kid. Also Lisa was so sweet, I sent her a picture of some of her other stuff I made and she was so encouraging and sweet about it. Great blog. Great host. Can’t wait to see what else she makes!
These were so good and so much fun to make! The recipe makes four which is perfect for two because trust me, you will want seconds. I actually stuffed mine with kimchi, which I would recommend! Definitely making again!
these are so good! I never fried my onigiri in a pan before and it adds such a nice hearty touch, with the sweet soy sauce/mirin,.. glaze! Will definitely be making these more often, as they are very easy and just taste so so good! Probably my new go to snack ♥️