
This Ultimate Guide covers How to Make Onigiri from start to finish. You’ll learn a variety of ways to season and fill them, and different ways of shaping and wrapping them perfectly every time! Plus, helpful tips and tricks to choosing the best ingredients and storing these Japanese Rice Balls.

Hi Friends! I’m super excited to finally be sharing this How to Make Onigiri Guide. I was inspired by my trip to Japan earlier this summer and have been working on it ever since. I wanted to make a comprehensive guide on making homemade Onigiri that ANYONE can make! Onigiri has been a staple in my household ever since I started eating rice (so like… 20+ years!). This staple Japanese food holds a special place in my heart because I used to make it with my grandma the morning of my flight back home to Canada- mainly to keep me busy from crying because I didn’t want to leave. Without further ado, lets get started!

What is Onigiri?
Onigiri, also called O-musubi or Nigirimeshi are Japanese Rice Balls that are hand shaped into round balls or triangles and usually wrapped in nori (seaweed). Back in the day when there was no such thing as refrigeration, the Japanese came up with a way to preserve rice by adding salt and pickled ingredients. Adding these ingredients helped keep rice fresh for longer. That’s why the most traditional onigiri’s are seasoned and filled with just salt, salted ingredients, furikake (Japanese rice seasoning with salt) and pickled ingredients like Umeboshi (pickled plum).
Onigiri has become one of the most popular convenience foods- for obvious reasons. They’re portable, stay fresh throughout the day, have so many different fillings and flavours and you can find them EVERYWHERE.
Okay so now that we know what Onigiri is, let’s tackle how to make them!
Ingredients

What Rice To Use for Onigiri?
First and foremost, the most important ingredient in Onigiri is the rice. I mean, there is no Onigiri without the rice. But it’s important to purchase and use the right kind of rice. You want to use Japanese Short Grain Rice or “Koshihikari” rice. I usually will try to give substitutions, but in this case this ingredient is a must. Other varieties of rice just won’t work here, either because the flavour is off or because they won’t stick together. IF YOU MUST find a substitute, you could try Korean Short Grain Rice BUT it is slightly different in flavour and texture.

Onigiri Seasonings (Furikake or ふりかけ)
One way to flavour Japanese rice balls is by adding some Furikake, which is a rice seasoning mix that usually contains salt, sea weed, sesame seeds, spices and sometimes dried fish or egg. Of course, there are vegan options that just contains dried vegetables. The photographed below are my two personal favourites! The green packaged furikake is vegetable based. The purple one is called Yukari Shiso which is dried red shiso leaves. If you’ve never tried Yukari Shiso before, it has a sweet, sour and tangle flavour to it. You can find these Japanese rice seasoning mixes on Amazon, Japanese/Asian grocery stores or even some local supermarkets! You can also pretty easily make your own furikake at home.
Onigiri Fillings
There are so many things you can fill your onigiri with! Here are some of the most common fish-based fillings you’ll find in Japan:
- tuna mayo
- okaka (bonito fish flakes)
- sha-ke (salted grilled salmon)
- mentaiko (salted spicy pollock roe)
- tarako (salted cod roe)

Here are some common VEGAN Onigiri options you’ll find just about anywhere:
- kombu (salted seaweed)
- natto (fermented soy beans)
- umeboshi (pickled plums)
- and other various pickled vegetables
People in Japan have used leftovers as fillings which if why you may also see Onigiri stuffed with ground beef, fried chicken, tempura, hard boiled eggs, BBQ eel and other Japanese side dishes. In recent years, as Japanese rice balls have expanded over to western countries, I’ve seen them stuffed with just about anything that goes with rice!

Other Onigiri Variations
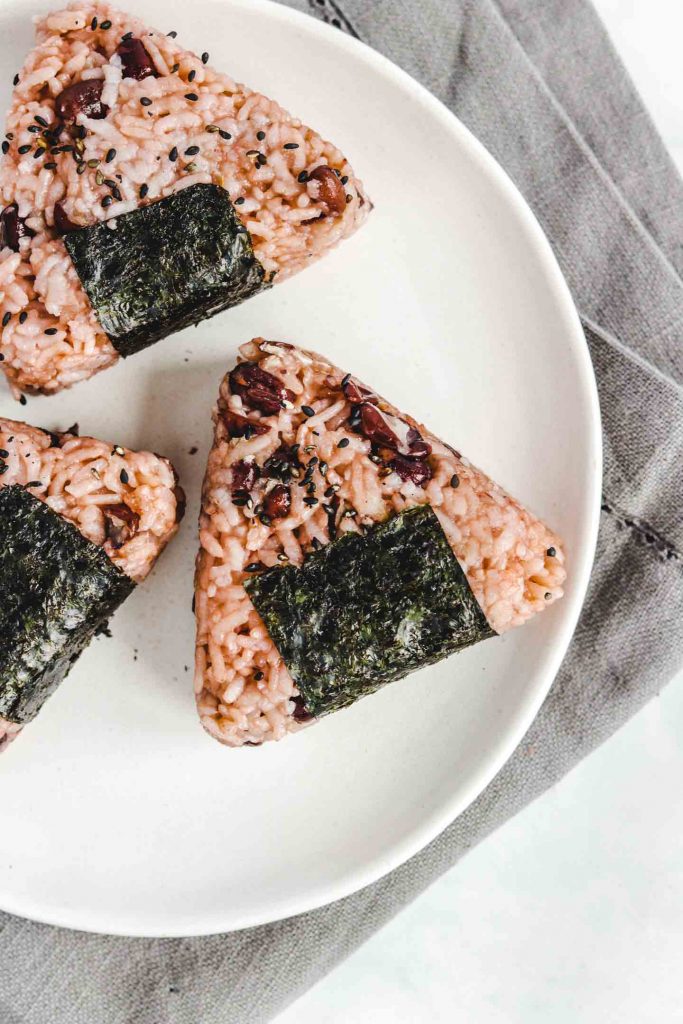
Yup, there are even more ways to make and flavour Japanese rice balls. You can use Takikomi Gohan and other kind of Japanese mixed rices and form them into Onigiri. My personal favourite is using Sekihan (Japanese Adzuki Red Bean Rice) and Edamame mixed rice! And I saved my absolute favourite variation for last: Yaki Onigiri (Grilled Japanese Rice Ball). It’s SO good: sweet, salty and crispy on the outside and tender on the inside (I’m totally going to have to make a recipe for this classic favourite, stay tuned ;)) Plus, majority of these Onigiri variations are Vegan!
Onigiri vs. Onigirazu
Recently Onigirazu has been poppin! The concept is quite simple, it’s basically a hybrid between a Japanese rice ball and a sandwich. The rice acts as the bread and is filled with less traditional Japanese ingredients like egg salad, BLT, katsu (cutlets) and more. In appearance, the Onigirazu is wrapped with sea weed into a flat square shape. When cut inside, it looks basically like a sandwich!

Onigiri Shapes & Sizes
How Big Should Onigiri Be?
Japanese rice balls can be made into any size. You can make them as big or as small as you like. For reference, convenient store Onigiri uses around 3/4 cup of cooked rice. When making them with my hands, I use around 1/2 cup of rice. The mold I used in the photos uses around 1/3 – 1/2 cup of rice per rice ball. The larger triangle mold holds around 1/2 cup of cooked rice.
Triangle Shaped
This is the most common and iconic shape of onigiri, the one you will find at any convenient store. When using your hands to make a triangle shape, it definitely is the most challenging out of the bunch and tends to come out a rounder than if you were to use a triangular rice ball mold. Your hands have to be in a “c” position and squeeze the rice as you rotate the rice ball.
Round Shaped
This is the easier version of making triangle shaped onigiri. Simply just roll the rice into a ball between the palm of your hands. Because it’s so easy, I haven’t seen a round onigiri mold. You can either keep it completely round or flatten it like the ones commonly seen at convenient stores.
Cylinder Shaped
This shape is made similar to the round shape, except by squeezing the sides a bit more into a cylinder shape. These tend to be smaller in size and use around 1/4 cup of rice- usually plain white rice with seaweed or mixed rice.

How to Make Perfect Onigiri?
Onigiri is REALLY easy to make. Simply put it’s just taking some cooked rice, and gently squeezing the rice between your hands together. Now, depending on the variation there are some additional steps.
The Basics
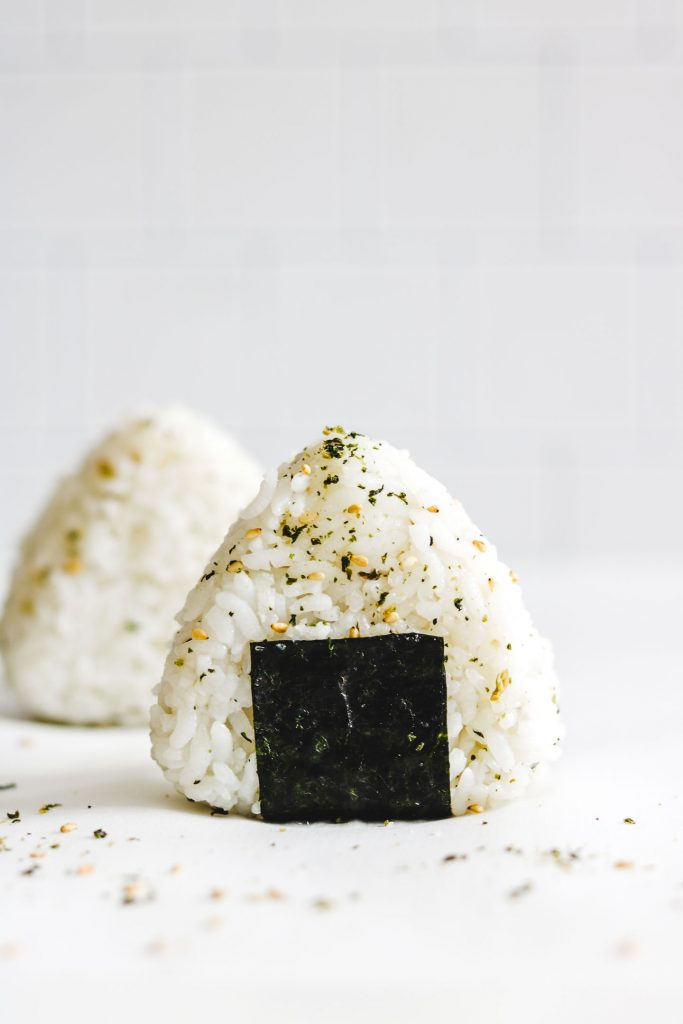
For every Onigiri, I highly recommend having a bowl of water and salt at your work station. When working with rice, it’s important to keep your hands moist so that the water doesn’t stick to your hands. Adding salt to your hands will help the Onigiri last longer and add additional flavour. Once your hands are wet, dip your pointer and middle finger into salt and rub the salt between your hands. Grab some rice and gently press between your hands until a triangle or ball shape forms. The pressure should be just enough to form a ball but try not to squish the actual grains of rice to maintain texture. From here you can wrap your completed rice ball with nori (roasted seaweed) or eat as is.
If you’re a video-visual learner, here’s an awesome video that shows you how to move your hands as you make onigiri.
Furikake Seasoned Onigiri
Take some rice and add in some furkake seasoning. Mix together and then form them into rice balls. It’s just as simple as making plain salted rice balls with just an extra step! I usually just eyeball the amount of furikake but it’s around 1 cup of cooked rice + 1/2 tsp furikake.
Filled Onigiri
Filled Onigiri takes just a bit more technique to make but still very easy to do especially once you get the hang of it. Once you have some rice in your hands, use your pointer finger and middle finger to make a small indentation in the center. Add in around 1/2-1 tbsp of filling where the indentation is and gently press it in. Mold the rice between your palms by gently pressing it together until a triangular or round shape forms.
Mixed Rice Onigiri
The steps to making Mixed Rice Onigiri is exactly the same as making a simple salted onigiri rice ball- but with the mixed rice instead. Try using Takikomi Gohan or Sekihan!
Yaki Onigiri
Yaki Onigiri just has an additional step after making a simple salted rice ball. Brush a bit of oil onto a skillet and allow the outside to brown until nice and crispy. Brush with a bit of sweet soy sauce or teriyaki sauce.
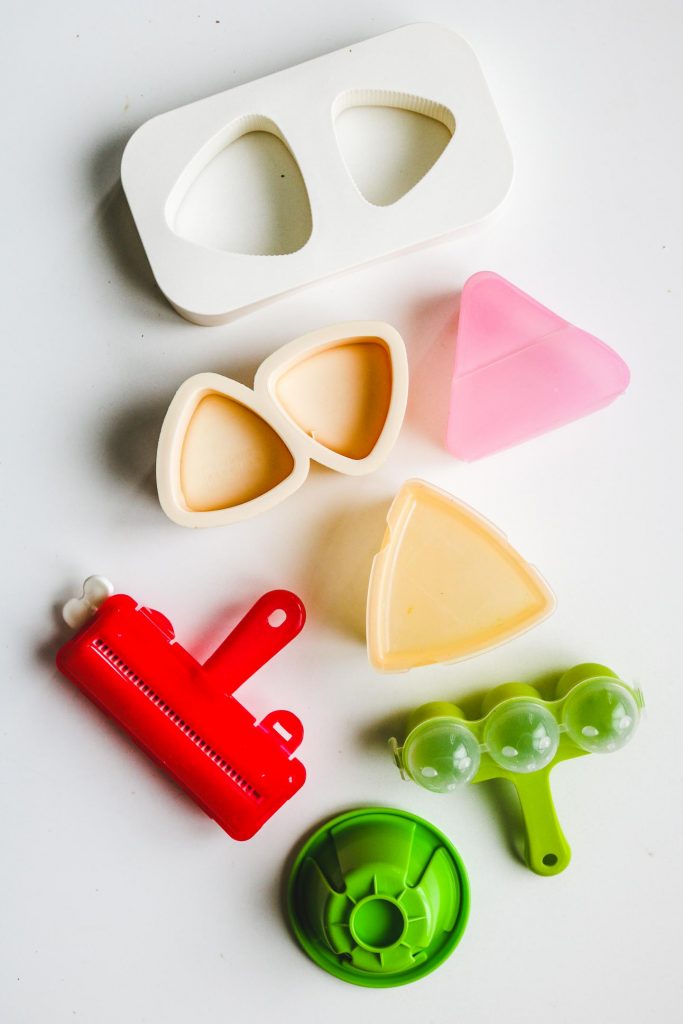
Onigiri Molds & Accessories
There are so many accessories to make Japanese Rice Balls! I’ve collected quite a few over the years and really do think they can be helpful- especially for those of you making Onigiri for the first time. The main accessory is Onigiri Molds that come in a couple different shapes and sizes. The Double Onigiri Mold I used in the photographs below is my favourite shape. Triangular but slightly rounded and the perfect size to place in bentos. The pink and beige single Larger Triangular Mold is made from silicon, around the size of the ones you find at convenient stores. It’s awesome for on-the-go eating. The Green Mold with the handle makes three small cylinder rice balls. And the round green mold makes onigiri shaped in cupcakes! There are also Nori rollers that pokes holes in the seaweed to make them easier for wrapping.
Onigiri Rice Balls: for Beginners
So I’ve went over the basics and important details on how to make really good Japanese rice balls, but I wanted to really highlight in this blog post an even easier way to make them (especially if you’re first starting out). Hand made Onigiri holds a special place in my heart but for convenience purposes I think Onigiri Molds are the PLUG! Plus, there are not a lot of visual tutorials on how to use them (well I guess because they’re easy and self explanatory?), but let me just show you HOW easy.

Step 1: Cook your rice. I used 3 (rice cooker) cups of short grain rice and added water until the 3 mark line. I highly recommend using a Japanese Rice Cooker to making quality short grain rice.

Set up your work station. TIP: keep a damp cloth over your cooked rice to keep it fresh.

Step 2: Set up your work station and have a bowl of water and salt on hand. Line up your filling & seasoning ingredients. For the Umeboshi filled rice ball, wet your hands and dab your two fingers into the salt. Rub between your hands and then scoop out some white rice (around 1/4 cup).

Step 3: Add one small (or half a large) umeboshi (or any other filling, around 1/2 – 1tbsp) in the centre and then cover it with more rice.

Step 4: Place the lid on top and gently press down. Shake the Onigiri out of the mold and place on a tray with a damp cloth over it.

If using furikake, before wetting your hands scoop some rice out and mix in some furikake. I usually just eyeball it but it’s around 1 cup of rice + 1 tsp furikake.

Fill the molds with around 1/2 cup of the rice, cover with the lid and gently press. That’s it! SO EASY RIGHT?!
How to Wrap Rice Balls with Seaweed
You can totally skip this step and just eat the rice ball as is (I usually do this for the furikake rice balls) but the roasted seaweed does add a nice crunch. There are a couple of ways to wrap rice balls with seaweed. The most iconic looking one is the one with a strip of seaweed going front to back. Simiarily, you can use a thicker piece of seaweed and wrap it front to back and cover the entire rice ball. Then we have one that is wrapped kind of like how you would wrap yourself in a blanket. Another is a strip of seaweed going around the outside of the rice ball.

How to Store Onigiri
These rice balls are one of those things that just taste better freshly made BUT I do have a couple tips to keeping Onigiri fresh.
Refrigeration: Onigiri tends to dry out/get a little hard because the fridge is too cold. So when going to university, my mom taught me this neat trick of wrapping the onigiri in plastic wrap or storing them in stacher bags and then wrapping them in kitchen towels to prevent them from getting TOO cold. If you have a cool room or basement area, you can also store them there but if you’re on the fence about it defiantly just place them into the fridge with towel around it.
Freezer: Place the individually wrapped rice balls on a tray and freeze. Then you can transfer them into a larger bag. They’ll last in the freezer for up to 3-4 weeks! To re-heat, just take as many as you want out of the freezer and nuke them in a microwave safe container for 1-2 minutes (or until nice and warm again). If you don’t have a microwave safe container, just place a damp paper towel over the rice ball and nuke until warm.

Onigiri for Bento
Have you ever seen those bentos packed with cute little rice balls? Ever wondered how they make them? Well you can- and very easily. Just an example of cute Onigiri balls (photo above), it took me less than 1 minute to make. I just used this Onigiri shaker maker to form small balls and then used Smiley Face Nori Seaweed Cutters and stuck those in with some tweezers. You can find cute bento accessories and cutters with face on them at any dollar store in Japan (DAISO).
Tips & Tricks to Making Onigiri
- Use FRESH Hot Japanese Short Grain Rice – using old, cooled or dried out rice makes it really hard for the rice grains to stick together.
- Cover Your Rice and Rice Balls with a Wet Towel – this prevents the rice from drying out. As you scoop out the rice, cover the bowl with a damp cloth. Cover your molded rice balls with a damp cloth as well until ready to wrap with seaweed or pack.
- Wet Your Hands – it’s much easier to work with rice with wet hands so it doesn’t stick to your hands but make sure not to make the rice too wet or it won’t stick together either.
- Use Salt – this helps not only preserve the rice ball for longer but also adds flavour to the rice.
- Wrap the Seaweed Before Eating – if making the rice balls for later, pack some nori in a separate bag/container and wrap before consuming (unless you like soggy seaweed).
- Hand Mold after using Onigiri Mold – My mom actually taught me this but after you make your rice balls using the mold (preferable the smaller round triangular one), wet and salt your hands and then place the rice ball on one palm of your hand. Curl your other and in a c-shape and then do the motion of making hand made Onigiri. This helps you get the feel of what it should be molded into.

Final Thoughts
There are so many ways to prepare and enjoy this simple Japanese dish. I really hope this Ultimate Onigiri Guide has left you inspired to making homemade Onigiri! It’s just as (if not more) delicious than the ones you buy at convenient stores/super markets. They really are the perfect portable meal or snack that you can fill or flavour with your favourite ingredients!

If you make any of these Onigiri / Japanese Rice Ball recipes let me know how you liked it by leaving a comment and rating below or by tagging me on Instagram @Okonomikitchen, I love seeing all of your tasty recreations!
Hungry for more? Be sure to subscribe to my newsletter and follow along on Instagram, Youtube and Pinterest for more deliciousness!
Print
How to Make Onigiri (Japanese Rice Balls) | Ultimate Guide
- Total Time: 55 minutes
- Yield: 10–12 Rice Balls 1x
Description
This Ultimate Guide covers How to Make Onigiri from start to finish. You’ll learn a variety of ways to season and fill them, and different ways of shaping and wrapping them perfectly every time! Plus, helpful tips and tricks to choosing the best ingredients and storing these Japanese Rice Balls.
Ingredients
- 3 rice cooker cups Japanese Short Grain Rice (appox. 450g)
- Roasted Sea Weed/Nori Sheets
- Salt
- 1–2 tsp Yukari Shiso
- 1–2 tsp Vegan Vegetable Furikake
- Umeboshi (Japanese pickled plums)
- Other pickled Vegetables or filling of your choice
Instructions
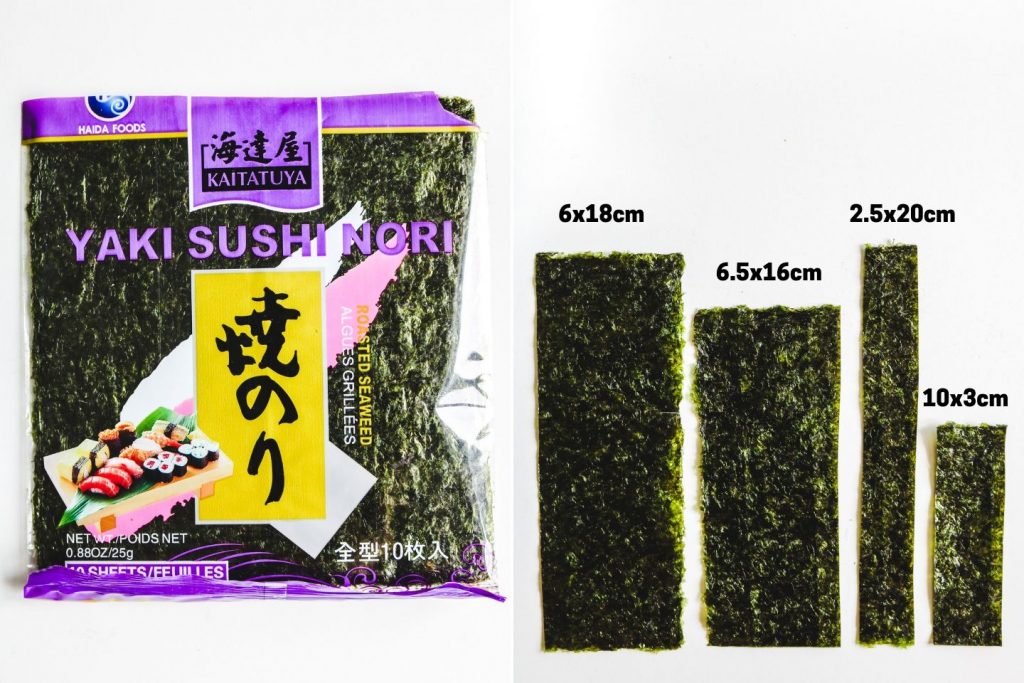
- First rinse 3 cups of short grain rice and then add it into the rice cooker. Fill with water until the 3 mark line* and allow the rice to cook. In the meantime, cut up some nori sheets (refer to information and photos above).
- Once the rice is finished cooking, let it rest for 5-10 minutes in the rice cooker. In the meantime, set up your work station. You should have a small bowl of salt, water, furikake and your fillings ready to be used. As well, keep a tray or container close by to place your finished rice balls on.
- Open the rice cooker than gently mix the rice and cover with a damp cloth. Bring it over to your work station.
ONIGIRI MOLD METHOD
- Filled Onigiri: Place some rice into a medium size bowl and sprinkle some salt over. Mix with the rice paddle. Place a small scoop of rice (just enough to fill the bottom part of the mold) and gently press it in. Make a small indent in the middle and place 1 umeboshi (or 1/2-1 tbsp of some kind of filling) in the indent. Cover with more rice until 3/4 of the way full and then place the lid on top. Gently press down until it’s formed into a rice ball. Lightly wet your hands and dab your pointer finger and middle finger in the salt and rub between your hands. Place the rice ball between your hands and cup it (like if you were to hand-mold the onigiri). This just ensures the rice ball is salted throughout for preserving longer. Place onto a tray or container and cover with a damp cloth. Repeat until you make as many as you desire.
- Seasoned Onigiri: Place some rice into a medium size bowl and sprinkle some Furikake or Yukari Shiso in. Mix with the rice paddle. Place a scoop of rice until 3/4 of the way full and then place the lid on top. Gently press down until it’s formed into a rice ball. Lightly wet your hands and dab your pointer finger in the salt and rub between your hands. Place the rice ball between your hands and cup it (like if you were to hand-mold the onigiri). Place onto a tray or container and cover with a damp cloth. Repeat until you make as many as you desire.
ONIGIRI HAND MADE METHOD
- Filled Onigiri: Place some rice into a medium size bowl and sprinkle some salt over. Mix with the rice paddle. Wet your hands and dab your pointer finger and middle finger in the salt, rub between your hands. Place a scoop of rice in the middle of your hand (around 1/3 – 1/2 cup) and gently press it in your palm. Make a small indent in the middle and add 1 pitted umeboshi or 1/2-1 tbsp of filling. With the hand holding the rice ball, curl your hand more and slowly cover the filling with rice from the side. Shape it into a ball or rounded triangle by gently pressing between your two hands. Place onto a tray or container and cover with a damp cloth. Repeat until you make as many as you desire.
- Seasoned Onigiri: Place some rice into a medium size bowl and sprinkle some Furikake or Yukari Shiso in. Mix with the rice paddle. Wet your hands and dab your pointer finger and middle finger in the salt, rub between your hands. Place a scoop of rice (around 1/3 – 1/2 cup) on to your hand and shape into a ball or rounded triangle. Place onto a tray or container and cover with a damp cloth. Repeat until you make as many as you desire.
Wrapping Onigiri with Roasted Seaweed
- If eating immediately, wrap your rice balls with the roasted cut up nori sheets and serve.
- If eating later, wrap your onigiri with some cling wrap or place in a bento box. Place the nori in a separate container to keep them crisp. Wrap the rice balls before eating.
Notes
- If you don’t own a Japanese rice cooker, cook your rice how you usually would with the ratio of 1 cup of rice (250g) to 1 1/4 cup of water (312ml). So if you use 2 cups of rice (500g), then add 3 cups (624ml) of water.
Nutritional Information Disclaimer: Nutrition information is a rough estimate calculated on an online tool (Cronometer), based on 1 out of 12 regular salted Onigiri Ball
- Prep Time: 30 minutes
- Cook Time: 25 minutes
- Category: Entree
- Method: Rice Cooker
- Cuisine: Japanese
Nutrition
- Serving Size: 1 Rice Ball
- Calories: 154
- Sugar: 0
- Sodium: 388mg
- Fat: 0.3
- Saturated Fat: 0.1
- Unsaturated Fat: 0.2
- Trans Fat: 0
- Carbohydrates: 33.4
- Fiber: 0.4
- Protein: 3.2
- Cholesterol: 0
SAVE IT FOR LATER! ↓

Okonomi Kitchen is a participant in the Amazon Services LLC Associates Program. When you purchase something through my amazon affiliate links, I earn a small commission that helps me produce consistent content at no cost to you. Thank you for supporting my plant based kitchen!


I love Onigiri!!! I even created a world made of Onigiris – https://myonigiri.com/onigiri-world. Just sharing this to everyone, please provide your reviews.
I am ten years old and i made it for my brother & I and they were delicious! thank you so much!🙂👍🚟❤️
This is one of the most thorough and detailed explanations of making onigiri I’ve found, and is definitely a great resource. The one thing I was a little disappointed by was when you got to how to wrap them, there’s really no information on *how* to do the wrappings so that they actually look nice, etc, which I’ve found can be quite tricky (particularly when doing things like the “wrap a blanket” form). Some additional directions/suggestions there (what size/shape to make the nori, how to wrap it so that the ends aren’t too short/too long, and so on) would be helpful, I think.
Also, a bit of a nitpick, but I notice throughout the article you refer to “convenient stores”. A “convenient store” just indicates a store (of any type) which happens to be convenient (i.e. it’s nearby, or some such). However, I believe what you meant was a “convenience store” (i.e. a 7/11, コンビニ, etc), which is how it is phrased when one is talking about the particular type/style of store which is intended to be open late hours, sell “convenience items”, and is often known in Japan for selling onigiri and similar things..
I loved following this guide, so helpful and informative!
So tasty and easy! An amazing snack or light lunch on the go!