
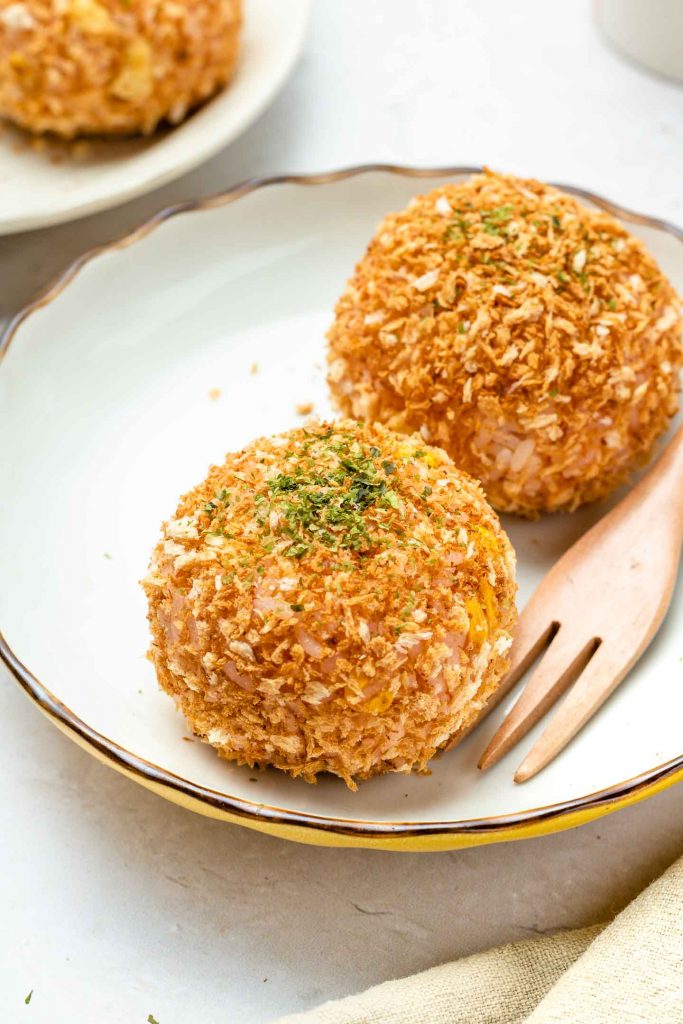
Delicious seasoned rice stuffed with cheese and coated in a golden panko exterior, Rice Croquettes (Rice Korokke) make for the perfect snack or appetizer. This rice croquette recipe doesn’t require deep frying so it’s much healthier and easier to make! (Vegan)
Have you tried Japanese Croquettes (Korokke // コロッケ) before? They’re one of my all time favourite hand held foods from Japan. I actually can’t believe I haven’t shared my grandma’s and mother’s Korokke recipe yet– they are TDF… but I promise to do so soon!
This Korokke recipe I’m sharing today is a little different. These are rice croquettes– so instead of creamy mashed potatoes they’re made with seasoned rice and coated with light crispy panko. My mother would often make these with leftover rice as a snack or side dish with different flavours and seasonings.
While nothing beats a deep fried korokke, she avoided deep frying as much as possible because of the mess, smell and for health reasons so these are actually toasted instead! While they do not have that ‘fried’ flavour to them, I promise they’re still incredibly delicious and satisfying. Plus, you’re not left with a oily mess or smell in the kitchen.

How to Make Rice Korokke
The Ingredients (+Substitutions)
All you need are 5 simple ingredients to make these addictive crispy rice balls:
- Panko: I highly recommend using Panko over breadcrumbs because it has a flakier texture, making it light and crunchy .
- Rice: Japanese short grain rice works best to hold the shape of the rice balls. Other types of rice tends to fall apart.
- Ketchup: for flavour.
- Corn: Can be omitted but adds a subtle sweetness and added texture.
- Vegan Cheese: I’ve used my own Vegan Melty Mozzarella Cheese, Daiya shreds and Follow Your Heart shreds– choose your favourite! If you don’t like cheese, you can completely omit it as well or stuff it with something else.

The Directions
These rice croquettes are incredibly easy and take under 15 minutes to make since there’s no baking or deep frying required.
- Toast panko: Toast the panko over medium low heat until golden brown and crispy (about 1 minute). Remove from heat and transfer to a rimmed tray or bowl.
- Season the rice: Add the cooked rice, ketchup, corn, salt and pepper to a bowl and mix to combine. Divide the rice into 4 portions.
- Mold and stuff: Using cling wrap, place one portion and flatten gently. Place desired amount of cheese in the middle and then twist the cling wrap to seal the rice ball. Pack firmly without over squishing the rice. Place on a plate and repeat for remaining 3 portions.
- Warm and roll: Cover with the same piece of cling wrap and then microwave the rice balls for 30 seconds, or until heated through. Roll in the toasted panko.
Serve these Rice Korokke immediately as they do tend to get soggy if they sit for too long.
Watch how to make it
Rice Korokke Variations
This rice korokke recipe is the most common and standard you might find people in Japan making. We love our ketchup seasoned food (ie. omurice, ketchup fried rice & ketchup spaghetti). To me, this is a nogtolgic flavour combination but to some it might sound..like a strange food combination?–– but don’t yuck it till you’ve tried it! The sweetness from the ketchup and savoriness from the cheese really balances it out but if you’re not a fan of the flavour of ketchup feel free to change it up! Here are some other variations & ideas:
- Kimchi flavoured rice
- Curried flavoured rice
- Cheesy miso flavoured rice
- Furikake seasoned rice
And as far as stuffing goes, I love a good vegan melted cheese pull but feel free to skip it! Play around with your favourites like vegan grounds, sausages and more.

What to Serve with Rice Croquettes
Rice Korokke can be served as a snack, appetizer or side dish! They’re the perfect hand held food for any occasion. Here are some other suggestions to pair these with for a complete meal:
- Miso Soup
- Cold Tofu with Spicy Chili Sauce
- Soy Butter Enoki Mushrooms
- Spinach Gomaae
- Napolitan (Japanese Ketchup Spaghetti)
- Vegan Japanese Hambagu (Hamburger Steak)

If you recreate this Rice Korokke recipe let me know how you liked it by leaving a comment and rating below or by tagging me on Instagram @Okonomikitchen, I love seeing all of your tasty recreations!
Hungry for more? Be sure to subscribe to my newsletter and follow along on Instagram, Youtube and Pinterest for more deliciousness!

Rice Korokke (Rice Croquette)
- Total Time: 12 minutes
- Yield: 2 servings
Description
Delicious seasoned rice stuffed with cheese and coated in a golden panko exterior, Rice Croquettes (Rice Korokke) make for the perfect snack or appetizer. This rice croquette recipe doesn’t require deep frying so it’s much healthier and easier to make! (Vegan)
Ingredients
- 1/4 cup panko (16g)
- 1 1/2 cups of cooked Japanese short grain rice (300g)
- 3–4 tbsp ketchup (45g)
- 1/4 cup corn (40g)
- 3–4 tbsp vegan cheese (I use my melty cheese recipe or Daiya) for stuffing
- salt and pepper
- dried parsley or aonori, for garnish (optional)
Instructions
- Toast the panko: Over medium toast the panko until golden brown– this takes about 1 minute. Shake the pan to prevent burning. Once it’s golden brown transfer to a rimmed tray or bowl immediately.
- Season the rice: Mix the rice with ketchup and corn. Add pepper and salt to taste. Use a small spatula or the side of a spoon to prevent mushing the rice. Divide the rice into 4 equal portions.
- Mold and stuff: Place a piece of cling wrap onto your hand and place one portion of the rice in the middle. Gently flatten the rice and then add some vegan cheese in the middle. Cup the rice with your hands and then fold the edges over to roughly cover the cheese. Twist the cling wrap securely. Unravel the cling wrap and place the rice ball onto a microwave safe plate. Using the same piece of cling wrap, cover the rice balls and microwave at 600W for 30 seconds or until heated through (the rice balls should be warm to the touch).
- Coat in panko: Roll the rice balls in the toasted panko. Top with dried parsley or aonori. Serve immediately and enjoy!
Notes
- Helpful Equipment: parchment muffin liners, 12 cup muffin tin, spatula, mixing bowls, whisk
- Nutritional Information Disclaimer: Nutrition information is a rough estimate calculated on an online tool (Cronometer).
- Prep Time: 10 minutes
- Cook Time: 2 minutes
- Category: Side Dish
- Method: Microwave
- Cuisine: Japanese, Vegan
Nutrition
- Serving Size: 1 serving (2 pieces)
- Calories: 334
- Sugar: 5.9g
- Sodium: 483mg
- Fat: 5.4g
- Saturated Fat: 2.5g
- Unsaturated Fat: 0.4g
- Trans Fat: 0
- Carbohydrates: 64.8g
- Fiber: 1.2g
- Protein: 5.5g
- Cholesterol: 0
Okonomi Kitchen is a participant in the Amazon Services LLC Associates Program. When you purchase something through my amazon affiliate links, I earn a small commission that helps me produce consistent content at no cost to you. Thank you for supporting my plant based kitchen!


The Japanese cousin to the arancini–I loved making these with my kiddo. Super fun to make and super fun to eat! Comfort food with so many possibilities, but so much healthier Bc it’s not fried! Can’t wait to experiment with more flavors!
I tried out the recipe and it was so good. These rice balls are surprisingly filling. I loved the fact that you do not need to deep fry to get a crunchy crust. I love a bit of spice being an Indian so I used schezwan sauce instead of ketchup.
I used the Farm Boy cheese and it was delicious! Definitely making again 🙂
100% would recommend. Though should use a melty vegan cheese, ours didn’t melt but still delicious!