

Panfried Japanese Curry Buns stuffed with a flavourful tofu and veggie filling. These Vegan Karee Oyaki buns are super quick, easy and made with without yeast! Perfect for a grab and go breakfast, lunch or dinner.

This past month, I’ve been obsessed with buns and dumps. Thanks to my favourite yeast free bun dough recipe, I’m pretty sure I’ve made some sort of bao or dumpling everyday–stuffed with all kinds of stuff (mostly leftovers). Something about the process of baking them is so satisfying and therapeutic.
Inspiration
One of my favourite fillings I’ve made were these Curry Buns, inspired by Kareeman which is Japanese steamed curry beef buns often made with leftover curry and oyaki which is Japanese style panfried buns. I made this recipe a couple times with different ingredients but the combination of carrots, tofu and onions was my favourite.
As for the dough, although I already have a tried-and-true yeast free bun recipe, I had some dairy free yogurt left in the fridge that desperately needed to be used. The idea of using it in buns came to mind– inspired by the internet craze two-ingredient magic dough that uses self rising flour and yogurt! I honestly didn’t know how it would come out… but this was one of those experiments that blew me away. The result was a soft, fluffy and perfectly moist bun. So for those are you requesting a oil free bun recipe, here ya go!

Ingredients for Curry Buns (+substitutions)
For the bun:
- Cake flour: Cake flour helps with the softness of the buns since there is no yeast in this recipe. However, you can use a combination of all purpose flour and corn starch. If using only all purpose flour, the buns will be slightly more dense.
- Baking powder: Since we’re not using self rising flour or yeast, the baking powder is what makes it fluffy.
- Dairy free yogurt OR tofu: I used coconut yogurt with a higher fat percentage. I haven’t tried this with other types of yogurt, but using a yogurt with more fat helps keep the buns nice and soft. I’ve also tried this with blended soft tofu which works quite well too! Simply blend the same amount of soft tofu with 1 tsp of neutral oil and use that instead.
For the filling:
- Pressed tofu: I used pressed tofu but you can use any firm tofu and press the moisture out. If you prefer to keep these soy free, you can also use TVP or mushrooms!
- Carrots: Potatoes are also a great option.
- Onions
- Garlic
- Curry Powder & Cumin: I used my Japanese curry powder recipe and added in a touch more cumin.
- Soy sauce
- Ketchup
How to make panfried buns without yeast
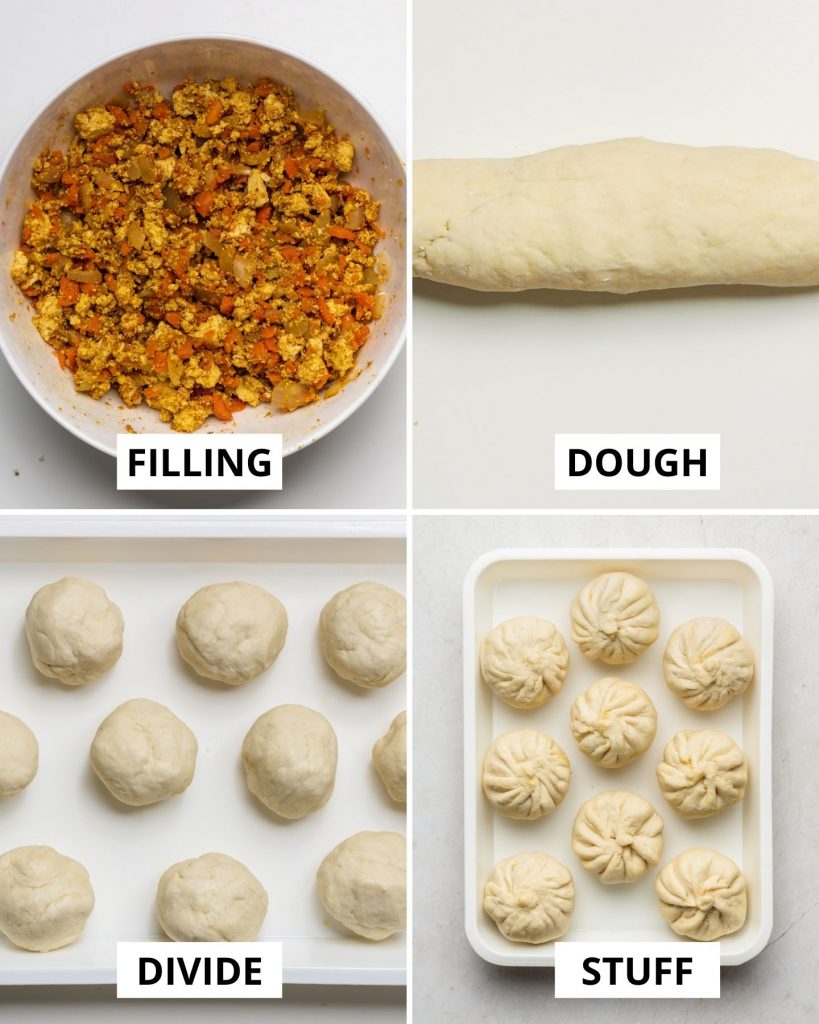
First make the filling. Add the grated carrots and onions to a bowl. Cover and microwave for 1 minute, this will soften them up a bit more. However, if you don’t mind more texture in your buns you can skip this step. Crumble in the pressed tofu and add the garlic, curry powder, cumin, soy sauce, ketchup salt and pepper. Mix it with your hands until well combined. If the filling feels overly wet, add in 1-2 tsp of flour (this will depend on how much you press your tofu or if you use other ingredients).
Next, make the dough. You can either use a stand mix or mix by hand. The nice thing about this easy dough recipe is that it is very forgiving. Unlike traditional steamed or panfried baos, the dough doesn’t require to be super smooth and you also don’t need to knead the dough for a long time. Just ensure its mixed enough that the dough comes together. The texture of the dough should be soft and elastic-y.
Now assemble the buns. Roll the dough into a log and divide it into 10 (32-33g) pieces. Roll each one into a ball. Cover the dough with a damp kitchen cloth as you fill each one to prevent them from drying.
Roll out each ball of dough about 4-4.5 inches in diameter, with the middle slightly thicker. I find it easier if the diameter of the dough is slightly larger but thick enough that it doesn’t rip. Place about 2 tbsp of filling inside (28g) and seal it closed. I pleated them baozi or shengjian style just for the looks but traditionally, oyaki is just sealed by pinching the dough together. Repeat for remaining buns.
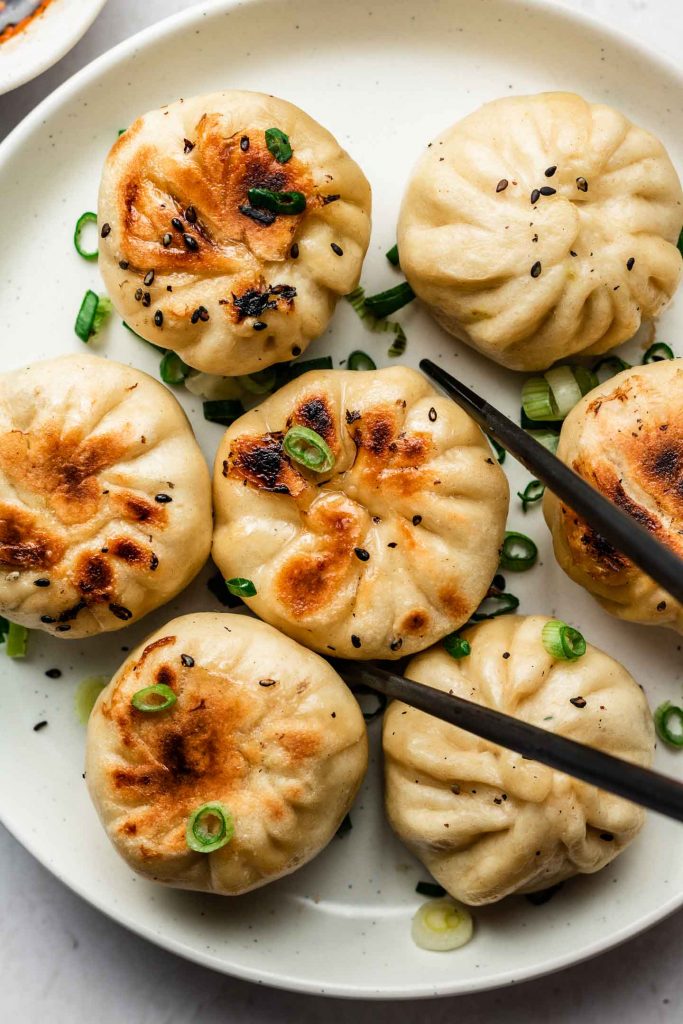
How to pan fry buns (with crispy bottoms!)
Add a little oil to a non-stick pan and place it over medium heat. Place the buns on the pan and cook until the bottom is light golden brown (about 4 minutes). Add water to the pan about 1/3 of the buns height and quickly cover with a lid. Let it cook for 8-10 minutes or until most of the water has evaporated. Remove the lid and add scallions if desired. Cook for another 2 minutes until all the water has evaporated and bottom is crispy.
These are best served right away and since it makes a small batch you shouldn’t need to store any leftovers. However, if you do I recommend freezing them over keeping them in the fridge. Simply place them in a freezer safe bag and freeze.

Tips, tricks & additional recipe notes
- Weigh the dough ingredients: As always, I recommend weighing out the ingredients for the dough. The amount of yogurt added depends on the humidity of your kitchen and the brand of yogurt you use but it should be about 150-160g. Start with less and add more as you need.
- Form the filling: I find it much easier to wrap the bun if the filling is packed and shaped into a ball so that it doesn’t fall out while pleating.
- Heat temperature: When first pan frying the buns, aim for a light golden brown. If you over do it, they’ll most likely burn with the second round of pan frying.
- Gluten free: I’m happy to say these work with King Arthurs gluten free flour! I haven’t tested it with any other brand but if you do, please let me know how it goes!
More vegan buns, baos & dumplings to try:
- The Ultimate Vegan Sheng Jian Bao (Pan fried soup dumplings) — Coming soon!
- Vegan Gyoza
- Crispy Gyoza with Wings
- Yeast Free Stuffed Bao Buns (Steamed + Pan fried)
- Vegan Char Siu Bao
- Lazy Dragon Roll
SAVE IT FOR LATER! ↓

If you recreate this Pan Fried Japanese Curry Buns recipe let me know how you liked it by leaving a comment and rating below or by tagging me on Instagram @Okonomikitchen, I love seeing all of your tasty recreations!
Hungry for more? Be sure to subscribe to my newsletter and follow along on Instagram, Youtube and Pinterest for more deliciousness!

Pan Fried Japanese Curry Buns (Yeast Free)
- Yield: 10 buns
Description
Quick and easy Crispy Panfried Curry Buns stuffed with a delicious vegetarian filling made with tofu and an assortment of veggies. Best of all they don’t require yeast, proofing or kneading.
Ingredients
Filling
- 1 carrot, grated (115 // can also use potatoes)
- 1 medium onion, diced (100g)
- 1/2 block of pressed tofu, mushrooms, rehydrated TVP or any ‘meat’ substitute you like (130g)
- 2 garlic cloves, minced (6g)
- 1 tbsp Japanese curry powder
- 1 1/2 tsp ground cumin
- 2 tsp soy sauce (10ml)
- 1 tbsp ketchup (15g)
- 1/4 tsp salt and pepper (to taste)
- 1–2 tsp flour (3-6g)
Dough
- 1 1/3 cup + 1 tbsp cake flour (180g // or 145g flour + 35 corn starch)*
- 1 tsp baking powder
- 1/4 tsp salt
- 1/2 cup + 1-2 tbsp dairy free yogurt (140-150g // or soft tofu + 1 tsp of oil)**
Instructions
Filling
- Add the grated carrots and onions to a bowl. Cover and microwave for 1 minute. Crumble in the pressed tofu and add the garlic, curry powder, cumin, soy sauce, ketchup salt and pepper. Mix with your hands. If the filling feels overly wet, add in 1-2 tsp of flour.
Bun Dough
- Stand mix: Add the cake flour, baking powder and salt to a electric mixer and start at a low speed (2). Spoon in the yogurt or tofu (starting with lesser amount). Bring up the speed to medium (4) and let it mix for a few minutes until it comes together. If needed, add in an extra 1-2 tbsp of yogurt.
- Hand mix: Add the cake flour, baking powder and salt to a bowl and whisk together. Spoon in the yogurt, mixing with your hands until it comes together. The dough does not need to be super smooth but should be soft and elastic-y.
Assemble the buns
- Roll the dough into a log and divide it into 10 (32-33g) pieces. Roll each one into a ball. Cover the dough with a damp kitchen cloth as you fill each one to prevent them from drying.
- Roll out each ball of dough about 4-4.5 inches in diameter, with the middle slightly thicker. Place about 2 tbsp of filling inside (28g) and pleat it closed. Repeat for remaining buns.
To cook
- Add a little oil to a non-stick pan and place it over medium heat. Place the buns on the pan and cook until the bottom is light golden brown (about 4 minutes). Add water to the pan about 1/3 of the buns height and quickly cover with a lid. Let it cook for 8-10 minutes or until most of the water has evaporated. Remove the lid and sprinkle with sesame seeds and scallions, if desired. Cook for another 2 minutes until all the water has evaporated and bottom is crispy.
- Serve and enjoy!
Notes
- *Use gluten free all purpose flour and tamari if needed. Do not use the tofu if using gluten free flour. I tested this only with King Arthurs blend.
- ** Because tofu is lower in fat, it helps to add a touch of oil to the tofu to ensure the buns are still soft.
- Helpful Equipment: electric stand mix, bowl, whisk, cooking chopsticks, wooden rolling pin
- Nutritional Information Disclaimer: Nutrition information is a rough estimate calculated on an online tool (Cronometer).
Nutrition
- Serving Size: 1 bun
Okonomi Kitchen is a participant in the Amazon Services LLC Associates Program. When you purchase something through my amazon affiliate links, I earn a small commission that helps me produce consistent content at no cost to you. Thank you for supporting my plant based kitchen!


Hello! This is the closest recipe that I can find to the baked-steamed-Oyaki version (mushroom filled) on your Instagram from November 2021. Where can I find that recipe? Thank you!
Super delicious, thank you! I used wholemeal wheat flour and potato starch (I misread recipe as we call corn starch cornflour in NZ) and they were delicious. So much so, we made another batch the next night to use up the filling we had made.
First time making these buns and it was so much fun! I think I over-kneaded my dough so it didn’t cook up fluffy and bao-like. Otherwise Lisa’s recipe is easy to follow and I will definitely try again!
The recipe was easy to follow and yielded delicious results. I will make them again!
Definitely my first time making buns and literally obsessed already! Best recipe, fam loved it, and I feel more cultured haha loved this recipe!
These were so delicious and easy to make! Love the crispy bottoms and the use of vegan yogurt instead of oil in the dough!
Thank you for including grams and cups/tbs. It made all the difference for substitutions and “making” cake flour. Rolling dough usually gives me anxiety but these were so simple and turned out great. I went with tvp, sweet potato, and kale filling with the curry. Super yum. Will be making again for appetizer night 🤩
Hi Beth! Of course, I think when it comes to baking things with flour, the best way is always measurements in weight 🙂 I’m so glad you enjoyed these! Thanks for sharing!!
Why not diary yogurt?
you can use dairy if you’d like but these are shared to be vegan 🙂
Can you use whole wheat pastry flour?
Thank you
Hi Samantha! I haven’t tried with whole wheat but it does require more water. If you try it, let me know how it goes!
Hi.
This is the best recipe I have used for making buns. I had been looking for a good recipe for a while, so glad I came across Lisa’s, I only use this recipe now.
I make th dough using full fat dairy yogurt and they come out perfectly.