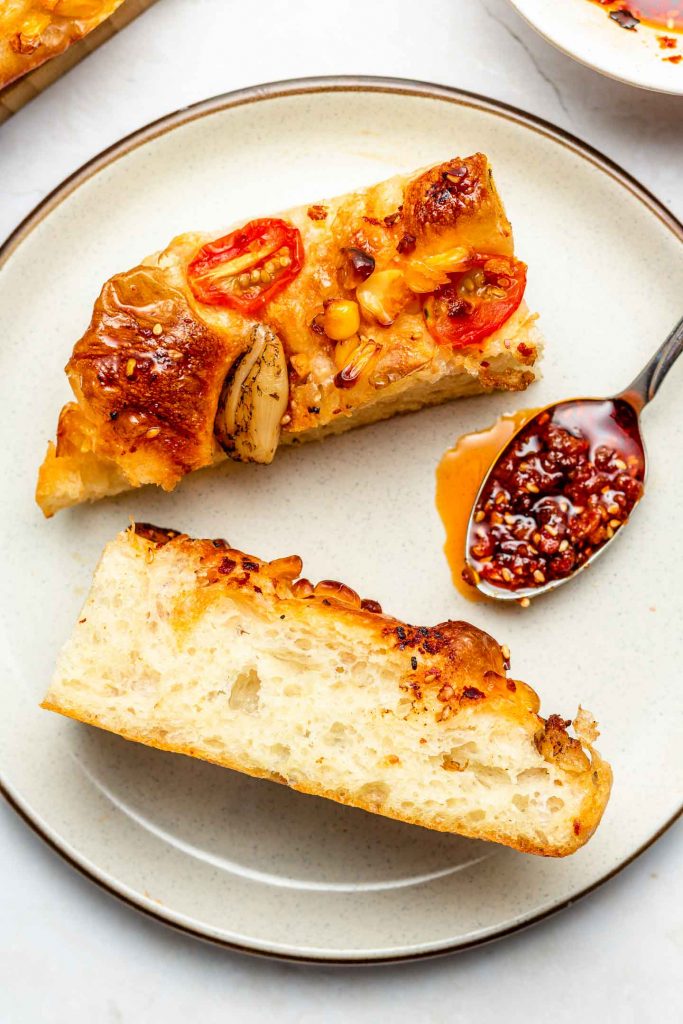
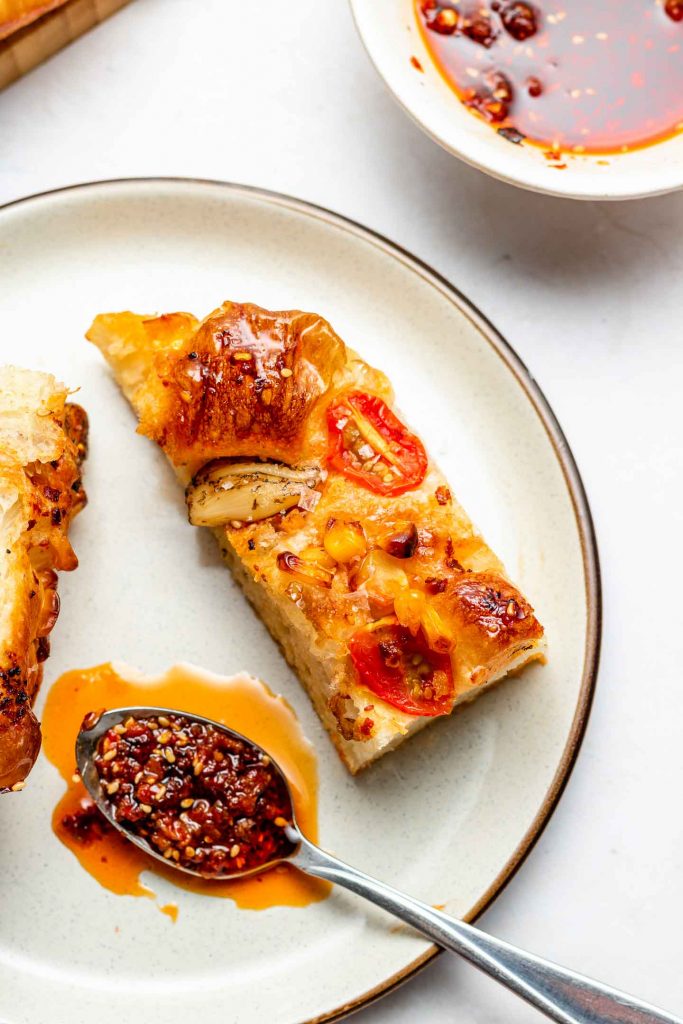
This miso chili oil focaccia has it all: golden crispy exterior, soft and chewy on the inside topped with sweet corn, tomatoes, roasted garlic and umami rich miso chili oil for a spicy kick! This tried and true no-knead overnight focaccia is the perfect bread for beginners and only requires basic pantry staple ingredients.

Since my oven has been working (thank goodness, perfect for the baking season!!), I’ve been baking and experimenting with a lot of bread. Something about homemade fresh bread… you can’t beat it! I’ve been testing a shokupan (a no-knead, yudane and nama-shoku pan version), and it’s been quite a ride. Lots more experimenting to do with shokupan but one that I ALWAYS can count on to be fail proof is this no knead overnight focaccia recipe. It’s seriously THE BEST bread for beginners and for everyday consumption because of how easy and hands-free it is.
You guys have been loving my miso garlic butter focaccia, I wanted to share this miso chili oil version for all my spicy lovers! Let’s get to it, shall we?
Ingredients (+ Substitutions)
I’m using my Miso Garlic Butter Focaccia as the base for this recipe which requires just 4 basic ingredients:
- Bread Flour: the high protein content in bread flour is what gives it’s chewy texture that focaccia has. All purpose flour can be substituted but please note that the texture will be slightly different.
- Instant Yeast: our rising agent.
- Salt: for flavour.
- Olive Oil: To ensure it does not stick to the pan and your fingers.
- Miso Chili Oil: I drizzled some of my homemade miso chili oil but you could substitute it with your favourite chili oil.
As far as toppings go, you can add whatever you like! I used what I had in the fridge which were tomatoes, corn and roasted garlic. I highly recommend the corn though because it adds a nice sweetness to contrast the spicy miso chili oil.
Toppings Suggestions
- mushrooms
- scallions
- onions
- figs
- spinach
How to Make Miso Chili Oil Focaccia
- Night before: In a large bowl, add flour, salt and instant yeast and whisk together. Mix with a spatula or wooden spoon until a wet and sticky shaggy dough ball forms. A wet dough will result in a fluffier focaccia. Add 1 tbsp (10g) of olive oil on top and rub the surface to coat. Cover the bowl with a slightly damp tea towel and then place into the refrigerator overnight (12-15 hours).
- Make the miso chili oil: if you do not have some prepared already, make the miso chili oil ahead of time.
- Following day: The dough should still be wet and increased in size. Grease or line a 11 x 8 inch pan. Add one tablespoon of olive oil to the pan. Rub some olive oil onto your fingers and then pull the sides of the dough towards the middle, rotating the bowl until all sides are pulled in. Transfer to prepared baking pan and flip it once to ensure the entire ball of dough is coated in olive oil. Let the dough rest for at least 2 1/2 – 4 hours or until the dough has spread close to the edges of the pan (it should look double in size).
- Prepare toppings: Choose toppings of choice. I chose sliced grape tomatoes, roasted garlic and corn.
- Prepare for baking: Preheat oven to 425 F. Drizzle two tbsp of miso oil on the dough and lightly coat fingers in oil again. Dimple the dough using your fingers by pressing them close to the bottom of the pan (but not all the way through). Allow the bubbles to form (don’t pop them!). Place desired amount of tomatoes, corn and roasted garlic on top and drizzle with more miso chili oil. Finish with a generous sprinkle of flakey salt.
- Bake: Place into middle rack of your oven and bake for 20-22 minutes or until surface is crisp and deep golden. Transfer the focaccia to a cooling rack. Allow it to cool for 15 minutes before slicing and serving. Enjoy!
Tips & Tricks to the best focaccia:
- Use a scale: When it comes to baking, I always recommend using a scale for the best and more accurate results.
- High hydration: which means the water to bread ratio is higher. This is the secret to focaccia with a perfect golden crispy crust and a super tender, moist and chewy inside is high hydration, which is why yuande and milk bread is also so soft and fluffy. The more hydration,
- Cold fermenting + longer rise: Aids in depth of flavour, creates larger air pockets and is totally hands off.
- Folding the dough: Incorporates more air pockets resulting in a fluffier focaccia and gives some integrity to the gluten giving it that chewy texture.
More delicious breads to try
SAVE IT FOR LATER! ↓
If you recreate this Miso Chili Oil Focaccia recipe let me know how you liked it by leaving a comment and rating below or by tagging me on Instagram @Okonomikitchen, I love seeing all of your tasty recreations!
Hungry for more? Be sure to subscribe to my newsletter and follow along on Instagram, Youtube and Pinterest for more deliciousness!

Miso Chili Oil Focaccia
Description
This miso chili oil focaccia has it all: golden crispy exterior, soft and chewy on the inside topped with sweet corn, tomatoes, roasted garlic and umami rich miso chili oil for a spicy kick! This tried and true no-knead overnight focaccia is the perfect bread for beginners and only requires basic pantry staple ingredients.
Ingredients
Focaccia
- 2 2/3 cup bread flour (324g)
- 1 1/8 tsp instant yeast (5g)
- 1 1/8 tsp salt (6g)
- 1 cup + 3 tbsp water (285ml)
- 2 tbsp olive oil (30ml)
- 2 tbsp miso chili oil (30ml)
Toppings
- 1/4 cup corn (45g)
- 1/4 cup grape tomatoes, halved (60g)
- 1 head roasted garlic
Instructions
- Night before: In a large bowl, add flour, salt and instant yeast and whisk together. Add the water and then mix with a spatula or wooden spoon until a wet and sticky shaggy dough ball forms. A wet dough will result in a fluffier focaccia. Add 1 tbsp (10g) of olive oil on top and rub the surface to coat. Cover the bowl with a slightly damp tea towel and then place into the refrigerator overnight (12-15 hours).
- Make the miso chili oil: if you do not have some prepared already, make the miso chili oil ahead of time.
- Following day: The dough should still be wet and increased in size. Grease or line a 11 x 8 inch pan. Add one tablespoon of olive oil to the pan. Rub some olive oil onto your fingers and then pull the sides of the dough towards the middle, rotating the bowl until all sides are pulled in. Transfer to prepared baking pan and flip it once to ensure the entire ball of dough is coated in olive oil. Let the dough rest at room temperature for at least 2 1/2 – 4 hours or until the dough has spread close to the edges of the pan (it should look double in size).
- Prepare toppings: Choose toppings of choice. I chose sliced grape tomatoes, roasted garlic and corn.
- Prepare for baking: Preheat oven to 425 F. Drizzle two tbsp of miso oil on the dough and lightly coat fingers in oil again. Dimple the dough using your fingers by pressing them close to the bottom of the pan (but not all the way through). Allow the bubbles to form (don’t pop them!). Place desired amount of tomatoes, corn and roasted garlic on top and drizzle with more miso chili oil. Finish with a generous sprinkle of flakey salt.
- Bake: Place into middle rack of your oven and bake for 20-22 minutes or until surface is crisp and deep golden. Transfer the focaccia to a cooling rack. Allow it to cool for 15 minutes before slicing and serving. Enjoy!
Notes
- Helpful Equipment:
- Nutritional Information Disclaimer: Nutrition information is a rough estimate calculated on an online tool (Cronometer).
Okonomi Kitchen is a participant in the Amazon Services LLC Associates Program. When you purchase something through my amazon affiliate links, I earn a small commission that helps me produce consistent content at no cost to you. Thank you for supporting my plant based kitchen!


I’ve made this a total of 3 times now and every time it’s been a crowd pleaser! People are blown away by the presentation AND the flavor!!
Best chili oil recipe and easy beginner focaccia! Will be looking to modify with sourdough subbed for the active yeast 🤞
I’ve made focaccia at least 15 times. This looks so good but when I did it the Garlic cloves chili flakes tomatoes and corn all burned and had to be picked off but the bread below came out fine. I baked it in a cake pan.
I baked at same temperature
It has been 3 years since I have made this recipe with my boyfriend! We loved it! It was so crunchy, moist and the miso chilli oil was chef’s kiss. Our Anniversary is next month and we will make it together again then. It’s such a delicious treat.
Recipe was amazing!! Just wondering if I multiply the recipe by 1.5 or 2 do I increase the yeast accordingly?
Yes!
The recipe was so easy to follow! My entire family loved it.
My dough didn’t double overnight but after baking, the bread was still fluffy and crispy!!
I definitely will be using this recipe again
I already dip all types of bread into Lisa’s Miso Chilli Oil, so naturally I had to give this a crack. Can’t really go wrong with the best damn chilli oil on bread, and baked inside bread is even better. I poured over more of the miso chilli oil once I took the foccacia out of the oven for it to soak it. Yes- it was an oily mess. Yes- it was also bloody good.
Absolutely delicious! I eat miso soup almost every day but never thought about making focaccia with it ! Such an amazing idea.
Love this so much! This recipe is much easier to follow than many other focaccia recipes online. As a lover of Lisa’s miso chili oil, i had to give this one a try! I topped the focaccia with chives, corn, grape tomatoes and enoki mushrooms. Also i arrange it as “gardenscape focaccia”, as that was going viral online for a while! I wanted to save some for myself throughout the week but my family finished everything on the same day cause its THAT GOOD!! Cant wait to try the other miso garlic focaccia recipe by Lisa!
Tasty, easy, crispy focaccia. I ate the whole pan.
Made this focaccia dough recipe the other day and it was sooo delicious and gone within a day. Super simple and quick method with basically no hands on time because of the overnight ferment which makes the lightest, fluffiest dough. Subbed in sliced mushrooms and fresh sliced smoked garlic with a szechuan chilli oil. Highly recommend 🙌
Hi just wondering if I substitute active dry yeast instead of instant? If so, would I use the same method? Thanks!
Have made this Focaccia a few times and it is always so moreish! Very easy e en for a beginner, which I was when I first made this! I keep a bottle of the miso chilli oil on hand at all times now!
I’d never made focaccia bread before but this recipe was super easy to make and it turned out incredible! Nice and crunchy outside with a chewy, fluffy inside. I’d also never made chili oil myself before, but it definitely elevated the flavors here. I used cherry tomatoes, corn and green onions as my toppings which were *chef’s kiss.* I ended up making this bread four times in one week lol.
This recipe was so easy to follow and delicious that we ended up making it 5 more times!!
This recipe was easy to follow and so delicious! Thank you for the wonderful recipe. I enjoyed making it 😊
I love love love this recipe! I was a bit wary about total prep and cook time (I’m a very last minute person) but just trust the process. Mine didn’t come out as golden and crispy, but still delicious! My boyfriend said it tasked like something you’d get from a restaurant! I cheated a little bit and bought garlic chili oil and just mixed it with miso paste. It gave great flavor! I also topped mine with plum tomatoes and scallions. YUM! can’t wait to try your other recipes! *chef kiss*
I love love love the way my focaccia came out! I was a little wary of the length of time it took to make but just trust the process!! Mine didn’t have the same nice crunch top glow that yours did but still crunchy enough and nice and chewy. My bf said it was restaurant level good. I kept my toppings simple with a prepackaged chili/garlic oil mixed with a miso paste and then topped with plum tomatoes and scallions. DELICIOUS!!! I def want to try all your recipes now!!
A delicious and fun recipe to make! My partner and I had the pleasure of making it and the focaccia turned out amazing!
Made this focaccia this week and it was so so delicious! It didn’t last very long in the house because it was so yummy. Will have to make two next time!
Y’all this recipe is super approachable and ridiculously tasty. This was my first go at focaccia and it’s a winner!
Made this the other day for my family and it was sooo good!! I personally have never baked bread in my life, ever, so this was such an easy recipe to follow. Brb making more hehe ^_^!!
Made this the other day for my family and it was sooo good!! I personally have never baked bread in my life, ever, so this was such an easy recipe to follow. Brb making more hehe ^_^!!
Have made this 4 times now and it gets better ever time!!! Such a simple recipe with amazing results!!
Such an incredibly easy focaccia recipe and so versatile! Defs become my go-to! Was a little unsure because the dough was much stickier and wet than usual but man oh man, it was perfect! Thanks Lisa!
I’ve never made any type of bread before and this was my first time! It was such an easy process. I even made the miso chili oil. So so soooo good and I will be making this many more times! The boyfriend also approves!!
Such a good recipe! My boyfriend ate the entire loaf I made in two hours, it’s really nice and fluffy! It took me about 4 hours for the dough to go completely the edges on a colder day.
So delicious! I’ve made this recipe a couple of times now and its super consistent and delicious. absolutely obsessed! It’ s super crunchy on the outside and fluffy on the inside, I highly recommend making this to impress friends and family. Miso chilli oil is also incredible
Such an easy way to make bread and it so good. I usually find baking taxing because of how accurate one needs to be but this was a really good recipe. Low effort high reward.
We used this base focaccia recipe and it came out so good! Fluffy, crunchy, and easy as can be. We love that it is no-knead and how versatile it was. We actually dumped a bunch of random toppings on from stuff we had in the fridge, like pesto, tomatoes, and onions and it came out wonderful! We are absolutely going to make this again and try the chili miso oil next!!
This was amazingggggg!! The miso gave an amazing umami taste with the combination of spicy chili oil on a crispy focaccia crust !!! I mean what could be better honestly.
Great recipe! Can I leave it outside to rise overnight? It took forever to come down to room temperature and fluff out next day.
This bread recipe was amazing. Once you start you can’t stop. I expected there to be leftover but we ate the whole bread for lunch! We ate this with salmon and cream cheese, it was the perfect combination!
10/10… Like the miso-chili oil paste is so magical and the dough is so jammy and crispy!
I’ll probably make this every week
Best focaccia recipe I’ve tried and so easy!
Would definitely make again 🙂
This is amazing! We made it twice already in the last two weeks!! We are hooked! Definitely trying more of your recipes!!!Thank you!!🤍🤍🤍
This was amazing! Made for a weekend treat ad my partner has asked I make it again this coming weekend. I used corn, roasted garlic and red onion to top, along with the miso chili oil. Thanks so much for this great recipe!
This is my new favorite focaccia recipe! I’ve made several batches now and just heading off to bake it again today 🙂
The miso chili oil is fantastic as well. I altered it slightly and used a base of szechuan peppercorns (red and green mix 3:1) with a spot of dried chilis since we prefer mala spice
Made this last night and I am still amazed at how chewy and crisp these came out. I highly recommend everyone to try this recipe out!
Would you happen to have any thoughts on making this foccacia with whole wheat flour?
Do yourself a favor! Bookmark this recipe! I love focaccia due to all the toppings you can add on top, and this one by far is the best. The miso chili oil is so good, and with my love of garlic, adding garlic on top of the focaccia just gave it that extra kick that I love. It was so easy to make and the bread is so fluffy. Thank you for this recipe!
10/10 would make it again 🙂 Crispy outside and soooo soft and chewy inside.
I’m not much of a bread maker myself, but this recipe was so insanely easy to follow and make. Since this was a no-knead focaccia recipe as well, it was like making bread in your sleep (who wouldn’t love that??).
Can’t wait to play around with the toppings as the focaccia bread itself is a great foundation.
This miso oil is life!!!
10/10 would definitely make again!! So crisp outside but soft and chewy inside.
I’m not much of a bread maker but this recipe was insanely easy, delicious, and all around fantastic. I got to practically make bread in my sleep!
I can’t wait to explore more topping options as the focaccia bread itself is an excellent foundation.
I made this last night and it was a huge HIT! I can’t believe how simple this recipe is. I highly recommend any who loves BREAD to try this recipe out.
this foccacia is so good! the texture is perfect and miso with chili flakes really change the original taste of foccacia ! thanks a lot ❤️
I don’t think I can go back to regular focaccia after this! I used mushroom and scallions for the topping and it blew my mind🤤
Such a creative idea, I loved that this was my gateway into miso chili oil! I’ll be making this again for charcuterie nights (would be a good alternative to plain French breads) and also dumpling nights for the chili oil!
I made this was half whole wheat, if you do the same, I recommend a longer proof and bit more water, maybe proof at room temp to help it get going.
This is totally delicious! I substituted the sugar to our local jaggery (Gula Melaka ie sugar from palm) and it is still the fav!!
Absolutely beginner friendly
Simple ingredients and techniques but give you such sophisticated texture, just amazing 🤩
In step 1, it looks like you left out adding the water. Do I add it all at once or a little at a time? Also in step 3, do I let the dough rest back in the fridge or at room temp? Thanks!
Hi Ryan! The water is added, thank you! And for the step three, it should be at room temperature 🙂
This focaccia is so good!!! So easy and delicious. I made it with mushrooms and tomatos