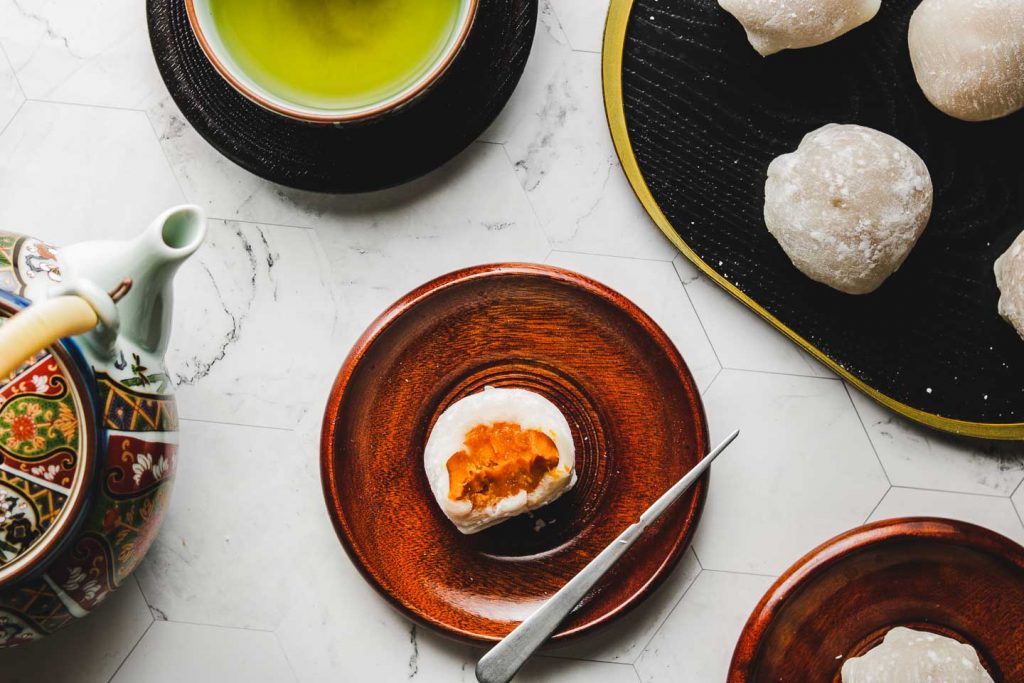
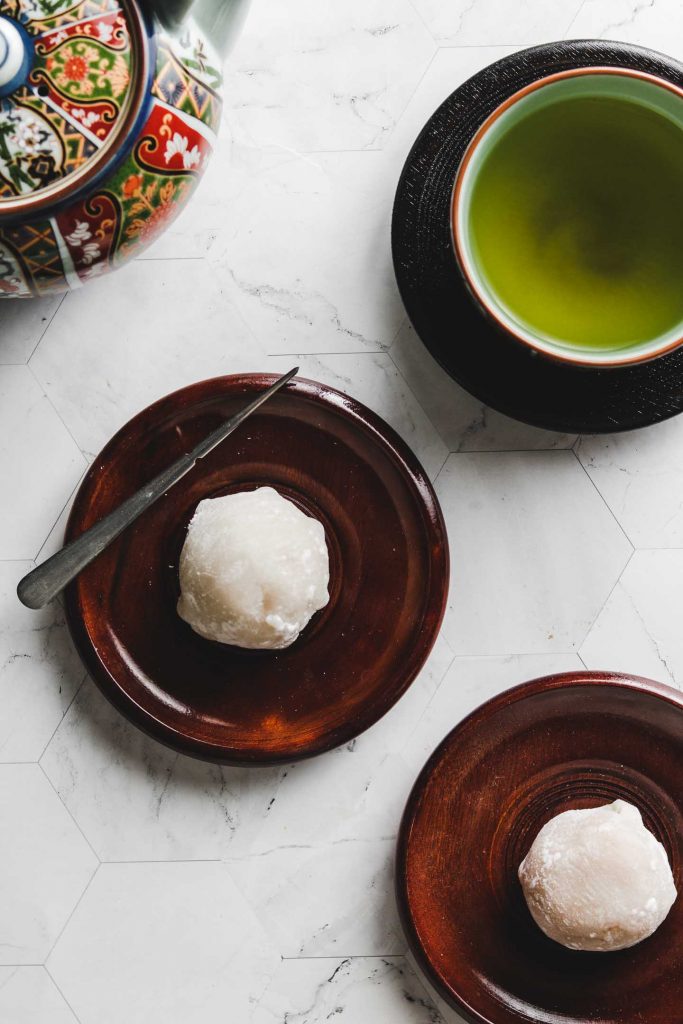
The classic Japanese Daifuku gets a fall make over! Learn how to make Kabocha Pumpkin Daifuku Mochi with the perfect soft and chewy mochi shell and sweet Kabocha paste filling.
As much as I have been enjoying all the classic fall desserts like Apple Crisp and Pumpkin Pie, I still have been craving Japanese sweets here and there (I think it’s just in my blood 😂). I was eating some kabocha and making classic daifuku mochi with red bean paste filling and it just came to my mind, why not stuff sweet kabocha in mochi?? Kabocha can easily be made into a paste like I did for my Kabocha Twist Buns. It just HAD to be done!
This recipe will show you how to make the classic daifuku with a fall twist using my favourite squash ever, Kabocha. Are you ready for this magic? Lets do this!
Ingredients in Kabocha Pumpkin Daifuku Mochi
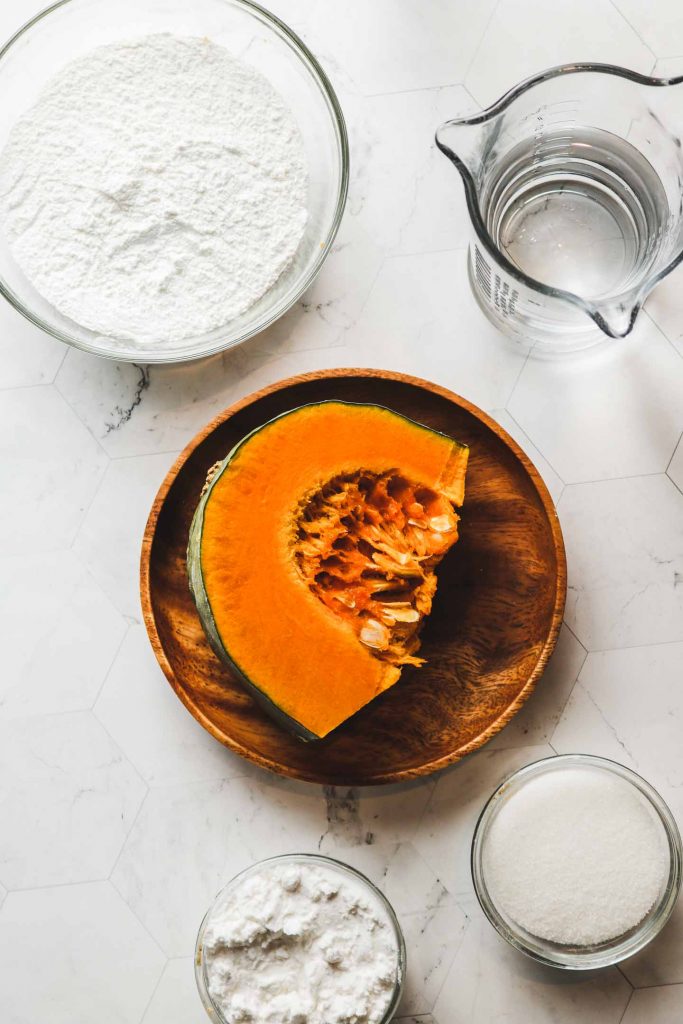
What I LOVE about Japanese desserts and mochi is that the ingredient list is super short- with just 4 ingredients!
- Kabocha: super sweet on its own and this squash creates a very similar consistency to red bean paste. Do not use regular pumpkin or canned pumpkin!
- Shiratamako: also called sweet rice flour or glutinous rice flour.
- Sugar: use white sugar to achieve that pure white mochi look. If not going for aesthetics, any sugar can work here like coconut sugar to make them refined sugar free.
- Potato Starch: a super important ingredient to successfully making mochi. Can also use corn starch.
How to Make Pumpkin Daifuku Mochi
The Kabocha Filling
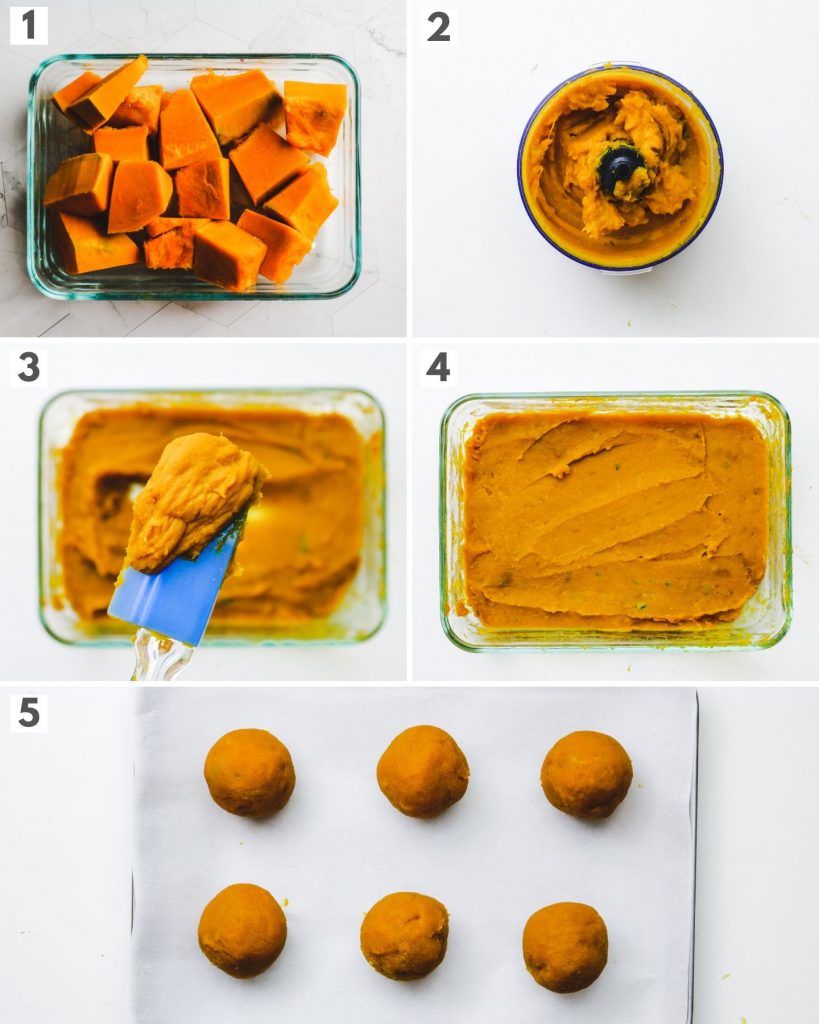
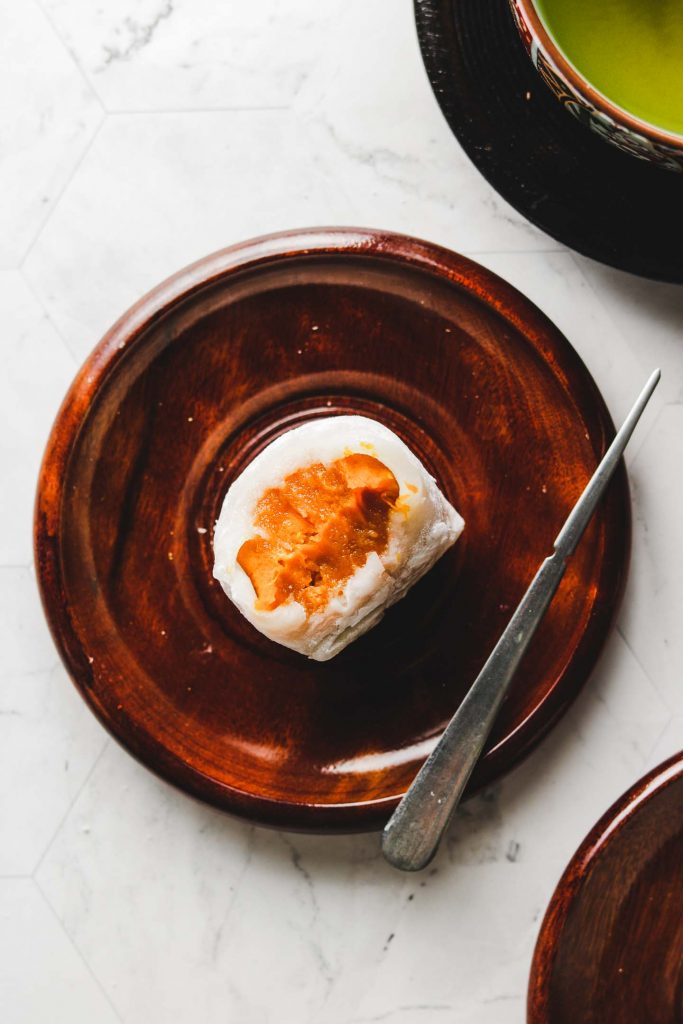
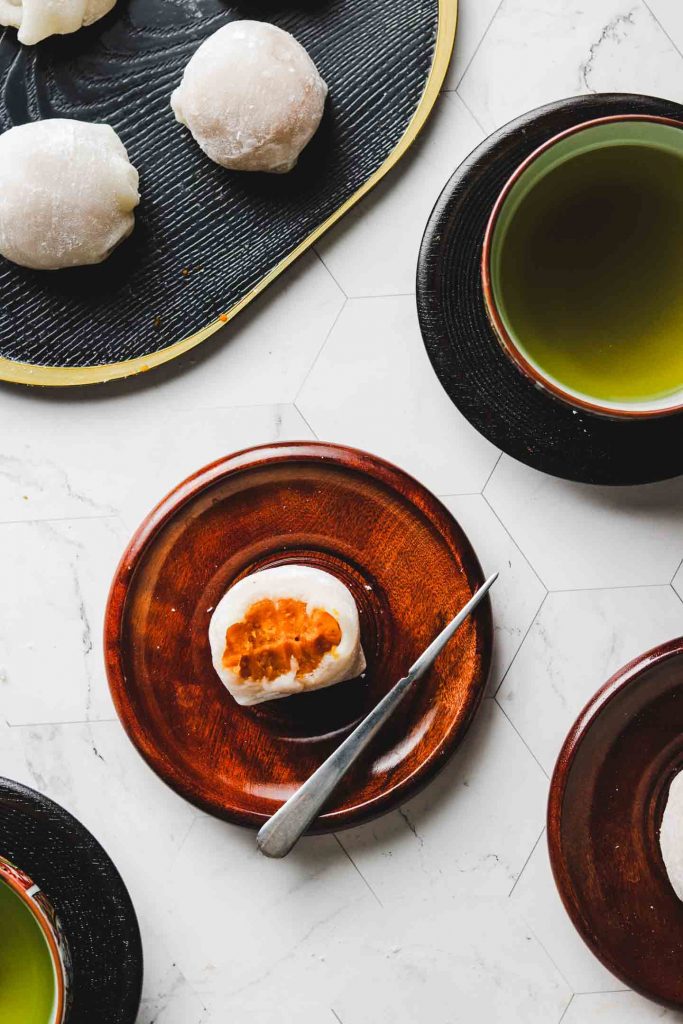
The classic daifuku mochi has red bean paste inside as the filling, but today to celebrate fall we’ll be making kabocha anko filling. This process is super simple:
- Chop Kabocha into 1 inch pieces. Place in a microwave safe dish and microwave on high (1100 W) for 4-5 minutes, or until cooked through.
- Add cooked kabocha into a food processor or blender along with sugar (if using) and blend until smooth.
- Transfer paste back into microwave safe dish and microwave for 3 minutes on high. Mix the paste and check consistency. If it still seems loose, microwave in 30 second intervals until thick.
- Let the paste cool for a few minutes by placing a icepack under the dish.
- Divide the paste into 6 equal portions, around 33-34g each. Roll them into balls and place them on a parchment lined baking tray. Place in the fridge to let them firm up.
The Mochi

Next, we have to prepare the mochi sheet. Traditionally, mochi is made by pounding cooked glutinous rice (a process called mochitsuki), forming them into round shapes and then filling or dusting them with another ingredient to give it flavour. Since not everyone has a pounder at home, we can easily make mochi on the stove or even easier- in the microwave:
- Combine the shiratamako and sugar into a bowl and whisk together. Add water and mix until well combined. Cover with a damp paper towel and microwave on high for 1 minute (1000 W). Mix with a silicon spatula and then microwave for another 30 seconds. Check to see if it’s done- there shouldn’t be any liquid remaining and the colour will look less solid.
- Place a large piece of parchment paper on work surface and dust with potato starch. Use a silicon spatula to transfer the mochi onto potato starch.
- Generously dust more potato starch on top of the mochi. Roll out the mochi, place onto a baking tray and place into the fridge for at least 10 minutes.
- Take the mochi out of the fridge and cut into 6 circles using a medium to large cookie cutter (I used a 7.5cm // 3 inch cookie cutter). Eat the remaining scraps as you work. Take the kabocha balls out of the fridge.
- Take one mochi sheet and brush off the potato starch.
- Place kabocha ball in the center of the mochi sheet.
- Pinch two ends of the mochi together to cover the kabocha filling.
- Pinch the other two corners together.
- Tuck and pinch the 4 remaining corners together until the bottom no longer has pointy corners sticking out.
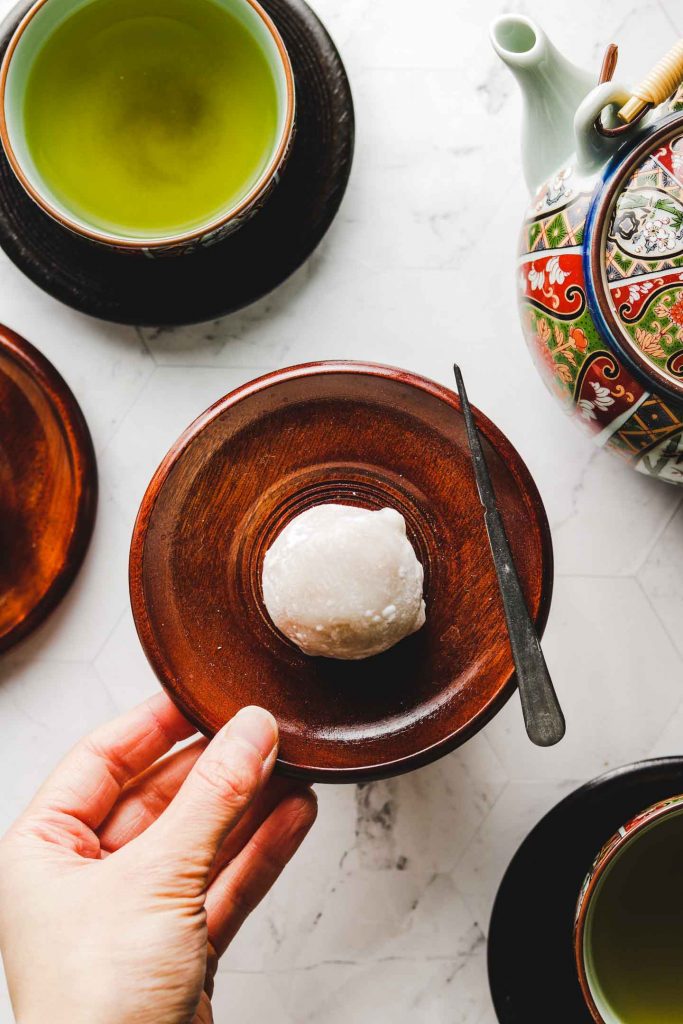
- Brush a bit of potato starch on the bottom and place on a plate. Repeat steps and finish making the rest of the daifuku mochi.
Tips & Tricks to Making Perfect Daifuku Mochi
- Taste Kabocha: After cooking the kabocha, give it a quick taste. Add sugar depending on how sweet the kabocha is. Because it’s in season right now and my family doesn’t like very sweet mochi, I ended up not adding any in this batch.
- Allow the Kabocha filling to cool completely: It’s much easier to roll and to mold into the mochi because it’s firm and won’t change shape as easily.
- Generously dust with potato starch: This ingredient is super important in order to work with mochi. Mochi is SUPER sticky and can become a mess without it.
Helpful Equipment:
- Cookie cutters: I used a 3 inch cookie cutter.
- Parchment paper: helps less sticking and cleaning.
- Pastry Brush: for dusting off the excess potato starch
I hope you try these Kabocha Pumpkin Daifuku this weekend and love them as much as I do! They’re great to make with your friends or family, or to bring to any holiday dinners cause ya know, they still contain pumpkin in them 😉
More Vegan Japanese Dessert Recipes to Love!
- Hanami Dango
- Matcha Mochi Donuts
- Matcha Mochi Waffles
- Vegan Coffee Jelly Dessert
- Miso Caramel Donuts
- Japanese Sweet Potato Tart

If you recreate this Kabocha Pumpkin Daifuku recipe let me know how you liked it by leaving a comment and rating below or by tagging me on Instagram @Okonomikitchen, I love seeing all of your tasty recreations!
Hungry for more? Be sure to subscribe to my newsletter and follow along on Instagram, Youtube and Pinterest for more deliciousness!

Kabocha Pumpkin Daifuku Mochi
- Yield: 6 Daifuku Mochi
Description
The classic Japanese Daifuku gets a fall make over! Learn how to make Kabocha Pumpkin Daifuku Mochi with the perfect soft and chewy mochi shell and sweet Kabocha paste filling.
Ingredients
- quarter of a medium kabocha (480g raw, no skin)
- 2–3 tbsp sugar, optional* (24-36g // cane, white or coconut sugar)
- 1/2 cup shiratamako OR sweet rice flour (90g)
- 3.5 tbsp white sugar* (45g)
- 2/3 cup water (162g)
- 1/2 – 2/3 cup potato starch for dusting (64-95g)
Instructions
- Chop Kabocha into 1 inch pieces. Place in a microwave safe dish and microwave on high (1100 W) for 4-5 minutes, or until cooked through.
- Add cooked kabocha into a food processor or blender along with sugar (if using, see notes) and blend until smooth.
- Transfer paste back into microwave safe dish and microwave for 3 minutes on high. Mix the paste and check consistency. If it still seems loose, microwave in 30 second intervals until thick. The paste should end up being anywhere from 200-215g depending on if any sugar is added. Let the paste cool for a few minutes by placing a icepack under the dish.
- Divide the paste into 6 equal portions, around 33-34g each. Roll them into balls and place them on a parchment lined baking tray. Place in the fridge to let them firm up.
- Combine the shiratamako and sugar into a bowl and whisk together. Add water and mix until well combined. Cover with a damp paper towel and microwave on high for 1 minute (1000 W). Mix with a silicon spatula and then microwave for another 30 seconds. Check to see if it’s done- there shouldn’t be any liquid remaining and the colour will look less solid.
- Place a large piece of parchment paper on work surface and dust with potato starch. Use a silicon spatula to trasnfer the mochi onto potato starch.
- Generously dust more potato starch on top of the mochi. Roll out the mochi, place onto a baking tray and place into the fridge for at least 10 minutes.
- Take the mochi out of the fridge and cut into 6 circles using a medium to large cookie cutter (I used a 7.5cm // 3 inch cookie cutter). Eat the remaining scraps as you work. Take the kabocha balls out of the fridge.
- Take one mochi sheet and brush off the potato starch.
- Place kabocha ball in the middle of the mochi sheet.
- Pinch two ends of the mochi together to cover the kabocha filling.
- Pinch the other two corners together.
- Tuck and pinch the 4 remaining corners together until the bottom no longer has pointy corners sticking out.
- Brush a bit of potato starch on the bottom and place on a plate. Repeat steps and finish making the rest of the daifuku mochi.
Notes
* Taste kabocha for sweeteness. If already sweet, start with 1-2 tbsp sugar. If you don’t mind the change of colour, you can also use coconut sugar.
** White sugar keeps the mochi soft and white. If you don’t mind change in colour, use coconut sugar for refined sugar free.
Nutritional Information Disclaimer: Nutrition information is a rough estimate calculated on an online tool (Cronometer).
- Category: Desserts
- Method: Microwave
- Cuisine: Japanese
SAVE IT FOR LATER! ↓

Okonomi Kitchen is a participant in the Amazon Services LLC Associates Program. When you purchase something through my amazon affiliate links, I earn a small commission that helps me produce consistent content at no cost to you. Thank you for supporting my plant based kitchen!


I’m looking for a kabocha filling recipe for a snow mooncake, and going to use your recipe as a base. Thanks!
So I didn’t have kabocha but I’ve been wanting to make my own daifuku mochi. So I used shop bought red bean paste for the stuffing. Your instructions are so clear, it was so quick and easy to get the mochi. I wish there was a way to keep it fresh for a few days to snack on. But loved how quick and easy it was. Your warabi mochi from your Instagram has also been a favourite of mine and I’ve made that recipe about 6 times already. X