This Caramelized Kimchi Jam is the epitome of how perfect sweet and savory are together. Spicy, with a little tang thanks to the natural acidity from the kimchi. Perfect for toast, sandwiches, bagels, crackers and more!!

Hi. Okay, I’ve gate-kept this recipe for too long, but it’s time I share one of my favourite original recipes to date: Caramelized Kimchi Jam. I honestly didn’t know whether to call this sweet relish, chutney or jam, lol but visually and texturally, I feel like it resembles jam the most. However, you can make it more chutney or relish like by altering how much to cook it down and process it.
She’s sweet, spicy, and tangy thanks to the natural acidity from the kimchi, and can be paired with sweet or savory ingredients.
This was inspired by my kimchi grilled cheese recipe where the kimchi is caramelized with a bit of butter and sugar before adding it to the grilled cheese.
Table of Contents

Kimchi Jam Ingredients
This kimchi jam required just 3-4 ingredients to make:

- Kimchi: Preferably homemade.
- Butter: For flavour. You can even go as far to brown the butter to add some extra nutty aroma. I use Becel plant based butter or Miyoko’s cultured butter.
- Sugar: Brown, cane or a combination of both sugar works well here.
- Mirin: optional, but recommended

How to Make Kimchi Jam
- Cook the kimchi in the butter
- Melt in the sugar
- Cook the kimchi – this softens the vegetables (cover and simmer to further soften)
- Blend in food processor – to desired consistency
- Cook further until jammy

Variations
For different variations, try adding:
- cinnamon
- gochujang
- soy sauce
- sesame oil
How to store kimchi jam
Keep refrigerated for up to 2 weeks in an air tight container.

Serving
This kimchi jam pairs well with a lot of things, but shines when used on something that needs flavour. Here are some suggestions:
- on homemade bread with butter or tahini (personal fav)
- in sandwiches
- as a dip for chips or crackers
- bagel with cream cheese
- in a grilled cheese sandiwch
- dimple it or spread on focaccia
- if you made a looser jam, over salads
- in cookies (seriously)

Top tip
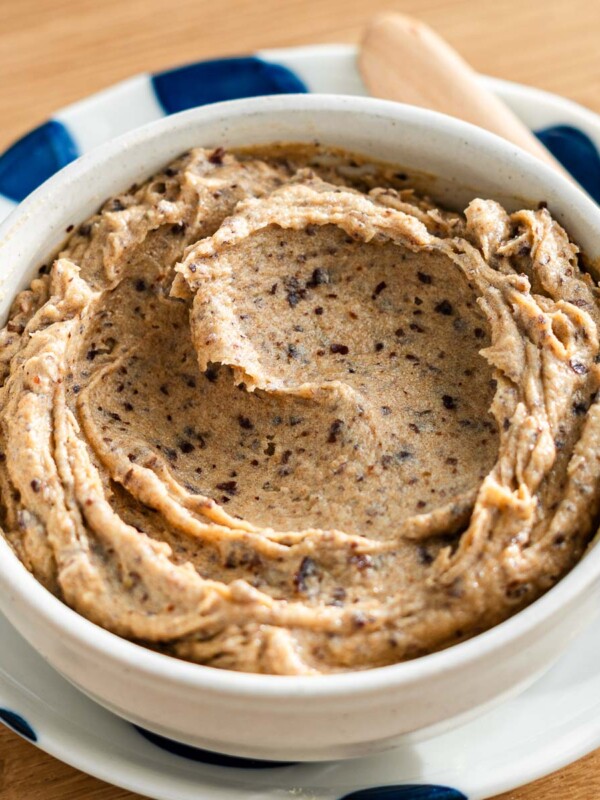
Depending on how long you cook the kimchi for and how much you blend it, the texture of the jam will vary. If you prefer jams with more texture (relish or chutney-like), cook less and pulse blend. If you prefer smooth jam, cook down until soft and blend until it looks like pumpkin puree.
Related
Looking for other recipes like this? Try these:


Caramelized Kimchi Jam
- Total Time: 20 minutes
- Yield: 1 cup
Description
This Caramelized Kimchi Jam is the epitome of how perfect sweet and savory are together. Spicy, with a little tang thanks to the natural acidity from the kimchi. Perfect for toast, sandwiches, bagels, crackers and more!!
Ingredients
- 2 cups (320 g) kimchi
- 2 tbsp butter
- 1 1/2 tbsp mirin, optional
- 1/2 – 1 1/2 cup (100 – 300 g) brown sugar*
Variations:
- 1/4 tsp cinnamon
- 2 tsp soy sauce
- 1–2 tsp gochujang
Instructions
- Add butter to a medium pan over medium heat, and let it melt. Add the kimchi and cook until softened, about 5 minutes. Add the brown sugar and mirin, and mix until sugar dissolves. Cover and let it simmer for 5-8 minutes, or until cabbage is throughly cooked.
- Transfer to a food processor and blend.
- Transfer back to the pan and cook further, stirring occasionally until jammy (about 5-8 minutes).
- Transfer to a bowl and cool. Serve or store in airtight container in the refrigerator for up to 2 weeks.
Notes
- *adjust sweetness to your liking. Use lesser amount of sugar for savory dishes and higher amount of sugar for sweet recipes. I typically use 1 cup of sugar for 320 g of kimchi.
- Prep Time: 5 minutes
- Cook Time: 15 minutes


This is the condiment I didn’t know I needed! After seeing the recipe on instagram, I knew I had to have it! I had some funky kimchi in my fridge that needed to be used, and I was getting sick of kimchi fried rice or kimchi noodle soup. I used a little less sugar than the recipe called for, no cinnamon but yes to extra gochujang and soy sauce. This is AMAZING. I have a tub in my fridge and I love it on toast with some thick slabs of sharp cheese on top. I really, really recommend making this!
Oops,
Forgot my ⭐⭐⭐⭐⭐ rating ! 🔥
So so good!
I loved this recipe so much that I’ve repeated it a week later to give my friends some love in the shape of kimchi jam!
Look forward to trying more of your recipes 🫶
I love this!!! Great for when your kimchi has gone a little too sour – the extra acidity mellows out in cooking but adds another flavor note.
Oh my goodness this recipe is heavenly!!
The balance of the sweet, spicy, tangy is just to die for!! We used only half cup of sugar and it was enough for us but of course it depends on personal taste, would 100% recommend this recipe and all of Lisa’s recipes in general, she’s a genius!!!
Wow, this jam is a game changer , the perfect blend of spicy, salty and sweet.
The whole family loved so much , we finished a jar in two days 🙂
Saw this on Instagram and knew immediately that this was how I was going to use the kimchi going sour in my fridge. I had so much kimchi I had to double the recipe and it was excellent! A few things – I went with the lower scale for sugar (1 cup brown sugar for double the recipe) and it felt a little sweet, so I added some extra gochujang and soy sauce and some kimchi paste that I had lying around from my last batch. I had some on toast the next morning and it was not too sweet at all – everything came out perfectly. Amazing!
Made this because I love savory jams and thought it would be awesome on avocado toast. My preschooler wanted to help, so we made this quick and simple recipe together. After, we ate it on toast and the exact words from my preschooler, “THIS IS YUMMY!” This is definitely going to be a staple in our house, especially since I know my picky eater will eat it!
This is a flavor bomb. I’m definitely going to make it again with homemade kimchi. It would make the perfect gift for a foodie.
Incredible!!! Skeptical when I first saw it but I love jam and kimchi so I had to try. Ran to buy a pack of kimchi immediately then made this. Spicy with a deep caramelised flavour, with sour and umami notes and just ah! So so good. A genius creation.
Sweet. Spicy. Funky. I knew I had to make this jam as soon as I saw it on Instagram. As luck would have it, all of the ingredients were sitting in my kitchen (including homemade butter AND kimchi). This jam is flavourful perfection – a keeper for sure!
Lisa, all of your recipes are amazing and this is no exception. Thank you!
Next up: Burnt Miso Brown Butter Banana Bread (say that 5 times fast!)
I am going to make this ASAP and throw it in a lunch bowl with some quinoa veggies and greens. I can’t wait! I’m salivating thinking about this. Mmmmmm