
This no-knead bubble bread is super soft, fluffy and subtly sweet. Easy to make and make ahead friendly!

What is Bubble Bread?
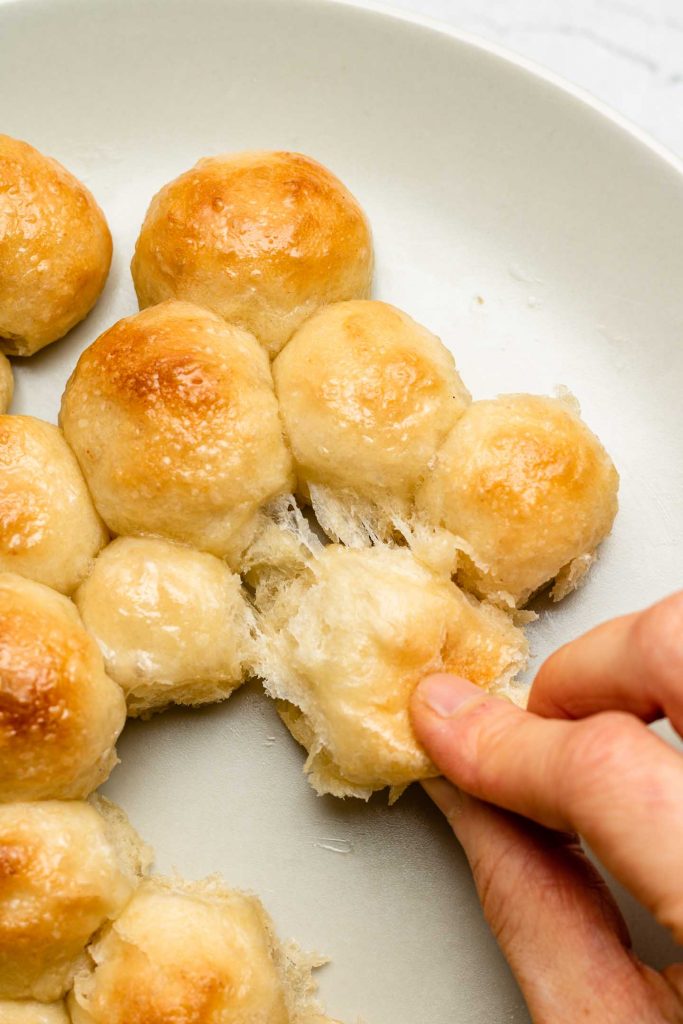
Think bubble waffles + pull apart bread! My mom used to make mini pull apart bread for us because they’re bite sized and fun to eat. She calls them mini chigiri pan which means mini pull apart bread but I’ve seen them also called honey comb bread and more recently, bubble bread! It really does remind me of bubbles since they’re all random sized and look like bubble waffles.
Ingredients for Bubble Bread
All you need are some basic pantry staple ingredients:
- Bread Flour
- Soy milk: I recommend soy milk because it has the most amount of protein and fat, and gives it a milky flavour. Be sure to use slightly warmer than room temperature milk.
- Sugar: For a subtle sweetness.
- Condensed milk: I love adding condensed coconut milk to this bread for an extra sweet milky flavour but if you don’t have it, you can substitute with more sugar and milk (measurements in the recipe card below in ‘notes’).
- Instant dry yeast
- Salt
- Unsalted butter: If using salted butter, reduce the amount of total salt.
How to Make Bubble Bread
- Make the dough: Ensure milk is slightly warmer than room temperature.
- If using soy milk straight out of the refrigerator, microwave for 20 seconds or until slightly warmer than room temperature. Add warm soy milk to a bowl and sprinkle the yeast on top. Roll the bowl to submerge the yeast. Add in sugar, condensed milk, salt and melted butter. Give it a quick whisk and then add in the flour, Use a wooden spoon utensil and mix together until just combined. Then use a spatula and mix together until no more flour remains and then cover.
- Leave at room temperature for 1 1/2 – 2 hours or until double in size.
- The dough will be quite sticky (this is normal). Dust the dough, working surface and hands with flour to prevent sticking. Degas the dough by pressing the air pockets out with your hands while shaping and speeding it into a square. Cut it into strips and then into small pieces. They do not have to be the same size or weight, about 6-15g each (about 30 pieces total). Place them onto a lined baking tray 1/2 cm apart from each other.
- Place into your oven with lights on and let it rise until double in size (about 30-60 minutes).
- Pre-heat your oven to 160 C (320 F). Right before putting into the oven, brush with soy milk. Bake for 15-18 minutes or until nice and golden on top. Transfer to a wire rack and immediately brush melted butter on top. Serve and enjoy!
Make Ahead for Potlucks & Holiday Dinners
Another great thing about this bubble bread is that you can prepare it ahead of time and refrigerate the dough overnight! IMO, I think they taste better when slowly fermented in the fridge overnight because the yeast has a longer time to ferment and for the dough to absorb flavour. With the holidays coming up, this is the perfect for for potlucks, parties and dinner gatherings! There are TWO ways to do this:
- Primary fermentation: After mixing the dough, cover and place in the refrigerator for 12-18 hours. Remove from the refrigerator and then let it rise in a warm place for 2 hours (or until double in size). And then proceed with the recipe. I microwave a bowl of water for 1 minute and then place the bowl inside the microwave (or oven with lights turned on).
- Secondary proofing: After primary fermentation and shaping it into balls, cover and place it into the refrigerator for 12-15 hours. Remove from the refrigerator 30-60 minutes before and then bake. The time depends on the temperature of your kitchen, but essentially they should come back to room temperature and be doubled in size.
I tend to go with the first option, but the second option is great for when you’re in a rush or don’t want to do any work prior to baking.
Bubble Bread Variations
I brushed it with some melted vegan butter today but there are so many ways to flavour-up bubble bread! Just brush different flavoured butters and condiments on top or sprinkle with additional ingredients before baking. Here are some delicious suggestions:
- Garlic Butter: your favourite garlic butter! May I suggest my miso garlic butter? 🙂
- Maple Miso Butter: 1:1:1 ratio of maple syrup, miso paste and butter
- Sweet Milky Butter: 2:1 ratio of condensed milk and melted butter
- cheese: sprinkle some shredded cheese on top prior to baking… or you can even take it a step up and STUFF the buns with cheese!!
- Cinnamon Sugar: Sprinkle some cinnamon sugar on top before or after baking. Adding it before baking will melt it down into a gooey-sticky consistency and sprinkling it on top after baking will be more like cinnamon sugar coated doughnuts
- Fruit ‘Sando’: my mom used to do this as a treat but she would slice the entire bubble bread in half and then spread whip cream on the base, add chopped fruit (usually berries and banans), add another layer of cream and then add the other half of the bun back on top. DEF A ONE TO TRY!!
More no-knead breads to try:
SAVE IT FOR LATER! ↓
If you recreate this Bubble Bread recipe let me know how you liked it by leaving a comment and rating below or by tagging me on Instagram @Okonomikitchen, I love seeing all of your tasty recreations!
Hungry for more? Be sure to subscribe to my newsletter and follow along on Instagram, Youtube and Pinterest for more deliciousness!
Bubble Bread (Mini Pull Apart Bread)
- Total Time: 28 minutes
- Yield: 2 servings
Description
This no-knead bubble bread is super soft, fluffy and subtly sweet. Easy to make and make ahead friendly!
Ingredients
- 1 1/4 cups (170g) bread flour
- 1/2 cup + 2 tsp (130ml) soy milk
- 2 tsp (8g) sugar
- 2 tbsp (25g) coconut condensed milk*
- 1/2 tsp (2g) instant dry yeast
- 1/2 tsp (2g) salt
- 2 tsp (8g) unsalted butter
Instructions
- If using soy milk straight out of the refrigerator, microwave for 20 seconds or until slightly warmer than room temperature. Add warm soy milk to a bowl and sprinkle the yeast on top. Roll the bowl to submerge the yeast. Add in sugar, condensed milk, salt and melted butter. Give it a quick whisk and then add in the flour, Use a wooden spoon utensil and mix together until just combined. Then use a spatula and mix together until no more flour remains and then cover.
- QUICKER VERSION: Leave at room temperature for 1 1/2 – 2 hours or until double in size.
- OVERNIGHT VERSION: Place in refrigerator for 12-15 hours. When ready, take it out of the refrigerator and let it proof in the oven with the lights on for 1 1/2 – 2 hours or until double in size.
- The dough will be quite sticky (this is normal). Dust the dough, working surface and hands with flour to prevent sticking. Degas the dough by pressing the air pockets out with your hands while shaping and speeding it into a square. Cut it into strips and then into small pieces. They do not have to be the same size or weight, about 6-15g each (about 30 pieces total). Place them onto a lined baking tray 1/2 cm apart from each other.
- Place into your oven with lights on and let it rise until double in size (about 30-60 minutes).
- Pre-heat your oven to 160 C (320 F). Right before putting into the oven, brush with soy milk. Bake for 15-18 minutes or until nice and golden on top. Transfer to a wire rack and immediately brush melted butter on top. Serve and enjoy!
Notes
- If no condensed milk use 1/2 cup + 2 tbsp + 2 tsp (145ml) soy milk and 1 1/2 tbsp (21g) sugar.
- Helpful Equipment: parchment muffin liners, 12 cup muffin tin, spatula, mixing bowls, whisk
- Nutritional Information Disclaimer: Nutrition information is a rough estimate calculated on an online tool (Cronometer).
- *Prep time does not include proof & rising time
- Prep Time: 10 minutes
- Cook Time: 18 minutes
- Category: Bread
- Method: Baking
- Cuisine: bread
Okonomi Kitchen is a participant in the Amazon Services LLC Associates Program. When you purchase something through my amazon affiliate links, I earn a small commission that helps me produce consistent content at no cost to you. Thank you for supporting my plant based kitchen!


Can you use regular cow’s milk instead of soy milk?
Yes!
Will pass this recipe down generations!
Pro tips to make it perfect:
1)Coconut condensed milk is a MUST. DO NOT opt this ingredient out.
Don’t have coconut condensed milk? Make it at home!
I make it homemade. I will take the extra steps to make the condensed milk because it’s KEY to pull the recipe altogether.
2)Smear splash of oil+condesed milk on top of the bread before you bake it, then when its done add more coconut condesed milk and put your oven on broil!
The broil with condesed milk on top is crucial for the golden brown finish!
3)Optional but vanila almond milk taste the best, also dont use water. Doesnt taste the same.
Love this!!
It was super yummy and my family finished it quickly. I’ve never thought of adding condensed milk into bread, and it’s such a awesome idea. Love your recipes
Absolutely IN LOVE with this recipe!! It gives me hope that I can really bake 🥲
I did the quick version and use maple miso butter as the glaze – it turned out so perfect!!!
It’s so fluffy and savoury and just absolutely delicious!!
This looks outstanding and am looking forward to making. I have a question out of curiosity, would using milk in place or soy milk ruin the recipe?
This is my first actual bread recipe, I’ve only had experience in using a bread maker so I was really nervous to try this recipe.
Instead of using condensed milk, I used Okonomikitchen’s roasted garlic miso butter and unfortunately my apartment was too cold so I had to keep rising it in different areas of my home. I found out that leaving it in the oven with the lamp and a hot boiling cup of water works THE BEST! The dough did overrise in the process so there wasnt any golden color on the bread but the satisfying pull and the taste was absolutely *Cheff kiss!! 😘😌
I made this with a fruit sando filling of strawberries and whipped coconut cream and it was so good and so cute, thank you for the recipe 🙂
I love this recipe. It’s so simple and the bread is such a lovely texture. Must try with different toppings.
This recipe was the perfect addition for my Christmas Care Package meals for friends who are sick, grieving, or dealing with family drama who are all shut in. The overnight option saved me after cooking a feast all day & this was my last side. I did the prep the night before & baked first thing in the morning before dropping everything off to everyone (socially distanced/no-contact). Everyone said they loved them so much & how they were the perfect appetizer buttery bite size 🤤! I’ve passed out the recipe to my friends & hope they keep wowing other people with Lisa’s amazing recipes 🔥
She’s literally my favorite online chef! My husband and I love practicing recipes from here & giving food to our friends. Authentic recipes for every day needs but also tradition dishes that will blow your mind!
This recipe was a HIT at Thanksgiving! We let the yeast rise overnight and it turned out delicious. I’d highly recommend topping with garlic butter.
This recipe was so easy to make, and the fact that you can prep the dough then leave it in the fridge overnight is so nice. I prepped it for a small dinner party I was having, then pulled the dough out of the fridge and finished the process really quickly. Five of us devoured all of the rolls, and if I’d made a double batch I think we’d still have eaten all of them. My four-year-old wants to make them again as soon as we can, and I don’t blame him.
This is an ABSOLUTE favorite!!! My inner French child is so happy right now, because these amazing fluffy balls are exactly the same as French “pain au lait” or “brioche” and that was one of my favorite things ever! And it still was growing up except that sinse I went vegan, I never found a good alternative to my sweet fluffy “pains au lait”. And finally: there it is!! I am beyond happy AND it was super easy to make. I made the quick version without condensed milk, I can’t even imagine how fluffy and sweet it can become! But really, thank you so much Lisa, your recipe brought me back one of my favorite foods <3
Yummy! Very fluffy and so cute! I didn’t even get to let it rise/rest for as long as recommended cause I was on a bit of a time crunch ahah, but I was presently surprised with the texture regardless 😀 The bubbles lowkey do take quite a bit of time to roll out but I do think it adds a lot to an otherwise very simple bread. Lisa is right that this is a very good base to add different flavors to!
One note is that, if you double the recipe with the included tool, it does NOT double the metric amounts or the measurements in the notes. Be careful cause I almost totally messed this up with that T^T
Yo! This recipe is amaaaayyyyzing! It’s so easy to follow and there’s NO WAY you can get it wrong! Only 7 ingredients! 7 is my lucky number, baby. I made this for the fam bam and they all loved it! My mom said we need to make it for Thanksgiving. It was my first try making this and it came out perfectly fluffy and delicious!
Yo! This recipe is amaaaayyyyzing! It’s so easy to follow and there’s NO WAY you can it wrong! Only 7 ingredients! 7 is my lucky number, baby. I made this for the fam bam and they all loved it! My mom said we need to make it for Thanksgiving. It was my first try making this and it came out perfectly fluffy and delicious!
Thanks for the recipe Lisa!! Mine came out a bit dense at the bottom and the top surface was slightly cracked, can any help me? 😄
This super cute, very easy and absolutely delicious bread is definitely gonna be my go-to for potlucks and whenever I am craving a nice home-made bread!
I slathered it with butter and kept popping a few bubbles every few hours because I couldn’t resist and my only disappointment was that it was quickly gone, hahaha!!
Definitely making it again, so yum!!!
This is the best recipe! so good I made it twice two days in a row!!!
This recipe was easy, lots of fun, and came out SO GOOD. I saw it on Tiktok first and couldn’t stop thinking about it, so I finally took the plunge and made it. I made a few small mistakes I’ll know to do better for next time (because there will be a next time) I make this, but the recipe itself was simple to follow. I’ve been making a lot of breads lately but this recipe is really unique and special. Perfect for this time of year, to serve with a veggie soup or just on its own!
i’ve been struggling to find food i have the ingredients for since starting to go vegan and i absolutely loved this recipe! your blog is the first place i go when trying to think of a snack/meal i’d enjoy
i didn’t have any condensed milk so i used the substitute you recommended which worked perfectly! i also added some cinnamon sugar on top before cooking and it was the perfect treat :))
These were so easy to make (only waited 2 hours because I would not wait 😅)! Perfect for breakfast or afternoon snack ❤️ The bread itself was perfecto, but definitely will try making the spreads! 🤤🤤
Easy to make and it tastes amazing!
THE ABSOLUTE BEST!!! I made the quick version bc I’m impatient, but it came out beyond delicious! Tomorrow I’ll be making the overnight version to see how much fluffy they become. I smothered mine in coconut condensed milk butter and it brought me back to my childhood eating sweet bread and coffee before bed. Thank you for your amazing recipes Lisa<3