Learn how to make authentic Karaage with this easy recipe—crispy, golden-brown chicken packed with umami flavor. This guide reveals the secrets to achieving a crunchy exterior while keeping the meat tender and juicy, from the perfect marinade to ideal frying techniques. Plus, get expert tips on choosing the right type of coating and making your version of the best Japanese Fried Chicken extra crispy and flavorful every time!

Table of Contents
My mom loves fried food, especially karaage, so naturally, I grew up eating a lot of it! When we visited Japan during the summers, we’d try karaage from all the department stores, izakaya, and food stalls and do taste comparisons—known as tabe kurabe (食べ比べ) in Japanese.
Even though it’s the same dish, the flavor, texture, and overall deliciousness can vary so much. Our favorites were always from food stalls or hidden little spots. But for me, the absolute best was always my grandma’s or my mom’s. Today, I’m sharing a recipe that combines the best parts of each to create the ultimate version.
What is Karaage?
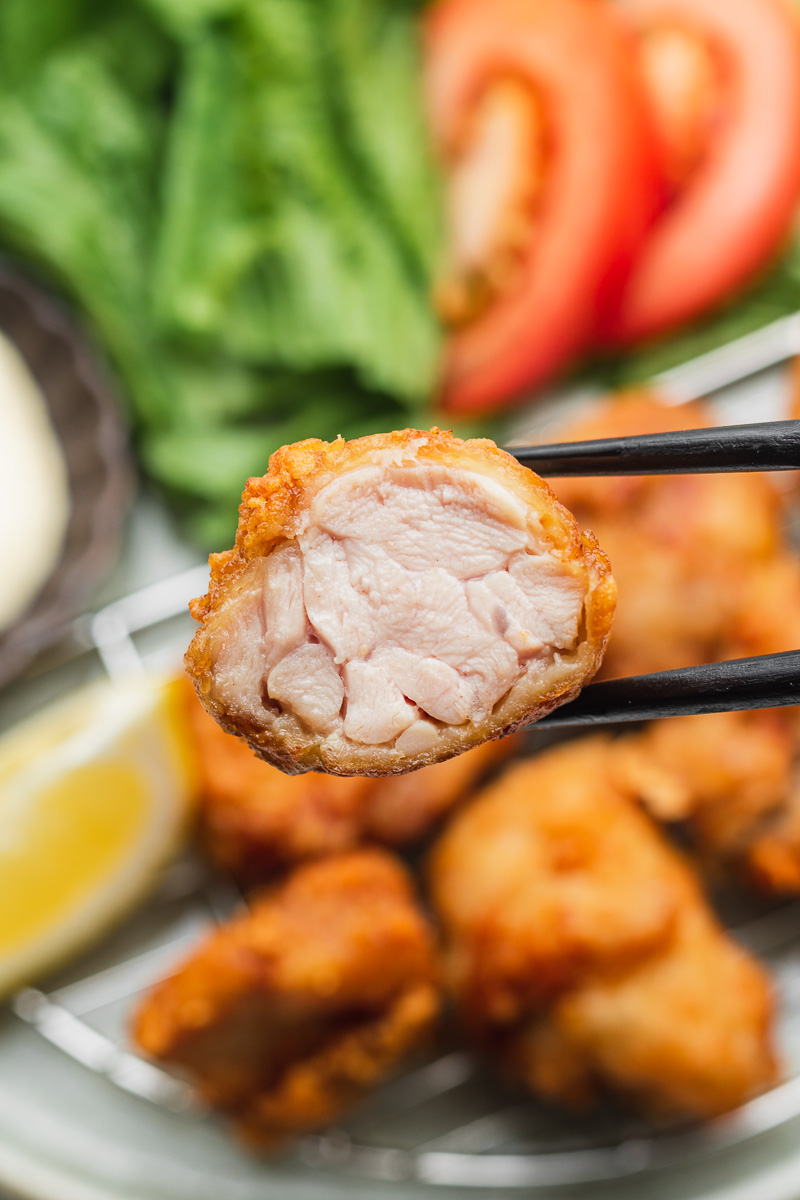
Karaage (唐揚げ) is a popular Japanese fried chicken dish known for its crispy exterior and juicy interior, making it a favorite in Japanese cuisine. While karaage is a general term that refers to the cooking method of frying food in oil, it is primarily associated with chicken in Japan. However, you can also find variations made with fish or vegetables. This versatile dish is commonly served as a main or side dish at home, as well as in restaurants, izakayas (Japanese pubs), supermarkets, and convenience stores. Often included in bento boxes, karaage can be enjoyed almost anywhere, making it a beloved staple that highlights the essence of Japanese comfort food.
Key Ingredients
There are 4 main components to karaage:
- Chicken
- Marinade
- Coating
- Frying oil (for frying)
Although most karaage recipes are very similar, little tweaks to these ingredients will yield quite different results. It all comes down to personal preference. As always, I encourage you to use this recipe as a blueprint and find what combination you like the most! Here’s a bit more on each component:
Chicken
In Japan, karaage is traditionally made with skin-on, boneless chicken thighs for maximum flavor and juiciness—the crispy skin adds texture, while the thigh meat stays tender. Here in Canada, however, skin-on thighs are usually sold with the bone in, so you’ll need to debone them yourself, which can be a bit time-consuming. Growing up, my mom often used skinless thighs to skip the deboning, and while they don’t offer the same crispy skin, they still make delicious, juicy karaage. If you’re in a pinch, opt for thighs over breast meat, as thighs are much more tender and flavorful.
Seasonings and Marinade
When it comes to seasonings for karaage, this is where recipes can truly take on a personal touch. The base marinade typically includes soy sauce, sake, and ginger for classic Japanese flavor, but from there, you can adapt it to suit your preferences. My mom never measured ingredients and added seasonings intuitively, while my grandma had her own twist, incorporating a bit of Kewpie mayonnaise for extra tenderness. My mom also picked up a tip from an izakaya she frequented to add spices like nutmeg, allspice, or garam masala to reduce any unwanted gamey flavor and as a kakushi aji (hidden flavor) and she loves to add garlic. Personally, I like to add a bit of MSG for an extra umami boost, sometimes in the marinade, other times in the coating. The recipe I share here is a blend of my grandma’s, mom’s, and my own methods.
Some popular variations to try in karaage seasoning include:
- Sesame oil
- Mirin
- Oyster sauce
- Curry powder
- Dashi
- Five spice powder
- Sansho pepper
- Aonori (seaweed flakes)
- Eggs: Mainly adds more volume to the chicken and keeps the chicken juicier for longer. My mom recommends adding eggs if making for bentos.
Coating
When it comes to karaage, the coating you choose significantly affects the texture and overall eating experience. Here’s a breakdown of popular coatings and combinations, each with its unique characteristics:
- All Flour: A thicker flour coating adheres well to the chicken, sealing in juices for a soft, juicy interior. It’s crispy when freshly fried but tends to soften as it cools, making it a good option for bento boxes. Flour also adds a subtle sweetness from the wheat.
- Cake Flour: Produces a soft, lighter crunch. It’s finer and absorbs less oil, resulting in a crisp but tender finish.
- Bread Flour: Creates a slightly thicker, more structured coating with a chewier texture. Not be as crispy as other flours.
- Potato Starch: This versatile starch can create either a light, crispy texture with a thin coating or a crunchier, thicker crust. While it’s crispy right after frying, it can absorb more oil and become greasy when cooled. Its neutral flavor keeps the focus on the chicken.
- Corn Starch: With finer particles than potato starch, corn starch yields a thin, light, and crispy coating that doesn’t absorb much oil. It’s ideal for dishes served with sauces (like chicken nanban), as it maintains crispiness even with added moisture.
- Tapioca Starch: Creates a light, airy, and crisp texture with a glassy finish. It maintains crunchiness and is less greasy, though it can be fragile with a thin coating.
- Sweet Potato Starch: Produces a crisp, airy coating that’s slightly thicker than potato starch. Its mildly earthy flavor adds depth while staying neutral, and it retains crispiness without becoming greasy.
- Rice Flour: Known for its fine texture, rice flour creates the thinnest, lightest coating and doesn’t absorb much oil, resulting in a crispy, crunchy finish. When combined with eggs, it can also develop a chewy texture.
- Mochiko: Produces a crisp, slightly chewy coating with a hearty texture and subtle sweetness that enhances the chicken without overpowering it.
- Glutinous Rice Flour: Creates a chewy, thick coating that’s softer and doughier than other options. It’s less crispy but adds a unique contrast between the exterior and interior.
Breakdown Chart of Each Type of Flour and Starch for Coating
| Coating | Texture | Flavour | Pros | Cons |
| Flour | Thick, soft and juicy interior, crispy when fresh, softens as it cools | Subtle sweetness from wheat | Seals in juices, great for bento boxes, crispy when fresh | Softens as it cools |
| Cake Flour | Light, airy, soft, delicate, absorbs less oil | Subtle sweetness from wheat | Light, delicate crunch, absorbs less oil | Lighter crunch may not satisfy those looking for a thicker coating |
| Bread Flour | Thicker and chewier | Subtle sweetness from wheat | Hearty, firm coating. | May not achieve the same crispness as lighter flours |
| Potato Starch | Light, crispy or thicker, crunchier crust, absorbs oil when cooled | Neutral | Versatile, crispy right after frying, neutral flavor | Can become greasy when cooled |
| Corn Starch | Thin, light, crispy, maintains crispiness with moisture | Neutral | Light and crispy, doesn’t absorb much oil, holds well with sauces | Fragile, may break easily |
| Tapioca Starch | Delicate, crisp, light, glossy finish, less greasy | Neutral | Light and airy, delicate crunch, less greasy | Can be fragile with a thin coating, not ideal for wetter dishes |
| Sweet Potato Starch | Crisp, airy, slightly thicker than potato starch, holds up well when cooled | Mildly earthy, subtle sweetness | Holds up well when cooled, doesn’t become greasy | Slightly harder to find, may not be as versatile |
| Rice Flour | Thin, light, crispy, slightly chewy when combined with eggs | Neutral, slightly nutty with egg | Crispy, light, great texture, works well with eggs | Can lack richness compared to other coatings |
| Mochiko (Sweet Rice Flour) | Crisp with chewy finish, thick coating, slightly sweet | Slight sweetness | Crunchy and chewy, adds depth of flavor | Less crispy, more doughy finish |
| Glutinous Rice Flour | Chewy, doughy, soft coating, less crispy, holds sauces well | Mildly earthy, adds depth | Distinctive chewy texture, holds sauces well | Less crispy, more doughy finish |
Coating Combinations
- Flour + Potato Starch: This classic combo balances a moist interior with a crispy, crunchy exterior (most common).
- Rice Flour + Cake Flour: A lighter, crispy option with a juicy interior, though it may become slightly oily.
- Cake Flour + Corn Starch: Remains crispy even with sauce, perfect for bento as it’s both moist and crunchy without excess oil.
- Cake Flour + Tapioca Starch: Similar to cake flour + corn starch but a little crispier.
- Rice Flour + Corn Starch: Thin, crispy, and flavorful, this mix keeps the chicken juicy even after cooling.
- Rice Flour + Potato Starch: Adds a crunchier, slightly oily finish with a juicy interior.
- Potato Starch + Corn Starch: Ultra-crispy but can be a bit oily.
- Tapioca Starch + Corn Starch: Very crispy yet light.
Each coating option brings its own texture, so experiment to find what you enjoy the most!
By the way, if you like a more crispy-crunchy type of texture, try my chicken karaage that is coated in starch crispies! This version uses chicken breast but you can swap it out for high. It’s a more modern take on karaage but it might be my new favourite!
Frying Oil
I get asked often what is the best oil to deep fry foods. Here are some options:
- Sunflower Oil: With a smoke point around 440°F (227°C), sunflower oil is another good option for frying karaage. Its clean, mild flavor won’t interfere with the taste of the chicken, resulting in a light, crispy finish. Our family uses this one as of recently.
- Vegetable Oil: Commonly used for deep frying, vegetable oil has a high smoke point (around 400°F/205°C) and a neutral flavor, making it ideal for crispy, evenly-cooked karaage.
- Canola Oil: Similar to vegetable oil, canola oil has a high smoke point (around 400°F/205°C) and a mild flavor, helping keep the chicken light and crispy without impacting the flavor profile.
- Rice Bran Oil: Popular in Japanese cooking, rice bran oil has a high smoke point (around 450°F/232°C) and a neutral taste, allowing the flavors of the marinade to shine through. Its antioxidant properties can also help prolong freshness in frying.
How to Make Crispy Chicken Karaage
I find Japanese fried chicken much easier to make because its a simple marinade, coated once, we’re working with smaller pieces and has a quick frying time!
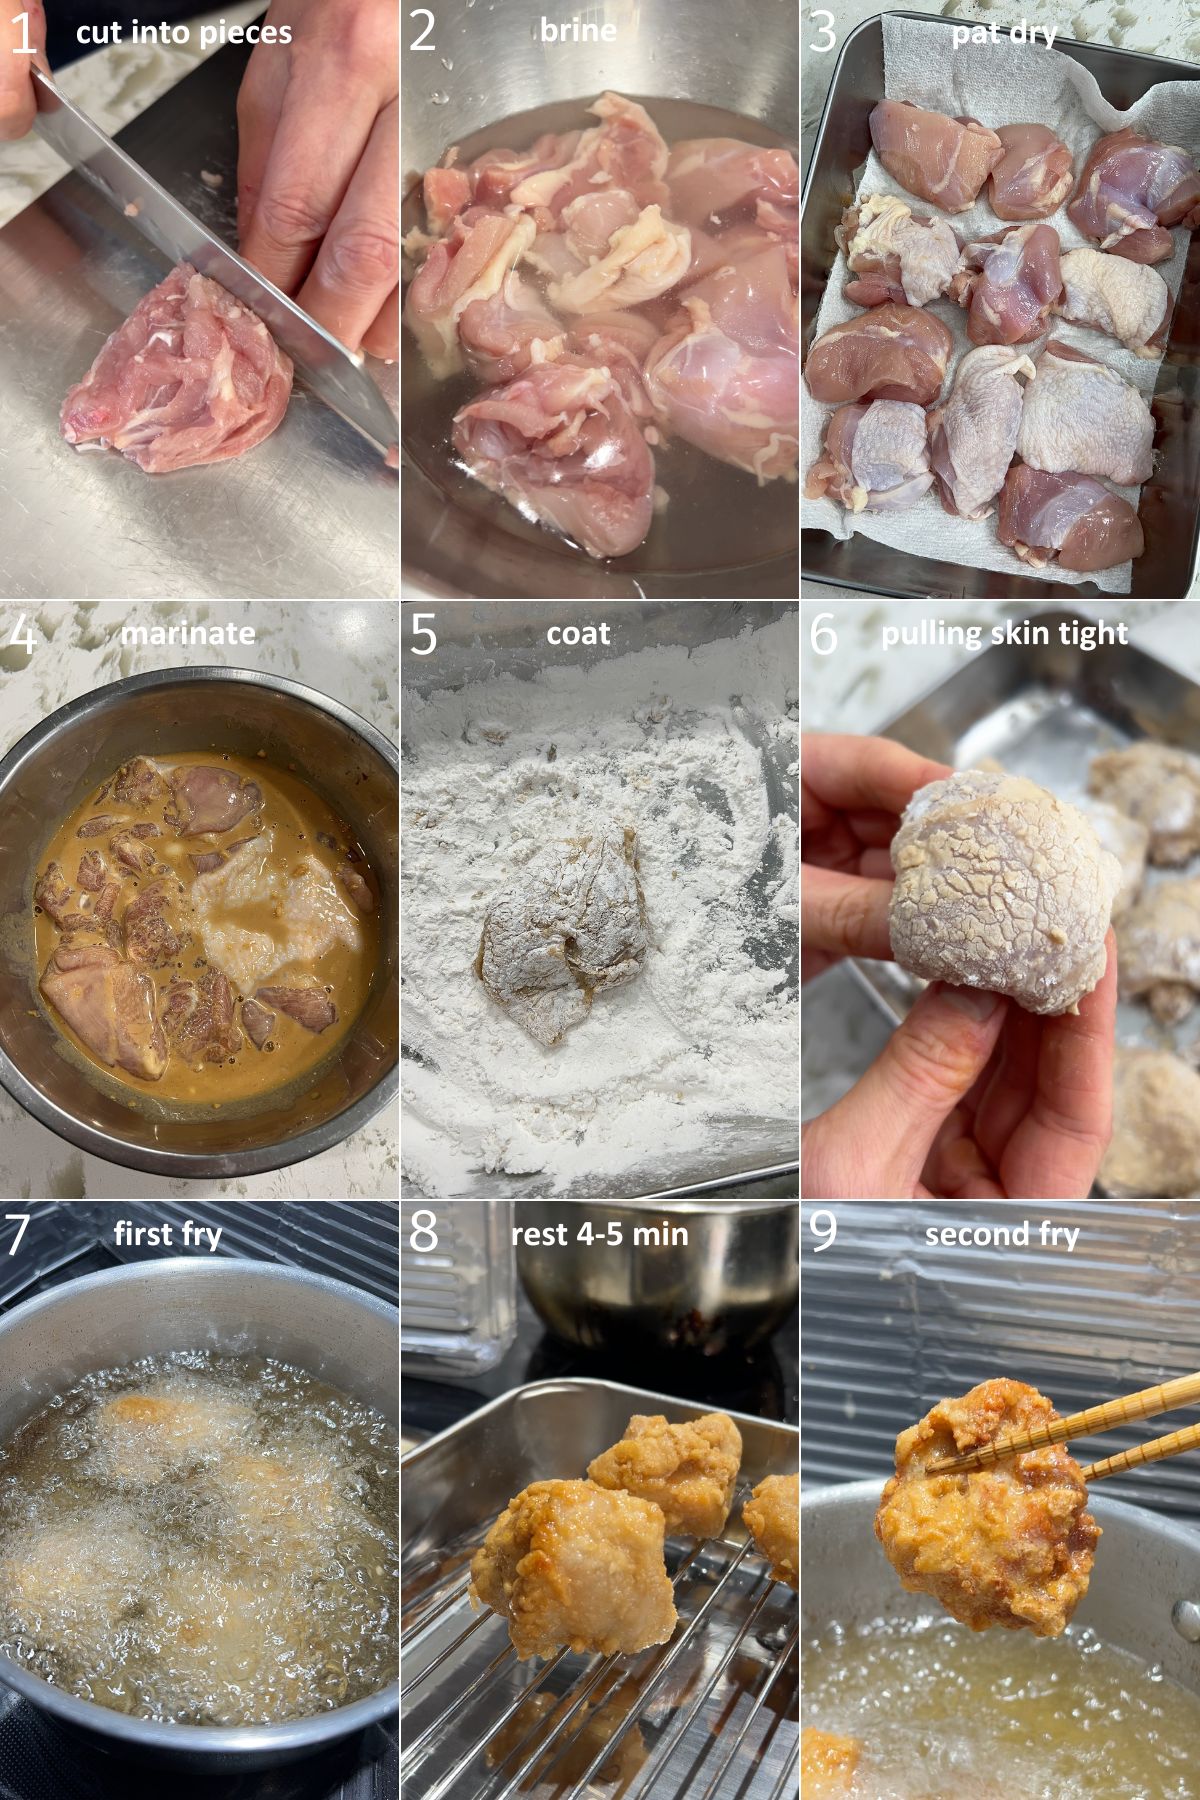
- Prep Chicken: Debone and trim chicken thighs, cutting into 2-inch pieces.
- Brine: Mix water with salt and sugar. Soak chicken for 1 hour at room temperature.
- Marinate: Drain and pat dry. In a bowl, combine seasonings. Mix well, then add cake flour. Add chicken and marinate for 15 minutes at room temperature.
- Coat: Prepare starch or flour. Coat marinated chicken in the coating and let rest for 15 minutes.
- Fry: Heat oil to 160°C (320°F) and fry chicken for 1 minute on each side, then increase temperature to 180-190°C (360-375°F) and fry until golden brown (about 2 minutes).
Tips for the Best Karaage
- Brining: Brining the chicken beforehand really makes a difference in the juiciness of the chicken. If you are really short on time, rubbing some sugar in it can also help retain soft and juiciness.
- Adding flour to the seasoning: This helps prevent soggy karaage and keeps them crispy by absorbing any excess seasoning liquid.
- Stretch the skin before coating: To ensure an even coating, place the chicken in a tray with flour rather than just sprinkling flour directly over it. This way, each piece is evenly coated without excess flour clumping on certain areas. As you coat the chicken, stretch the skin outwards so it covers the meat more uniformly. If the skin is left bunched up, the coating will concentrate in one area, which can affect texture and flavor.
- Rest after coating and before frying: Allow the coating to moisten before frying so that it doesn’t come off during frying.
- Marinate for 15 Minutes: Marinating karaage for too long can actually draw moisture out of the chicken due to osmotic pressure, which can make the finished dish tough and overly strong in flavor.
- Frying temperature: The most important element to delicious karaage is the frying temperature. I recommend using a oil thermometer for best results, especially if it’s your first time making karaage.
- Double frying: If your chicken pieces are under 30 grams, no need to double fry. However, I do find bigger pieces of karaage more tasty!
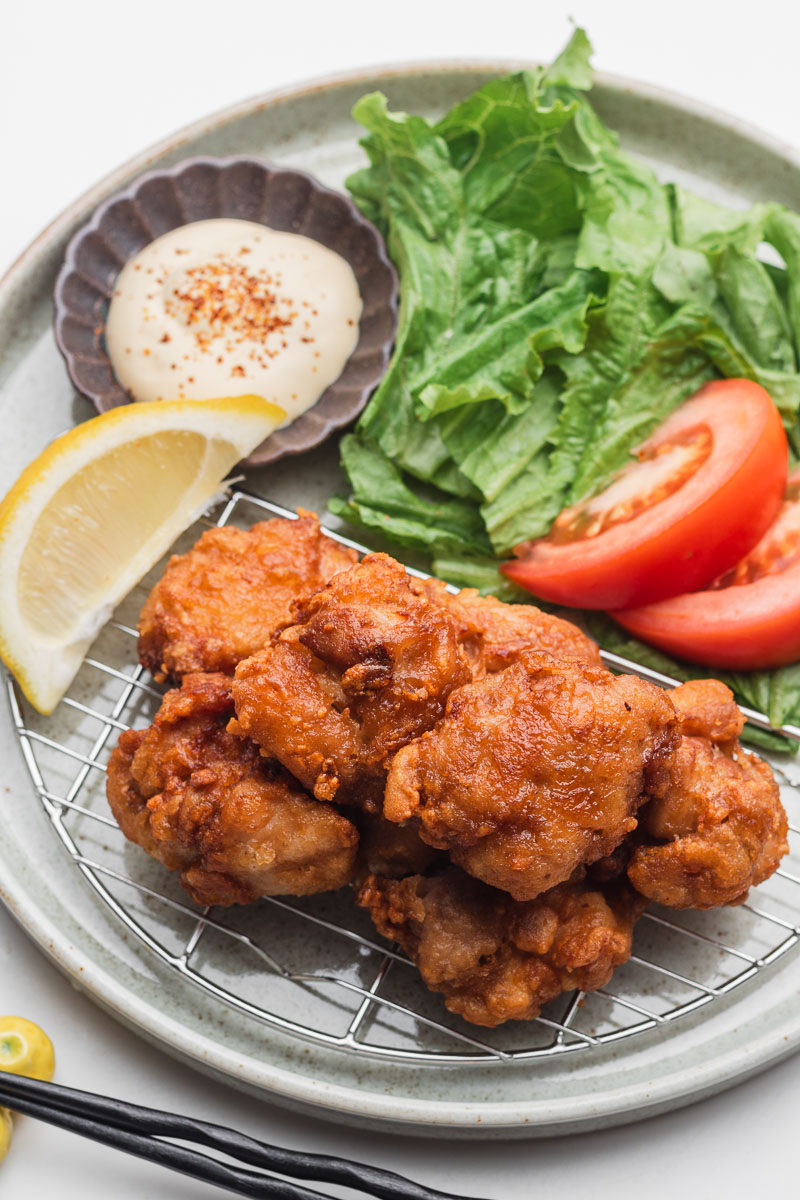
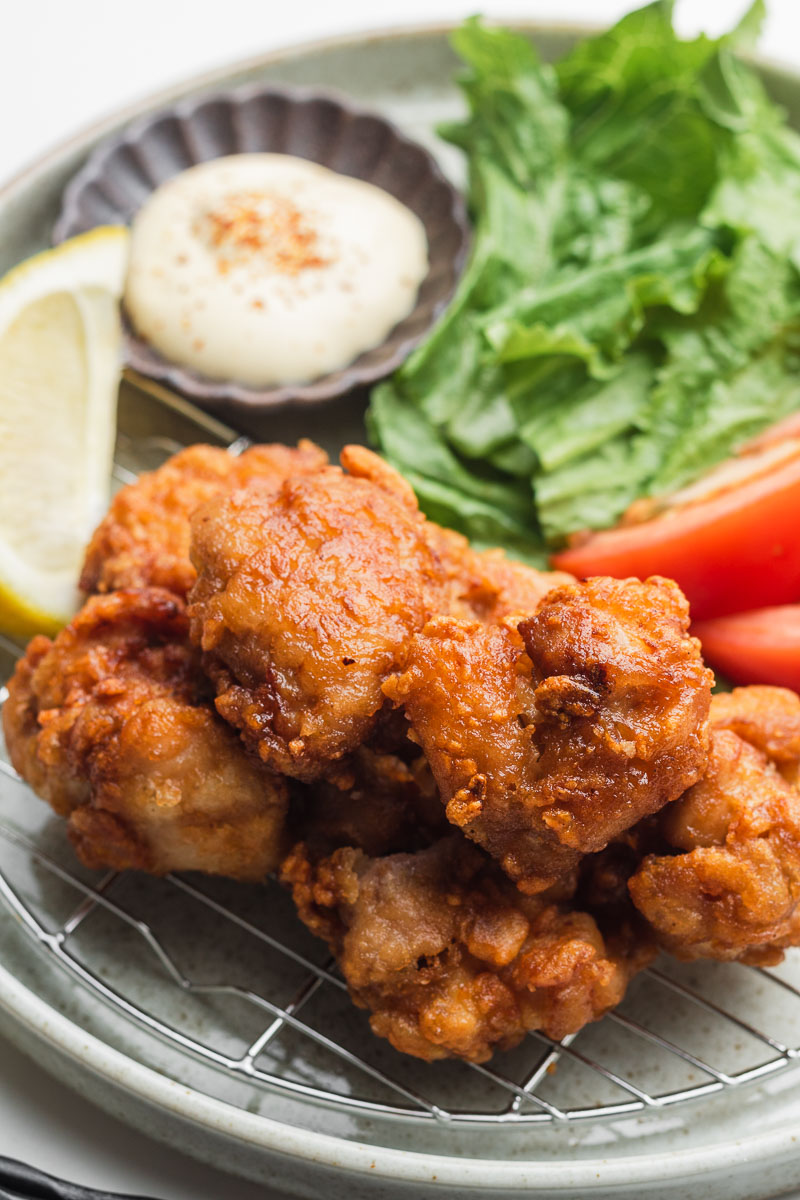
Serving Suggestion
Karaage is often served with a squeeze of lemon for freshness and mayo for dipping. It can be a main protein or side dish alongside miso soup and rice at home, or enjoyed as part of a variety of dishes at an izakaya. Here are more ideas for serving:
- Rice Bowls (Donburi): This is a really popular way or serving karaage, especially leftovers! Drizzle some mayo or drizzle with your favourite sauce.
- Greens or Cabbage: Pair with some greens or shredded cabbage to add some vegetables.
- Japanese Curry: Just like katsu curry, serve on top of a bowl of Japanese curry rice for a comforting, hearty dish.
- Bento Box: Pack in a bento box with side dishes like tamagoyaki (Japanese rolled omelet), pickles, and rice for a well-rounded lunch.
- Noodle Dishes: Add on top of a bowl of noodles like ramen or udon for a delicious protein-packed addition to the dish.
- Karaage Fried Rice: Cut up some leftovers and throw it into fried rice.
- Onigiri:
How to Store Leftovers
There are a few key steps to follow to store while keeping it crispy, whether you’re refrigerating or freezing. When storing in the fridge, place the pieces in an airtight container or wrap them in foil to prevent moisture from softening the coating. Karaage can last in the fridge for up to three days. For reheating, use an oven or toaster oven at 350°F (175°C) for 5–10 minutes, which will help restore the crispiness in comparison to microwaving.
For freezing, let it cool completely, then freeze in a single layer on a baking sheet for 1–2 hours. Once firm, transfer to a freezer-safe bag or container, removing as much air as possible. Frozen karaage will stay fresh for up to one month. To reheat, bake at 375°F (190°C) for 15–20 minutes, or air fry at 350°F (175°C) for 10–12 minutes, flipping halfway through. This will help you enjoy crispy karaage even after storing.
Recipe FAQ
No, sake isn’t strictly necessary, but it adds flavor and texture. It’s slightly acidic, rich in umami, and helps tenderize the chicken, making it juicier. Sake also evaporates quickly, allowing the coating to crisp up faster for a light, crunchy texture.
No, this is completely optional but does make it more juicy!
Soggy and dry fried chicken can be caused by uneven cooking. If the oil is too hot or the chicken pieces are too large, the outside may cook faster than the inside. A sticky batter suggests the oil temperature was too low, preventing moisture from evaporating. To avoid this, maintain the right oil temperature and consider double frying for a crispier result.
I have a vegan tofu karaage recipe that you can try or simply swap the chicken with pressed medium firm, firm or extra firm tofu.
Enjoy!! If you make this Karaage recipe, let me know! Leave a comment, rating and if you decide to share it on socials, tag me on instagram @Okonomikitchen. I’d love to hear from you!
Print
Karaage (Japanese Fried Chicken)
- Total Time: 40 minutes
- Yield: 2 servings
Description
This easy chicken karaage recipe delivers the perfect balance of crispy, golden-brown coating and juicy, flavorful chicken. A beloved staple of Japanese cuisine, it’s ideal for serving as a main dish or in bento boxes. Learn our tips and tricks for achieving the perfect karaage every time!
Ingredients
Chicken Brine
- 350–400 g chicken thigh, preferably skin on
- 1 cup (250 ml) water
- 1 1/2 tbsp (20 g) salt
- 1 1/2 tbsp (20 g) sugar
- OR 2 tsp sugar
Seasoning
- 1 tbsp (15 g) kewpie mayo, optional
- 2 tbsp (30 ml) sake
- 2–3 tbsp Japanese light soy sauce
- 1 garlic clove, minced
- 1 tsp (5 ml) ginger juice
- 1/8 tsp all spice, nutmeg or graham masala*
- 1/2 tsp MSG*
- 2 tbsp cake flour or potato starch (absorbs excess moisture to keep it crispy)
Coating
- 1/2 cup starch or flour of choice or a combination (corn starch, potato starch, cake flour, rice flour; refer to blogpost) I use a 1:1 ratio of rice flour and corn starch.
- 2–4 cups neutral oil, for frying
For serving
- lemons
- schimi togarashi
- Japanese mayonnaise
Instructions
Prepare the Chicken
- If using bone-in chicken thighs, debone them and remove any excess fat. Cut the thighs into bite-sized pieces (about 2 inches).
- To brine the chicken, in a bowl, mix the water, salt, and sugar. Place the chicken in the brine and let it rest for 1 hour at room temperature. If the environment is warm (>30°C), use very cold water to maintain a safe temperature.
- Alternatively, you can massage the chicken with sugar and then move on to the next step.
Marinade the Chicken
- Drain the chicken and pat it dry (skip this step if using sugar). In a separate bowl, combine the kewpie mayo, sake, soy sauce, garlic, ginger, MSG and nutmeg (or all spice/graham masala). Mix well, then add the cake flour and combine. Allow the chicken to marinate for 15 minutes at room temperature.
Coat the Chicken
- In another bowl, mix the starch or flour (I typically use a 1:1 mix of rice flour and corn starch).
- Stretch the chicken skin around the meat and shape it into a ball and coat in starch mixture, ensuring each piece is well-coated. Place the coated chicken on a tray and let it rest for 5 minutes to allow the coating to moisten (if you’re in a hurry, you can lightly spray it with water).
Fry the Chicken
- Add oil to a deep pan 3.5 cm high from the base and eat over medium high heat to 160°C-170°C (320°F – 338°F).
- Once it reaches temperature, reduce to medium. Fry the chicken for 1 minute, then flip and fry for an additional 2 minutes, or until the internal temperature reaches 70-75°C (160-165°F). Let the chicken rest for 3 minutes to allow residual heat to finish cooking.
- Next, increase the oil temperature to 180-200°C (360-400°F) and fry the chicken until golden brown, about 2 minutes.
- For smaller pieces (under 30 g), fry at 180°C (350°F) for 4-5 minutes until golden brown, no need to double fry.
- Place the fried chicken on a wire rack to drain excess oil and let it rest before serving.
Serve
- Plate alongside salad or shredded cabbage if desired. Serve with lemon juice, Japanese mayo and schimi, and enjoy!!
Notes
- *Refer to blogpost to see what other types of spices or hidden flavours you can add!
- Prep time does not include brining waiting time.
- Prep Time: 30 minutes
- Cook Time: 10 minutes
- Category: Main dish
- Method: Deep frying
- Cuisine: Japanese
Nutrition
- Serving Size: 1 serving
- Calories: 617
- Sugar: 1
- Sodium: 660
- Fat: 35
- Saturated Fat: 7
- Unsaturated Fat: 19
- Trans Fat: .51
- Carbohydrates: 20
- Fiber: 0.7
- Protein: 50
- Cholesterol: 157 mg
Okonomi Kitchen is a participant in the Amazon Services LLC Associates Program. When you purchase something through my amazon affiliate links, I earn a small commission that helps me produce consistent content at no cost to you. Thank you for your support!


I made this recipe with the corn starch, tapioca starch and flour and it was so crispy. It stayed crispy even when cooled down too. We had leftovers the next day and it still tasted amazing.