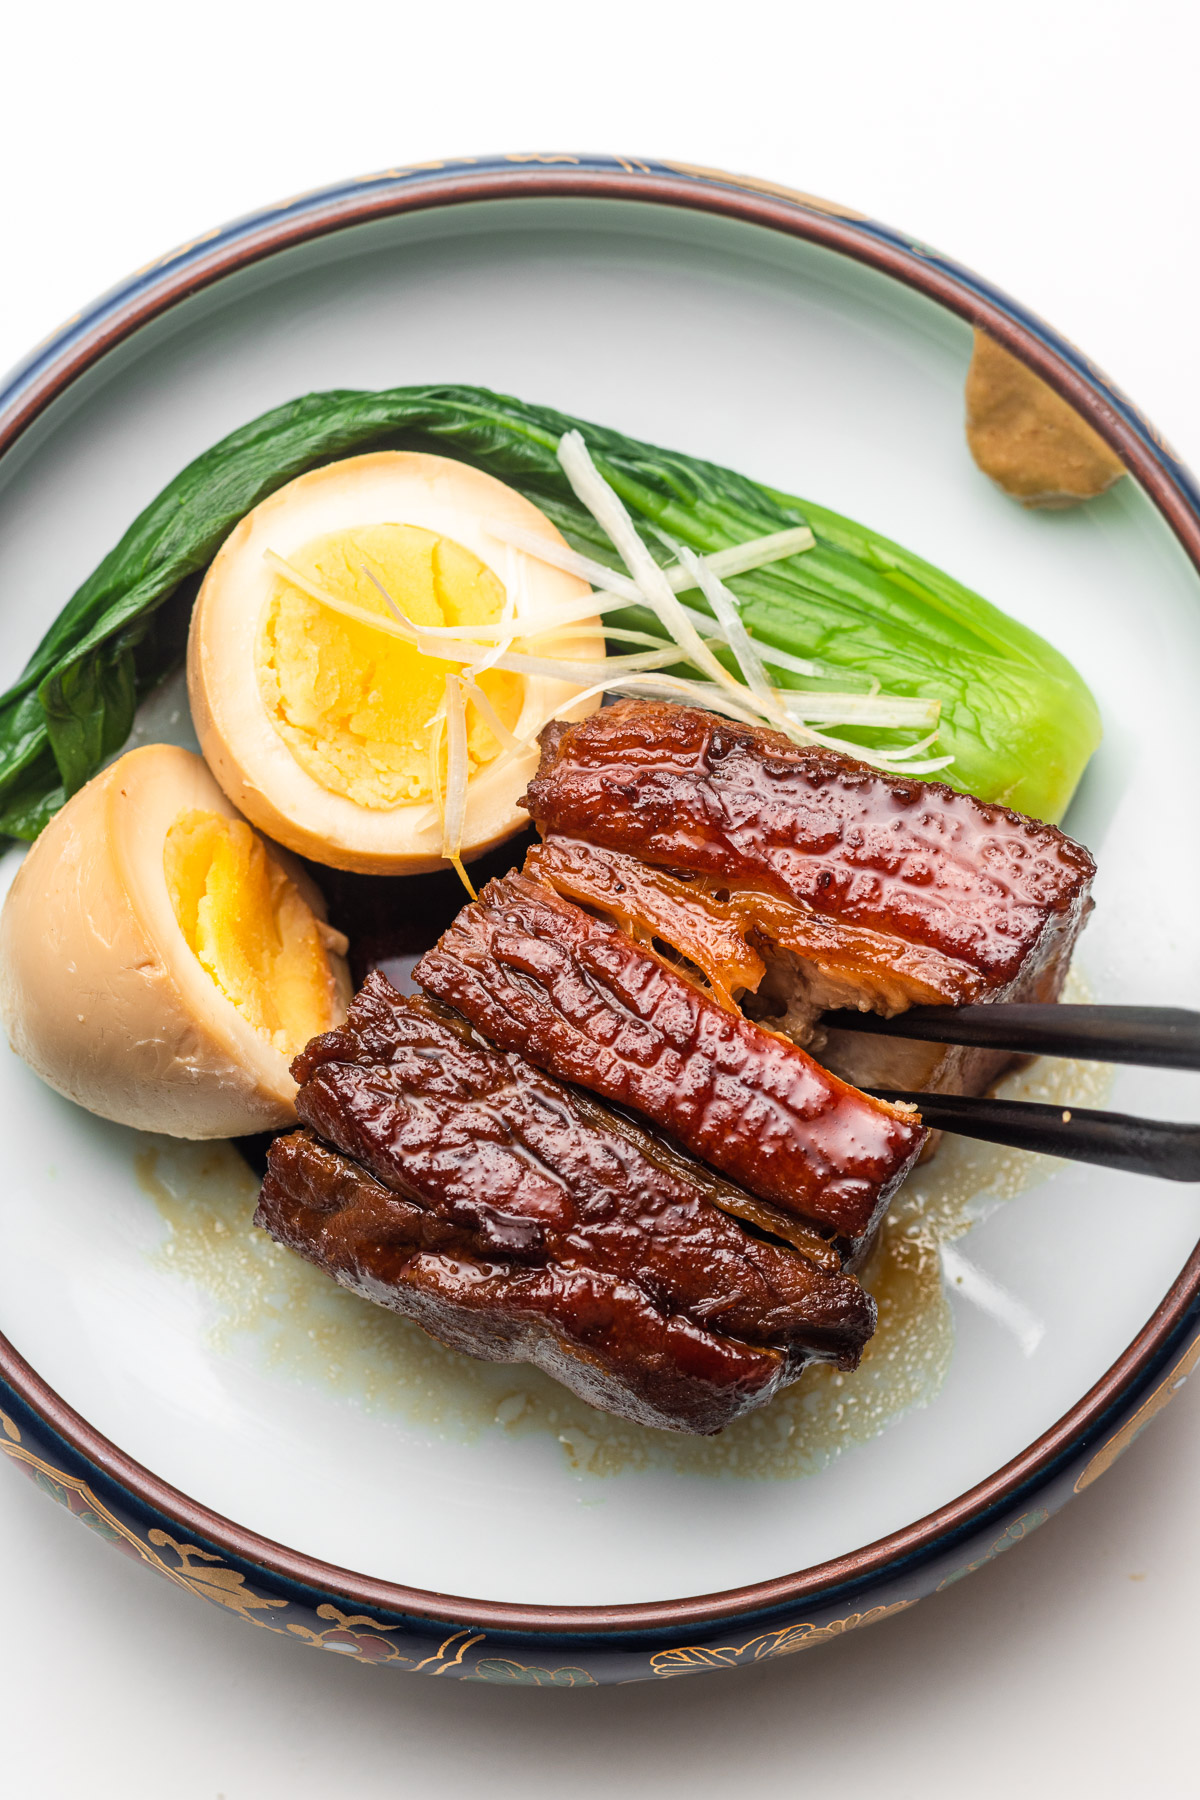
Kakuni (Japanese Braised Pork Belly) is a classic dish made by slowly simmering pork belly until it’s melt-in-your-mouth tender. Simmered in a savory-sweet broth of dashi, soy sauce, sake, and mirin, the pork absorbs rich umami flavor with every bite. It’s deeply satisfying, full of comfort, and surprisingly simple to make with just a few key ingredients.

Table of Contents
What is Kakuni?
Kakuni (角煮) literally translates to “square simmered.” The name comes from the thick, square-cut chunks of pork belly that are gently braised until fork-tender. Each bite is packed with umami from dashi, soy sauce, sake, and mirin—a combination that defines so many comforting Japanese dishes.
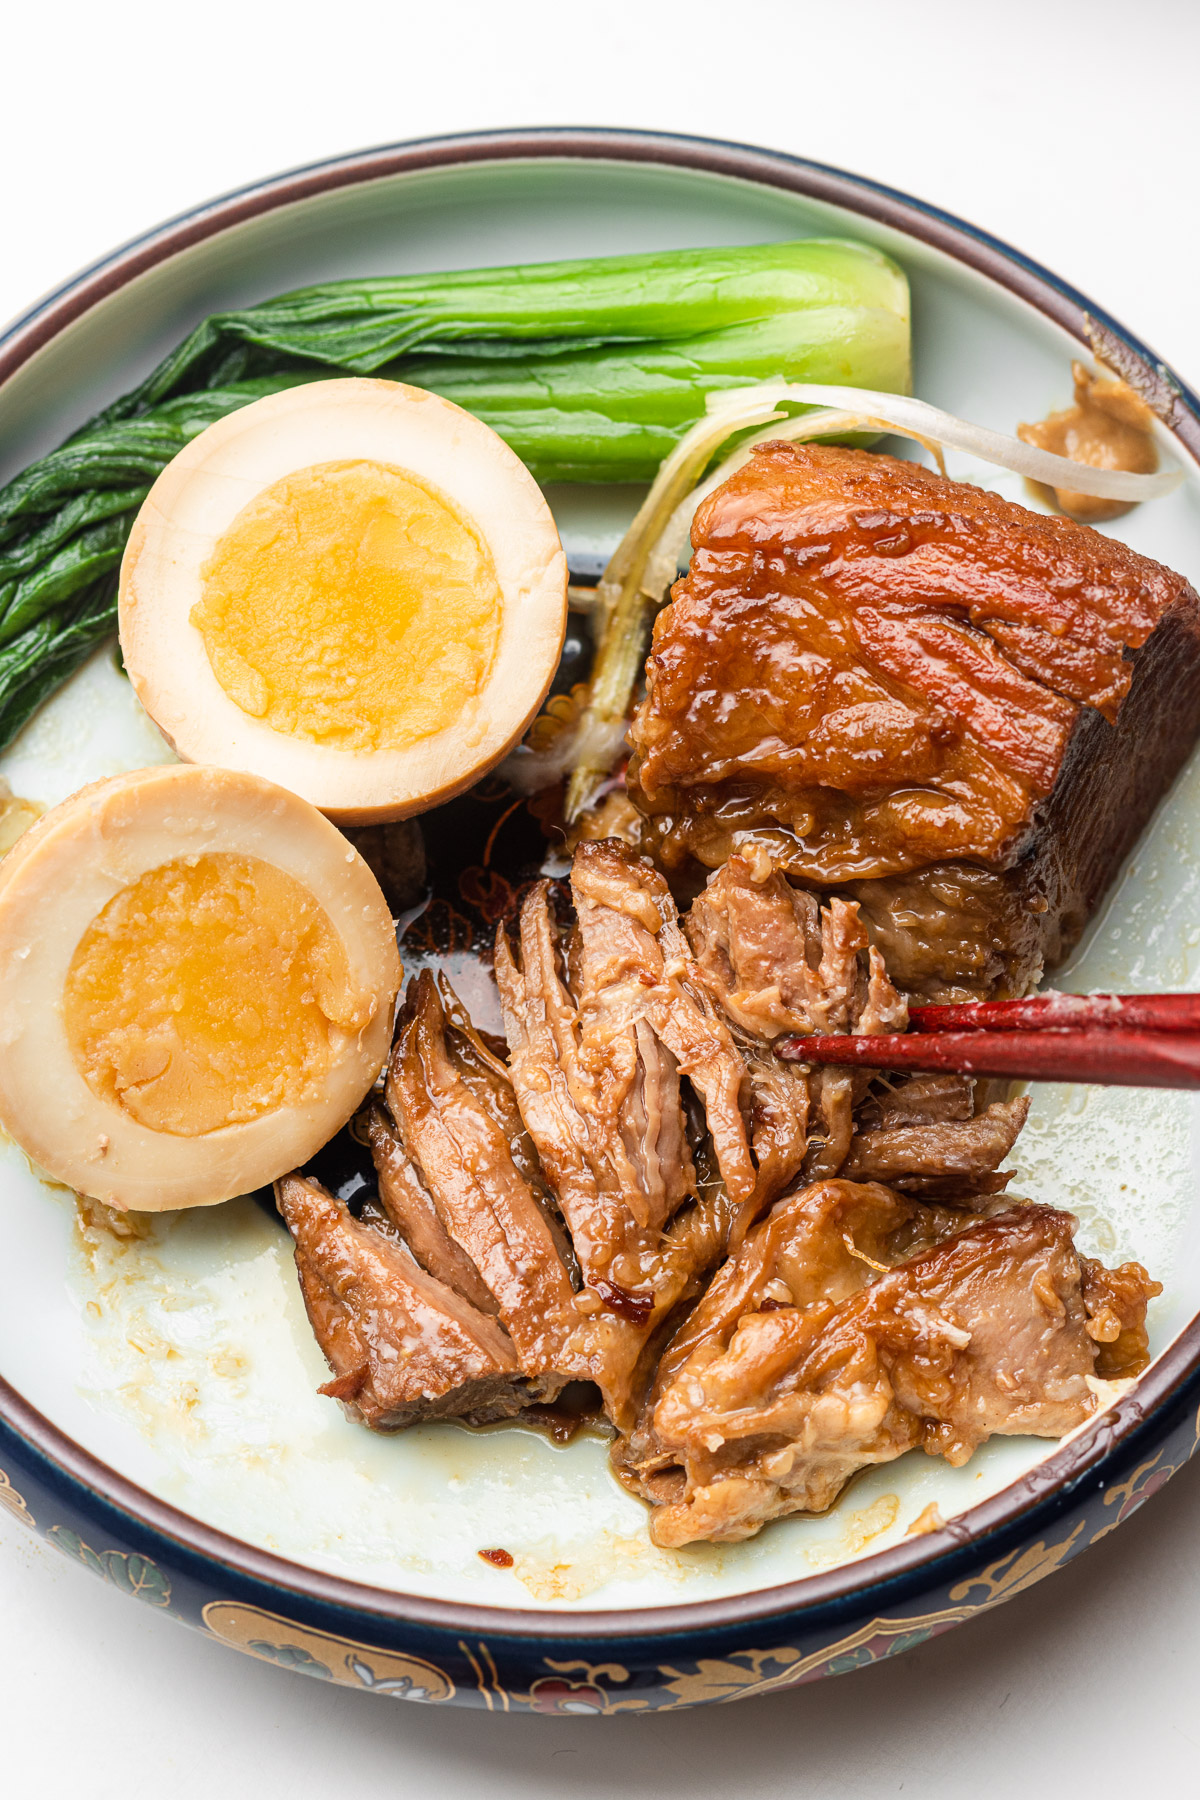
The flavor is deeply savory with a touch of sweetness, but what really makes Japanese braised pork belly so special is the texture. The pork belly becomes so soft that it almost falls apart, yet the layers of fat and lean meat stay distinct and satisfying. It’s no surprise that this dish is a household favorite in many parts of Japan, especially in Kyushu where it’s often enjoyed with mustard or as part of a donburi (rice bowl).
A Brief History
Kakuni is believed to have roots in Chinese red-braised pork (dong po rou, 东坡肉) but has evolved into a distinctly Japanese dish over the centuries. It’s especially popular in Nagasaki, which has a long history of cultural exchange with China. There, kakuni is often made with a bit of local flair—sometimes even served with steamed buns or in oden. A similar dish called rafute exists in Okinawan cuisine, also featuring braised pork belly but typically using awamori (Okinawan liquor) and a touch of Okinawan brown sugar. Over time, kakuni has become a staple on izakaya menus and in home kitchens across Japan.
Why This Recipe
There are many of kakuni recipes, but I’ve refined this one to make sure the pork belly turns out ultra-tender, well-seasoned, and balanced every time. A few things that make this recipe stand out:
- Ingredient Ratios Based on Weight: No matter how much pork you’re cooking, you’ll get consistent flavor by calculating the seasonings based on cooked pork weight.
- Melt-in-your-mouth tender: Low and slow simmering with rice water makes all the difference in texture.
- Freezer-Friendly: Make a big batch and freeze portions for ramen, rice bowl, or quick dinners.
- Versatile: Enjoy kakuni on rice, tucked into bao, or as a topping for ramen and udon.
- Deep umami flavor: Built from dashi, caramelized sugar, and layered seasoning, this broth is next level.
Ingredients and Substitutions
You don’t need many ingredients to make incredible kakuni. Here’s what you’ll need:
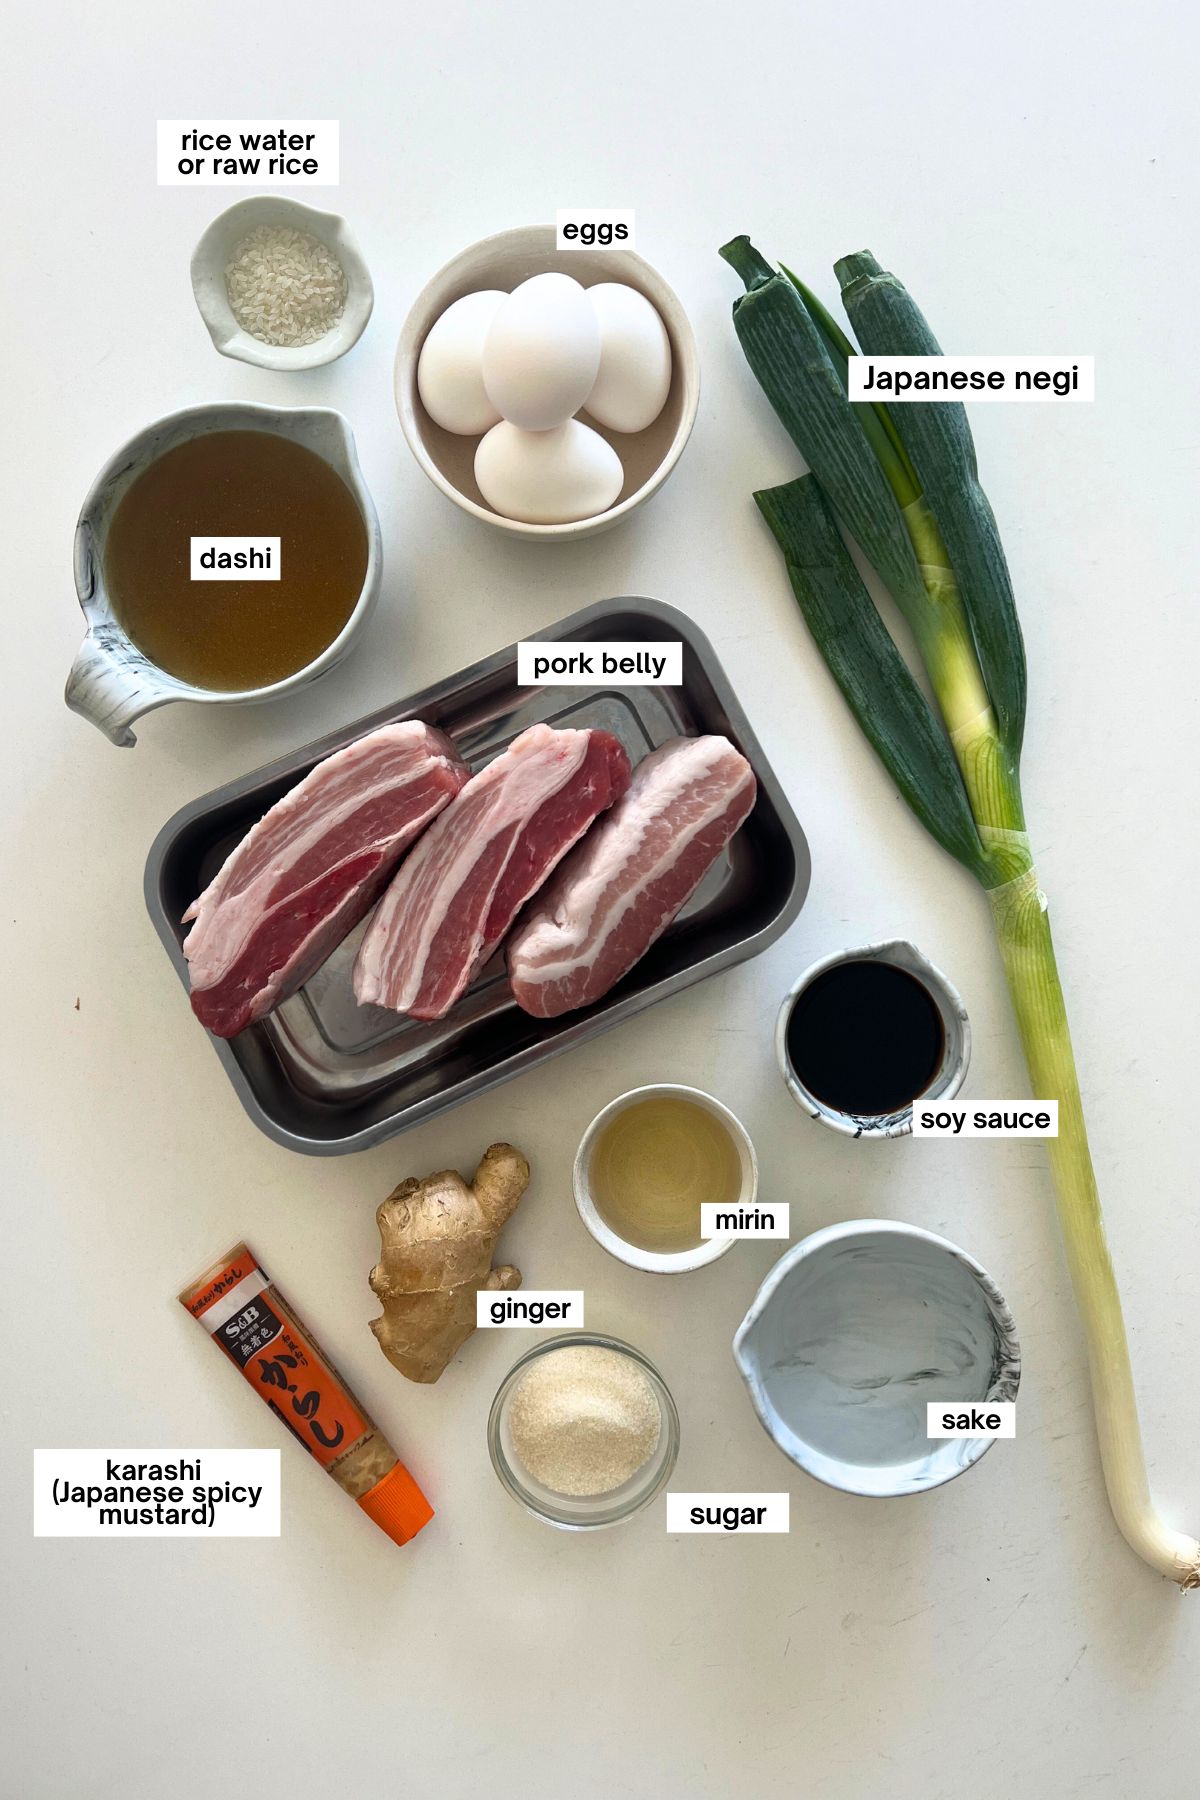
- Pork belly: Use skinless. Pork shoulder works too, though it’s a bit leaner.
- Ginger:
- Japanese Negi: The green part for simmering and the white part for serving. You may substitute with green onion (scallions) or leek.
- Rice Water: From the initial rinsing of the rice. Helps soften the meat and remove impurities. You can also use raw rice in tea bag pouch. Sake can be used as a substitute.
- Dashi: Homemade or instant. You can also use the pork broth with the fat removed if not using rice water.
- Sake (cooking sake)
- Mirin (sweet rice wine)
- Sugar
- Soy sauce
- Eggs (optional): Hard or soft boiled. Cook slightly less than desired outcome as the residual heat from the braising liquid will firm up the yolk more. I love the result of a hard boiled egg as the yolk soaks up the rich braising liquid.
- Green vegetables: often served with komatsuna, a Japanese mustard spinach. Bok choy, green beans, snap peas, or broccoli also work.
- Karashi (Japanese mustard): optional, for serving.
How to Make Authentic Kakuni
The key to authentic kakuni lies in its slow cooking process and careful layering of flavors. Here’s a brief overview of the essential steps:
- Sear the pork: This locks in flavor and renders excess fat.
- Simmer in rice water: Simmering the pork with rice water, ginger, and negi helps tenderize the meat and remove impurities.
- Weigh and season: Once cooked, weigh the pork and calculate seasonings based on its final weight. Then slice into cubes.
- Braise in layers: Add ingredients in the proper order—starting with the pork belly cubes, sugar, then sake and mirin, and finally soy sauce.
- Let it rest: Cool completely and refrigerate overnight for the deepest flavor.
VIDEO: Watch How to Make It
Lisa’s Recipe Tips
- Sear the Pork: Start by searing the meat to render out excess fat and lock in the natural flavors. A little oil in the pan helps achieve an even, golden sear.
- Cook Low and Slow: The most important part of cooking kakuni is cooking it oveer low heat slowly.
- Simmer Whole: Keep the pork in large chunks initially to avoid it falling apart. Slow simmering ensures even tenderness throughout.
- Use Rice Water: This natural ingredient helps soften the meat and prevent scum formation. You can also experiment with raw okara or daikon radish to harness their enzymatic benefits.
- Layer Seasonings Correctly: Follow the “sashisuseso” order—sugar, sake, then soy sauce—to allow the flavors to penetrate deeply into the meat. If your pork belly doesn’t taste as flavorful as expected, it could be because the soy sauce was added too early. Adding it at the beginning can toughen the meat and block the other seasonings from soaking in properly. For the best flavor, add seasonings in stages—this helps create a balanced, mellow taste where the dashi really shines through.
- Rest Overnight: Let the dish cool fully to lock in the flavors, then reheat gently before serving.
Serving Suggestions
Kakuni is usually served with soft-boiled eggs and greens like komatsuna, but any green vegetable works. Here are a few more ideas:
- Kakuni Donburi: Serve the tender pork over a bowl of rice, drizzled with the extra braising liquid.
- Kakuni Fried Rice: Reuse the leftover fat and chopped pork for a hearty fried rice.
- Kakuni Sandwich: Transform it into a unique fusion sandwich for a modern twist.
- Noodles: Enjoy with ramen or udon, letting the pork enhance your broth.
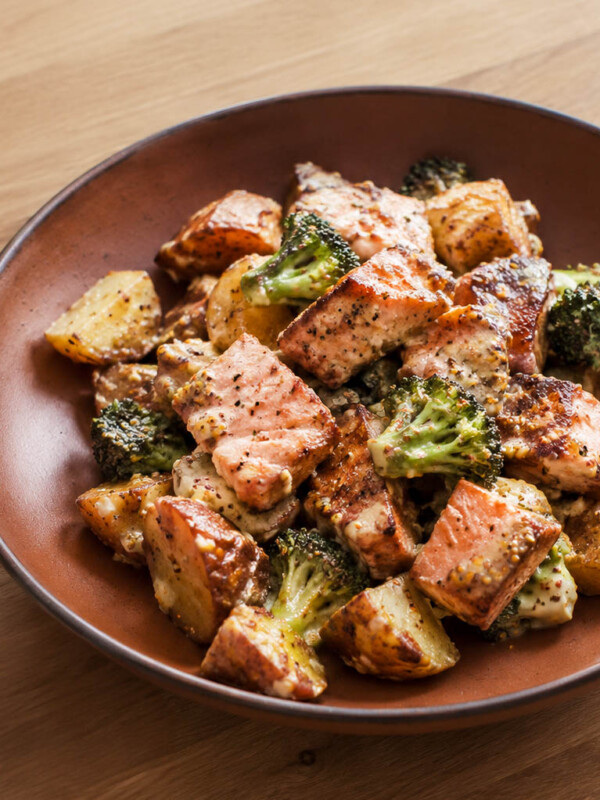
- Side Dishes: Serve alongside traditional Japanese sides like a smashed cucumber salad, spinach gomae, or kinpira renkon.
How to Store Leftovers
- Refrigerate: Place leftovers in an airtight container and store them in the fridge for 3 to 4 days.
- Freeze: Separate the pork and braising liquid into a freezer-safe bag, lay flat, and keep frozen for up to one month.
- Reheat: For frozen portions, thaw overnight in the refrigerator. Gently heat the braising liquid first, then add the pork, turning it halfway through to warm evenly without overcooking the lean parts.
Recipe FAQ
Yes — pork shoulder works, though it’s leaner. Pork ribs are also a tasty but less traditional option.
Chicken thighs are great for a lighter version. Firm tofu also soaks up the flavor beautifully if you’re going meatless.
Kakuni and Hong Shao Rou are both braised pork belly dishes, but they’re quite different in flavor and origin. Kakuni is Japanese and features a lighter, more delicate broth made with dashi, sake, mirin, and soy sauce. The flavor is subtle, slightly sweet, and umami-rich. Hong Shao Rou is Chinese and uses ingredients like Shaoxing wine, dark soy sauce, rock sugar, garlic, and star anise, giving it a deeper color and bolder, sweeter flavor with aromatic spices.
Yes, see my rice cooker kakuni recipe for both rice cooker and instant pot methods!
To make pork belly tender, simmer it low and slow for at least 2 to 3 hours, or until the meat is easily pierced with a chopstick or fork. Cooking it gently over time helps break down the fat and connective tissue, resulting in melt-in-your-mouth texture. For even deeper flavor and tenderness, some recipes recommend letting it rest in the braising liquid overnight.
Yes, if using a pressure cooker on the stove, add the pork along with the negi, ginger, and rice water to the pot and lock the lid. Bring it to high pressure over high heat, then reduce to low and cook for about 20–25 minutes. Let the pressure release naturally, then follow the remaining braising steps in the recipe.
Enjoy! If you make this Kakuni recipe, I’d love to hear what you think! Leave a comment and rating below, and if you share it on social media, tag me on Instagram @Okonomikitchen. I can’t wait to see your creations!
Print
Kakuni (Japanese Braised Pork Belly)
- Total Time: 4 hours 15 minutes
- Yield: 4 servings
Description
Kakuni (Japanese Braised Pork Belly) is a classic dish made by slowly simmering pork belly until it’s melt-in-your-mouth tender. Simmered in a savory-sweet broth of dashi, soy sauce, sake, and mirin, the pork absorbs rich umami flavor with every bite. It’s deeply satisfying, full of comfort, and surprisingly simple to make with just a few key ingredients.
Ingredients
For the Pork:
- 700–800 g skinless pork belly
- 1 knob ginger (approx. 50 g), sliced
- 1 Japanese negi (or green onion)
- 2 tbsp raw rice*
- 1 cup rice water + 3 cups water
Seasonings (based on cooked pork weight):
- 1/4 cup (52 ml) sake (10%)
- 1/4 cup (52 ml) mirin (10%)
- 1/4 cup (52 g) sugar (8-10%)
- 1/3 cup (72 ml) soy sauce (12-14%)
- 2 cups (520 ml) dashi (100%)*
To Garnish:
- 4 large eggs
- 8 baby bok choy (or greens of choice)
- Japanese karashi mustard, for serving
- White portion of Japanese negi, julienned and soaked in ice water
Instructions
Prepare the Pork
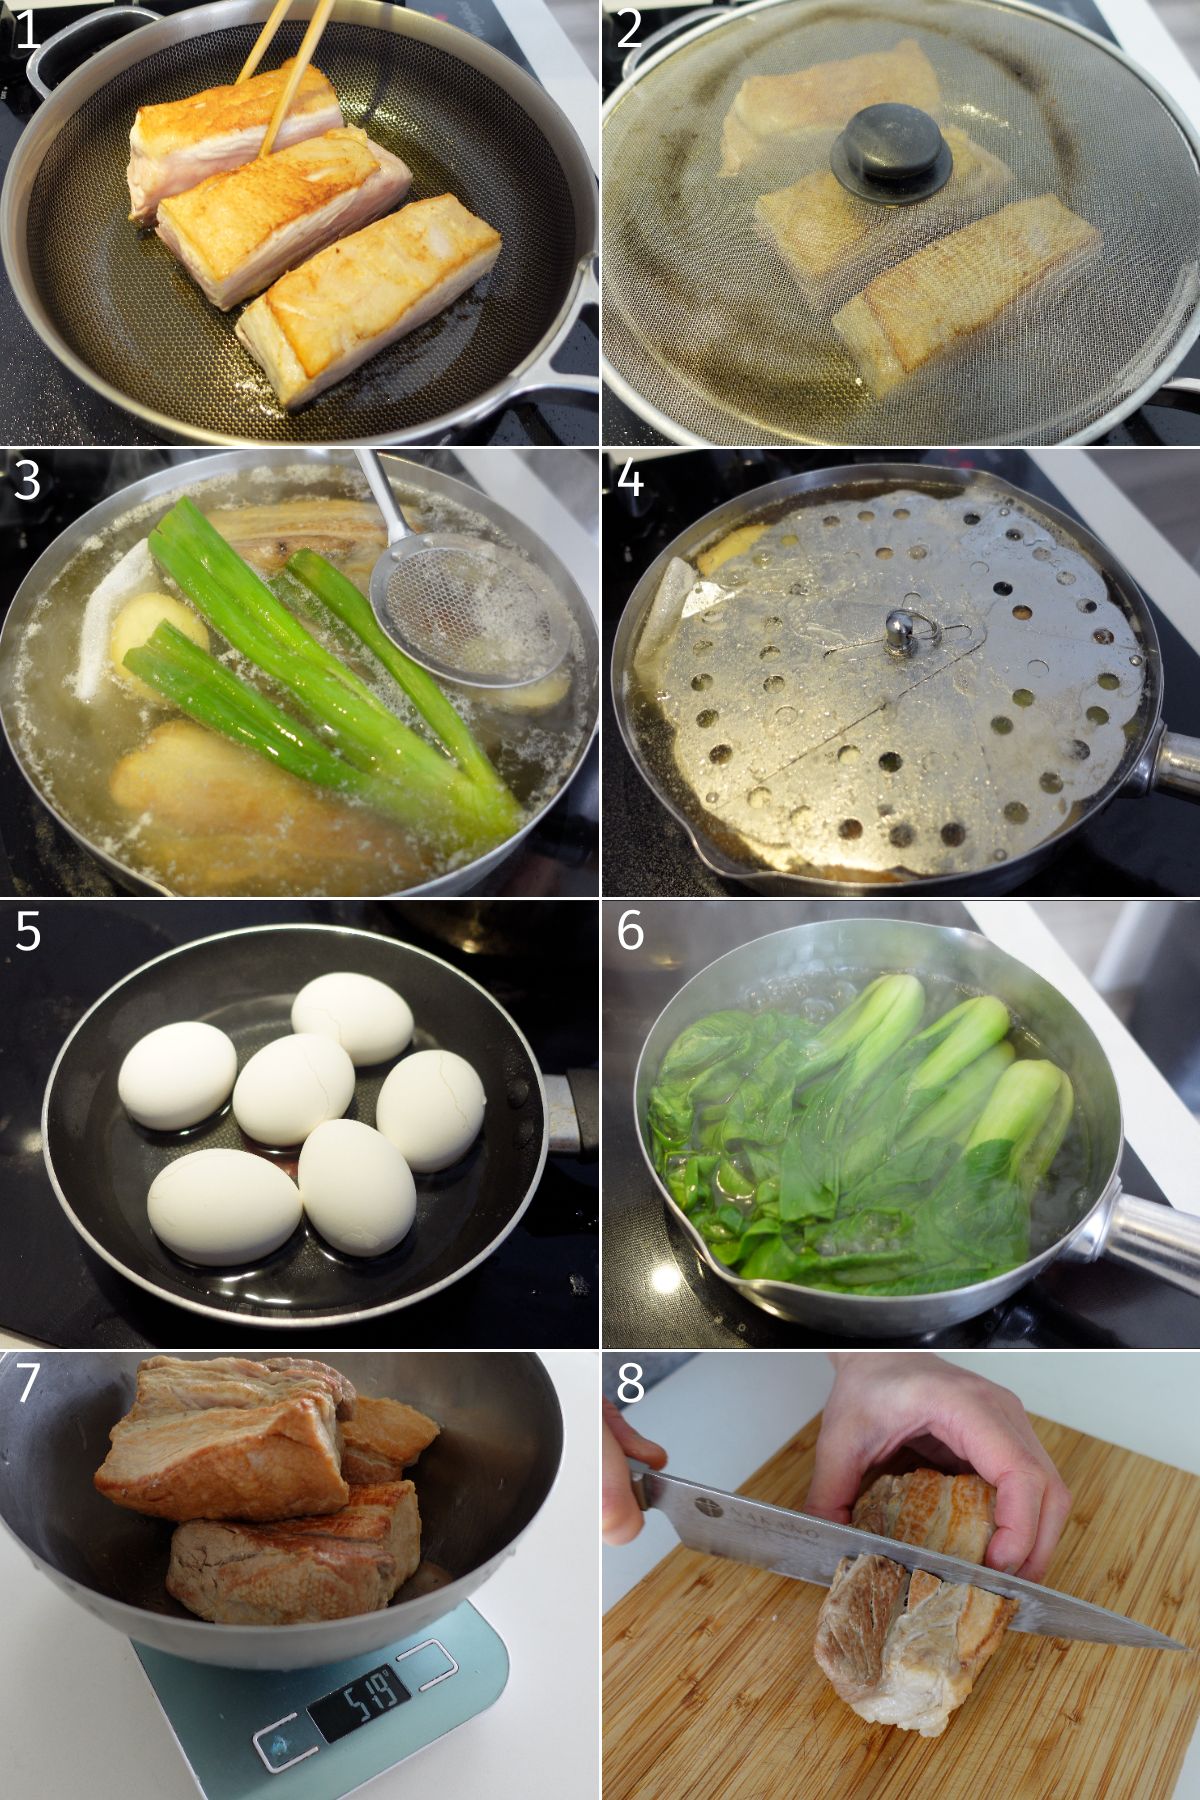
- Sear the Pork: Heat a pan over high heat. Sear pork belly on all sides until golden brown. Remove from pan and set aside.
- Simmer with Rice Water: Add the raw rice to a tea bag or spice pouch. Scrunch the negi with your hands. If they’re large, tear them in half. In a pot, combine the pork belly, sliced ginger, negi, rice pouch, rice water, and additional water (enough to submerge the pork). Bring to a boil over medium heat, skimming any scum. Cover with an otoshibuta (drop lid) and simmer for 2–3 hours. The ideal temperature is below 95 F / 35 C. Add more water if the pork isn’t fully submerged.
Prepare Eggs and Greens (Optional, if adding)
- Cook the Eggs: Place eggs in a skillet with 1 cm of water. Bring to a boil over medium-high. Once bubbling, cover and cook 45 seconds. Flip the eggs, cover again, and cook 3 more minutes. Turn off the heat and let sit, covered, for 7–8 minutes. Transfer to ice water, cool, and peel.
- Blanch Greens: Bring a small pot of water to a boil and add 1/2 tsp salt. Blanch the greens for 1-2 minutes or until vibrant green in colour.
Determine Amount of Seasonings
- Weigh the Pork: After 2–3 hours, remove the pork and weigh it. The cooked weight will vary—more fat means more shrinkage. For example:
- 780 g raw = ~520 g cooked
- Use this cooked weight to calculate seasoning:
- Example: 520 g cooked pork → 52 g sake, 52 g mirin, 52 g sugar, 72 g soy sauce, 520 g dashi.
- Slice the Pork: Carefully cut the pork into 4–5 cm (1.5–2 in) pieces and place into a pot, preferably one that fits the pork belly tightly.
- For Pork Belly Broth: Strain and drain the cooking liquid. Slice the pork into 4–5 cm (1.5–2 in) pieces and return to the pot.
- Tip: If not using rice water, you can reserve the pork broth and use it for other dishes like ramen. Pour the broth into a bowl and let it cool completely. Remove the solidified fat (lard) and save that for cooking. Keep the broth in the fridge for 3-4 days or freeze for future use. Store the lard in the fridge for several months.
Braise in Seasoning
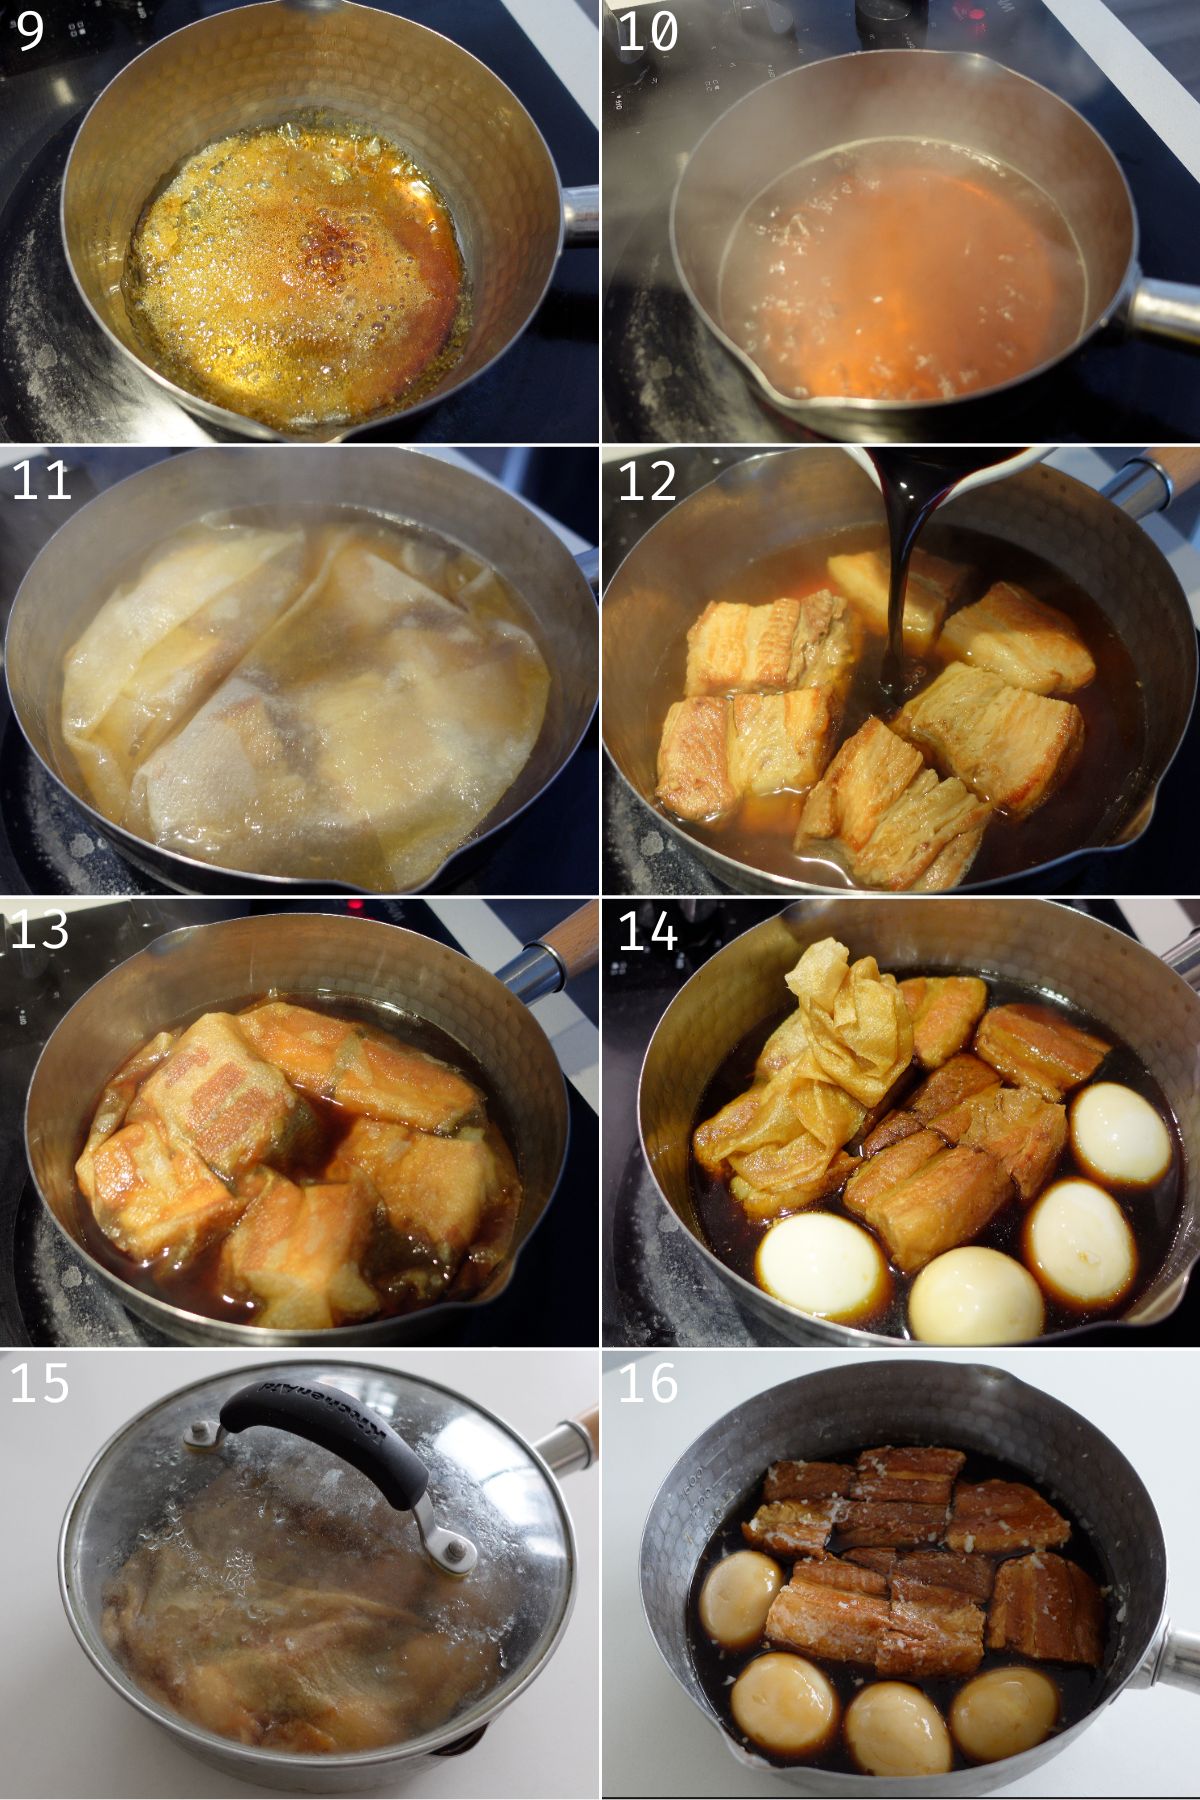
- Caramelize the Sugar (Optional but recommended): In your pot, caramelize the sugar with 2 tsp of water over medium-high heat. Once amber-colored, pour in the dashi and stir to dissolve any residual sugar.
- First Half of Braising: Add the sliced pork, mirin, and sake. Bring to a boil, then lower to a gentle simmer. Cover with a paper towel and lid. Simmer for 30 minutes.
- Second Half of Braising: Add soy sauce and taste the broth—it should be slightly lighter than your desired flavor (it will reduce and intensify). Adjust if needed. Lower heat and cover again with an otoshibuta. Simmer gently for another 10–30 minutes, then turn off the heat. 10 minutes if you plan to let it rest overnight and 30 minutes if you plan to serve it on the day of.
- Add Eggs & Cool: Add the peeled eggs to the pot and cover with the paper towel. Let rest for at least 15 minutes to marinate. For best results, let everything cool completely and refrigerate overnight.
To Serve
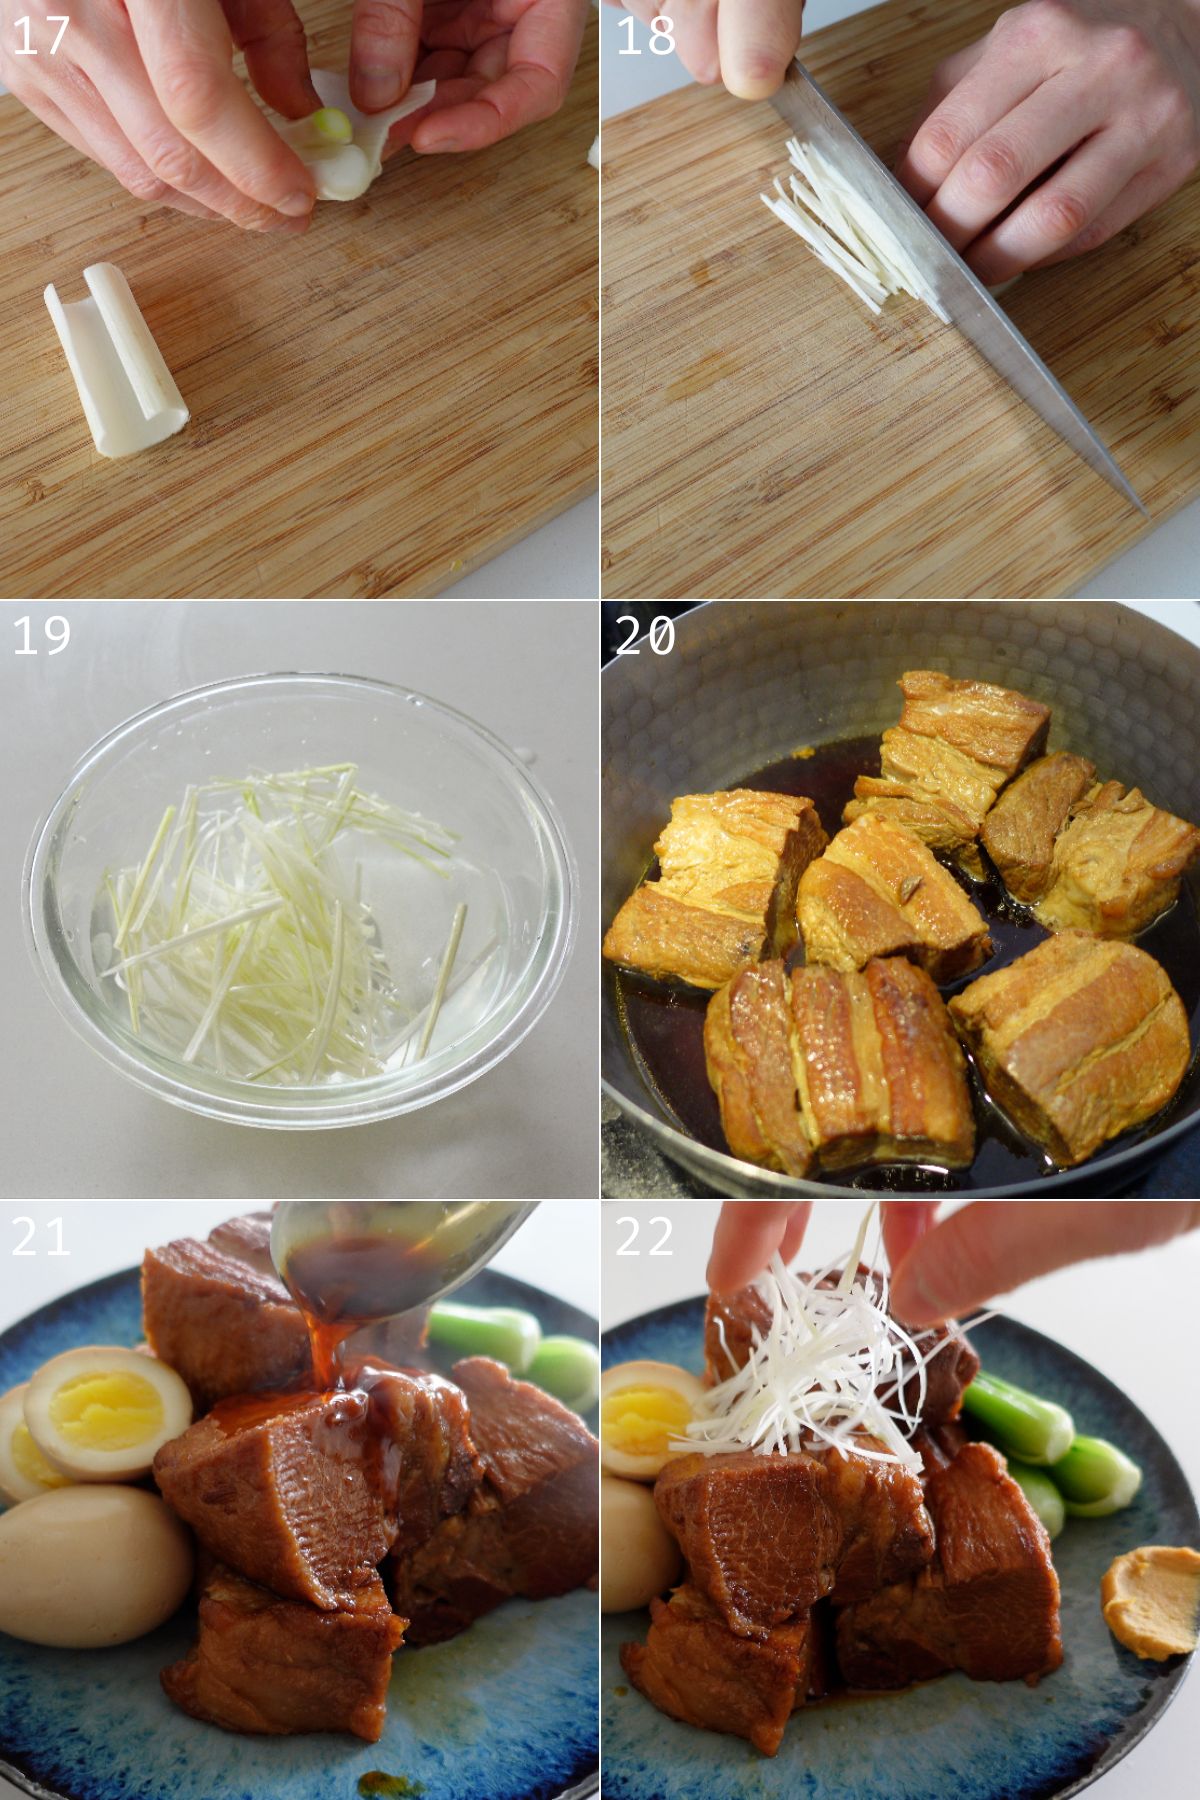
- Shiraga Negi (thinly sliced): Cut the negi into 2-inch sections. Remove the inner core, lay the layers flat, and thinly slice. Soak in ice water for 7–10 minutes, then drain and pat dry.
- Reheat: Remove the pork and eggs from the chilled broth (it will be gelatinous if it was refrigerated). Bring the broth to a boil, then reduce to low and return the pork. Simmer gently for 5 minutes, flipping halfway. If you prefer a thicker sauce, reduce the broth a little more. Add eggs and warm through.
- Serve: Plate the kakuni, slice eggs in half, add greens, and garnish with shiraga negi and karashi. Enjoy!
Notes
- *You can also use rice water from the initial rinse. Alternatively, use 1/4 cup cake and enough water to cover the pork.
- **1 tsp dashi granules per cup of water. You may also use the reserved pork broth if you did not use rice water. Cool the broth completely and scoop up the hardened lard. Save the lard for cooking!
- Prep Time: 15 minutes
- Cook Time: 4 hours
- Category: Main dish
- Method: Stove top
- Cuisine: Japanese
Nutrition
- Serving Size: 1serving
- Calories: 585
- Sugar: 13 g
- Sodium: 1240 mg
- Fat: 38 g
- Saturated Fat: 14 g
- Unsaturated Fat: 22 g
- Trans Fat: 0.1 g
- Carbohydrates: 15 g
- Fiber: 0
- Protein: 32 g
- Cholesterol: 95 mg


I’ve tried many kakuni recipes but this one made the softest and most tender, just like the one I had in Japan! Decently a labour of love.
Hi Lisa! Thank you for this recipe. I’ve used it four times now and its almost perfect! I am curious about the 95 F / 35 C for 3 hours recommendation. I use a probe to get the exact temperature, and the pork doesn’t end up as soft as I have it in some restaurants.
Hi Brian! Sometimes the fat to meat ratio can play a roll in how soft it is or even the quality of the meat. Is it more like pulled pork texture? Or just seperation from the fat and meat?