Anpan is a traditional Japanese sweet bun filled with smooth, sweet red bean paste (anko). This soft and fluffy bread has a golden-brown crust and a mildly sweet flavor, making it perfect for breakfast, snacks, or dessert. Popular in Japanese bakeries, Anpan is easy to make at home with simple ingredients and a few basic steps. Follow this recipe to create authentic Anpan buns that capture the perfect balance of sweetness and texture!

Table of Contents
Growing up, anpan was always my first pick when we would go to bakeries. There was definitely a heavy influence from Anpanman, my favorite childhood TV show, but the combination of soft Japanese milk bread and sweet red bean paste is one of the best ever. I’m excited to finally share my anpan recipe, which my mom (finally!) approves of.
What is Anpan?
Anpan is a popular Japanese bun filled with sweet red bean paste (anko). Traditional anpan features soft, slightly sweet bread surrounding the smooth paste, with variations like koshian (smooth red bean paste) or tsubuan (chunky red bean paste). Over time, many variations have emerged, such as using white bean paste, matcha bean paste, chestnut, or adding butter, custard, or cream with anko. Anpan continues to be a beloved part of Japanese bakery culture, enjoyed as a snack or dessert.
History of Anpan
Kimuraya, a long-established Japanese bakery, was founded by Kimura Yasubei in 1869 during the Meiji era. At that time, Japan was rapidly adopting Western culture, including bread. However, early bread in Japan was hard and low in moisture, making it less appealing to a population accustomed to rice-based staples.
In 1874, Yasubei Kimura and his son Eizaburo sought to create a bread that would appeal to Japanese tastes. Inspired by sake manju (steamed buns made with sake yeast), they developed a fluffy bread using sake yeast, wrapped it around sweet red bean paste, and topped it with salted cherry blossoms. This innovative fusion resulted in the birth of anpan, a bread that symbolized Japan’s modernization and Western influence.
On April 4, 1875, thanks to Yamaoka Tesshu, a government official, Kimuraya presented their anpan to Emperor Meiji, who appreciated the bread. This event popularized anpan, and April 4th is now celebrated as “Anpan Day.”
Ingredients
To make delicious anpan, you’ll need the following ingredients to create the soft sweet dough:
- Bread flour and Cake flour: this combination of flours make the perfect soft textured bread but you can substitute the total amount for all purpose flour.
- Whole milk
- Egg yolk
- Granulated sugar
- Dry yeast
- Salt
- Red bean paste (anko): You can use smooth bean paste (koshian), chunky bean paste (tsubuan) or mashed sweet bean paste (tsubushian)
- Black sesame seeds or poppy seeds
How to Make Anpan
Follow these simple steps to make your own soft and fluffy anpan, perfect for a sweet snack or dessert:
- Make the Yudane (Optional): Boil water, add bread flour, and stir to form a thick paste. Let cool, then refrigerate for at least 4 hours or overnight.
- Prepare the Dough: In a bowl, whisk together whole milk, egg yolk, sugar, and yeast. Add flour, cake flour, and salt, then mix to form a shaggy dough. Add yudane if using. Add softened butter and knead for 10-15 minutes until the dough is smooth and elastic.
- First Proofing: Place dough in an oiled bowl, cover, and let rise for 1-1.5 hours until doubled.
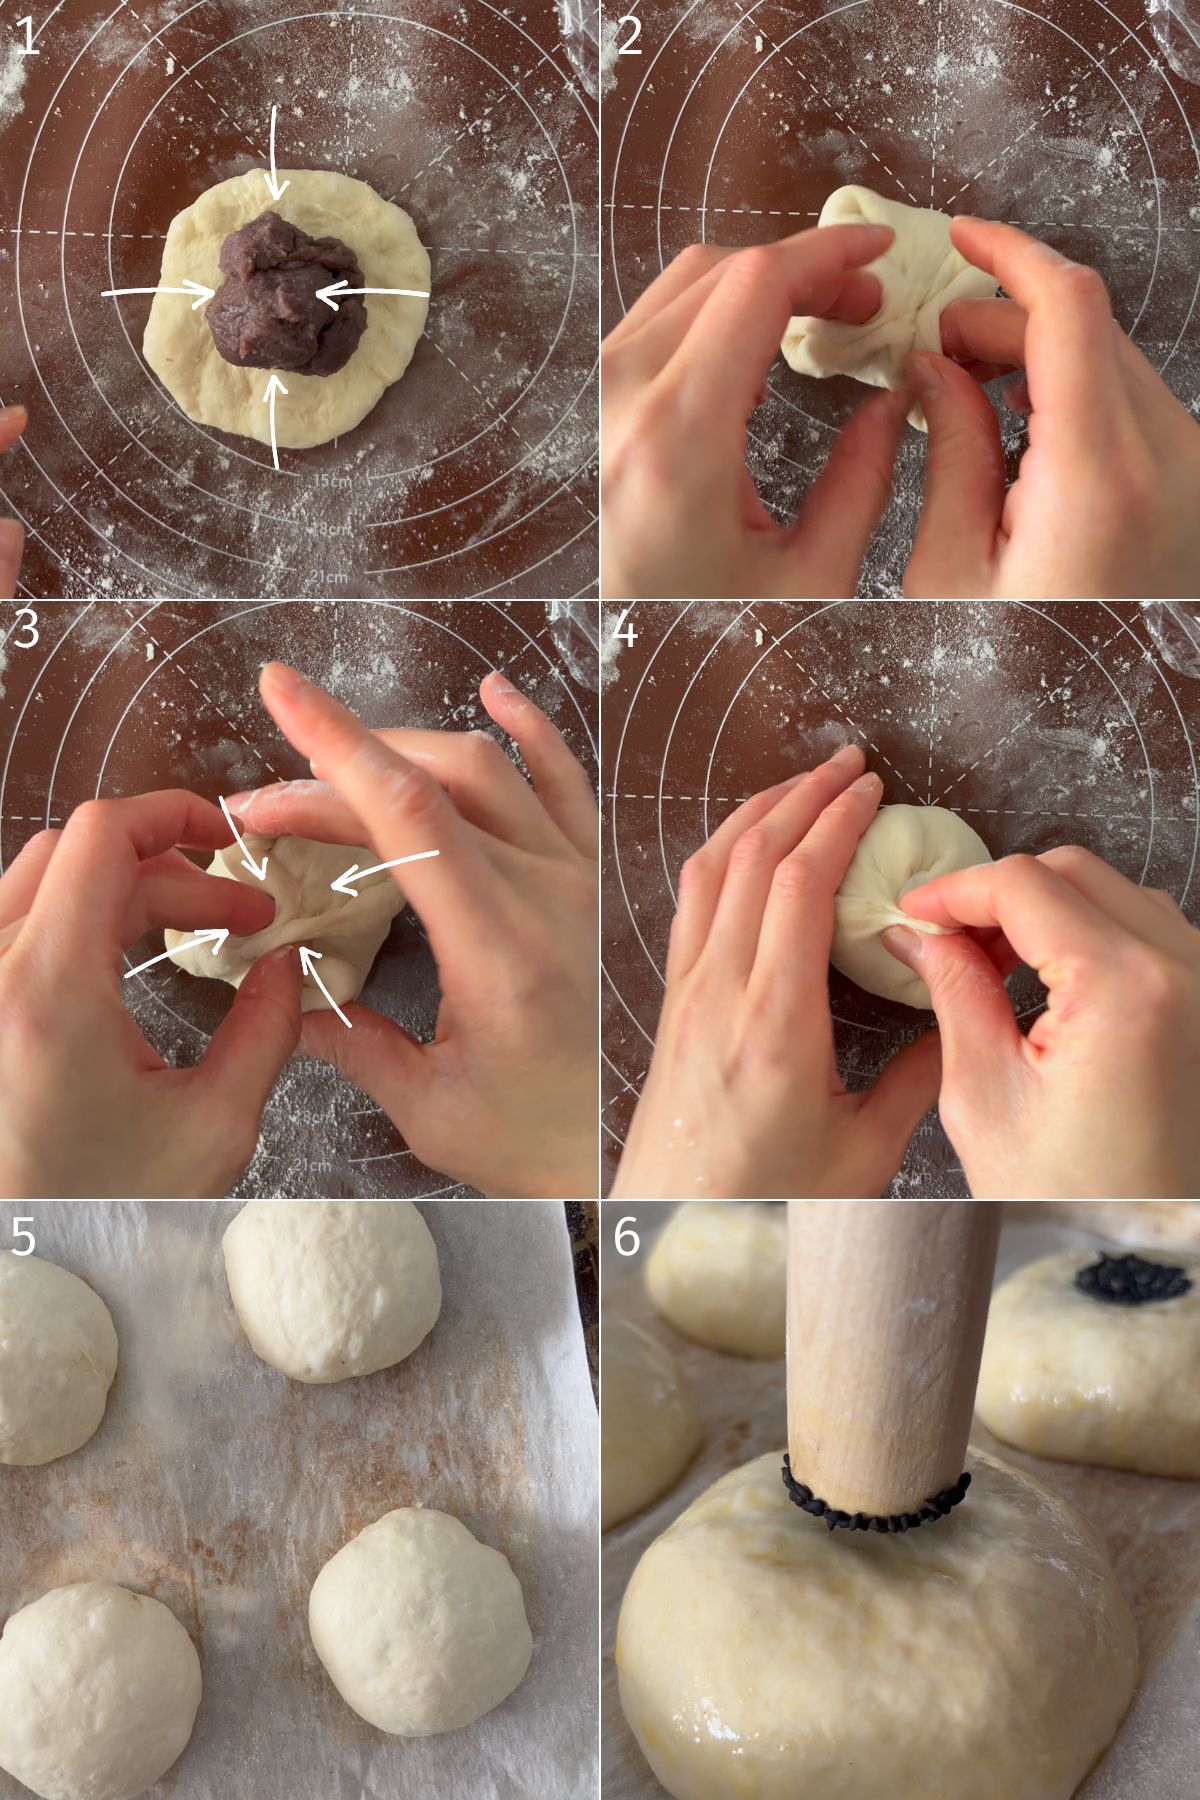
- Shape the Anpan (1-4): Punch dough down and divide into 8 equal pieces. Roll into balls and let rest for 15 minutes. Flatten each ball, add red bean paste, and seal the dough around the filling. The photo above shows an easy way to stuff and shape the anpan by folding and pinching together opposite sides and then pinching the opposite corners together. Advanced shaping can be done similarly to a classic steamed bao but without the hole in the middle. Be sure to pinch the seam securely.
- Second Proofing (5): Place dough balls on a lined baking sheet, cover loosely, and let rise for 30-45 minutes.
- Prepare for Baking (6): Preheat oven to 200°C (390°F). Brush buns with egg wash and stamp with black sesame or poppy seeds.
- Bake: Bake for 10-12 minutes (12-15 for larger buns) until golden brown.
Lisa’s Recipe Tips
- Measure Ingredients with a Food Scale: For the most accurate results, use a food scale to measure your ingredients. This ensures the perfect dough consistency every time.
- Yudane Method: To achieve extra soft buns, prepare the yudane (a paste made from flour and hot water) in advance and let it rest overnight. This technique helps retain moisture in the dough, resulting in a tender texture.
- Seal the Dough Properly: When filling your buns, make sure to pinch the edges tightly to prevent any filling from leaking out during baking. A well-sealed bun ensures the perfect bite.
- Watch the Oven: Keep a close eye on the buns while they bake. Every oven is different, so monitor them closely to avoid over-browning and ensure they bake evenly for a golden, soft finish.
How to Store Anpan
To store anpan, keep it in an airtight container at room temperature for up to 2-3 days to maintain its softness. If you need to store it for longer, freezing is the best option. Wrap each anpan individually in plastic wrap and place them in a freezer-safe bag. When you’re ready to enjoy, simply thaw and reheat in the microwave or toaster oven for the best texture. Avoid refrigerating, as it can cause the bread to become stale more quickly.
Recipe FAQ
No, you can skip it. However, the yudane makes the bread stay soft and moist longer and adds more chewiness.
Yes, add all ingredients to the bread machine and knead for 20 minutes. Proceed with proofing and shaping as directed.
Yes, use the dough hook attachment to knead the dough for 10-15 minutes until smooth and elastic.
Yes, mix all ingredients until a dough ball forms. Cover and rest for 20 minutes, then perform three sets of stretch-and-folds, resting 20 minutes between each. Proceed with proofing and shaping.

Enjoy!! If you make this Anpan recipe, let me know! Leave a comment, rating and if you decide to share it on socials, tag me on instagram @Okonomikitchen. I’d love to hear from you!
Print
Anpan
- Total Time: 1 hour 52 minutes
- Yield: 8 servings
- Diet: Vegetarian
Description
Anpan is a traditional Japanese sweet bun filled with smooth, sweet red bean paste (anko). This soft and fluffy bread has a golden-brown crust and a mildly sweet flavor, making it perfect for breakfast, snacks, or dessert. Popular in Japanese bakeries, Anpan is easy to make at home with simple ingredients and a few basic steps. Follow this recipe to create authentic Anpan buns that capture the perfect balance of sweetness and texture!
Ingredients
Yudane (Pre-dough mixture):
- 60 ml water
- 40 g bread flour
Dough Ingredients:
Original Version
- 3 tbsp + 1 tsp (50 ml) whole milk
- 1 large (20 g) egg yolk
- 2.5 tbsp (30 g) granulated white sugar
- 2/3 tsp (3 g) dry yeast
- 140 bread flour
- 20 g cake flour
- 2/3 tsp (3 g) salt
- 2 tbsp (30 g) unsalted butter
Other Ingredients
- 300 grams sweet red bean paste (smooth, chunky or mashed)
- 1 large egg
- 1 tbsp water
- black sesame seeds or poppy seeds
Vegan Eggless Version
- Yudane: 60 ml water + 40 g bread flour
- 160 g bread flour
- 3 g salt
- 3 g instant yeast
- 25 g sugar
- 20 g unsalted dairy free butter, softened
- 60 ml soy milk
- 2–2.5 tbsp (30–37.5 ml) water (adjust based on humidity)
Instructions
Step 1: Make the Yudane (Optional, skip this step if making straight method)
- In a small pot, heat 60 ml of water until it reaches a boil.
- Add the 40 g of flour, stirring quickly to form a thick, paste-like mixture.
- Remove from heat, let it cool to room temperature, and store in the refrigerator overnight or for at least 4 hours. This mixture helps create soft and fluffy bread.
Step 2: Prepare the Dough
- Combine wet ingredients: In a large bowl, whisk together the whole milk, egg yolk, sugar and yeast. If skipping the yudane, add in the water as well.
- Add dry ingredients: Add the flour, salt and yudane (if skipping yudane, add the additional flour). Mix well until a shaggy dough forms.
- Knead: Add the softened butter and knead the dough on a clean surface for about 10-15 minutes until it becomes smooth and elastic. You can also use a stand mixer with a dough hook attachment or bread machine.
Step 3: First Proofing
- Place the kneaded dough in a lightly oiled bowl, cover it with a damp cloth or plastic wrap, and let it rise in a warm place (about 25-28°C) for 1-1.5 hours or until it doubles in size.
Step 4: Shape the Anpan
- Punch and divide: Once the dough has doubled, gently punch it down to release air. Divide it into 8 equal pieces (approximately 50 g each). You may also divide it into to 6 pieces for larger buns.
- Rest: Roll each piece into a smooth ball and let them rest on the bench, covered with a cloth, for 15 minutes. This relaxes the gluten, making it easier to shape.
- Fill: Flatten each dough ball into a circle, about 8 cm in diameter. Place 37 g g of red bean paste (anko) in the center.
- Seal: Pull the opposite edges of the dough up and over the anko, pinching them together to seal. Then pinch together the opposite corners together. Roll the filled dough ball gently in your hands to create a smooth surface.
Step 5: Second Proofing
- Place the filled dough balls seam-side down on a baking sheet lined with parchment paper.
- Cover loosely and let them proof for 30-45 minutes, or until they become puffy and almost double in size.
Step 6: Prepare for Baking
- Preheat your oven to 200°C (390°F) and remove cover from the buns to let them dry out a little.
- Egg wash: Whisk together the egg and water. Brush the tops with egg wash. This gives the buns a beautiful golden-brown color.
- Add topping: Put the black sesame seeds in a small bowl. Dip any utentil with a flat round bottom (I use a wooden rolling pin) and dip it into the egg water. Then dip into the black sesame seeds and stamp it onto the buns. Alternatively, you can just sprinkle the sesame seeds or poppy seeds on top.
Step 7: Bake
- Bake in the preheated oven at 200°C for 10-12 minutes. If making 6 buns, bake for 12-15 minutes.
- Keep an eye on the buns to avoid over-browning. They should be golden and sound hollow when tapped.
Step 8: Cool and Serve
- Let the buns cool on a wire rack.
- Enjoy your freshly baked anpan warm or at room temperature!
- Prep Time: 10 minutes
- Proof Time: 90 minutes
- Cook Time: 12 minutes
- Category: Snack
- Method: Baking
- Cuisine: Japanese
Nutrition
- Serving Size: 1 serving
- Calories: 194
- Sugar: 8.8 g
- Sodium: 171 mg
- Fat: 3.7 g
- Saturated Fat: 2 g
- Unsaturated Fat: 1.2 g
- Trans Fat: 0.12 g
- Carbohydrates: 32 g
- Fiber: 2 g
- Protein: 6 g
- Cholesterol: 18 mg
Okonomi Kitchen is a participant in the Amazon Services LLC Associates Program. When you purchase something through my amazon affiliate links, I earn a small commission that helps me produce consistent content at no cost to you. Thank you for your support!


I just made these and they are perfect! Adding yudane to the dough really made the bread fluffy. Now to practice brushing on the egg wash… Mine had streaks on the sides but they tasted fantastic. Thank you!
Thank you so much for an including a vegan version of this recipe! Egg yolks can be a barrier to simply substituting ingredients when baking, so I greatly appreciate the effort to include those of us who can’t eat them. This looks delicious, and I’ll definitely be trying this recipe 🙂
I’m newer bread making and the use of active dry yeast. Do I have to active it before using it in the recipe?
No you do not. It’s recommended to do it just to make sure it is still active but if you’re sure it is you can just add it straight to the bowl!
Your instructions indicate butter but ingredients do not show any. If it does have, how much?
Thank you!
Hi! It’s 2 tbsp of butter thank you for catching that!