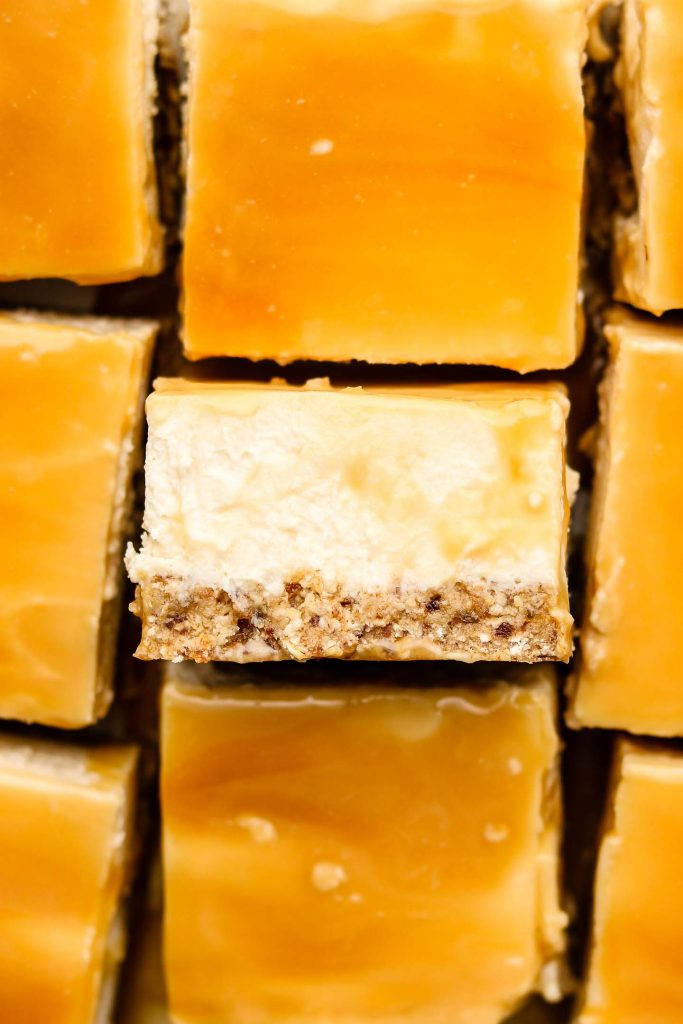
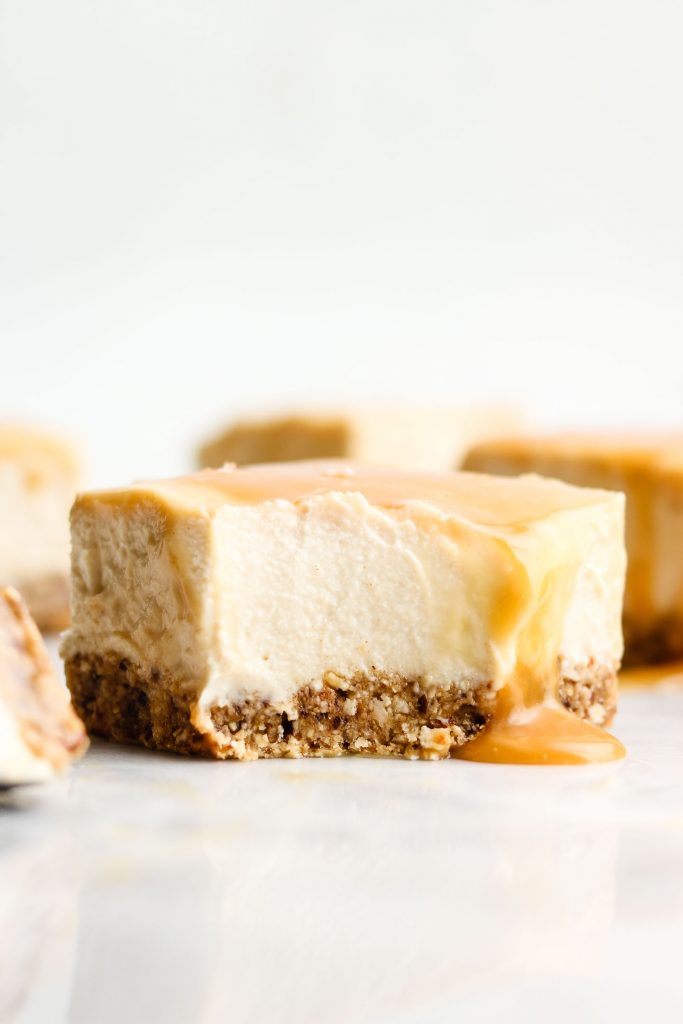
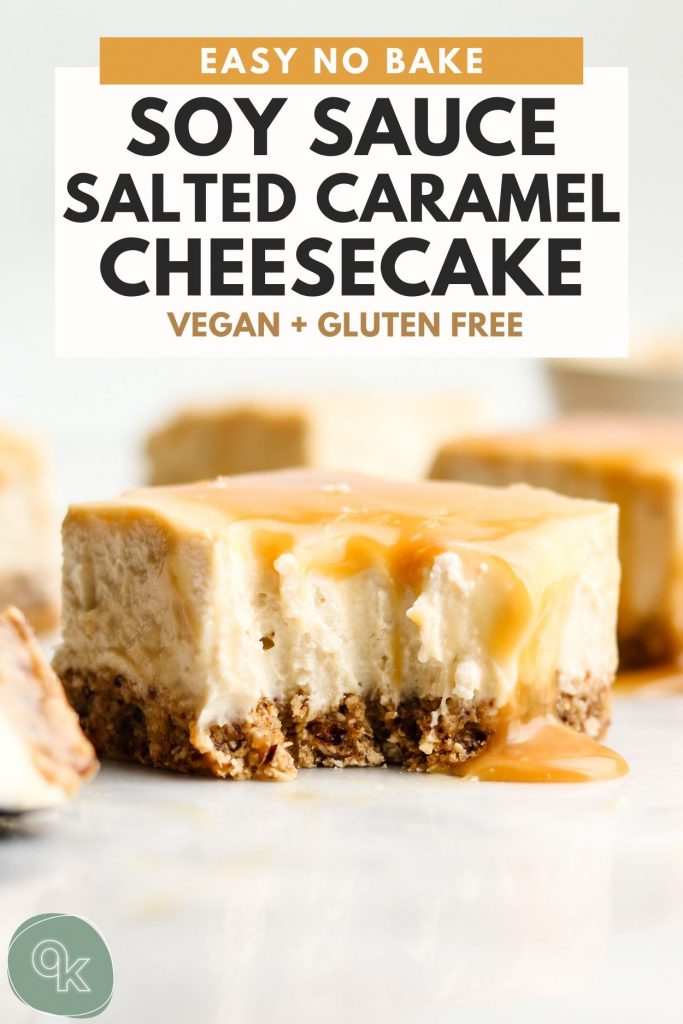
This No-Bake Caramel Cheesecake features a soy salted caramel, rich and creamy filling with a nutty brown butter crust. The soy sauce caramel adds an unique salty-sweet twist that elevates this dessert to a whole new level. With minimal effort and maximum flavor, it’s perfect for a casual dessert, holiday dinner or special event.

Table of Contents
Soy Salted Caramel No Bake Cheesecake
After sharing my Soy Sauce Caramel recipe, I wanted to create a recipe utilizing it.
Salted Caramel No Bake Cheesecake Ingredients
Here is everything you’ll need for this soy caramel no bake cheesecake:
- Graham Crackers: A classic base for cheesecakes, offering a slightly sweet, crumbly texture. Use gluten-free for dietary preferences.
- Unsalted Butter: Adds richness and depth of flavor, browned to bring out a nutty aroma that enhances the crust.
- Cream Cheese: The foundation of any cheesecake, providing a smooth and creamy texture with a slight tang. Use dairy free for a plant based option.
- Heavy Cream: Lightens the filling, making it soft and velvety. Use dairy free for a plant based option.
- Refined Coconut Oil: Adds structure to the no-bake filling without adding gelatin.
- Sour Cream or Full-Fat Greek Yogurt: Adds a touch of tanginess and creaminess to balance the sweetness. Use dairy free for a plant based option.
- Granulated White Sugar: Caramelizes into a rich, golden sauce with deep, sweet flavors.
- Heavy Cream: Adds creaminess to the caramel, resulting in a smooth, luscious sauce.
- Unsalted Butter: Adds richness and a glossy finish to the caramel.
- Japanese Light Soy Sauce: Provides a subtle, salty contrast to the sweetness of the caramel, giving it a unique umami flavor.

How to Make No Bake Soy Caramel Cheesecake
- Brown the butter: Melt butter in a saucepan over medium heat, stirring until golden brown and nutty, about 5-7 minutes. Cool slightly.
- Prepare the crust: Crush graham crackers into crumbs. Mix crumbs with brown butter until it resembles wet sand. Press into an 15 cm square pan and then freeze.
- Make the filling: Soften the cream cheese and beat it with sugar. Add the coconut oil, sour cream and vanilla. Beat for 2-3 minutes on medium high until smooth and well incorporated. Whip the heavy cream in a stand mixer or hand mixer until stiff peaks on medium high speed for about 3-4 minutes. Fold in the whipped cream into the cream cheese until well combined. Pour filling over the crust. Smooth the top and refrigerate for at least 4 hours or overnight.
- Prepare the caramel: Heat sugar and water in a saucepan until deep amber, about 8-10 minutes. Off heat, carefully whisk in butter and cream. Gradually whisk in soy sauce. Let it cool before using.
No Bake Cheesecake Tips
- Use Room Temperature Ingredients: Ensure that all your ingredients, particularly cream cheese and heavy cream, are at room temperature. This helps achieve a smooth, creamy filling without lumps.
- Watch the Caramel Closely: Keep a close eye on your caramel as it cooks to prevent it from burning. To prevent crystallization, avoid stirring too vigorously and use a clean brush to wash down any sugar crystals that form on the sides of the pan.
- Warm the Caramel if Necessary: If your caramel becomes too firm while cooling, gently warm it in the microwave or on the stovetop over low heat until it’s pourable again. This will make it easier to drizzle over the cheesecake without clumping.
How to Store No Bake Cheesecake
To store a no-bake cheesecake, keep it in the refrigerator for up to a week, covering it with plastic wrap or foil to prevent it from absorbing odors. For longer storage, transfer it to an airtight container or, if it’s in a springform pan, tightly wrap the top with plastic wrap. If you prefer to freeze it, wrap the cheesecake well in plastic wrap and then place it in a freezer-safe container. When ready to enjoy, thaw it in the refrigerator overnight.

More Caramel Desserts:
If you recreate this No Bake Soy Caramel Cheesecake recipe let me know how you liked it by leaving a comment and rating below or by tagging me on Instagram @Okonomikitchen, I love seeing all of your tasty recreations! Hungry for more? Be sure to subscribe to my newsletter and follow along on Instagram, Youtube and Pinterest for more deliciousness!
Print
No Bake Soy Caramel Cheesecake
- Total Time: 23 minutes
- Yield: 6 servings
- Diet: Vegan
Description
This No-Bake Soy Sauce Caramel Cheesecake features a rich, creamy filling with a nutty brown butter crust. The soy sauce caramel adds an unique salty-sweet twist that elevates this dessert to a whole new level. With minimal effort and maximum flavor, it’s perfect for a casual dessert, holiday dinner or special event.
Ingredients
Brown Butter Crust
- 1 sleeve (100 g) graham crackers (gluten free)
- 4 tbsp (56 g) unsalted butter
Filling
- 1 block (224 g) cream cheese, room temperature
- 1/3 cup (80 ml) heavy cream, cold
- 2 tbsp (30 ml) refined coconut oil, melted
- 1 tbsp (15 g) sour cream or full fat greek yogurt, room temperature
- 1/4 cup (50 g) sugar
Soy Sauce Caramel*
- 1 cup (200 g) granulated white sugar
- 3 tbsp (45 g) water
- 3/4 cup (180 ml) heavy cream, room temperature
- 1/3 cup (70 g) unsalted butter, room temperature
- 1 1/2 – 2 tbsp Japanese light soy sauce
Instructions
For the Brown Butter Crust
- Brown the butter: In a small saucepan, melt the unsalted butter over medium heat. Stir constantly until the butter turns a golden brown color and smells nutty, about 5-7 minutes. Remove from heat and allow it to cool slightly.
- Prepare the crust: Crush the graham crackers into fine crumbs using a food processor or by placing them in a ziplock bag and crushing with a rolling pin.
- Combine the ingredients: Pour the cooled brown butter into the graham cracker crumbs and mix until fully combined. The mixture should resemble wet sand.
- Press into a pan: Firmly press the graham cracker mixture into the bottom of an 8-inch (20 cm) springform pan to form an even crust. Place in the freezer while preparing the filling.
For the Cheesecake Filling
- Make the filling: Soften the cream cheese and beat it with sugar. Add the coconut oil, sour cream and vanilla. Beat for 2-3 minutes on medium high until smooth and well incorporated. Whip the heavy cream in a stand mixer or hand mixer until stiff peaks on medium high speed for about 3-4 minutes. Fold in the whipped cream into the cream cheese until well combined. Pour filling over the crust. Smooth the top and refrigerate for at least 4 hours or overnight.
- Assemble: Pour the cheesecake filling onto the chilled crust, smoothing the top with a spatula. Cover the pan and refrigerate for at least 4 hours, or preferably overnight, until set.
For the Soy Sauce Caramel
- Prepare the caramel: In a medium saucepan, combine the sugar and water. Cook over medium heat without stirring, occasionally swirling the pan to prevent burning, until the sugar turns a deep amber color, about 8-10 minutes.
- Add the butter and cream: Remove from heat and carefully whisk in the heavy cream and butter (be cautious of splatters). Stir until smooth.
- Add soy sauce: Gradually whisk in the soy sauce, starting with 1 1/2 tablespoons and adjusting to taste. The caramel should be slightly salty but balanced. Allow the caramel to cool slightly before pouring over the cheesecake.
To Serve
- Once the cheesecake has set, drizzle the soy sauce caramel over the top. For a more intense flavor, you can add a thicker layer of caramel before serving.
- Slice and enjoy!
Notes
- *In the photo I used my soy sauce caramel recipe that is more of a sauce. I have updated the recipe to be more of a firm soft type of caramel.
- Helpful Equipment: spatula, mixing bowls, high speed blender, food processor, 6×6 inch baking tin
- Nutritional Information Disclaimer: Nutrition information is a rough estimate calculated on an online tool (Cronometer).
- Prep Time: 15 minutes
- Cook Time: 8 minutes
- Category: Dessert
- Method: No bake
- Cuisine: American
SAVE IT FOR LATER! ↓
Okonomi Kitchen is a participant in the Amazon Services LLC Associates Program. When you purchase something through my amazon affiliate links, I earn a small commission that helps me produce consistent content at no cost to you. Thank you for supporting my plant based kitchen!