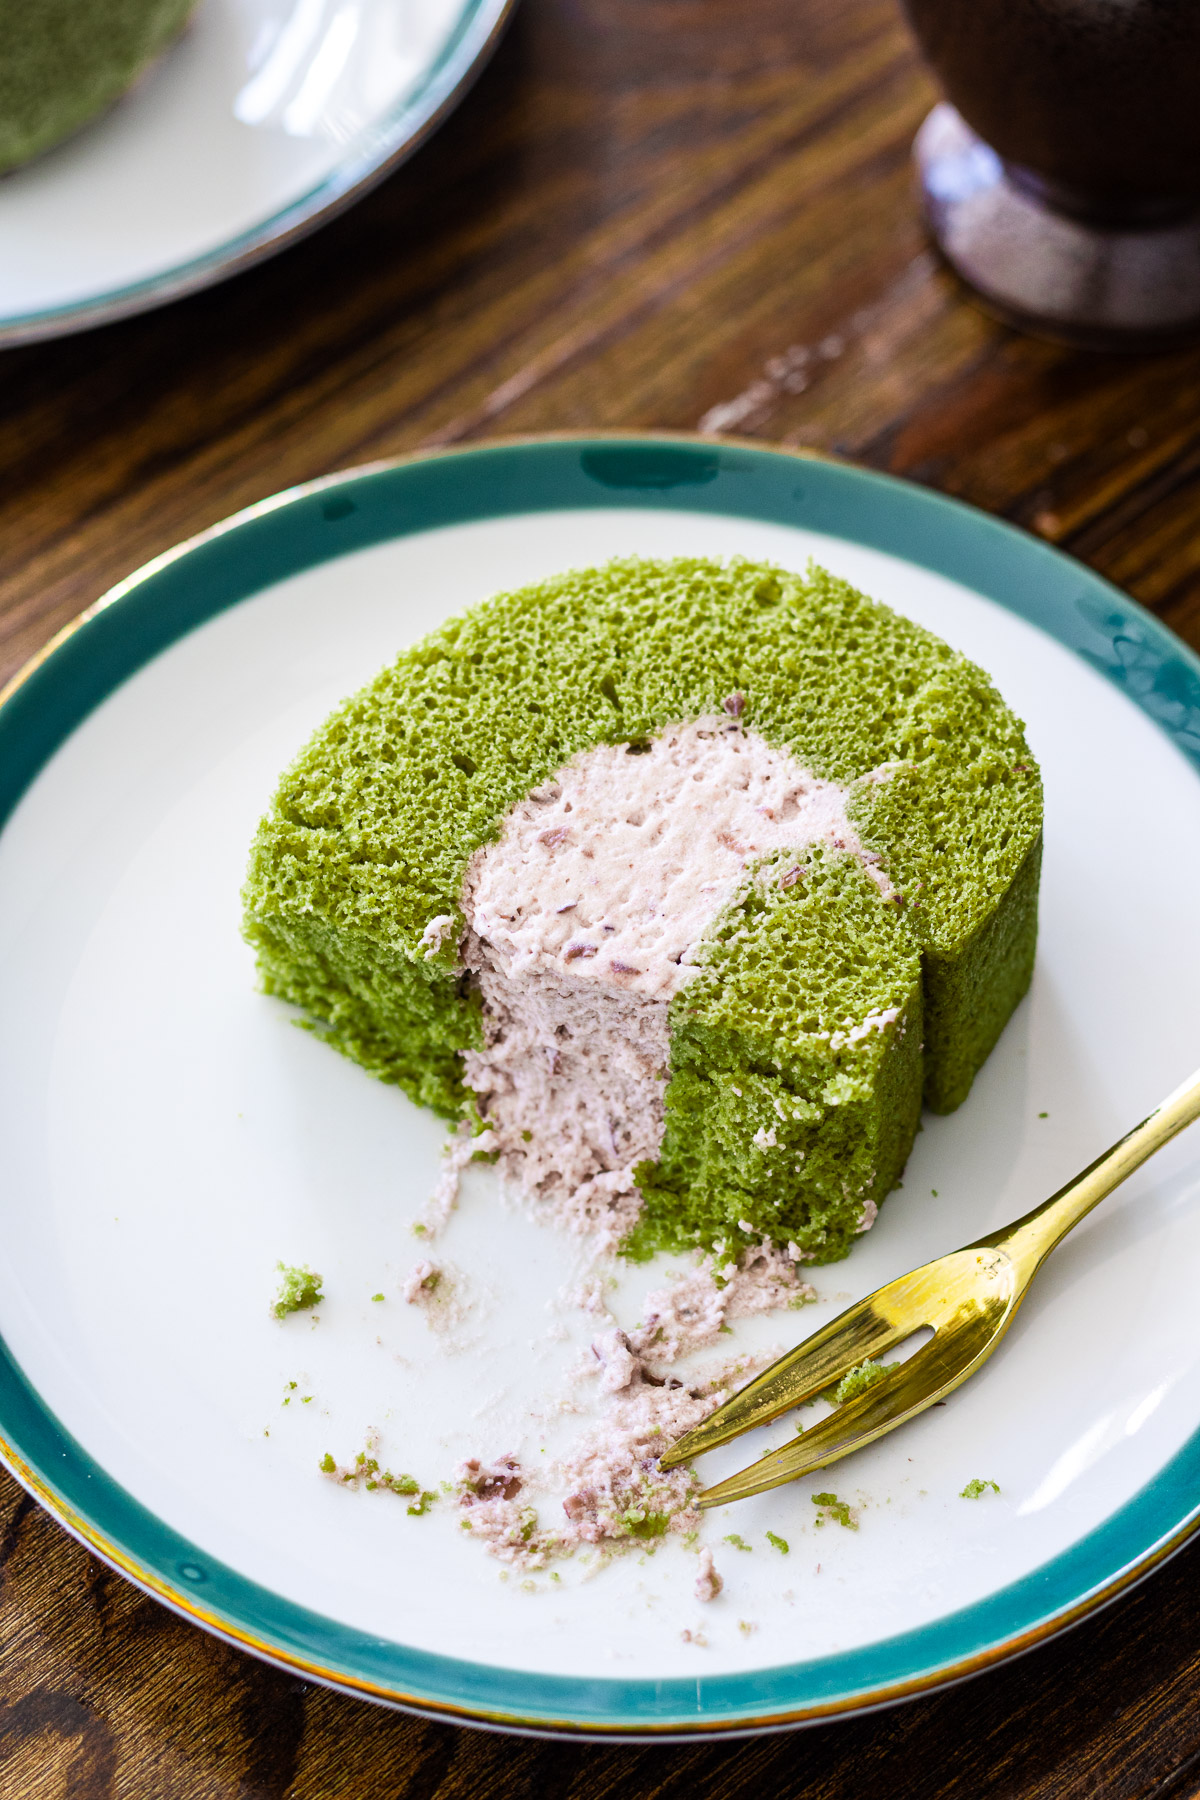
This Matcha Roll Cake is made with a soft, fluffy chiffon sponge that rolls up beautifully without cracking. It’s filled with a creamy adzuki milk whipped cream that adds a subtly sweet, nutty contrast to the earthy matcha. Light, elegant, and perfectly balanced, it’s a stunning dessert for tea time or any special occasion.

Table of Contents
Easy Matcha Cake
Of all the matcha desserts I make, roll cakes might be my favorite. Why? They’re deceptively simple. No need to stack or frost layers. You bake one sheet of sponge, spread the cream, roll it up, and that’s it. Done. Plus, they actually look impressive without needing much extra decor. The best part? You can make them ahead of time—perfect for when you want to prep for a gathering or just have a sweet treat ready in the fridge.
Why This Recipe
- Pillow-soft chiffon sponge: This cake is ultra moist, soft, and melts in your mouth. I use my trusted chiffon base that bakes up smooth and even every time.
- Bold matcha flavour, no bitterness: Thanks to a higher ratio of matcha powder (without going overboard), the sponge stays vibrant and earthy—but still gentle on the palate.
- Perfectly sweetened cream: The whipped cream is made with a bit of melted white chocolate for extra milkiness, and I fold in adzuki (red bean paste) for a slightly nutty twist.
- No cracks, no stress: Rolling cake can be intimidating, but I’ll walk you through tips to get a smooth, crack-free roll every time.
Ingredients and Substitutions
Before we get started, here’s what you’ll need. No measurements here—just a list of ingredients so you can check your pantry:
- Eggs
- Granulated sugar
- Cornstarch – helps stabilize the meringue
- Cake flour – for that delicate crumb
- Matcha powder – baking grade or medium quality is totally fine here
- Milk – warmed slightly
- Neutral oil – like canola or grapeseed
- White chocolate – adds milkiness and a touch of sweetness to the cream
- Heavy cream – use 35% or higher
- Red bean paste (anko)
What Type of Matcha to Use for Baking
This might be controversial… but you don’t need the most expensive ceremonial grade matcha for baking. When it’s baked, matcha naturally loses some of its color and complexity. Baking matcha or a mid-range culinary matcha is totally fine. Just avoid anything that’s dull brown-green or overly bitter. My mom has been baking with affordable matcha her whole life and her matcha desserts are always the ones people ask for. Save the fancy stuff for your matcha lattes or usucha where it really shines.
Equipment and Tools
- Kitchen Scale: As always, I recommend using a kitchen scale to make sure the ratio of ingredients are accurate for best results.
- 11-11.8 inch (28×28 or 30×30 cm) Baking Pan: This it the pan size I use to make all of my roll cakes in. It’s the perfect size for this amount of ingredients so that the cake portion isn’t too thin or thick. While you can use a different sized pan, you will need to adjust the amount of ingredients accordingly.
- Stand Mix or Electric Hand Mixer: I highly recommend using an electric stand or hand mix when making chiffon cakes because the egg whites need to be mixed vigorously to make meringue.
- Sifter: To sift the cake flour and matcha powder.
- Whisk: Used to whisk the yolk mixture and meringue without deflating the batter too much.
- Spatula: A large spatula makes it easier to to mix the final batter evenly and to pour it out into the pan as quickly as possible.
- Offset spatula: This type of spatula makes it easier to spread the cream evenly.
How to Make Matcha Roll Cake
Here’s a quick overview before you jump into the full recipe below:

- Prep your ingredients and tools: mise en place makes everything smoother.
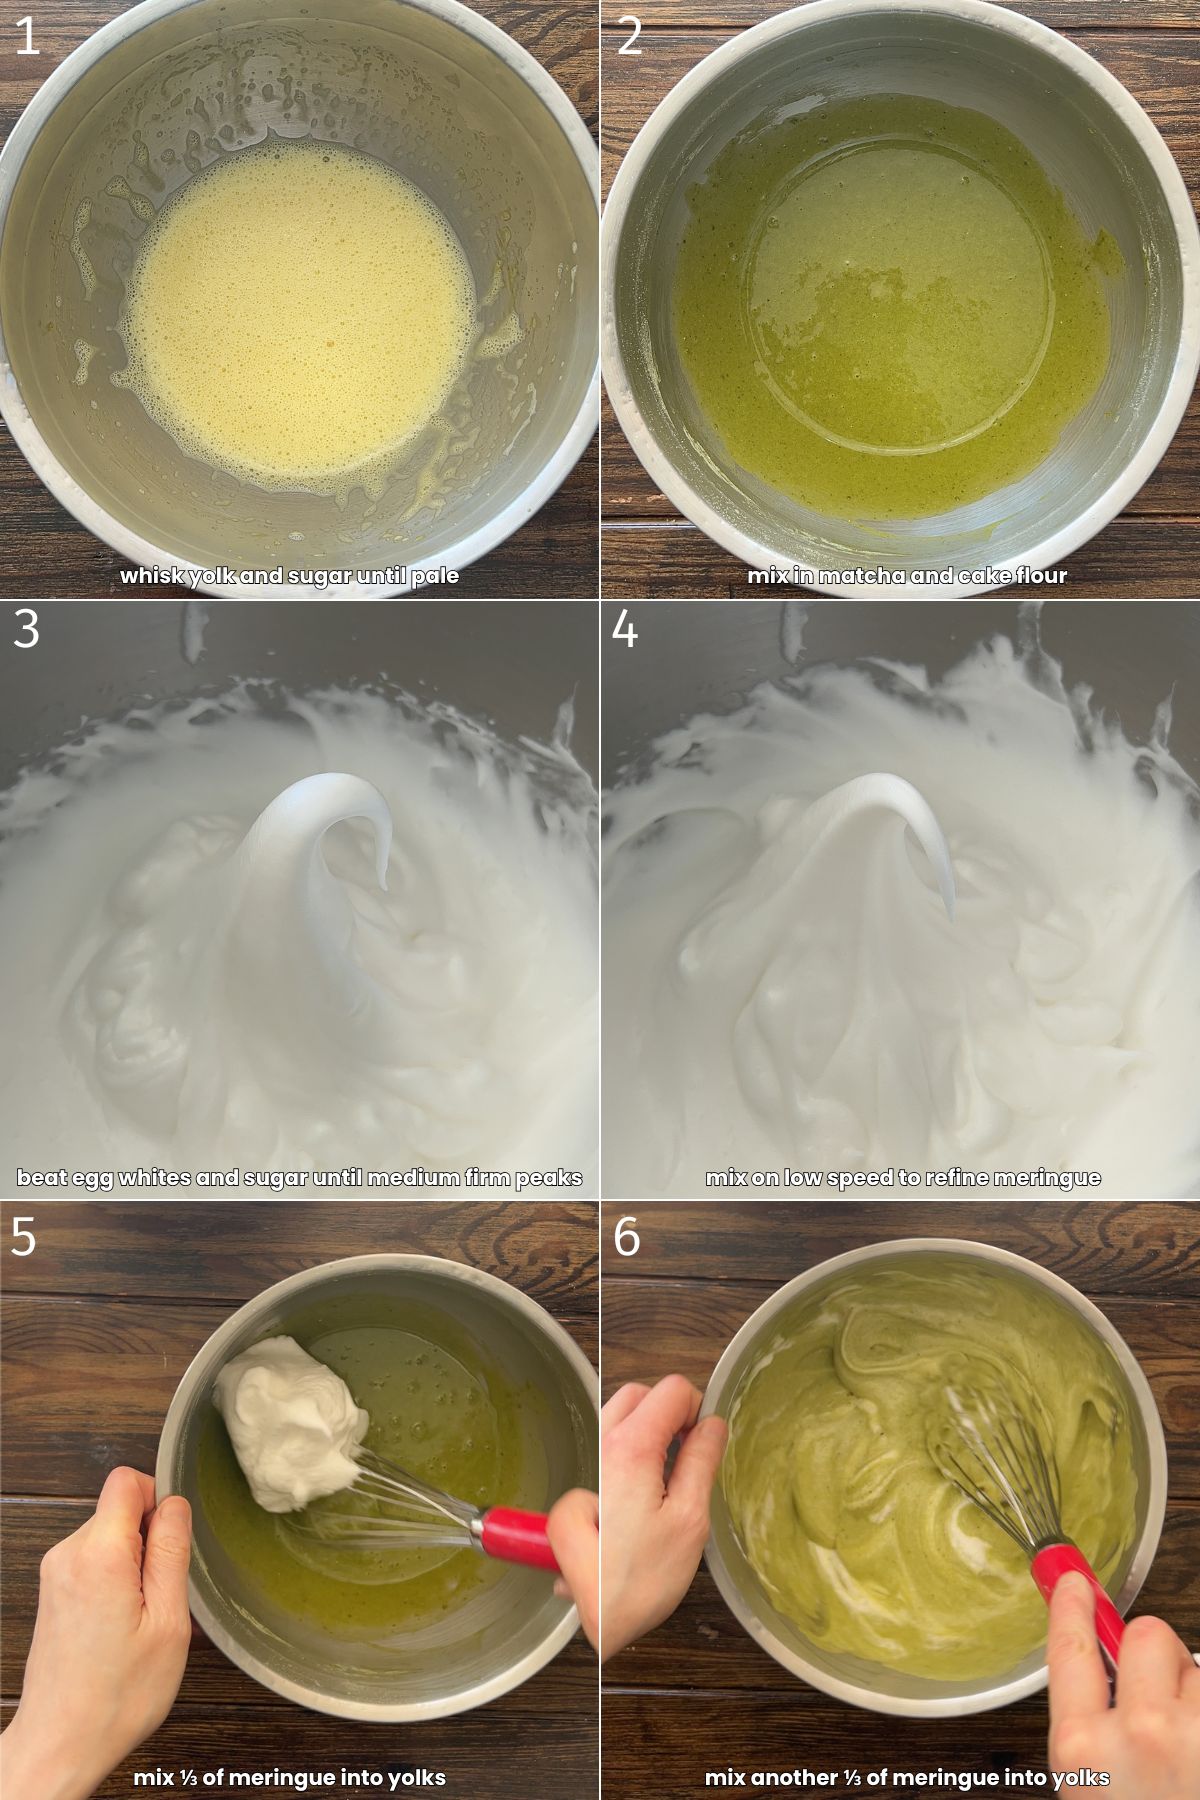
- Mix the yolk batter (1-2): Whisk the yolk and sugar until pale and there are no more sugar granules. Then stir in the sifted cake flour and matcha powder until smooth.
- Make the meringue (3-4): Use a standmix or electric hand mixer to make the meringue. Beat the egg whites without sugar. Then add in the sugar and beat on high until medium peaks that curl at the tip. Reduce speed to low and mix for minute to refine the meringue.
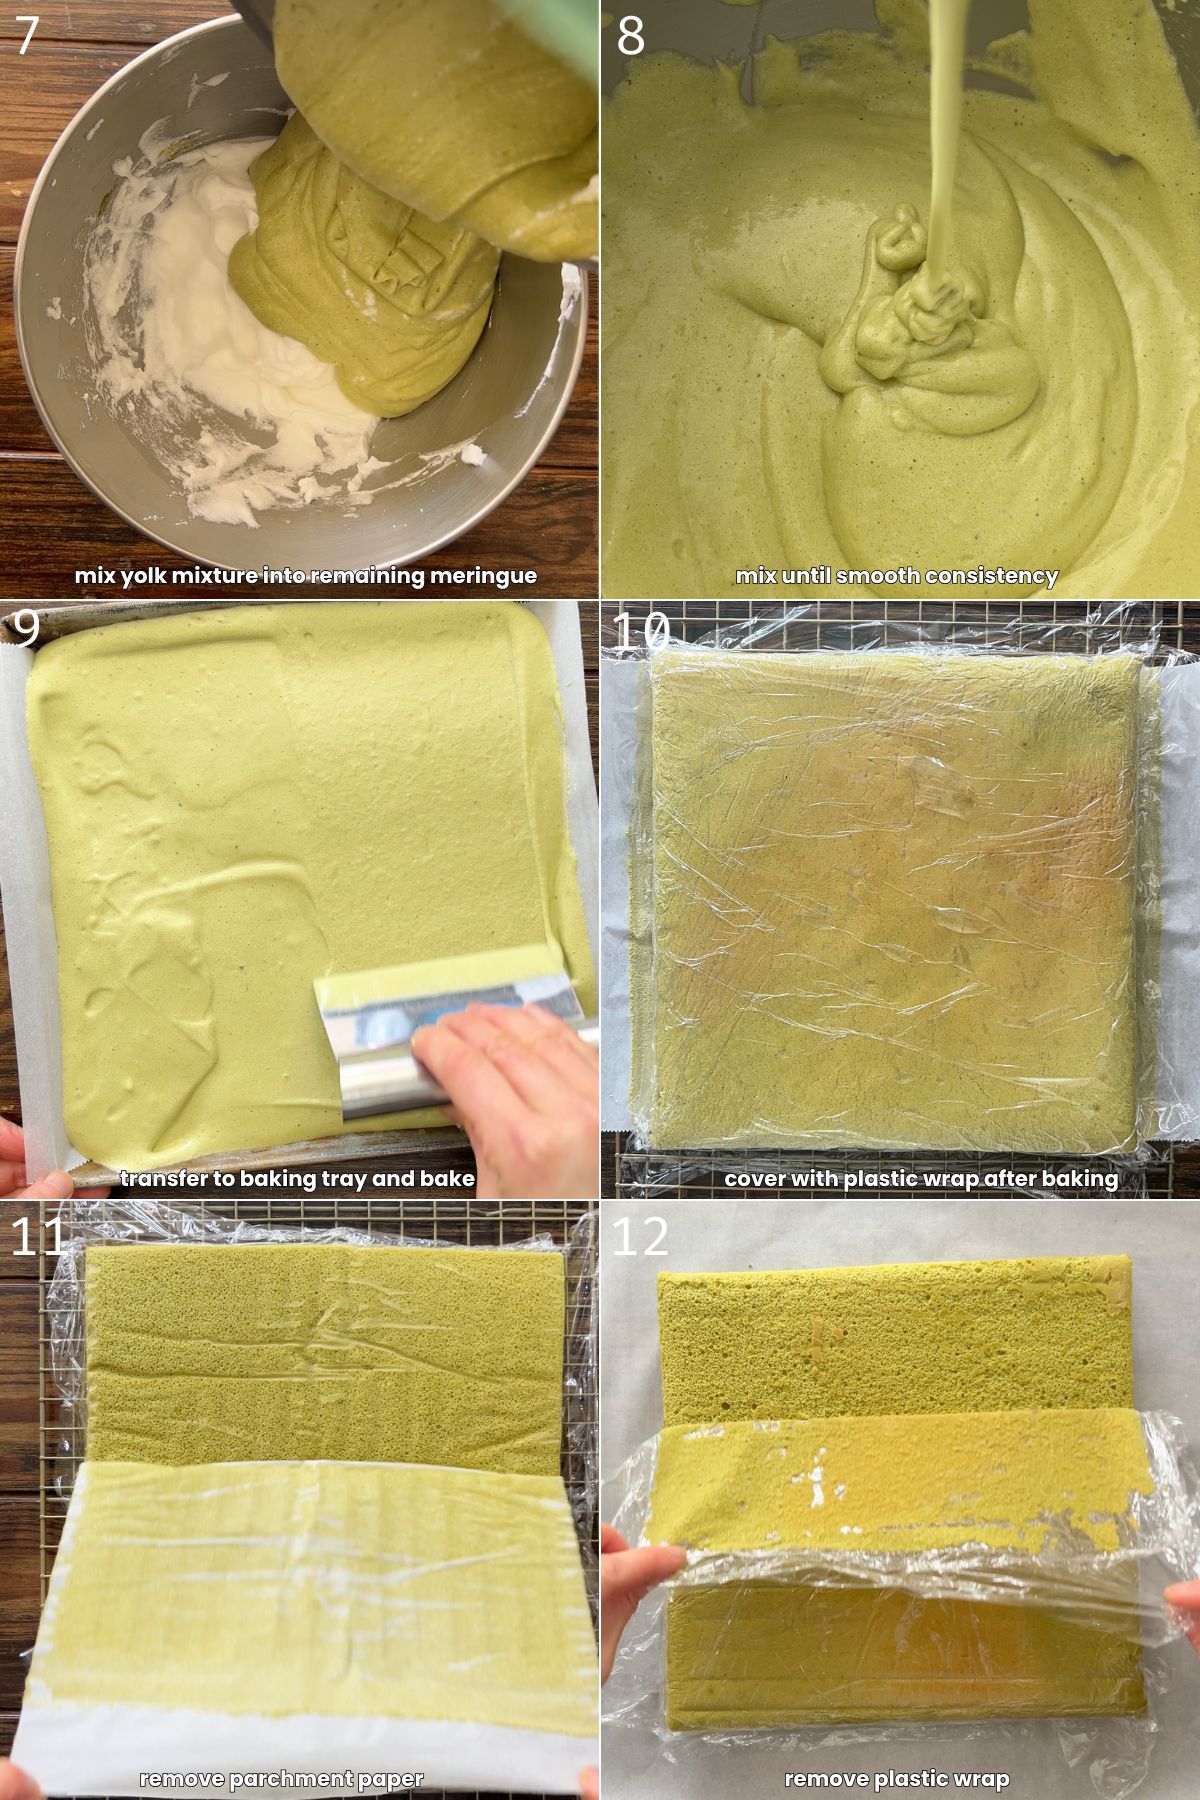
- Mix the chiffon batters (5-8): Add the yolk mixture to the meringue in two 1/3 batches. Then pour the matcha batter into the last portion of meringue. Be sure to whisk the meringue before each addition.
- Bake and cool (9-10): Bake and cool slightly before covering with cling wrap.
- Prepare for assembly (11-14): Remove the parchment paper and then place onto a new piece of parchment paper. Remove the cling wrap and carefully scrape off the excess ‘skin’ off the cake. Slice one side of the cake at a 45° angle.
- Brush sugar syrup (15): Heat the sugar and water until sugar is dissolved. Brush the syrup onto the cake.
- Whip up the adzuki milk cream (16): Melt white chocolate, mix with cream, whip until fluffy, and then fold in red bean paste.
- Note: Make the cream a day ahead or while the cake is baking and cooling.
- Assemble and roll (17-18): Spread cream, roll up tightly using parchment, chill.
VIDEO: Watch How to Make It

Lisa’s Recipe Tips
- Don’t use expensive matcha: You really don’t need to use the highest quality matcha for baking. After baking, the colour of matcha tends to fade anyways and as long as you’re not using the lowest quality of matcha where its just bitter with no flavour, baking matcha works well and is much more affordable.
- Refine the meringue. After reaching medium peaks, whip on low for 30–60 seconds to smooth out big air bubbles. This gives a finer crumb and makes folding easier.
- Re-whisk between additions. Meringue can separate if it sits too long. Give it a quick whisk before folding into the batter to keep the texture consistent.
- Don’t overbake. Bake until the cake springs back when gently pressed. Overbaking = dry, cracked roll.
- Trap the steam. After baking, cover the cake with a clean towel or parchment to keep it moist while it cools slightly before rolling.
- Tighten the roll: Use the technique of pushing a flat object like bench scraper under the parchment paper and cake roll so that there are no gaps between the cream and the cake doesn’t unravel.
- Make ahead of time: Make the matcha chiffon cake and adzuki milk cream the day before and assemble the next day for time efficiency.
- Let the cake sit: The cake tastes even better after letting it sit for a few hours or preferably overnight as the cream has a chance to further mend with the cake.
How to Store Leftovers
This matcha roll cake stores really well!
- Fridge: Wrap tightly or store in an airtight container. Best eaten within 2–3 days, but lasts up to 4–5.
- Freezer: Freeze whole or in slices. Wrap in plastic wrap and store in a freezer-safe bag or container. Let thaw in the fridge before serving.

Recipe FAQ
Most likely it was over baked or cooled without being covered. Dry cake = cracks. It could also be from under-mixing or incorrect ingredient ratios that mess with structure.
Yes, but you’ll need to scale the recipe. A smaller pan = thicker cake = longer bake time. Just keep that in mind.
More Matcha Dessert Recipes
- Matcha Gateau Chocolate (coming soon)
- Matcha Anko Shortcake (coming soon)
- Matcha Basuqe Cheesecake (coming soon)
- Matcha Bagel Strawberry Sandwich
- Matcha Latte Sandwich Cookies
- Candied White Chocolate Matcha Almonds
- Matcha Nama Chocolate Sandwich Cookies
Enjoy! If you make this Matcha Roll Cake recipe, I’d love to hear what you think! Leave a comment and rating below, and if you share it on social media, tag me on Instagram @Okonomikitchen. I can’t wait to see your creations!
Print
Matcha Roll Cake
- Total Time: 45 minutes
- Yield: 8 servings
- Diet: Vegetarian
Description
This Matcha Roll Cake is made with a soft, fluffy chiffon sponge that rolls up beautifully without cracking. It’s filled with a creamy adzuki milk whipped cream that adds a subtly sweet, nutty contrast to the earthy matcha. Light, elegant, and perfectly balanced, it’s a stunning dessert for tea time or any special occasion.
Ingredients
Matcha Chiffon Cake
- 130 g egg whites, from about 4 large eggs
- 70 g egg yolks, from about 4 large eggs
- 2 tbsp + 4 tbsp (26 g + 52 g) sugar, divided
- 2/3 tsp (2 g) corn starch
- 1/2 cup (56 g) cake flour
- 1 tbsp + 1 tsp (9 g) matcha
- 3.5 tbsp (52 g) milk
- 2 tbsp + 1 tsp (35 ml) neutral oil
Sugar Syrup
- 1 tbsp water
- 1 tbsp sugar
Anko Milk Cream
- 1 oz (30 g) white chocolate
- 3 tbsp + 1 tsp (50 ml) 35% heavy cream, warmed
- 1/2 cup (120 ml) 35% heavy cream
- 1/3 cup (90 g) red bean paste
Instructions
Equipment & Ingredient Prep
- Line a 28×28 cm or 30×30 cm baking pan with parchment paper.
- A medium bowl for egg yolks
- A clean, dry stand mixer bowl (or bowl if using hand mixer) for egg whites
- Separate each egg into a small bowl first, then transfer the yolk and white to their respective bowls to avoid contamination.
- Mix the cornstarch into the bowl of sugar for the egg whites.
- Sift the cake flour and matcha powder twice.
- Warm the milk over the stove or in the microwave to 98.6°F (37°C) over low heat.
Matcha Chiffon Cake
- Prepare the Yolks: Add 26 g sugar to the yolks and immediately whisk vigorously until pale and no sugar granules remain. Be sure to scrape the sides of the bowl to ensure all the sugar granules are mixed in. Whisk in the warm milk and neutral oil until fully combined. Add in the sifted cake flour and matcha powder. Whisk until smooth. Set aside.
- Preheat oven to 180°C (350°F).
- Make the Meringue: In a small bowl, combine the 52 g sugar with 2 g cornstarch. Start whipping the egg whites on medium speed (speed 4) for 15 seconds. Add the sugar-cornstarch mixture all at once. Whip on high speed (speed 10) until glossy, medium-firm peaks form (the tip should curl). Finish on low speed for 1 minute to refine the meringue.
- Combine yolk and meringue: Add ⅓ of the meringue into the yolk mixture. Gently fold with a hand whisk using a scoop-and-drop motion just until roughly mixed — it doesn’t need to be fully incorporated at this stage. Briefly re-whisk the meringue before each addition, as it tends to separate as it sits. Add another ⅓ of the meringue and fold gently with the same motion. Before the final addition, give the remaining meringue another quick whisk. Then pour the yolk mixture into the remaining meringue. Use a whisk to fold with scoop-and-drop motions until mostly incorporated, then switch to a spatula to fold gently and thoroughly. Be sure to scrape from the bottom to incorporate any unmixed meringue. It’s mixed enough when you lift some of the batter and runs down smoothly in ribbons.
- Bake: Pour batter into prepared baking tray and smooth the top with a spatula or bench scraper. Tap the tray on the counter to release air bubbles. Bake for 15-17 minutes, or until lightly browned and the cake springs back.
- Cool: Remove from oven and tap again to release steam. Invert onto a wire rack and let cool for 5–8 minutes. Cover the top with plastic wrap while still warm to retain moisture.
Sugar Syrup
- In a small bowl, combine the sugar and water. Heat in the microwave for 15-20 seconds or until sugar is dissolved.
Red Bean Cream
- Melt white chocolate over a double boiler or in the microwave until glossy.
- Warm up 3 tbsp + 1 tsp (50 ml) of the cream over the stove or microwave until just warm to the touch. Whisk into the melted white chocolate. Let cool slightly.
- Over a bowl of ice water, whip the cold cream with the white chocolate mixture until firm peaks form.
- Fold in the red bean paste or mix on low speed until smooth and fully incorporated.
Assemble the Roll
- Once the cake is cool, flip the cake so the parchment side is facing up. Peel off the parchment. Place a new, larger piece of parchment (about 15 cm longer) on top and flip again. Remove the plastic wrap and optionally, carefully scrape the browned top with a knife.
- Trim one short edge diagonally (about 1.5 cm).
- Spread a generous layer of cream, leaving 2 cm at the far edge where trimmed for sealing. Face the trimmed edge away from you.
- Starting from the edge closest to you, lift and tuck the cake using the parchment, then roll in one motion.
- Tightly wrap with parchment. Use a ruler or bench scraper to press underneath the parchment paper and shape the roll.
- Refrigerate for at least 2 hours before slicing.
- To serve, slice into 3 cm thick pieces using a slightly warmed knife for clean cuts.
- Prep Time: 30 minutes
- Cook Time: 15 minutes
- Category: Dessert
- Method: Oven, Baking
- Cuisine: Japanese
Nutrition
- Serving Size: 1 serving
- Calories: 190
- Sugar: 15 g
- Sodium: 90 mg
- Fat: 8 g
- Saturated Fat: 3 g
- Unsaturated Fat: 5 g
- Trans Fat: 0
- Carbohydrates: 26 g
- Fiber: 2 g
- Protein: 4 g
- Cholesterol: 45 mg


Loved the recipe, thank you for sharing your tips and guidance on achieving such a beautiful dessert. I mixed in a tad bit of cream cheese in my Anko Milk Cream, borrowing from Cantonese-style Swiss Rolls, just for a slightly different flavour and texture!
this looks amazing, your recipes are always so comprehensive and well thought out.
can I substitute the matcha with something else for a different flavor profile?
Yes, you can as long as it’s a powder like hojicha.
Light, airy, and fluffy! Tried this along with the Matcha gateau cake and im in love 😍